3. Combine View s with Stacks
After creating the title view in the previous section, let's add a text view that displays landmark details, such as the name of the park and the state in which it is located.
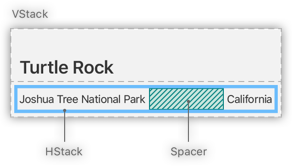
When creating a SwiftUI view, we can describe its content, layout, and behavior in the body property of the view.Since the body property only returns a single view, we can use Stacks to group and embed multiple views together in a horizontal, vertical, or backward-to-front order.
In this section, we use a horizontal stack to show Park details, and a vertical stack to put the title on top of the details.

We can use Xcode editing to embed the view in a container, or inspector or help to find more help.
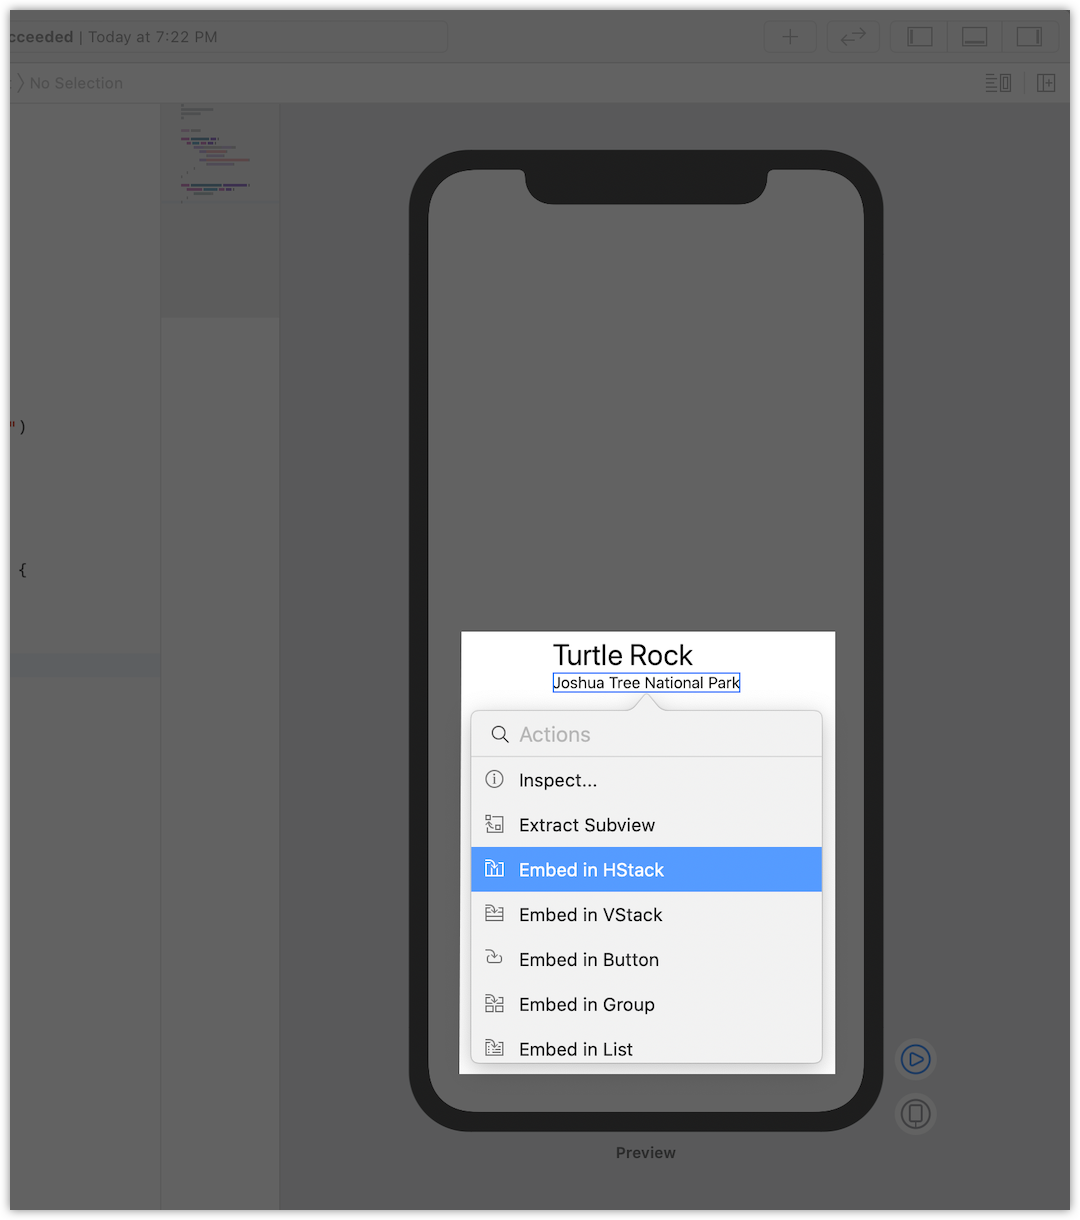
3.1 Hold down Command and click the initialization method of text view and select Embed in VStack in the edit window.

Next, we drag a Text view from the Library to add to the stack.
3.2 Click the plus button (+) in the upper right corner of Xco de to open the Library, then drag a Text view behind Turtle Rock in your code.

3.3 Change Placeholder to Joshua Tree National Park.
ContentView.swift
import SwiftUI

struct ContentView: View {
    var body: some View {
        VStack {
            Text("Turtle Rock")
                .font(.title)
            Text("Joshua Tree National Park")
        }
    }
}

struct ContentView_Preview: PreviewProvider {
    static var previews: some View {
        ContentView()
    }
}

Adjust the location view to meet the layout requirements.
3.4 Set font of site view to.subheadline.
ContentView.swift
import SwiftUI

struct ContentView: View {
    var body: some View {
        VStack {
            Text("Turtle Rock")
                .font(.title)
            Text("Joshua Tree National Park")
                .font(.subheadline)
        }
    }
}

struct ContentView_Preview: PreviewProvider {
    static var previews: some View {
        ContentView()
    }
}

3.5 Edit the initialization method of the VStack to align the view as leading.
By default, stacks will center the content along its axis and set a spacing appropriate to the context.
ContentView.swift
import SwiftUI

struct ContentView: View {
    var body: some View {
        VStack(alignment: .leading) {
            Text("Turtle Rock")
                .font(.title)
            Text("Joshua Tree National Park")
                .font(.subheadline)3
        }
    }
}

struct ContentView_Preview: PreviewProvider {
    static var previews: some View {
        ContentView()
    }
}

Next, we add another text view to the right of the site to show the state in which the park is located.
3.6 Hold down Command in canvas, click Joshua Tree National Park, and select Embed in HStack.

3.7 Add a new text view after the location, modify Placeholder to California, and set font to.subheadline.
ContentView.swift
import SwiftUI

struct ContentView: View {
    var body: some View {
        VStack(alignment: .leading) {
            Text("Turtle Rock")
                .font(.title)
            HStack {
                Text("Joshua Tree National Park")
                    .font(.subheadline)
                Text("California")
                    .font(.subheadline)
            }
        }
    }
}

struct ContentView_Preview: PreviewProvider {
    static var previews: some View {
        ContentView()
    }
}

3.8 Add a Spacer to the horizontal stack to split and fix Joshua Tree National Park and California so they share the entire screen width.
A spacer can expand the views it contains so that they share all the space of their parent view, rather than just define its size through its content.
ContentView.swift
import SwiftUI

struct ContentView: View {
    var body: some View {
        VStack(alignment: .leading) {
            Text("Turtle Rock")
                .font(.title)
            HStack {
                Text("Joshua Tree National Park")
                    .font(.subheadline)
                Spacer()
                Text("California")
                    .font(.subheadline)
            }
        }
    }
}

struct ContentView_Preview: PreviewProvider {
    static var previews: some View {
        ContentView()
    }
}

3.9 Finally, use the.padding() modification method to leave some space for the name and information of the landmark.
ContentView.swift
import SwiftUI

struct ContentView: View {
    var body: some View {
        VStack(alignment: .leading) {
            Text("Turtle Rock")
                .font(.title)
            HStack {
                Text("Joshua Tree National Park")
                    .font(.subheadline)
                Spacer()
                Text("California")
                    .font(.subheadline)
            }
        }
        .padding()
    }
}

struct ContentView_Preview: PreviewProvider {
    static var previews: some View {
        ContentView()
    }
}
