Ceph version: 14.2.22
Linux version: Ubuntu server 18.04
Part I cluster organization structure
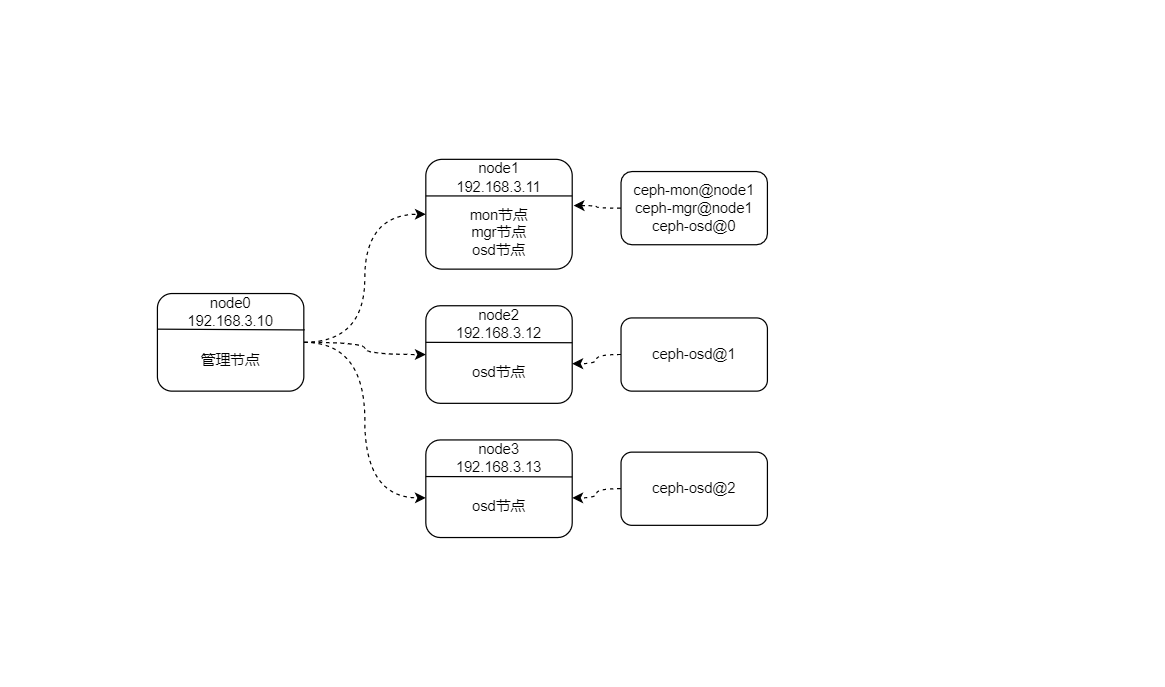
Note: the management node in the figure above does not belong to ceph cluster, but an ordinary host without ceph installed. The cluster node mentioned below refers to the node with ceph software installed.
The second part downloads Ceph source code
2.1 configuring Ceph source image source
Ceph source code is hosted on Github. For some reasons, domestic access to Github website is very slow, so we need to speed up the acquisition of source code from other ways. Github officially gives several Github mirror websites:
Local needs to be modified ~ / gitconfig file, you can obtain the source code from the above image website. The relevant configurations are as follows:
#Github mirror source
[url "https://hub.fastgit.org/"]
        insteadOf = https://github.com/
Note: there are also images of Ceph source code in China, such as Gitee and Gitcode, but it is not recommended to obtain them from these websites. Ceph source code uses a large number of third-party source code as its own sub modules, and Gitee and Gitcode do not necessarily synchronize all these sub modules. On the contrary, the above two mirror websites are completely synchronized with Github, so they can be used safely.
2.2 cloning ceph source code
Ceph has a large source code. You can choose which version or branch to download according to your needs. This case pulls V14 2.22 version of the source code. The difference between version and branch: the code of version will not change over time and will be fixed at the moment of labeling; The code of the branch will be developed and changed over time.
# Replace V14 according to your own needs 2.22 the version you need
git clone -b v14.2.22 --depth=1 https://github.com/ceph/ceph.git
2.3 source code of synchronization sub module
Ceph source code uses a large number of sub modules in Ceph / All sub modules are listed in the gitmodules file. Do later_ cmake. When the SH script generates the build directory, do_cmake.sh first synchronizes the sub module source code to the specified directory. According to experience, it is easy to have incomplete synchronization or synchronization failure when synchronizing the source code of sub modules, which will directly lead to the failure of building the build directory. In order to prevent this situation, it is recommended to manually synchronize the sub module source code in advance.
git submodule update --init --recursive
Note: if the source code of the synchronization sub module fails, repeat the above command. If you interrupt synchronizing the source code of the sub module, you must delete all the files of the sub module in the corresponding directory, especially git file. If not deleted git, when the above command is repeated, the synchronization of the sub module will be skipped directly, resulting in the loss of the sub module source code. This problem cannot be detected, because after executing the above command, it will still show that the synchronization is successful without prompting which sub module has not been synchronized.
Part III source code compilation
3.1 installation dependency
Ceph source code installation dependency is very simple. Directly execute install DEPs under the root directory of the source code SH script. According to experience, it is found that the script has some problems and needs to be modified slightly.
3.1.1 modify launchpad source
The script will install the GCC environment. You only need to keep one source url of the installation package. Modify install DEPs Ensure function in SH script_ decent_ gcc_ on_ ubuntu
deb [lang=none] http://ppa.launchpad.net/ubuntu-toolchain-r/test/ubuntu $codename main
#deb [arch=amd64 lang=none] http://mirror.cs.uchicago.edu/ubuntu-toolchain-r $codename main
#deb [arch=amd64,i386 lang=none] http://mirror.yandex.ru/mirrors/launchpad/ubuntu-toolchain-r $codename main
3.1.2 shielding calls and installing libboost
Libboost library will be installed in the script, and the boost source package will be downloaded again in the process of compiling the source code. Therefore, libboost should not be installed in the script and install DEPs should be shielded Sh the following 2 places
 *Bionic*)
        #install_boost_on_ubuntu bionic
  ;;
3.1.3 setting pypi image source
The script will install the pypi library. The default url is slow to download. You need to set the image source of the pypi library. Create ~ / pip/pip.conf file and add the following contents
[global]
index-url = https://mirrors.aliyun.com/pypi/simple/
[install]
trusted-host=mirrors.aliyun.com
3.1.4 installing other dependencies
In the process of compiling the source code, you will encounter many functions that use the zstd library. By default, Ubuntu 18 04 only libzstd1 is installed, but it is useless. Libzstd1 dev needs to be installed
sudo apt install libzstd1-dev
3.1.5 execution script
./install-deps.sh
3.2 compiling Ceph source code (can be skipped)
In principle, this step can be skipped directly, because in the following, when making deb package and executing dpkg buildpackage command, it will be compiled automatically; In order to prevent errors in the compilation process and solve the error reporting problem in time, it is recommended to compile the source code first.
3.2.1 enable debug mode
If you want to debug Ceph source code, you need to set the compiled source code mode to debug mode. The default compiled mode is release mode, which cannot debug source code. Add the following contents to the set(VERSION 14.2.22) of ceph/CMakeList file
set(CMAKE_BUILD_TYPE "Debug")
set(CMAKE_CXX_FLAGS_DEBUG "-O0 -Wall -g")
set(CMAKE_CXX_FLAGS "-O0 -Wall -g")
set(CMAKE_C_FLAGS "-O0 -Wall -g ")
3.2.2 build directory
Execute do directly_ Cmake script, which will carry out a series of tests, including whether the source code is complete, whether the dependencies are installed, and so on. If there is a problem, the built build directory is incomplete. The most direct impact is that the makefile file cannot be generated, resulting in failure to compile.
./do_cmake.sh
3.2.3 download the boost source package
During make compilation, the script will automatically download boost_1_72_0.tar.bz2, due to the problem of download address and network, the download is very slow. In order to save time, Download manually in advance. Download address: https://download.ceph.com/qa/boost_1_72_0.tar.bz2 , put the downloaded package in ceph/build/boost/src.
3.2.4 compilation
The compilation using make must be executed in the ceph/build directory. The ceph source code can compile a module separately or all. Use make to specify multi-threaded compilation and improve the compilation speed. However, to reasonably allocate the number of threads, it is recommended to use 4-thread compilation.
#Method 1: compile all
make all -j4
#Method 2: compile a osd block separately
make ceph-osd -j4
#View all modules
make help
Note: source code compilation will generate many library files and binary files, which are placed in ceph/build/lib and ceph/build/bin directories respectively
The fourth part is to make the source of local software warehouse
4.1 making deb package
CEPH official website provides the method of making deb package. After testing, it is found that there will be problems. If you directly execute dpkg build package, visa problems will occur, resulting in production failure. Visa should be disabled here and multithreading should be enabled. Execute the following command in the root directory of CEPH source code
dpkg-buildpackage --build=binary -us -ui -uc -j4
Note:
- The above production process is very long. In addition, all packages are placed outside the ceph source code, which is the same level directory as the ceph source code
- By default, two kinds of deb packages will be generated, one with dbg suffix and the other without dbg suffix; The difference is that the dbg package can be used to debug code. For example, if you want to debug the osd process, you need to install both CEPH osd and CEPH osd dbg packages
4.2 create Ceph software directory
mkdir -p package/pools
mkdir -p package/keys
mkdir -p package/dists/bionic/main/binary-i386
mkdir -p package/dists/bionic/main/binary-amd64
Note: bionic is Ubuntu 18 04's name
4.3 put all deb packages under pools
mv *.deb package/pools
4.4 generate Packages and Release files
After testing, it is found that Packages and Release files need to be generated for pools and disks / bionic directories respectively. If Packages and Release files are generated only for pools, an error will be reported when apt update is executed because the Release file cannot be found.
4.4.1 generate Packages and Release files for pools
cd package
#Generate Packages file
apt-ftparchive packages pools | tee -a dists/bionic/main/binary-i386/Packages
gzip -c dists/bionic/main/binary-i386/Packages > dists/bionic/main/binary-i386/Packages.gz
apt-ftparchive packages pools | tee -a dists/bionic/main/binary-amd64/Packages
gzip -c dists/bionic/main/binary-amd64/Packages > dists/bionic/main/binary-amd64/Packages.gz
#Generate Release file
apt-ftparchive release pools | tee -a dists/bionic/main/binary-i386/Release
apt-ftparchive release pools | tee -a dists/bionic/main/binary-amd64/Release
4.4.2 generate Packages and Release files for dists/bionic
cd package
apt-ftparchive release dists/bionic | tee -a dists/Release | mv dists/Release dists/bionic
4.5 generate signature
The signature will generate a Release based on the above Release file and the user's key GPG file, so first generate the user key, and then generate the Release for pools and dists/bionic separately GPG file.
4.5.1 generate key
gpg --gen-key
4.5.2 generate InRelease and release for pools GPG file
cd package
gpg --clearsign -o dists/bionic/main/binary-i386/InRelease dists/bionic/main/binary-i386/Release
gpg -abs -o dists/bionic/main/binary-i386/Release.gpg dists/bionic/main/binary-i386/Release
gpg --clearsign -o dists/bionic/main/binary-amd64/InRelease dists/bionic/main/binary-amd64/Release
gpg -abs -o dists/bionic/main/binary-amd64/Release.gpg dists/bionic/main/binary-amd64/Release
4.5.3 generate InRelease and release for dists/bionic GPG file
cd package
gpg --clearsign -o dists/bionic/InRelease dists/bionic/Release
gpg -abs -o dists/bionic/Release.gpg dists/bionic/Release
4.5.4 export key file
cd package
gpg -a --export 857BAAF7E89478946A67362DF07995A7191CA249 | tee -a keys/release.asc
Note: 857BAAF7E89478946A67362DF07995A7191CA249 is a pubkey id, which can be viewed and obtained through the following command
gpg -k
The results are as follows:
/home/admins/.gnupg/pubring.kbx
-------------------------------
pub   rsa3072 2022-01-17 [SC] [expires: 2024-01-17]
      857BAAF7E89478946A67362DF07995A7191CA249
uid           [ultimate] ceph-14.2.22 <1146038583@qq.com>
sub   rsa3072 2022-01-17 [E] [expires: 2024-01-17]
4.5.5 adding key s to the system
When using apt update, you must add the public key to the system, otherwise you will be prompted with NO_PUBKEY error message
cd package
sudo apt-key add keys/release.asc
The final directory structure is as follows
├── dists
│   └── bionic
│       ├── InRelease
│       ├── main
│       │   ├── binary-amd64
│       │   │   ├── InRelease
│       │   │   ├── Packages
│       │   │   ├── Packages.gz
│       │   │   ├── Release
│       │   │   └── Release.gpg
│       │   └── binary-i386
│       │       ├── InRelease
│       │       ├── Packages
│       │       ├── Packages.gz
│       │       ├── Release
│       │       └── Release.gpg
│       ├── Release
│       └── Release.gpg
├── keys
│   └── release.asc
└── pools
    ├── ceph_14.2.22-1_amd64.deb
    ├── ceph-base_14.2.22-1_amd64.deb
    ├── ceph-base-dbg_14.2.22-1_amd64.deb
    ├── ceph-common_14.2.22-1_amd64.deb
    ├── ceph-common-dbg_14.2.22-1_amd64.deb
    ├── cephfs-shell_14.2.22-1_all.deb
    ├── ceph-fuse_14.2.22-1_amd64.deb
    ├── ceph-fuse-dbg_14.2.22-1_amd64.deb
4.6 add CEPH list
Create ceph List file and add it to / etc / apt / source list. D /, this step can be omitted because ceph deploy will automatically create this file when installing ceph
echo "deb http://192.168.3.10/ceph bionic main" | sudo tee -a /etc/apt/sources.list.d/ceph.list
Note: the above uses http mode, which can be used only after apache service is installed
4.7 installing Apache services
sudo apt install apache2
After installation, the browser accesses http://192.168.3.10 , the default is the Apache interface, which needs to be set so that it can be accessed http://192.168.3.10/ceph
sudo ln -sf /home/admins/package /var/www/html/ceph
Part V cluster deployment
If ceph has been installed before, no matter which version it is, please follow the steps of cluster uninstallation in part 6 to uninstall
5.1 modify host name
In ceph cluster, each host is a node. In order to facilitate cluster management, it is recommended to modify the host name at the same time
5.1.1 modify / etc/hostname file
Log in to each cluster node, modify the / etc/hostname file, and overwrite the original contents of the file with the following contents
node1
5.1.2 modify / etc/hosts file
Log in to each cluster node and modify the / etc/hosts file
192.168.3.11 node1 #Simulate real ip address
Note:
- In the actual environment, each host has a real ip, so add a virtual network card for each virtual machine, with the ip address range of 192.168.3.11-192.168.3.12
- Modification of other node hosts, and so on
5.1.3 add node host to management node
When you log in to a node remotely via ssh, you must enter the corresponding ip address by default. In order to facilitate cluster management and avoid using ip directly, you can add the host name and ip of the cluster node to the hosts file of the management node
192.168.3.11 node1
192.168.3.12 node2
192.168.3.13 node3
5.2 create a new user and obtain sudo permission
In the process of installing ceph deploy software to different hosts, users with sudo authority need to log in to different hosts. Therefore, it is officially recommended to create a new user for each host in the cluster, and the user name can be the same. But the user name cannot be ceph
5.2.1 create a new user
Log in to each cluster node and execute the following commands in the following format:
sudo useradd -d /home / username - m username sudo passwd username
sudo useradd -d /home/siscte -m siscte
sudo passwd siscte
5.2.2 obtaining sudo permission for new users
Log in to each cluster node and execute the following commands in the following format:
echo "username all = (root) nopasswd: all" | sudo TEE / etc / sudoers D / user name sudo Chmod 0440 / etc / sudoers D / user name
echo "siscte ALL = (root) NOPASSWD:ALL" | sudo tee /etc/sudoers.d/siscte
sudo chmod 0440 /etc/sudoers.d/siscte
Note:
- If the current user is root, you can ignore 2.2.1 and 2.2.2
- If you want to create a new ordinary user, you must execute 2.2.1 and 2.2.2
- If you are already an ordinary user, it is not recommended to create a new user according to the official statement. You only need to obtain sudo permission for the current user
5.3 setting password free login
When ceph deploy tool installs ceph software to different hosts, you need to log in to different hosts as a user with sudo permission. If the user is an ordinary user, you must enter a password. However, ceph deploy tool fully adopts an automatic way to deploy software in the implementation process, and does not support interactive operation. Therefore, it is necessary to set password free
5.3.1 generate ssh key
Log in to the management node and execute the following commands. Press enter all the way without entering anything
ssh-keygen
5.3.2 copy SSH keys to all hosts
Log in to the management node and execute the following command. The format is as follows:
SSH copy ID username @ hostname or SSH copy ID username @ ip address
ssh-copy-id siscte@node1
ssh-copy-id siscte@node2
ssh-copy-id siscte@node3
Note: the password free method here is to use ssh key management
5.3.3 setting user name free login
The process of deploying ceph software to each node in the cluster is actually through ssh Remote Login, which requires the user name and password to be specified. Of course, ceph deploy can specify the user name through the -- username parameter. Here, it is suggested to use ~ / Specifying the user name in ssh/config file can avoid requiring the specified user during ceph deploy deployment.
Log in to the management node and use vim to create a new ~ / ssh/config and add the following
Host node1
   Hostname node1
   User siscte
Host node2
   Hostname node2
   User siscte
Host node3
   Hostname node3
   User siscte
5.4 setting time synchronization
ceph cluster, OSD process heartbeat mechanism, MON process maintains cluster map, and requires time synchronization between each host, otherwise the cluster will be affected. Log in to each cluster node and execute the following command to install ntp
sudo apt install ntp
5.5 installing CEPH deploy deployment tool
The ubuntu warehouse comes with the CEPH deploy tool by default, but it is not recommended to install this version. This version is too low and may not support the operations related to ceph 14.2.22. Therefore, you need to download the latest version from the official download address: ceph-deploy_2.0.1 . After downloading, execute the following command to install
sudo dpkg -i ceph-deploy_2.0.1_all.deb
5.6 create a cluster
Log in to the management node and execute the following command to deploy a new cluster on the node1 node. The format is as follows
CEPH deploy new hostname
ceph-deploy new node1
5.7 modify CEPH deploy configuration file
By default, the address of ceph13 version is specified in the CEPH deploy installation script, which needs to be re specified as the address of ceph14 version
Log in to the management node and log in to ~ / cephdeploy. Add the following contents to the conf file
[ceph]
baseurl=http://192.168.3.10/ceph
gpgkey=http://192.168.3.10/ceph/keys/release.asc
default=true
Note:
- sources. The source address of ceph software in the list is not valid for ceph deploy script, but is valid for manual installation of ceph, because ceph deploy will overwrite sources when installing ceph Source address of ceph software in list
- ~/. cephdeploy. All lines in the conf file must top left without spaces, otherwise an error will be reported
5.8 installing ceph software
Log in to the management node and execute the following command to install ceph software for each node in the cluster. The format is as follows:
CEPH deploy install hostname 1 hostname 2
ceph-deploy install node1 node2 node3
5.9 create and initialize mon process
Log in to the management node and execute the following command to initialize the mon process on node1 node
ceph-deploy mon create-initial
5.10 creating mgr process
Log in to the management node and execute the following command to create mgr process on node1 node. The format is as follows:
CEPH deploy Mgr create hostname
ceph-deploy mgr create node1
5.11 creating osd process
Log in to the management node and execute the following commands to create osd processes for node1 node, node2 node and node3 node respectively. The format is as follows:
bluestore mode:
CEPH deploy OSD create -- data disk device name host name
filestore mode:
CEPH deploy OSD create -- data disk device name 1 --journal disk device name 2 --filestore host name
By default, CEPH deploy adopts bluestore mode. If only for learning or testing, it is recommended to use the filestore mode, because in the filestore mode, you can see which directory the data exists in; Bluestore cannot be seen
bluestore mode:
ceph-deploy osd create --data /dev/sdb node1
ceph-deploy osd create --data /dev/sdb node2
ceph-deploy osd create --data /dev/sdb node3
filestore mode:
ceph-deploy osd create --data /dev/sdb --journal /dev/sdc --filestore node1
ceph-deploy osd create --data /dev/sdb --journal /dev/sdc --filestore node2
ceph-deploy osd create --data /dev/sdb --journal /dev/sdc --filestore node3
5.12 CEPH Conf and CEPH client. admin. Add Keyring to the / etc/ceph directory
ceph manages the cluster through the ceph command. If you want to use the ceph command, you need to connect the relevant key file with ceph Put the conf file in the specified path
Log in to the management node and execute the following command to save the key file and CEPH The conf file is distributed to each cluster node in the following format
CEPH deploy admin hostname 1 hostname 2
ceph-deploy admin node1 node2 node3
Note: it is not necessary to distribute to all cluster nodes. If you want to use ceph command on other hosts, repeat this step and change the node name to the corresponding node
If ceph has been installed before and the files related to ceph have not been deleted, use the following command
5.13 modify CEPH client. admin. Keyring permission
Log in to each cluster node and execute the following commands
sudo chmod +r /etc/ceph/ceph.client.admin.keyring
5.14 viewing cluster status
Log in to any node in the cluster and execute the following command
ceph -s
Part VI cluster unloading
Deleting a cluster is very simple, but it is also easy to delete it. It mainly includes uninstalling ceph software and deleting logical volumes
6.1 unloading ceph
6.1.1 deleting ceph software
Log in to the management node and execute the following command. The format is as follows:
CEPH deploy purge hostname 1 hostname 2
ceph-deploy purge node1 node2 node3
6.1.2 deleting data
Log in to the management node and execute the following command. The format is as follows:
CEPH deploy purgedata hostname 1 hostname 2
ceph-deploy purgedata node1 node2 node3
6.1.3 delete key
Log in to the management node and execute the following commands
ceph-deploy forgetkeys
6.2 deleting logical volumes
When creating osd, CEPH deploy will hang the hard disk corresponding to each osd in the system in the form of logical volume. If you do not delete the logical volume corresponding to the osd, the next time you deploy an osd with the same id, you will find that the logical volume corresponding to the osd already exists, which directly leads to the creation failure of the osd.
6.2.1 viewing osd logical volumes
Log in to each cluster node and execute the following commands
sudo vgdisplay
The results are as follows:
  --- Volume group ---
  VG Name               ceph-38503e2e-ff3c-4513-ae4c-27197145c4ac
  System ID
  Format                lvm2
  Metadata Areas        1
  Metadata Sequence No  5
  VG Access             read/write
  VG Status             resizable
  MAX LV                0
  Cur LV                1
  Open LV               0
  Max PV                0
  Cur PV                1
  Act PV                1
  VG Size               <10.00 GiB
  PE Size               4.00 MiB
  Total PE              2559
  Alloc PE / Size       2559 / <10.00 GiB
  Free  PE / Size       0 / 0
  VG UUID               x0XARi-ztWg-0LI8-y3GS-FbBM-zMQZ-Z6Yhjq

  --- Volume group ---
  VG Name               ceph-86ebc595-b0ed-4020-a5a3-469fb43f56db
  System ID
  Format                lvm2
  Metadata Areas        1
  Metadata Sequence No  5
  VG Access             read/write
  VG Status             resizable
  MAX LV                0
  Cur LV                1
  Open LV               0
  Max PV                0
  Cur PV                1
  Act PV                1
  VG Size               <10.00 GiB
  PE Size               4.00 MiB
  Total PE              2559
  Alloc PE / Size       2559 / <10.00 GiB
  Free  PE / Size       0 / 0
  VG UUID               jLj3vl-EgKz-vqxf-18P4-06pW-2JzD-zk4krZ
  ......
6.2.2 deleting osd logical volumes
Log in to each cluster node and execute the following commands in the following format:
sudo vgremove VG Name
sudo vgremove ceph-38503e2e-ff3c-4513-ae4c-27197145c4ac