One line of code for multiple-choice batch operation of RecyclerView
MultiSelectAdapter project address
Loading Part B
In the ancient days of Android, if people wanted to display lists, they needed ListView. It was simple but not flexible. Then, Google introduced a new alternative RecyclerView. RecyclerView was really flexible. You can't do it without it, but there is no free lunch in the world. The cost of flexibility is more Codi.Ng, I think the essence of flexibility is to just abstract the logic at the bottom. As for the specific scenes, let's just do it by your yard growers, haha...
It's hard to remember that in the era of ListView, multiple selection was the function of ListView itself, and Item's click callback was the function of ListView itself. It was easy to use, but in the era of RecyclerView, everything had to be done by itself, and multiple selection was one of the functions that needed to be implemented by itself.
As I understand, if you want to implement multiple-choice functionality on RecyclerView, the normal practice is
- When defining an Item, bury the selected state View in the layout of the Item
- Define a global variable in the Adapter, temporarily called isSelectMode l, to represent the current state
- Define a collection (HashMap or SparseBooleanArray) in the Adapter that records the selected state
- Listens for Item clicks, inserts selected or unselected records into the collection above when clicked
- Refresh the list to show checked or unchecked markers in onBindViewHolder
- ...
As you can see, I just want to make a simple multi-choice and write so much code. It's really a code farmer
To solve this problem, I designed a Library that converts from a normal RecyclerView to a gorgeous RecyclerView that supports multiple selections in a single line of code
✨✨✨✨✨✨✨✨✨✨✨✨✨✨✨✨✨✨✨✨✨✨✨
✨✨✨✨✨✨✨MultiSelectAdapter✨✨✨✨✨✨✨✨
✨✨✨✨✨✨✨✨✨✨✨✨✨✨✨✨✨✨✨✨✨✨✨
Although its name is very rustic, it is very comfortable to use. Who knows?
"How can I use it then?Really just one line of code?"
"Amount, O_u O"...In fact, in theory, no matter what the procedure is, it can be done in one line, can't it?"
"Stool"
Let's talk about how to use it first
Introduction to Use
recycler.adapter = MultipleSelect.with(Activity).adapter(YourAdapter).build();
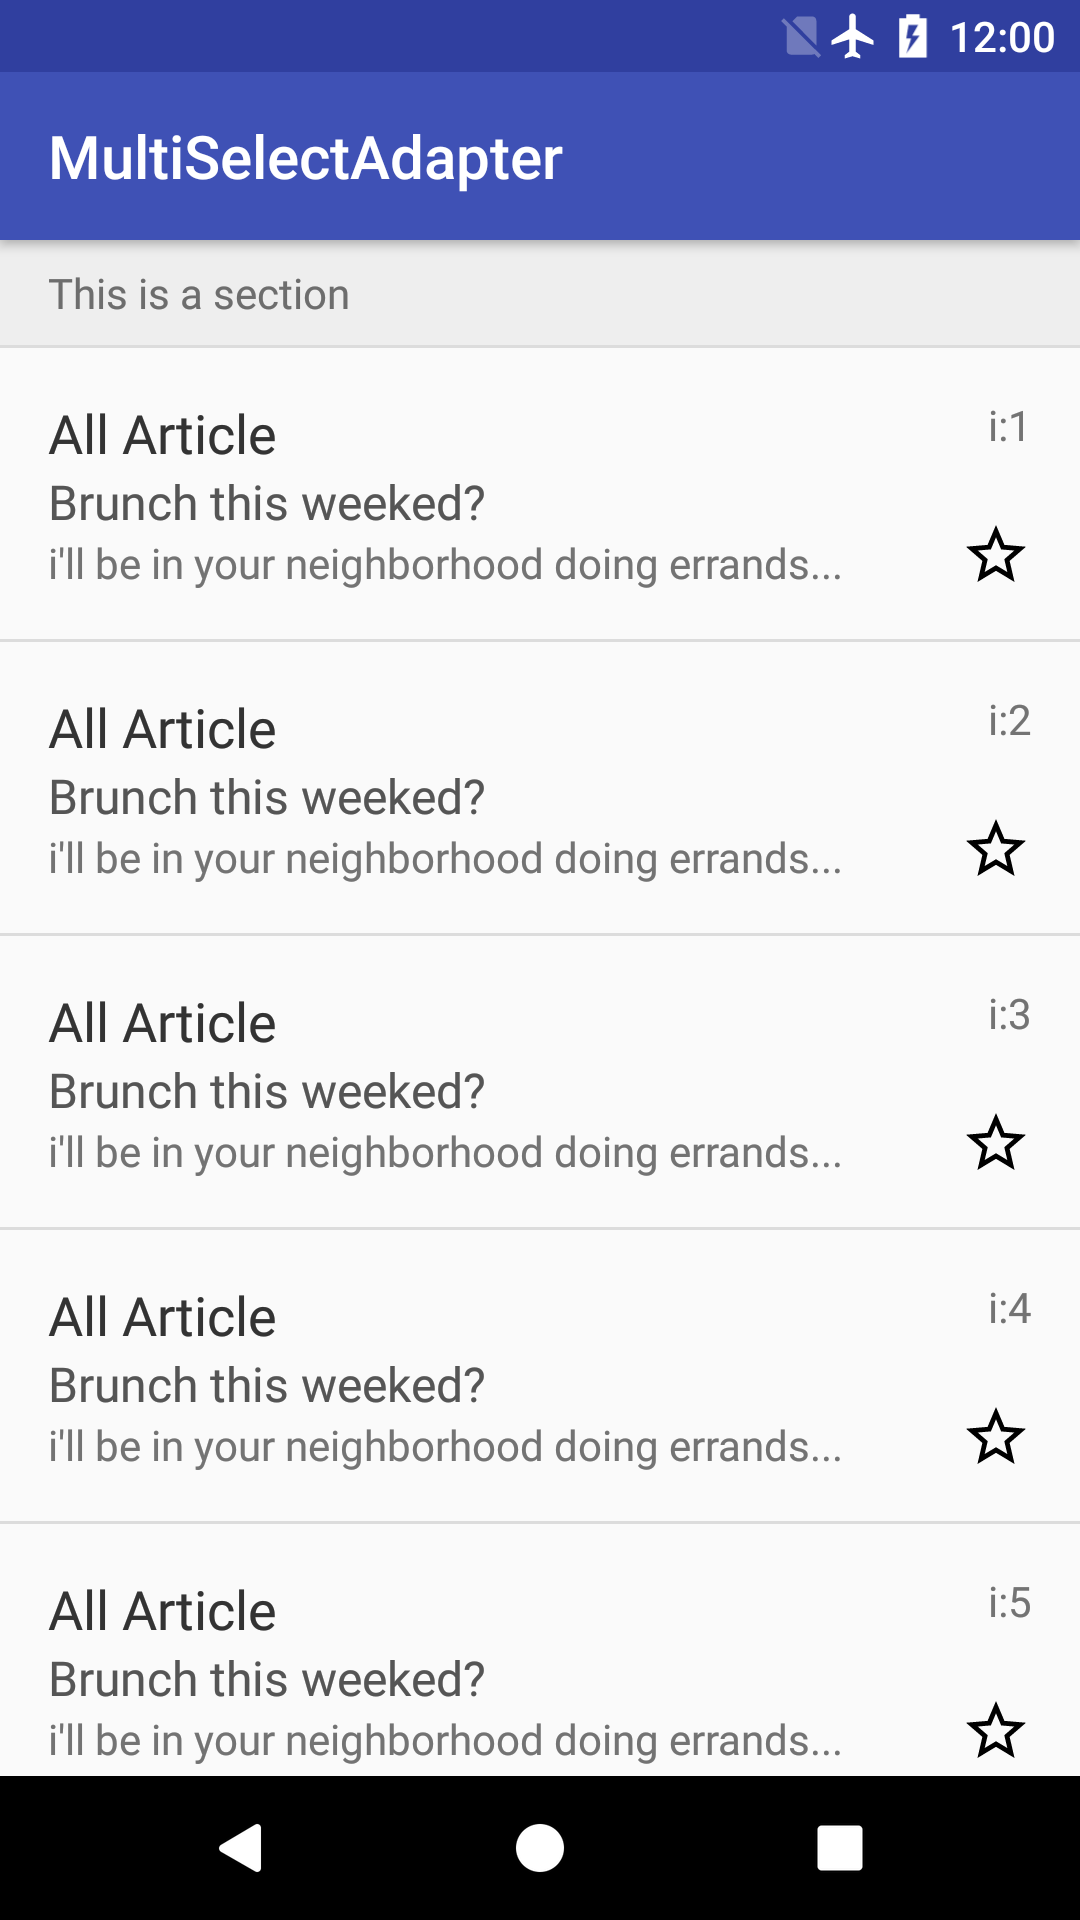
The corresponding display effect is as follows:
| Normal mode | Multiple Selection Mode |
|---|---|
 |
 |
I wipe, it's really a line, but if you want more different display effects, you have to tap a few more lines. I don't have more bb on how to use it. This article mainly want to talk about the source part of this Library.
As for how to use it, see here, which is very detailed. If you like, please remember to click Star:
MultiSelectAdapter project address
Source Part
In fact, the project itself does not use any complex technology, it is a very common thing, just the encapsulation of some common code. I think as a programmer, the proficiency in language use and advanced skills are important, but more importantly, the encapsulated ideas are universal, like when we learn a foreign language, there will be many words, many wordsSentences, many grammatical structures are important, but it doesn't make sense to learn them if you can't use them to accurately express what you mean.
Overall structure:
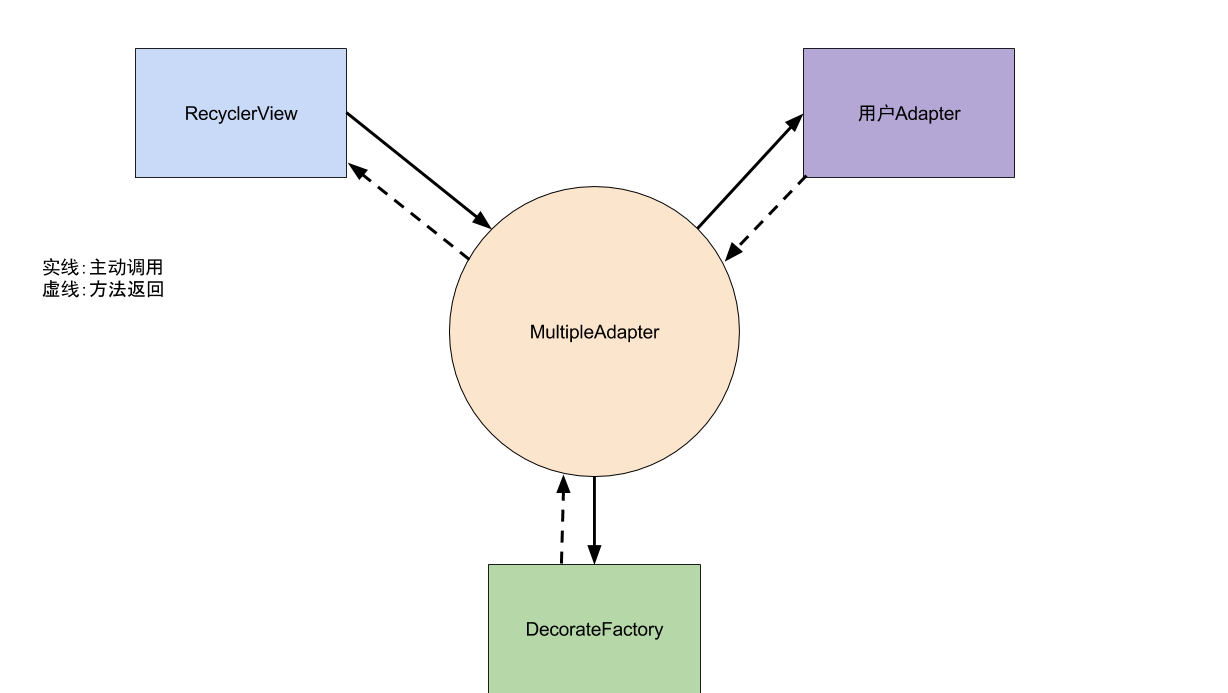
From the diagram above, you can see that MultipleAdapter uses decoration mode to process the user's Adapter, then returns the decorated ViewHolder to RecyclerView, and the decorate process is handed over to DecorateFactory.
Now that you know the general structure, let's look at the code, the old rules, starting with the point of use, step by step.
 MultipleAdapter adapter = MultipleSelect
                .with(Activity)
                .adapter(YourAdapter)
                .ignoreViewType(ItemViewType)
                .stateChangeListener(StateChangeListener)
                .decorateFactory(? extends DecorateFactory)
                .customMenu(? extends MenuBar)
                .build();
The code for this project was written by Kotlin and is very similar to Java. There should be no reading difficulties.
First look
MultipleSelect
MultipleSelect is a singleton designed primarily to construct a MultipleAdapter that facilitates user incoming initialization configurations via Builder mode, with the main parameters being:
| parameter | type | Explain |
|---|---|---|
| adapter | RecyclerView.Adapter | User-defined Adapter |
| ignoreViewType | Integer[] | Ignore multi-selected ItemViewType |
| decorateFactory | DecorateFactory | Multiple Selection Style Generator |
| customMenu | MenuBar | Custom MenuBar, which generally inherits CustomMenuBar, passes in menu id |
| stateChangeListener | StateChangeListener | Some callbacks |
Finally, a MultipleAdapter is constructed by the build() method and the user's configuration is passed in as a parameter by the construction method
MultipleAdapter
/**
 * val At the beginning it means this is a constant
 * This class inherits fromRecyclerView.Adapter,
 * Also holding usersAdapter,Take advantage of decorators
 * Mode, for usersAdapterProcessing
 */
class MultipleAdapter(val adapter: RecyclerView.Adapter<RecyclerView.ViewHolder>,
                      val stateChangeListener: StateChangeListener?,
                      val popupToolbar: MenuBar?,
                      val ignoreType: Array<Int>?,
                      val decorateFactory: DecorateFactory,
                      val duration: Long) : RecyclerView.Adapter<RecyclerView.ViewHolder>(), MenuController {
    // There are four types of showState: Default, Default to Selection, Selection to Default
    var showState = ViewState.DEFAULT
    // An array recording the selected state
    val selectIndex = SparseBooleanArray()
    var selectNum = 0
}
MultipleAdapter.onCreateViewHolder
override fun onCreateViewHolder(viewGroup: ViewGroup, position: Int): RecyclerView.ViewHolder {
    // Generate the original ViewHolder by calling the user's Adapter
    val outerHolder = adapter.onCreateViewHolder(viewGroup, position)
    // Determine if this ViewHolder allows multiple selections
    // If not, simply return to the user's ViewHolder
    if (isIgnore(position))
        return outerHolder
    // Otherwise, process the outerHolder with decorateFactory
    return decorateFactory.decorate(outerHolder, this)
}
Skip decorateFactory.decorate for now, as described later
MultipleAdapter.onBindViewHolder
override fun onBindViewHolder(viewHolder: RecyclerView.ViewHolder, position: Int) {
    // If the type is not the ViewHolder we defined
    // Return directly
    if (viewHolder !is BaseViewHolder) {
        adapter.onBindViewHolder(viewHolder, position)
        return
    }

    /**
     * Invoke external bound ViewHolder first
     */
    adapter.onBindViewHolder(viewHolder.viewHolder, position)

    /**
     * If ignored, do not go down
     */
    if (isIgnore(position))
        return
    // Calling BaseViewHolder.selectStateChanged based on selectIndex data,
    // Selected/Unselected
    if (selectIndex.get(position)) {
        viewHolder.selectStateChanged(SelectState.SELECT)
    } else {
        viewHolder.selectStateChanged(SelectState.UN_SELECT)
    }
    // Switch Selection Mode or Normal Mode
    viewHolder.showStateChanged(showState)
}
The main method of MultipleAdapter is onCreateViewHolder and onBindViewHolder, where:
- onCreateViewHolder: Generate ViewHolders that support multiple selections
- onBindViewHolder: Refresh status based on showState and selectIndex
MultipleAdapter temporarily stops here and we jump to decorateFactory.decorate(...) Take a look
DecorateFactory.decorate
interface DecorateFactory {

    /**
     * In this way, you can convert a regular Recycler item into one that supports multiple selections
     * Is it amazing?
     */
    fun decorate(viewHolder: RecyclerView.ViewHolder, adapter: MultipleAdapter): BaseViewHolder;

}
This is an interface. The parameter is a ViewHolder created by the user's Adapter, and the return value is our own BaseViewHolder. Let's find a subclass to see the implementation:
abstract class CustomViewFactory : DecorateFactory,AnimationInterface {

    override fun decorate(viewHolder:ViewHolder, adapter:MultipleAdapter):BaseViewHolder {
        val context = viewHolder.itemView.context
        // Call onCreateRootView to create a container for the entire Item
        val root = onCreateRootView(context)
        val rootParams = ViewGroup.LayoutParams(viewHolder.itemView.layoutParams)
        root.layoutParams = rootParams
        return createViewHolder(context, root, viewHolder, adapter)
    }


    /**
     * this
     */
    fun createViewHolder(context:Context,
                         root: android.view.ViewGroup,
                         viewHolder:ViewHolder,
                         adapter:MultipleAdapter): BaseViewHolder {
        // Call onCreateSelectView and onCreateNormalView
        // Generate Selected and Unselected State View s
        val selectView = onCreateSelectView(context)
        val defaultView = onCreateNormalView(context)
        val selectRoot = FrameLayout(context)
        selectRoot.id = R.id.id_select_view
        val layoutParams = FrameLayout.LayoutParams(FrameLayout.LayoutParams.MATCH_PARENT, FrameLayout.LayoutParams.MATCH_PARENT)
        layoutParams.gravity = Gravity.CENTER
        selectRoot.addView(defaultView, layoutParams)
        selectRoot.addView(selectView, layoutParams)
        selectRoot.visibility = android.view.View.GONE
         // Call onBindSelectView to add selectRoot and viewHolder.itemView to the root
        onBindSelectView(root, viewHolder.itemView, selectRoot)

        selectRoot.measure(root.width, root.height)
        selectRoot.visibility = android.view.View.GONE
        // Generate CustomViewHolder, CustomViewHolder
        // Inherited from BaseViewHolder
        return CustomViewHolder(root, viewHolder, adapter, this, selectRoot, selectView, defaultView)
    }

    /**
     * Generate default SelectView
     */
    abstract fun onCreateSelectView(context:Context): android.view.View

    /**
     * Generate default UnSelectView
     */
    abstract fun onCreateNormalView(context:Context): android.view.View


    /**
     * Create Outermost View
     */
    abstract fun onCreateRootView(context:Context): android.view.ViewGroup


    /**
     * Bind SelectView
     */
    abstract fun onBindSelectView(root:ViewGroup, itemView:View, selectView:View)
As we can see, CustomViewFactory is also an abstract class that implements only a part of the logic and finds one of its subclasses to continue looking down
class CheckBoxFactory(val color: Int = Color.RED,
                      val duration: Int = 300,
                      val gravity: Int = Gravity.RIGHT,
                      val marginDp:Int = 8) : CustomViewFactory() {
    // Show animation, if lazy add animation, directlyVISIBLEthat will do
    override fun onShowAnimation(itemView: View, selectView: View) {
        selectView.visibility = View.VISIBLE
    }
    // Hide animation, same as above
    override fun onHideAnimation(itemView: View, selectView: View) {
        selectView.visibility = View.GONE
    }
    // Displayed when the selected state is createdView,Here's oneCheckBoxStyle picture
    override fun onCreateSelectView(context: android.content.Context): View {
        val imageView = android.widget.ImageView(context)
        imageView.setImageResource(R.drawable.ic_check_box_black_24dp)
        imageView.setColorFilter(color)
        return imageView
    }
    // Displayed when creating an unchecked stateView,Here's oneCheckBoxStyle picture
    override fun onCreateNormalView(context: android.content.Context): View {
        val imageView = android.widget.ImageView(context)
        imageView.setColorFilter(color)
        imageView.setImageResource(R.drawable.ic_check_box_outline_blank_black_24dp)
        return imageView
    }
    // Create selectView andItemViewContainer for
    // This determines yourItemFinal layout
    override fun onCreateRootView(context: android.content.Context): ViewGroup {
        return FrameLayout(context)
    }

    // Set up twoViewstayRootLayoutLayout in
    override fun onBindSelectView(root: ViewGroup, itemView: View, selectView: View) {
        root.removeAllViews()
        root.addView(itemView)
        val params = FrameLayout.LayoutParams(FrameLayout.LayoutParams.WRAP_CONTENT, FrameLayout.LayoutParams.WRAP_CONTENT)
        params.gravity = gravity
        params.leftMargin = marginDp.toPx(root.context)
        params.topMargin = marginDp.toPx(root.context)
        params.rightMargin = marginDp.toPx(root.context)
        params.bottomMargin = marginDp.toPx(root.context)
        root.addView(selectView, params)
    }
As mentioned above, the return value of DecorateFactory.decorate is BaseViewHolder
BaseViewHolder
// An abstract class that primarily listens to Item's Touch events and implements the monitor's long press and click events
abstract class BaseViewHolder(val view: View,
                              val viewHolder: RecyclerView.ViewHolder,
                              val adapter: MultipleAdapter) : RecyclerView.ViewHolder(view) {

    val onTouchListener = OnTouchListener(adapter,this)
    init {
        viewHolder.itemView.setOnTouchListener(onTouchListener)
    }

    abstract fun selectStateChanged(state: Int)

    open fun showStateChanged(toState: Int) {}

}
BaseViewHolder is also an abstract class. Find a subclass of it to see
class CustomViewHolder(view: View,
                       viewHolder: RecyclerView.ViewHolder,
                       adapter: MultipleAdapter,
                       val animationInterface: AnimationInterface,
                       val selectViewContainer: View,
                       val selectView: View,
                       val unSelectView: View) : BaseViewHolder(view, viewHolder, adapter) {
    init {
        selectView.setOnTouchListener(onTouchListener)
        unSelectView.setOnTouchListener(onTouchListener)
    }

    // Hide and show the corresponding when selected or uncheckedView
    override fun selectStateChanged(state: Int) {
        if(state == SelectState.UN_SELECT){
            selectView.visibility = INVISIBLE
            unSelectView.visibility = VISIBLE
        }else if(state == SelectState.SELECT){
            selectView.visibility = VISIBLE
            unSelectView.visibility = INVISIBLE
        }
    }

    // Selection mode and normal mode conversion
    override fun showStateChanged(toState: Int) {
        when(toState){
            ViewState.DEFAULT -> {
                selectViewContainer.visibility = GONE
            }
            ViewState.DEFAULT_TO_SELECT -> {
                animationInterface.onShowAnimation(itemView,selectViewContainer)
            }
            ViewState.SELECT -> {
                selectViewContainer.visibility = VISIBLE
            }
            ViewState.SELECT_TO_DEFAULT -> {
                animationInterface.onHideAnimation(itemView,selectViewContainer)
            }
        }
    }
}
At this point, the actual process of onCreateViewHolder and onBindViewHolder is complete, and the rest of the logic is simple
When we introduced BaseViewHolder above, BaseViewHolder listens for the ItemView onTouch event and then distinguishes between long press and click. If long press, the MultipleAdapter.onItemLongClick() method is called, and if click, the MultipleAdapter.onItemClick() method is called.
MultipleAdapter.onItemLongClick
fun onItemLongClick(position: Int): Boolean {
    if (isIgnore(position))
        return false
    selectIndex.clear()
    // If the current mode is normal, after onItemLongClick
    // Should switch to selection mode
    if (showState == ViewState.DEFAULT) {
        selectMode(false)
        // Long press which one is selected by default
        selectIndex.put(position, true)
        stateChangeListener?.onSelect(position, selectNum)
    } else if (showState == ViewState.SELECT) {
         // Otherwise revert to normal mode
        selectNum = 0
        cancel()
    }
    // Refresh RecyclerView
    notifyDataSetChanged()
    handler.postDelayed(run, duration)
    return true
}
MultipleAdapter.onItemClick
/**
* Click in Selection Mode to process here
* In normal mode, this is passed to the caller's
* adapter
*/
fun onItemClick(position: Int) {
if (isIgnore(position))
return
if (showState != ViewState.SELECT)
return
// Set to Opposite Selection State
selectIndex.put(position, !selectIndex[position])
selectNum += if (selectIndex[position]) 1 else -1
popupToolbar?.onUpdateTitle(selectNum,getTotal())
if (selectIndex[position]) {
stateChangeListener?.onSelect(position, selectNum)
} else {
stateChangeListener?.onUnSelect(position, selectNum)
}
if (selectNum <= 0) {
cancel()
} else {
notifyItemChanged(position)
}
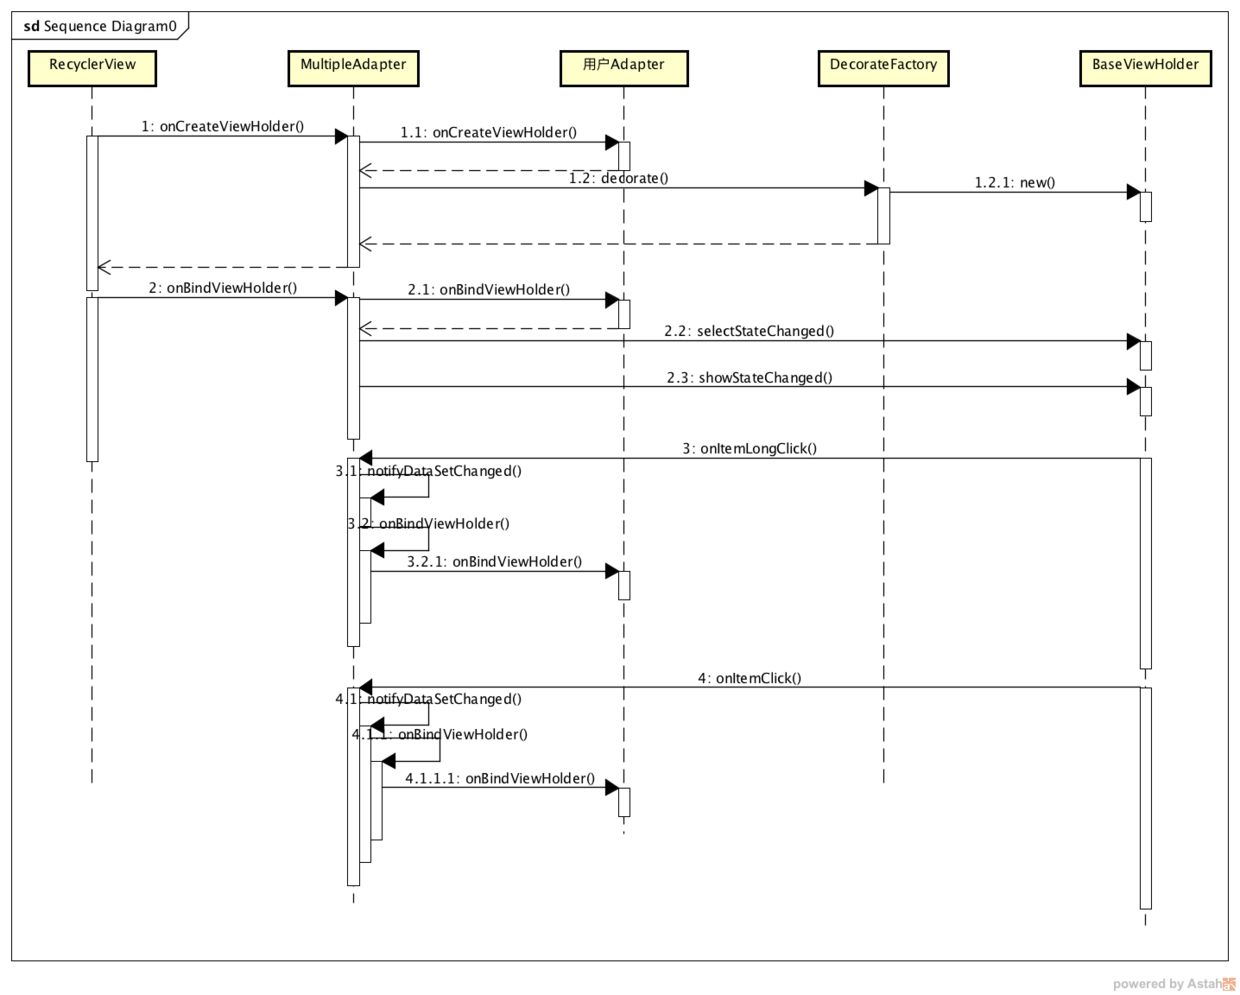
}Time Series Diagram
At this point, the main logic of MultiSelectAdapter is probably clear. All that's left is some fur. If you have any doubts, you can look at the source code. As I said earlier, this Library doesn't use any advanced technology or interface calls, it's just some ideas for encapsulation.
If you find any mistakes or more advanced ideas, be sure to tell me.