CICD continuous integration based on kubernetes platform
1. Continuous integration of Jenkins based on k8s cluster
The process of Jenkins updating the traditional LNMT project is very simple. Jenkins only needs to be deployed on the physical server to realize the continuous update iteration of the project version
If the project is deployed in the k8s cluster and Jenkins is still deployed on the physical machine, the project update process will become cumbersome. The general process is as follows: firstly, Jenkins compiles the project into a war package, and then runs the war on a physical machine. If the operation is successful, another Jenkins task will be called, The main function of Jenkins task is to copy the war package and ROOT directory into the initial image. After the image is built, push the image to the harbor platform, and then the operation and maintenance department takes the image version and puts it in k8s to upgrade.
If Jenkins is only deployed on a physical machine, the whole CI/CD platform will not be able to update and iterate after a Jenkins hangs up, which is a very serious consequence. If Jenkins is deployed on the k8s platform, with the help of the k8s pod self-healing function, Jenkins hangs up almost never.
After Jenkins is deployed in the k8s environment, by establishing RBAC authorization mechanism, Jenkins can realize one click Update iteration to the k8s environment without the cumbersome steps of using the physical machine environment
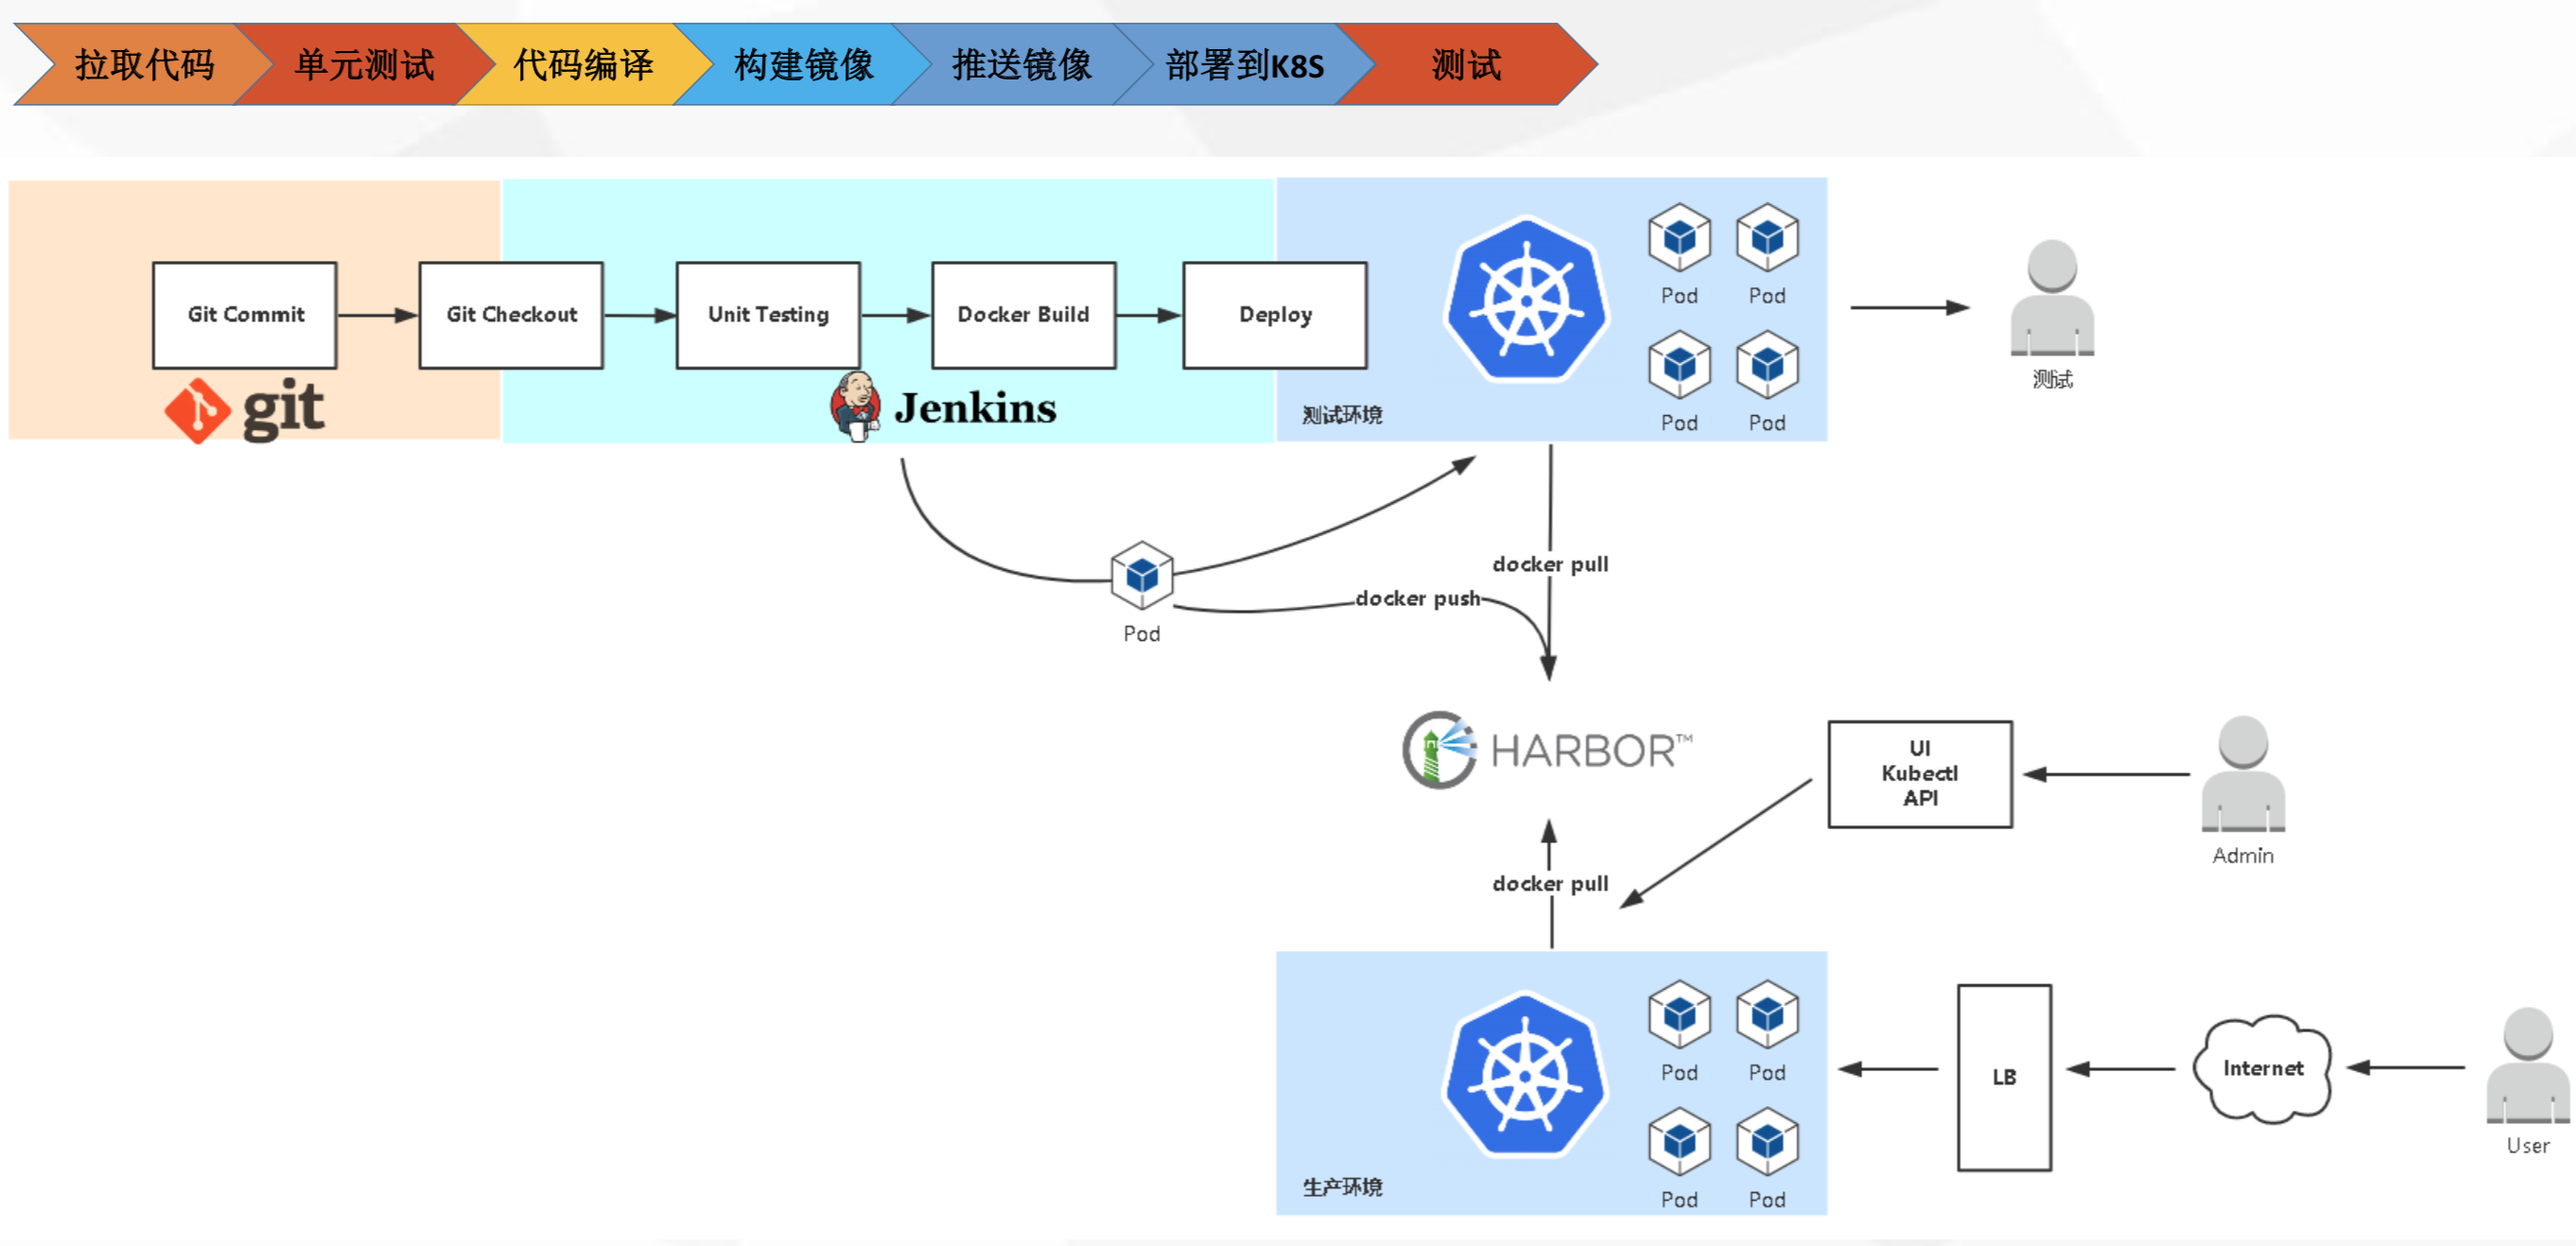
Update process after Jenkins and kubernetes integration:
1) Jenkins pulls the development submitted code from gitlab
2) Jenkins calls maven to compile the project
3) Jenkins calls docker to build the written dockerfile into an image
4) Push the image to the harbor warehouse
5) Jenkins calls k8s to deploy the image in the k8s environment
2. Deploy Jenkins in k8s cluster
Deployment idea:
1. Because Jenkins wants to update items to various namespaces, it needs to do RBAC authorization, prepare a ServiceAccount, and directly bind the ServiceAccount to the cluster admin cluster role, so that Jenkins has operation permissions on items under all namespaces.
2. The Jenkins deployment adopts the statefullset controller and cooperates with StorageClass to dynamically persist Jenkins data.
3. Prepare svc resources and expose ports 8080 / 50000 of Jenkins.
2.1. Write Jenkins namespace file
[root@k8s-master1 jenkins]# cat jenkins-namespace.yaml
apiVersion: v1
kind: Namespace
metadata:
    name: jenkins
2.2. Prepare Jenkins rbac authorization document
Create a serviceaccount account Jenkins, and directly bind the sa account to the cluster admin cluster role
[root@k8s-master1 jenkins]# cat jenkins-rbac.yaml
apiVersion: v1
kind: ServiceAccount
metadata:
  name: jenkins
  namespace: jenkins

---

apiVersion: rbac.authorization.k8s.io/v1beta1
kind: ClusterRoleBinding
metadata:
  name: jenkins-crb
roleRef:
  apiGroup: rbac.authorization.k8s.io
  kind: ClusterRole
  name: cluster-admin
subjects:
- kind: ServiceAccount
  name: jenkins
  namespace: jenkins
2.3. Write Jenkins statefullset resource file
Jenkins also generates data, so stateful services are deployed with stateful set, and storage systems are dynamically created with StorageClass
[root@k8s-master1 jenkins]# cat jenkins-statefulset.yaml
apiVersion: apps/v1
kind: StatefulSet
metadata:
  name: jenkins-master
  namespace: jenkins
spec:
  replicas: 1
  serviceName: jenkins
  selector:
    matchLabels:
      app: jenkins-master
  template:
    metadata:
      labels:
        app: jenkins-master
    spec:
      serviceAccount: jenkins
      initContainers:
      - name: jenkins-chown
        image: harbor.jiangxl.com/jenkins/busybox:1.30
        command: ["sh","-c","chown -R 1000:1000 /var/jenkins_home"]
        securityContext:
          privileged: true
        volumeMounts:
        - name: jenkins-data
          mountPath: /var/jenkins_home
      containers:
      - name: jenkins-master
        image: harbor.jiangxl.com/jenkins/jenkinsci-blueocean:1.24.6
        env:
        - name: JAVA_OPTS
          value: "-Xms4096m -Xmx5120m -Duser.timezone=Asia/Shanghai -Dhudson.model.DirectoryBrowserSupport.CSP="
        ports:
        - name: http
          containerPort: 8080
        - name: slave
          containerPort: 50000
        volumeMounts:
        - name: jenkins-data
          mountPath: /var/jenkins_home
  volumeClaimTemplates:
    - metadata:
        name: jenkins-data
      spec:
        storageClassName: jenkins-storageclass
        accessModes:
        - ReadWriteMany
        resources:
          requests:
            storage: 10Gi
2.4. Write Jenkins StorageClass resource file
[root@k8s-master1 jenkins]# cat jenkins-storageclass.yaml
apiVersion: storage.k8s.io/v1
kind: StorageClass
metadata:
  name: jenkins-storageclass
provisioner: nfs-storage-01
reclaimPolicy: Retain
2.5. Write Jenkins svc resource file
[root@k8s-master1 jenkins]# cat jenkins-svc.yaml
apiVersion: v1
kind: Service
metadata:
  labels:
    app: jenkins-master
  name: jenkins-svc
  namespace: jenkins
spec:
  ports:
  - name: http
    port: 8080
    targetPort: 8080
    nodePort: 38080
  - name: slave
    port: 50000
    targetPort: 50000
    nodePort: 50000
  selector:
    app: jenkins-master
  type: NodePort
2.6. Prepare Jenkins images and push them to harbor
[root@k8s-master1 jenkins]# docker pull jenkinsci/blueocean:1.24.6
[root@k8s-master1 jenkins]# docker tag jenkinsci/blueocean:1.24.6 harbor.jiangxl.com/jenkins/jenkinsci-blueocean:1.24.6
[root@k8s-master1 jenkins]# docker push harbor.jiangxl.com/jenkins/jenkinsci-blueocean:1.24.6
2.7. Create all resources and view their status
1.Create all resources
[root@k8s-master1 jenkins]# kubectl apply -f ./
namespace/jenkins created
serviceaccount/jenkins created
clusterrolebinding.rbac.authorization.k8s.io/jenkins-crb created
statefulset.apps/jenkins-master created
storageclass.storage.k8s.io/jenkins-storageclass created
service/jenkins-svc created

2.View resource status
[root@k8s-master1 jenkins]# kubectl get pod,statefulset,svc,storageclass,sa -n jenkins
NAME                   READY   STATUS    RESTARTS   AGE
pod/jenkins-master-0   1/1     Running   0          31m

NAME                              READY   AGE
statefulset.apps/jenkins-master   1/1     31m

NAME                  TYPE       CLUSTER-IP   EXTERNAL-IP   PORT(S)                         AGE
service/jenkins-svc   NodePort   10.101.2.5   <none>        8080:38080/TCP,50000:50000/TCP   31m

NAME                                               PROVISIONER      RECLAIMPOLICY   VOLUMEBINDINGMODE   ALLOWVOLUMEEXPANSION   AGE
storageclass.storage.k8s.io/jenkins-storageclass   nfs-storage-01   Retain          Immediate           false                  31m

NAME                     SECRETS   AGE
serviceaccount/jenkins   1         31m

3.see pvc,Created dynamically
[root@k8s-master1 jenkins]# kubectl get pvc -n jenkins
NAME                            STATUS   VOLUME                                     CAPACITY   ACCESS MODES   STORAGECLASS           AGE
jenkins-data-jenkins-master-0   Bound    pvc-3f49831b-7faa-456e-9a2f-65b6085933de   10Gi       RWX            jenkins-storageclass   32m
2.8. Jenkins installation page
Access any ip+38080 port of the cluster node
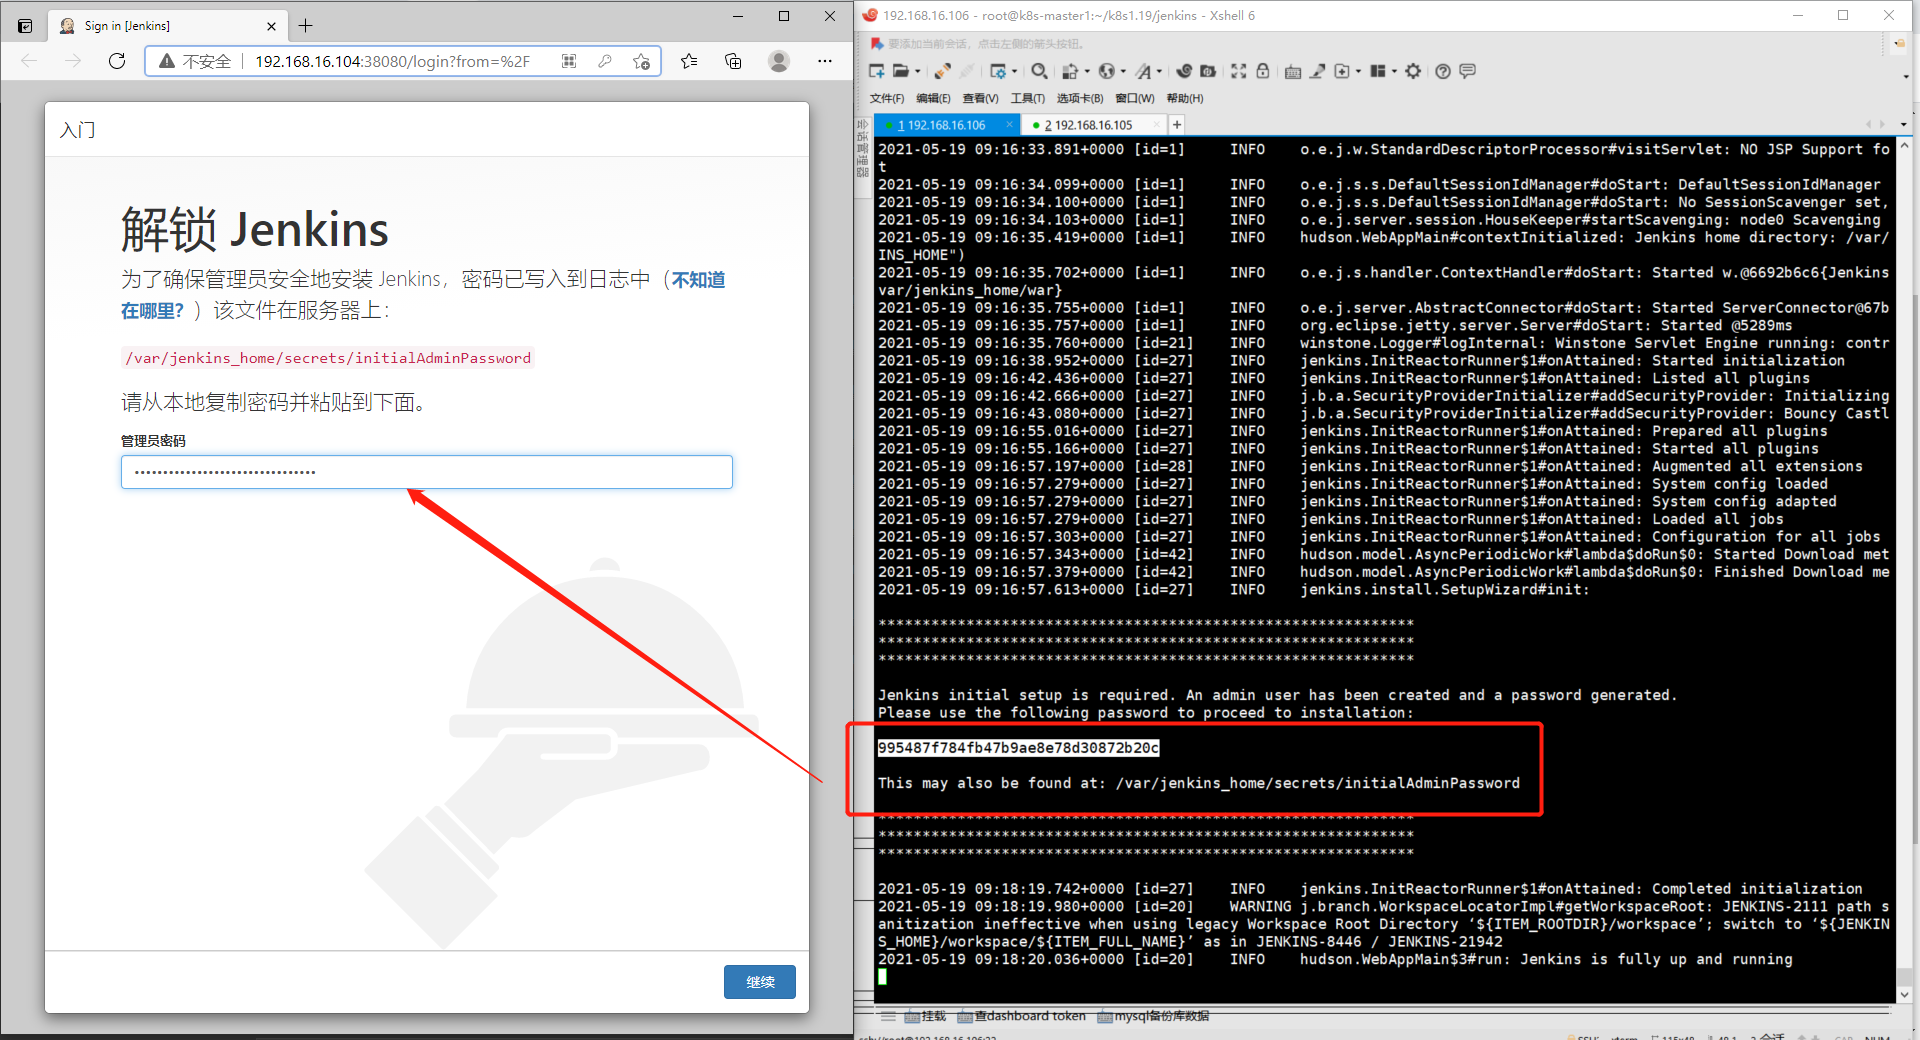
Visit the following page to see that Jenkins is still starting. When the log is output to the following figure, refresh Jenkins to enter the system, copy the password in the log and unlock Jenkins
[the external chain picture transfer fails, and the source station may have an anti-theft chain mechanism. It is recommended to save the picture and upload it directly (img-Gq67dowz-1629451468833)(.\k8s+jenkins realize continuous integration - note picture storage \ 1621415881187.png)]
1) Unlock Jenkins
You can copy the password in the log or view / var/jenkins_home/secrets/initialAdminPassword this file
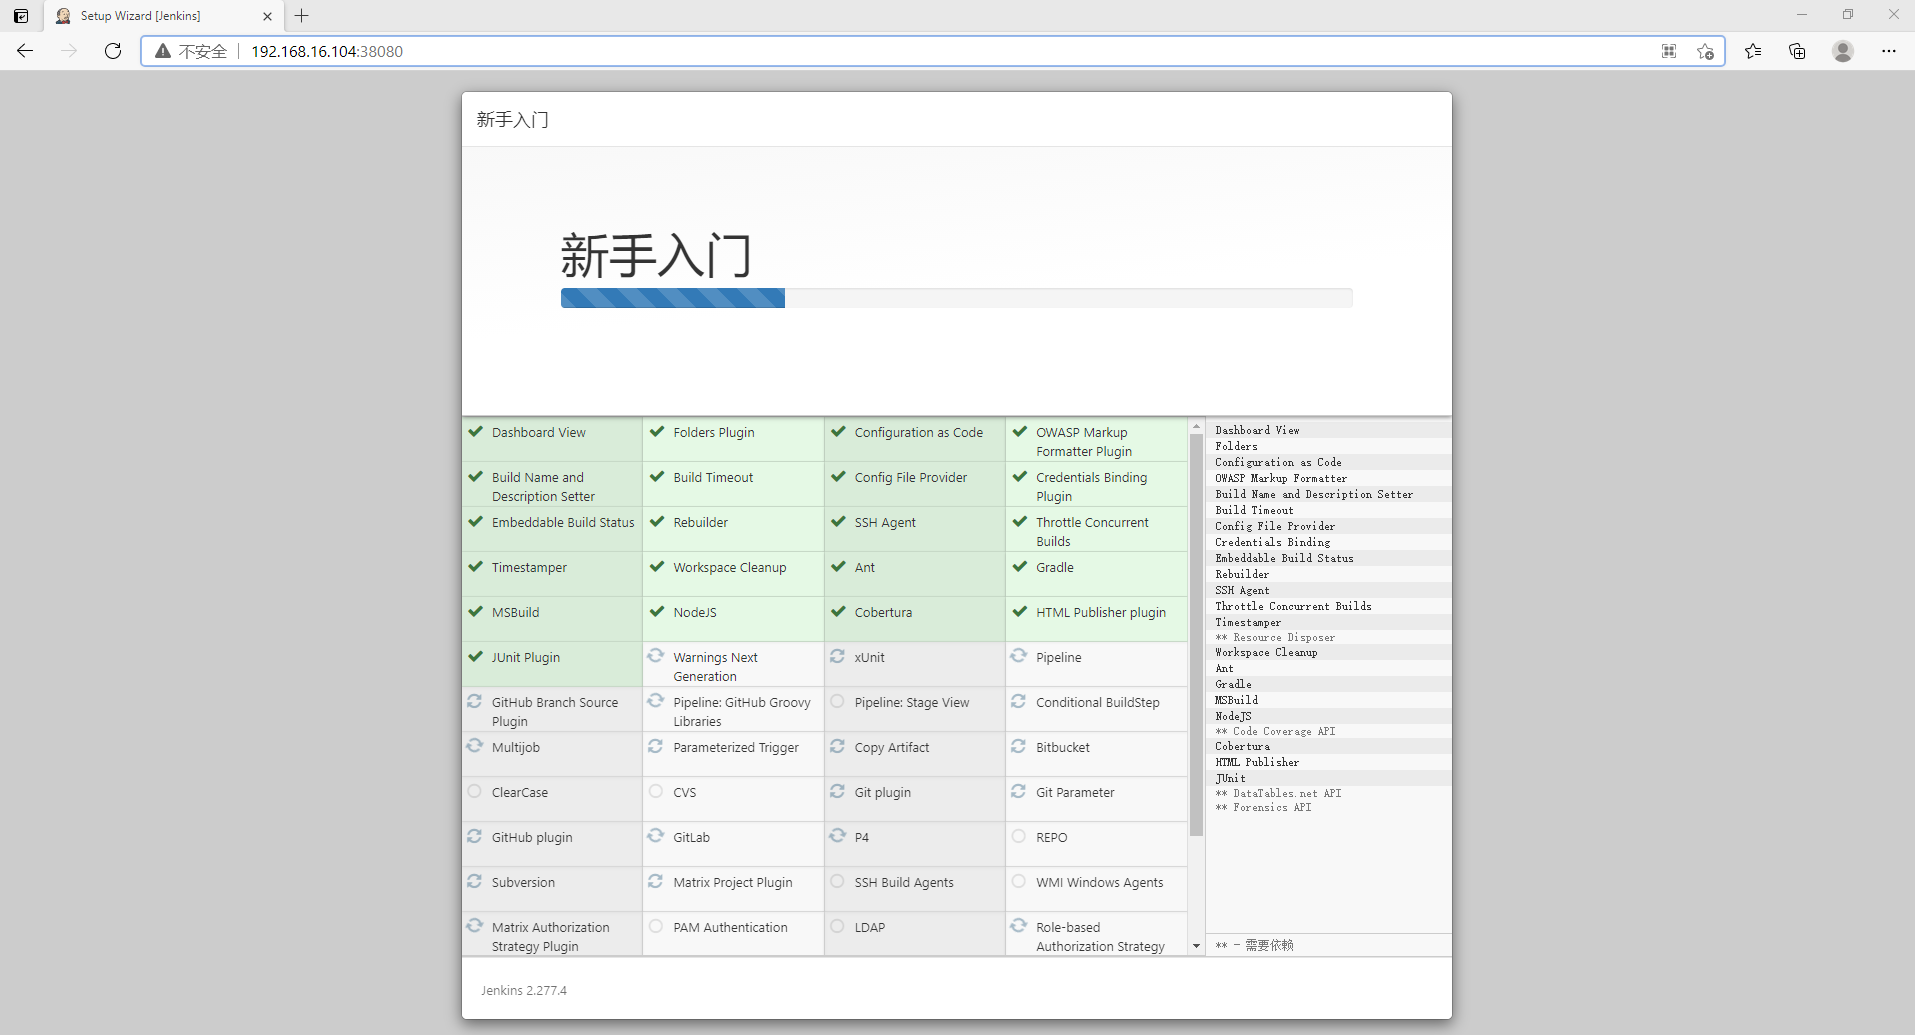
2) Select the plug-in to install
Check all plug-ins to avoid software dependency in the later stage
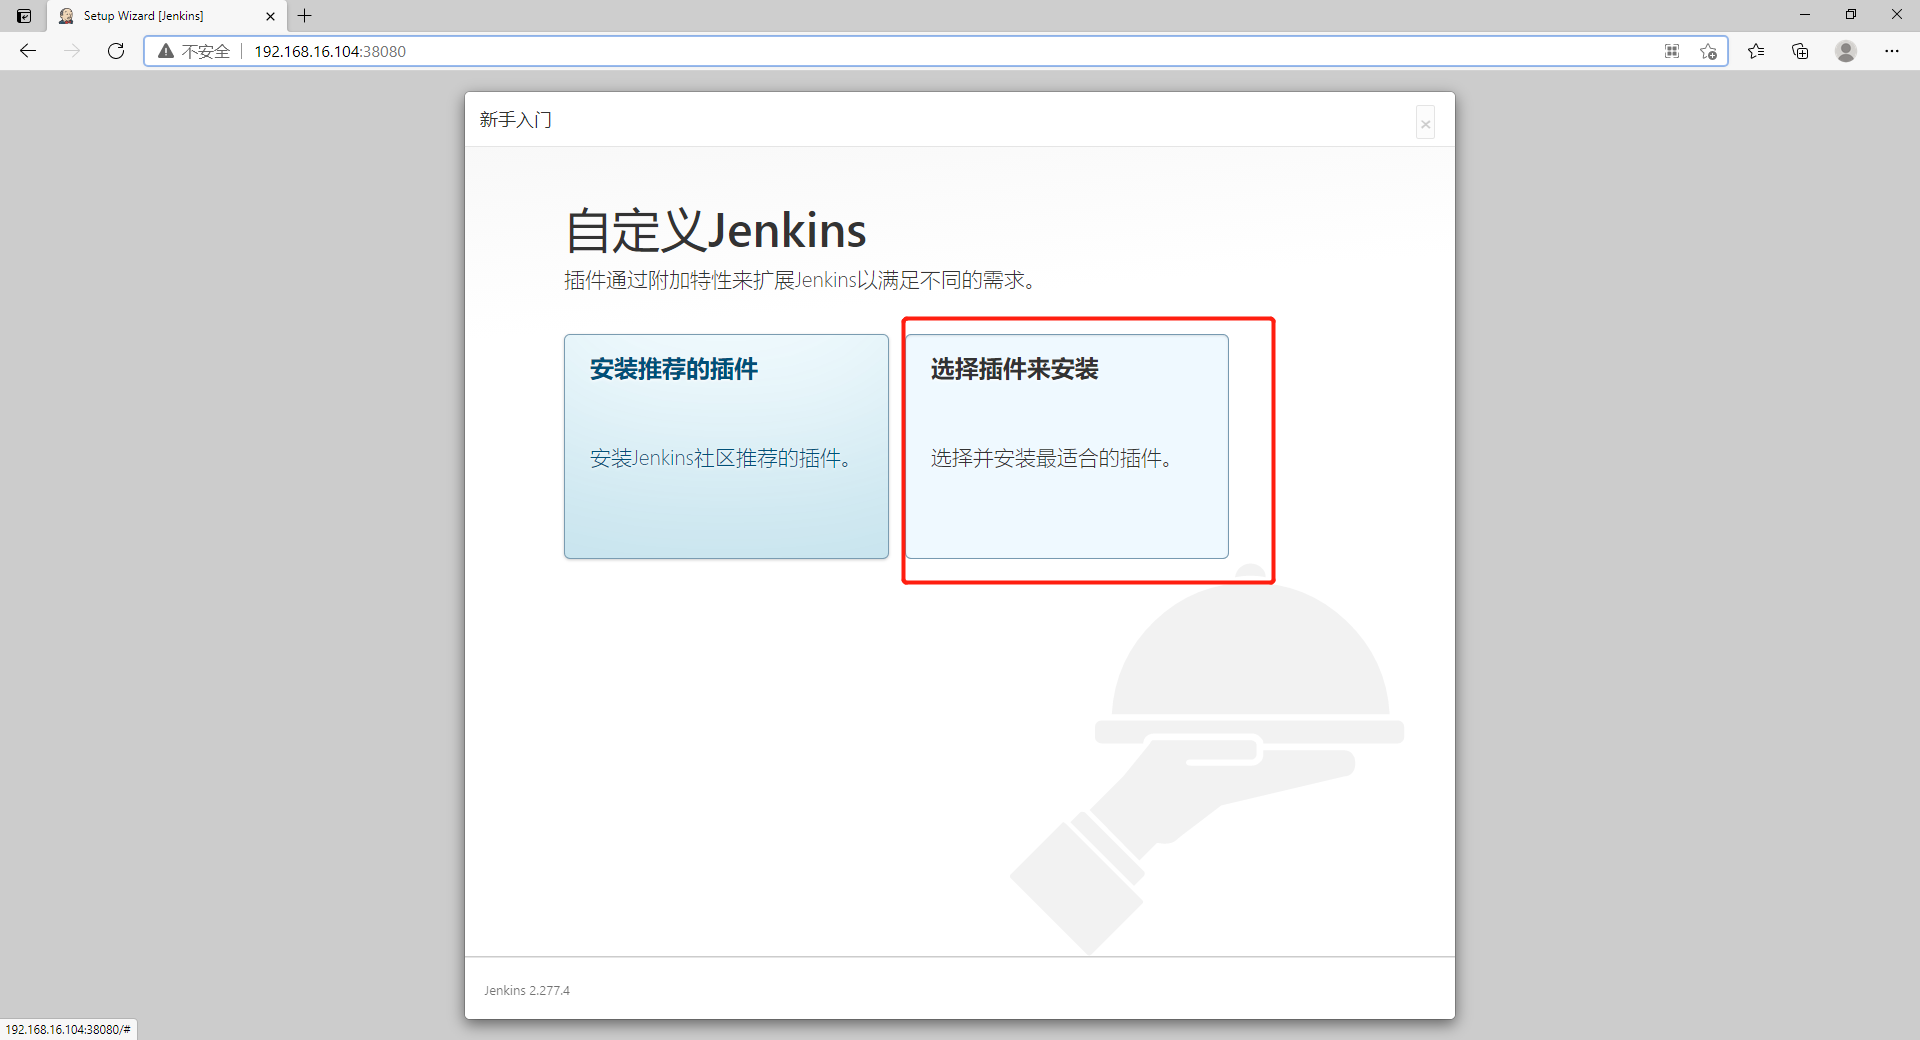
Click all to check all

3) Wait until the plug-in is installed
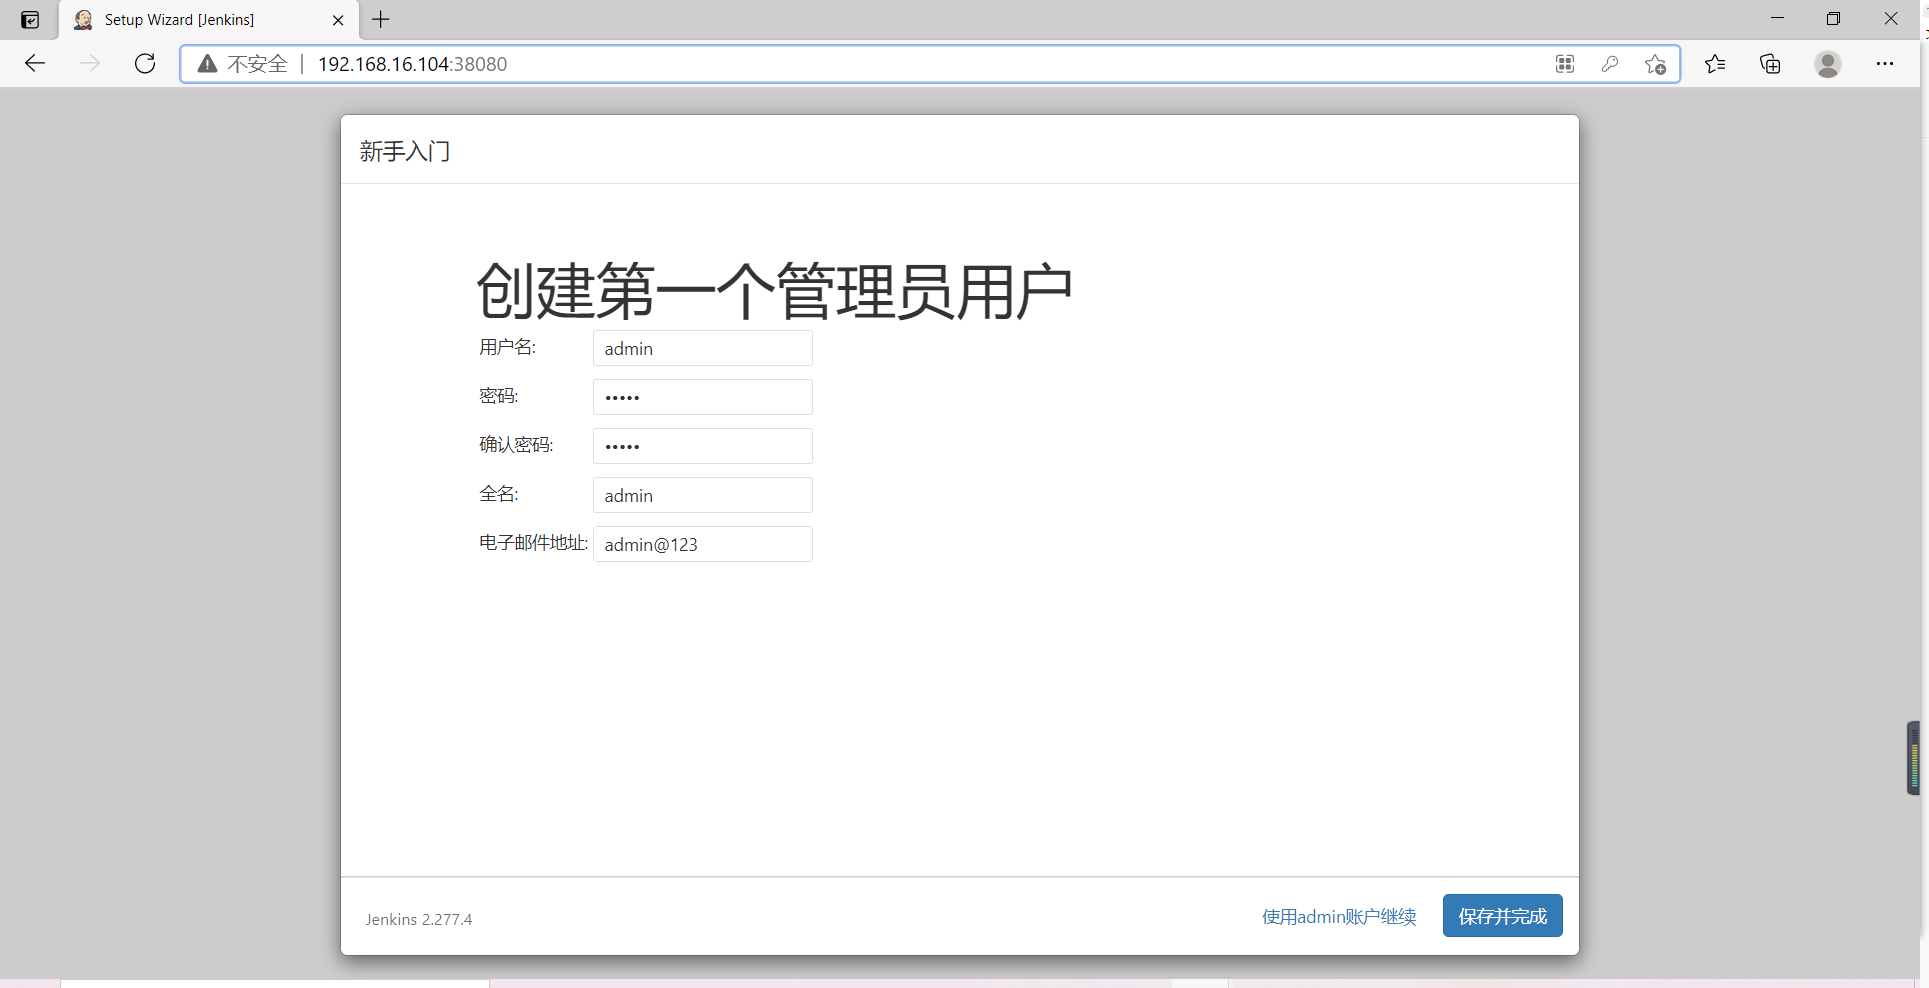
4) Create Jenkins account
5) Set instance address

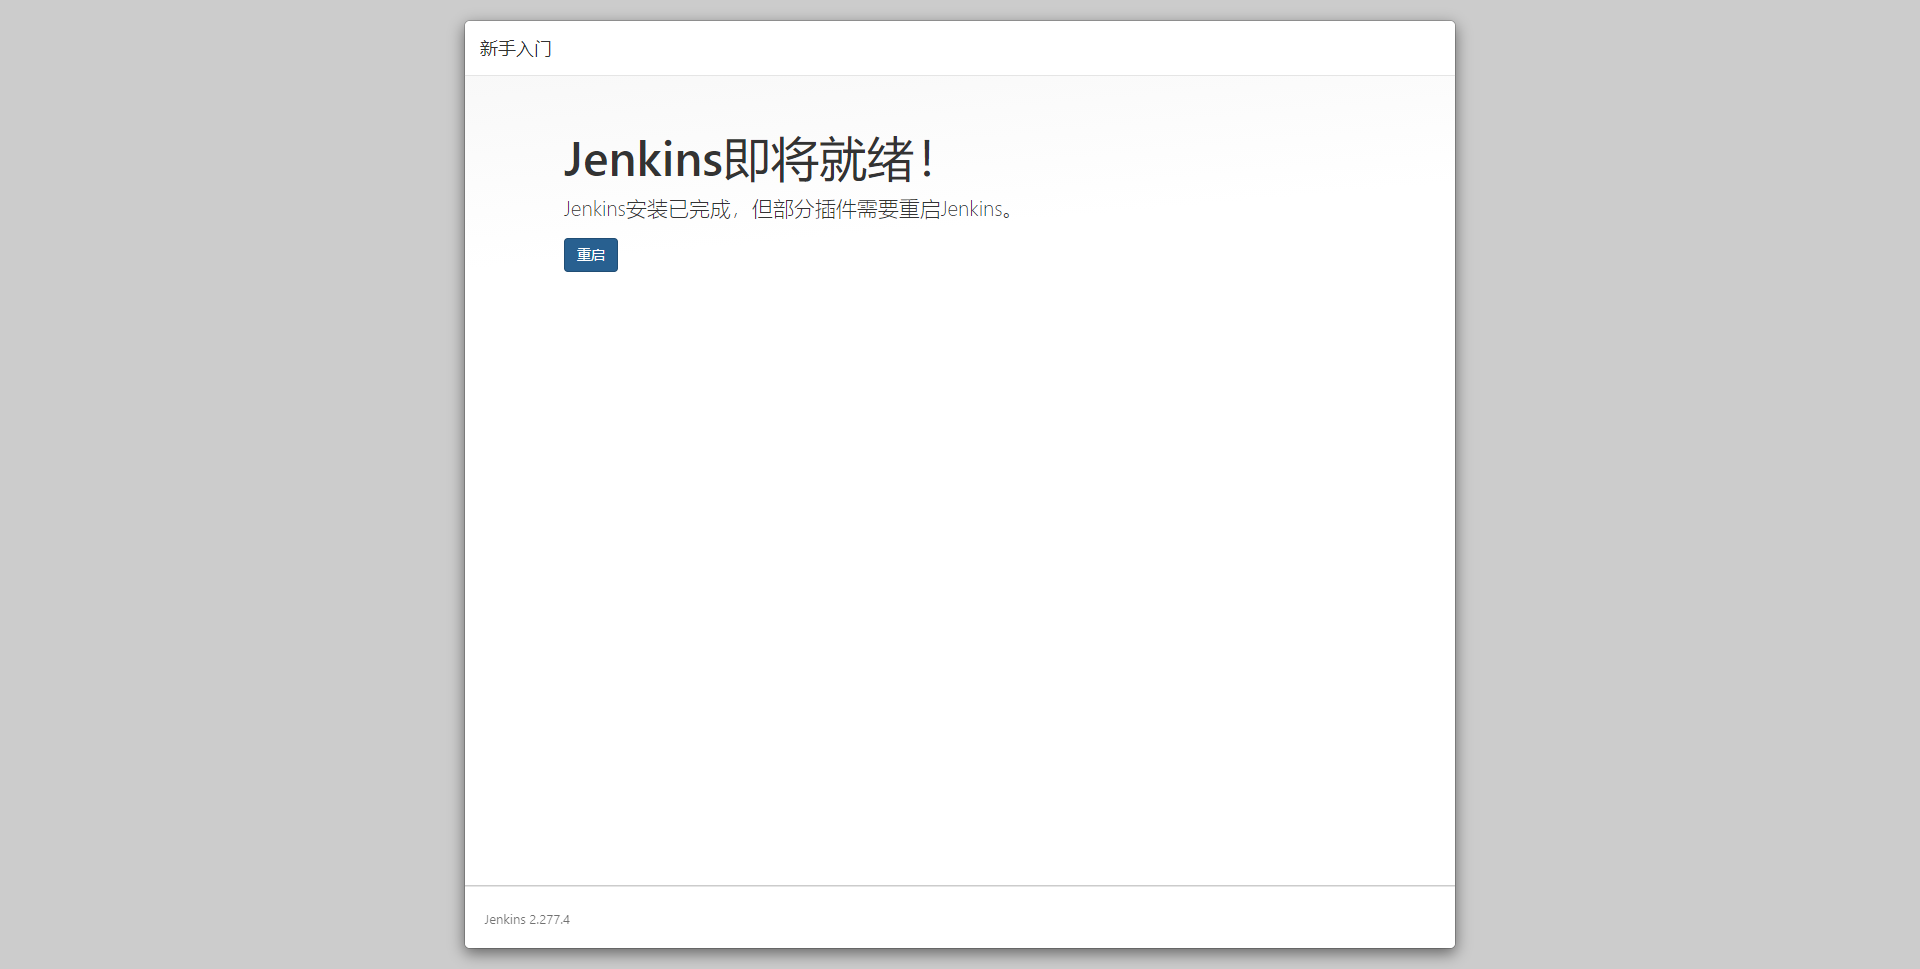
6) Restart Jenkins
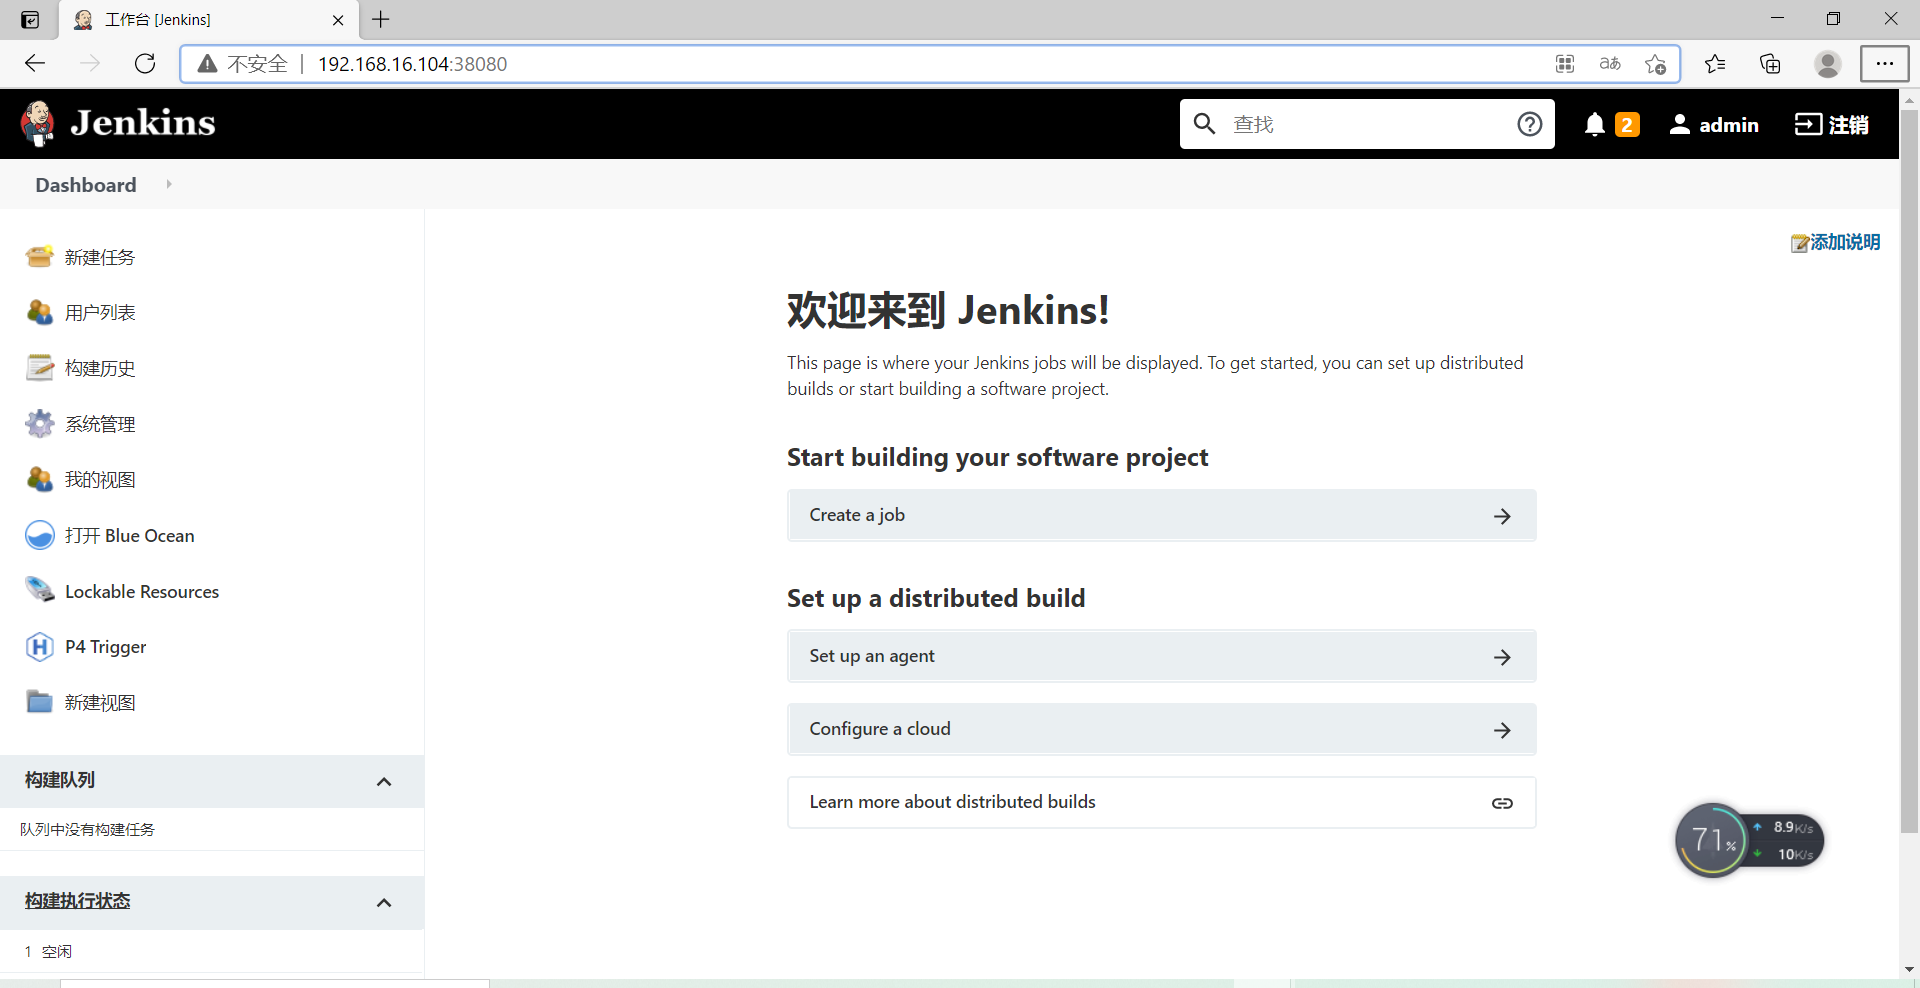
2.9. Login Jenkins
Account admin password admin
3. Deploy gitlab using docker
Here is just an extension of how to deploy gitlab with docker. It is recommended to deploy gitlab with k8s in 4
3.1. Deploy gitlab
[root@k8s-master2 ~]# docker run -d --hostname 192.168.16.105 -p 8443:443 -p 8080:80 -p 8022:22 --name gitlab --restart always -v /data2/k8s/gitlab-data/config/:/etc/gitlab -v /data2/k8s/gitlab-data/logs/:/var/log/gitlab -v /data2/k8s/gitlab-data/data/:/var/opt/gitlab gitlab/gitlab-ce:13.11.4-ce.0

[root@k8s-master2 ~]# docker ps
CONTAINER ID        IMAGE                           COMMAND                  CREATED             STATUS                   PORTS                                                               NAMES
33d868fe0369        gitlab/gitlab-ce:13.11.4-ce.0   "/assets/wrapper"        14 minutes ago      Up 4 minutes (healthy)   0.0.0.0:8022->22/tcp, 0.0.0.0:8080->80/tcp, 0.0.0.0:8443->443/tcp   gitlab
When the following page appears, gitlab startup is complete
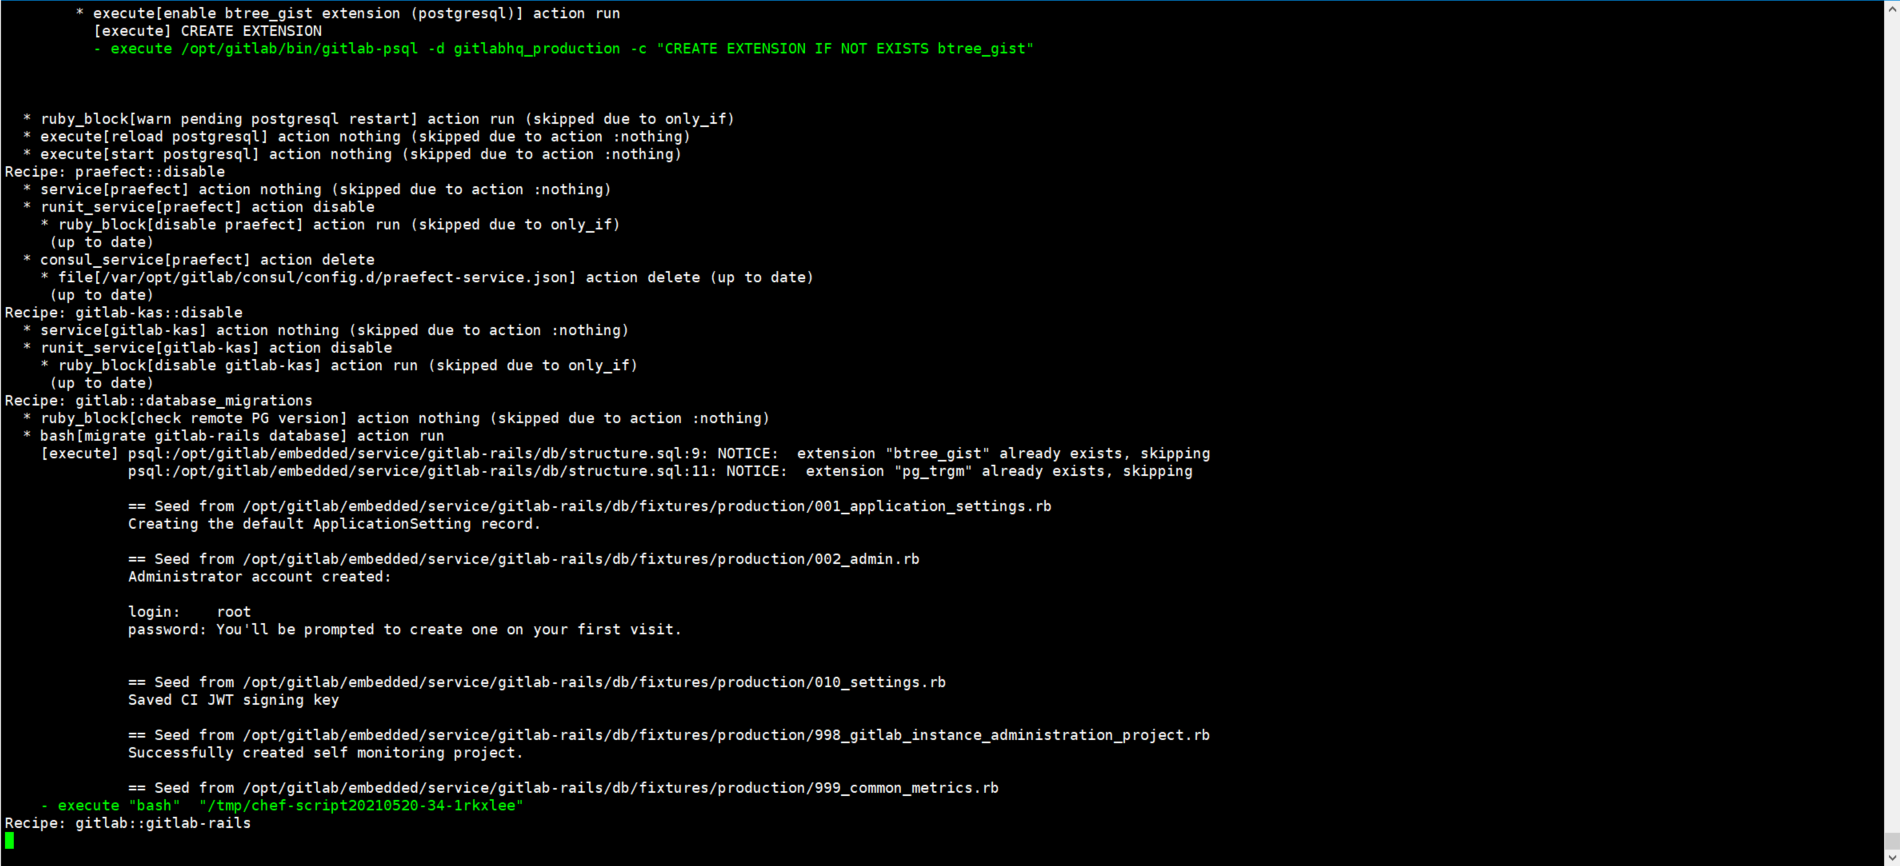
3.2. Access gitlab
visit http://192.168.16.105:8080/
The root password needs to be set for the first login
After setting the password, you can log in to the system

4. Deploy gitlab in k8s cluster
Deployment Analysis:
- Gitlab is deployed by the statefullset controller, and the gitlab configuration file and gitlab data file are persistently stored through StorageClass
- Because the gitlab image integrates many components, and the user groups used by each component in the gitlab data directory are different, you need to modify the corresponding user for each component, otherwise you have no permission to start relevant components. First, run the gitlab image with docker to query the different users corresponding to different components in the gitlab data directory, Then weight it in the initialization container
- Modify the configuration file of gitlab to determine the url for external access
- Port 80 of gitlab is exposed through svc resources
4.1. Push gitlab image to harbor warehouse
[root@k8s-master1 ~]# docker tag gitlab/gitlab-ce:13.11.4-ce.0 harbor.jiangxl.com/jenkins/gitlab-ce:13.11.4-ce.0
[root@k8s-master1 ~]# docker push  harbor.jiangxl.com/jenkins/gitlab-ce:13.11.4-ce.0
4.2. Use docker to run gitlab to query the user's id number
Each component of gitlab is managed by different users. We don't know the uid and gid of each user, so we need to start the query with docker first
Remember the user uid and gid of these components, which will be used later when defining the initialization container in the statful resource
1.use docker function gitlab container
[root@k8s-master1 ~]# docker run -d harbor.jiangxl.com/jenkins/gitlab-ce:13.11.4-ce.0

2.Enter container
[root@k8s-master1 ~]# docker exec -it 33d868fe0369 bash

3.see gitlab The user of each component in the data path
root@192:/# ll /var/opt/gitlab/
total 20
drwxr-xr-x 20 root              root       4096 May 20 09:12 ./
drwxr-xr-x  1 root              root         20 May 14 15:17 ../
drwxr-xr-x  2 git               git           6 May 20 09:01 .bundle/
-rw-r--r--  1 git               git         363 May 20 09:01 .gitconfig
drwx--->--->  2 git               git          29 May 20 09:01 .ssh/
drwxr-x--->  3 gitlab-prometheus root         42 May 20 09:11 alertmanager/
drwx--->--->  2 git               root          6 May 20 09:01 backups/
-rw--->--->-  1 root              root         38 May 20 09:06 bootstrapped
drwx--->--->  3 git               git          26 May 20 09:01 git-data/
drwx--->--->  3 git               root        123 May 20 09:11 gitaly/
drwxr-xr-x  3 git               root         20 May 20 09:01 gitlab-ci/
drwxr-xr-x  2 git               root         53 May 20 09:11 gitlab-exporter/
drwxr-xr-x  9 git               root        160 May 20 09:11 gitlab-rails/
drwx--->--->  2 git               root         24 May 20 09:10 gitlab-shell/
drwxr-x--->  3 git               gitlab-www   55 May 20 09:11 gitlab-workhorse/
drwx--->--->  4 gitlab-prometheus root         83 May 20 09:12 grafana/
drwx--->--->  3 root              root         71 May 21 02:21 logrotate/
drwxr-x--->  9 root              gitlab-www  163 May 20 09:05 nginx/
drwx--->--->  2 gitlab-psql       root         26 May 20 09:11 postgres-exporter/
drwxr-xr-x  3 gitlab-psql       root         81 May 20 09:11 postgresql/
drwxr-x--->  4 gitlab-prometheus root         53 May 20 09:11 prometheus/
-rw-r--r--  1 root              root        226 May 20 09:12 public_attributes.json
drwxr-x--->  2 gitlab-redis      git          60 May 21 02:29 redis/
-rw-r--r--  1 root              root         40 May 20 09:01 trusted-certs-directory-hash

4.Just look postgresql,reids,gitlab-data,prometheus Directory users can, mainly these four
#You can see that gitlab data users are git, postgresql users are gitlab PSQL, and redis users are gitlab redis
root@192:/# id git
uid=998(git) gid=998(git) groups=998(git)
root@192:/#
root@192:/# id gitlab-psql
uid=996(gitlab-psql) gid=996(gitlab-psql) groups=996(gitlab-psql)
root@192:/#
root@192:/# id gitlab-redis
uid=997(gitlab-redis) gid=997(gitlab-redis) groups=997(gitlab-redis)
root@192:/#
root@192:/# id gitlab-prometheus
uid=992(gitlab-prometheus) gid=992(gitlab-prometheus) groups=992(gitlab-prometheus)
4.3. Write gitlab StorageClass resource file
[root@k8s-master1 gitlab]# vim gitlab-storageclass.yaml
apiVersion: storage.k8s.io/v1
kind: StorageClass
metadata:
  name: gitlab-storageclass
provisioner: nfs-storage-01
reclaimPolicy: Retain
4.4. Write gitlab statefullset resource file
The StorageClass pvc template defines two, one for storing gitlab data and the other for storing gitlab configuration files
Assign the user uid and gid just found to each component directory through the initialization container
[root@k8s-master1 gitlab]# vim gitlab-statefulset.yaml
apiVersion: apps/v1
kind: StatefulSet
metadata:
  name: gitlab
  namespace: jenkins
spec:
  replicas: 1
  serviceName: gitlab
  selector:
    matchLabels:
      app: gitlab
  template:
    metadata:
      labels:
        app: gitlab
    spec:
      initContainers:							#Define the initialization container and assign each component path to the corresponding user permissions
      - name: gitlab-data-git
        image: harbor.jiangxl.com/jenkins/busybox:1.30
        command: ["sh","-c","chown -R 998:998 /var/opt/gitlab"]			#git users authorize the entire gitlab data directory
        securityContext:			#Enable privileged mode
          privileged: true
        volumeMounts:				#Mount the data persistent pvc
        - name: gitlab-data
          mountPath: /var/opt/gitlab
      - name: gitlab-data-psql
        image: harbor.jiangxl.com/jenkins/busybox:1.30
        command: ["sh","-c","chown -R 996:996 /var/opt/gitlab/postgresql*"]			#Gitlab PSQL authorization postgresql directory
        securityContext:
          privileged: true
        volumeMounts:
        - name: gitlab-data
          mountPath: /var/opt/gitlab
      - name: gitlab-data-redis
        image: harbor.jiangxl.com/jenkins/busybox:1.30
        command: ["sh","-c","chown -R 997:997 /var/opt/gitlab/redis"]		#Gitlab redis authorized redis directory
        securityContext:
          privileged: true
        volumeMounts:
        - name: gitlab-data
          mountPath: /var/opt/gitlab
      - name: gitlab-data-prome									#Gitlab prometheus user authorization prometheus directory
        image: harbor.jiangxl.com/jenkins/busybox:1.30
        command: ["sh","-c","chown -R 992:992 /var/opt/gitlab/alertmanager /var/opt/gitlab/grafana /var/opt/gitlab/prometheus"]
        securityContext:
          privileged: true
        volumeMounts:
        - name: gitlab-data
          mountPath: /var/opt/gitlab

      - name: gitlab-config-chown					#The initialization container is mainly used to authorize the configuration directory, which is optional, because the user of this directory is root, and the storage path created by nfs is also the owner of root by default
        image: harbor.jiangxl.com/jenkins/busybox:1.30
        command: ["sh","-c","chown -R 998:998 /etc/gitlab"]			#Authorized to gitlab users
        securityContext:
          privileged: true
        volumeMounts:
        - name: gitlab-config
          mountPath: /etc/gitlab
      containers:										#Define master container
      - name: gitlab
        image: harbor.jiangxl.com/jenkins/gitlab-ce:13.11.4-ce.0
        ports:
        - name: http
          containerPort: 80
        volumeMounts:							#The path to mount the persistent data volume to the container
        - name: gitlab-data
          mountPath: /var/opt/gitlab
        - name: gitlab-config
          mountPath: /etc/gitlab
  volumeClaimTemplates:						#Define pvc template
    - metadata:								#Metadata is in the form of an array, so multiple can be defined. A metadata is a pvc template
        name: gitlab-data					#pvc name
      spec:
        storageClassName: gitlab-storageclass			#StorageClass name used
        accessModes:
        - ReadWriteMany						#The access mode is multi host read-write
        resources:
          requests:
            storage: 10Gi
    - metadata:
        name: gitlab-config
      spec:
        storageClassName: gitlab-storageclass
        accessModes:
        - ReadWriteMany
        resources:
          requests:
            storage: 1Gi
4.5. Write gitlab service resource file
[root@k8s-master1 gitlab]# vim gitlab-svc.yaml
apiVersion: v1
kind: Service
metadata:
  labels:
    app: gitlab
  name: gitlab-svc
  namespace: jenkins
spec:
  ports:
  - name: http
    port: 80
    targetPort: 80
    nodePort: 30080
  selector:
    app: gitlab
  type: NodePort
4.6. Create all resources and view status
1.Create all resources
[root@k8s-master1 gitlab]# kubectl apply -f ./
statefulset.apps/gitlab created
storageclass.storage.k8s.io/gitlab-storageclass created
service/gitlab-svc created

2.View the status of resources
[root@k8s-master1 gitlab]# kubectl get all -n jenkins
NAME                   READY   STATUS    RESTARTS   AGE
pod/gitlab-0           1/1     Running   0          4m21s
pod/jenkins-master-0   1/1     Running   0          18h

NAME                  TYPE       CLUSTER-IP      EXTERNAL-IP   PORT(S)                          AGE
service/gitlab-svc    NodePort   10.101.97.95    <none>        80:30080/TCP                     57m
service/jenkins-svc   NodePort   10.99.113.179   <none>        8080:38080/TCP,50000:50000/TCP   23h

NAME                              READY   AGE
statefulset.apps/gitlab           1/1     57m
statefulset.apps/jenkins-master   1/1     23h

3.see pvc Status of the resource
[root@k8s-master1 gitlab]# kubectl get pvc -n jenkins
NAME                            STATUS   VOLUME                                     CAPACITY   ACCESS MODES   STORAGECLASS           AGE
gitlab-config-gitlab-0          Bound    pvc-91e63538-e07d-4196-82e8-4195b29d9352   1Gi        RWX            gitlab-storageclass    64m
gitlab-data-gitlab-0            Bound    pvc-2a300c8d-49e6-4035-99f1-81c3e190fe3e   10Gi       RWX            gitlab-storageclass    57m
jenkins-data-jenkins-master-0   Bound    pvc-9efb572b-d566-418d-bb6e-b225b43de4a5   10Gi       RWX            jenkins-storageclass   23h
4.7. Modify gitlab configuration
After the gitlab service is started, the configuration file and data directory will be stored on pvc. We need to modify the gitlab configuration file to specify the access address
Main: only write the address here and do not add the port. If a port other than 80 is added, the 80 of gitlab in the container will be changed to the port you specify, and the svc will fail to expose gitlab
This step can also be omitted, because for k8s, it is mapped through the ip of any node in the cluster
[root@k8s-master2 ~]# vim /data2/k8s/storageclass/jenkins-gitlab-config-gitlab-0-pvc-91e63538-e07d-4196-82e8-4195b29d9352/gitlab.rb
external_url 'http://192.168.16.106'
After modification, redeploy gitlab
[root@k8s-master1 gitlab]# kubectl replace -f gitlab-statefulset.yaml
statefulset.apps/gitlab replaced
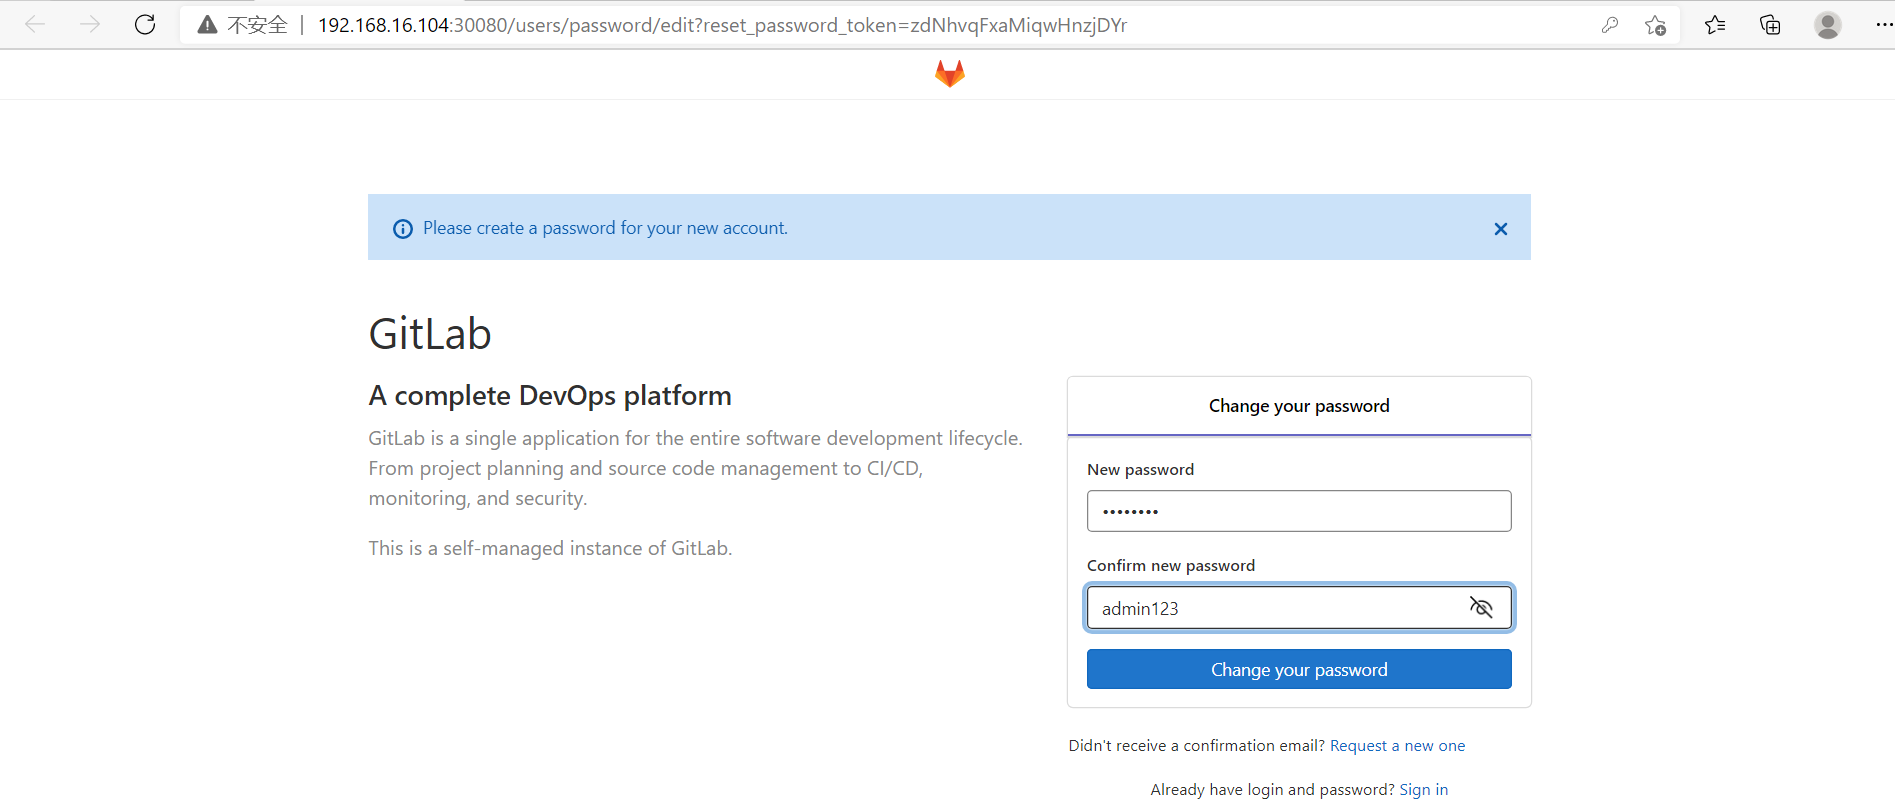
4.8. Access gitlab
Access http: / / any node of the cluster ip:30080 port
Gitlab starts slowly. Enter the container to check the status of gitlab. You can access it after run ning

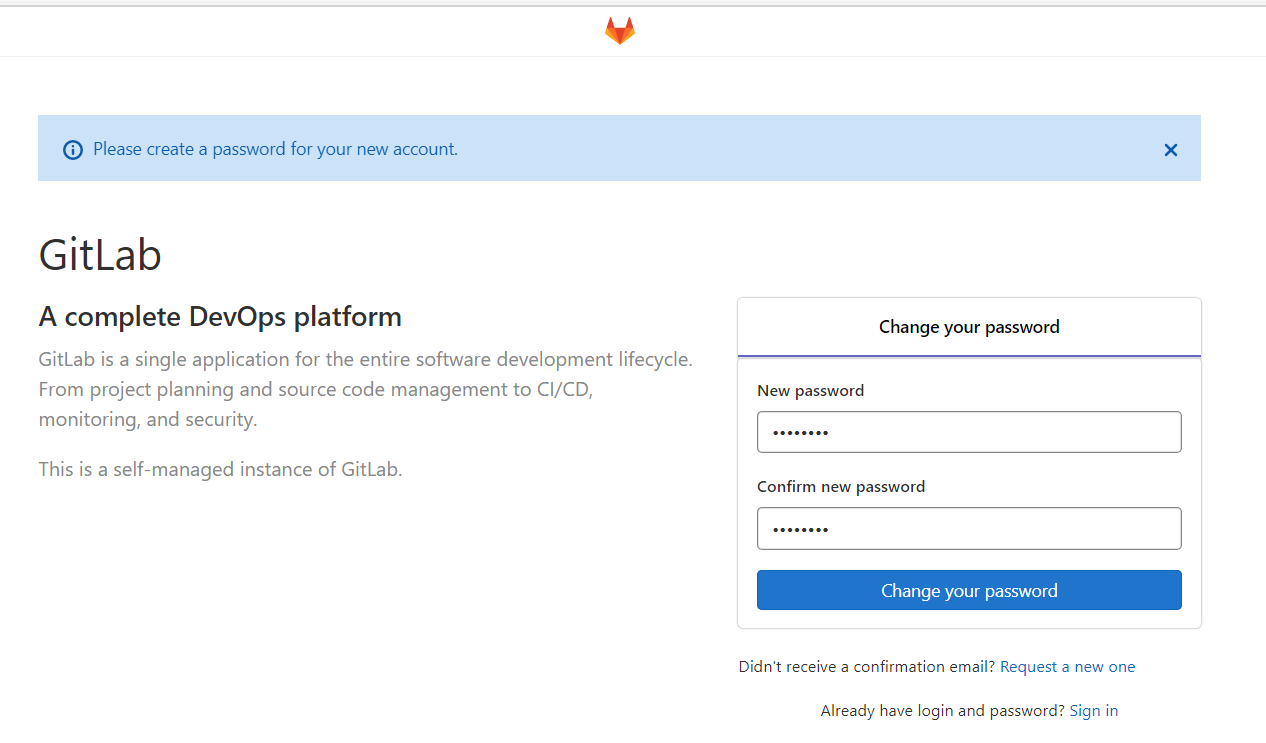
1) Set user password
At least 8 bits. admin123 is set here
2) Enter gitlab

3) Set language to Chinese

5. Submit the program code to gitlab
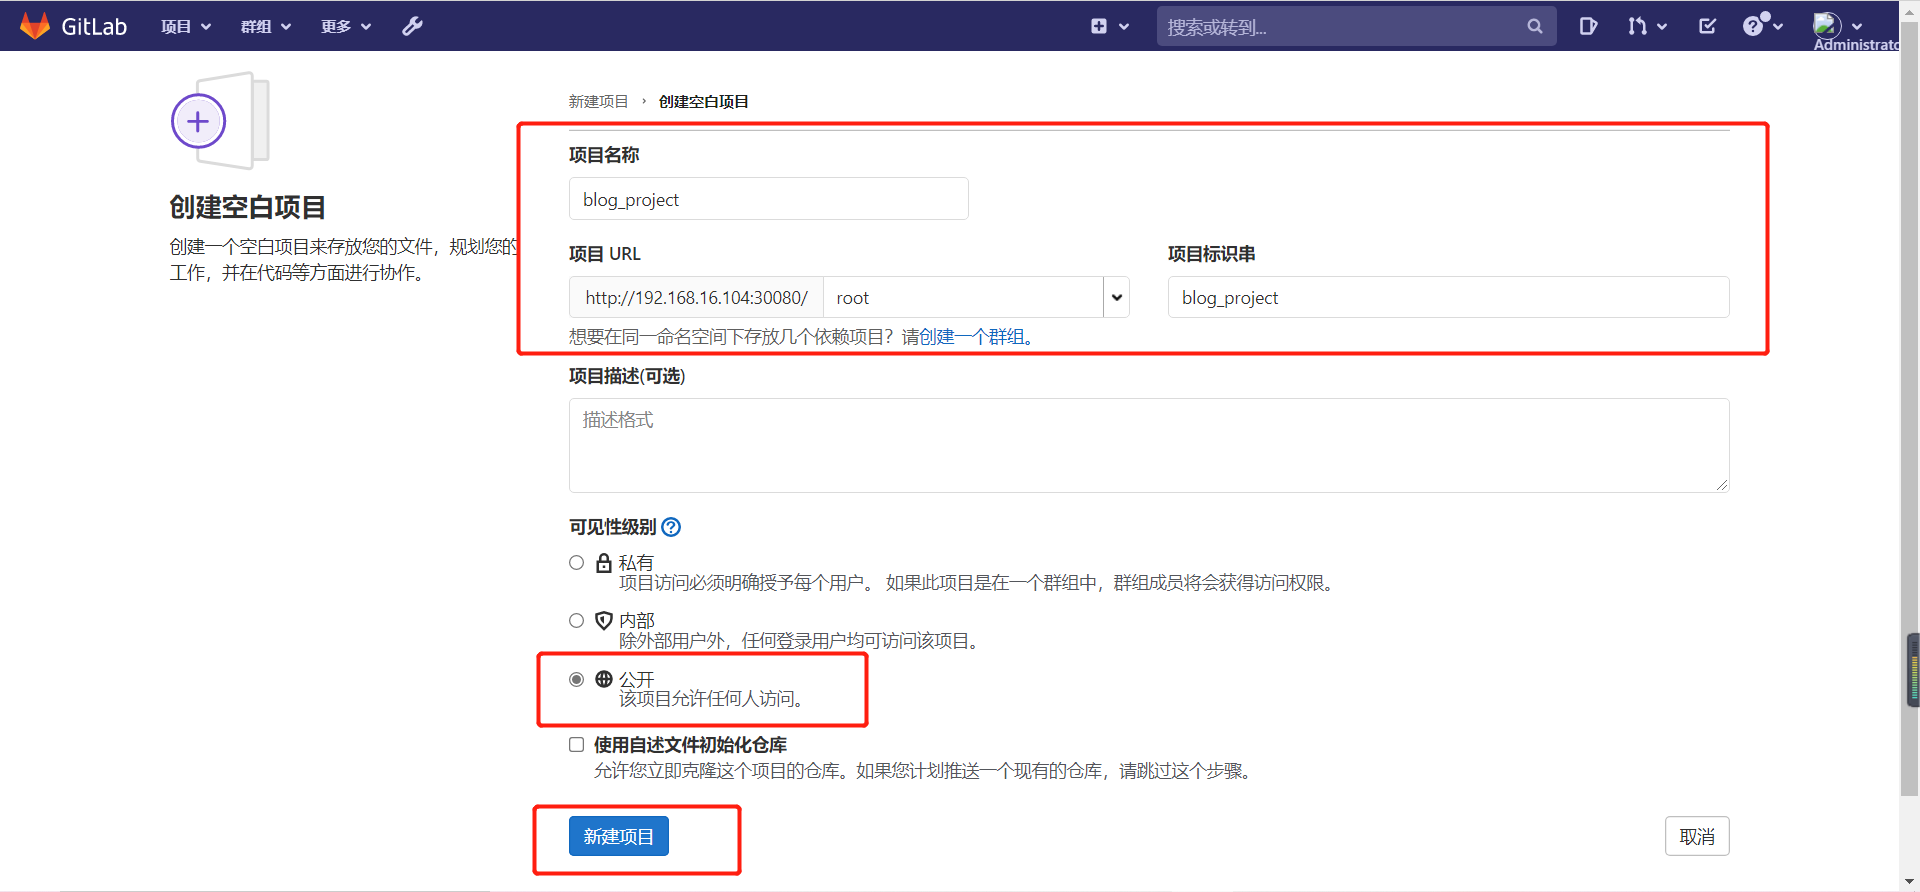
5.1. Create a new project
1) Click new item
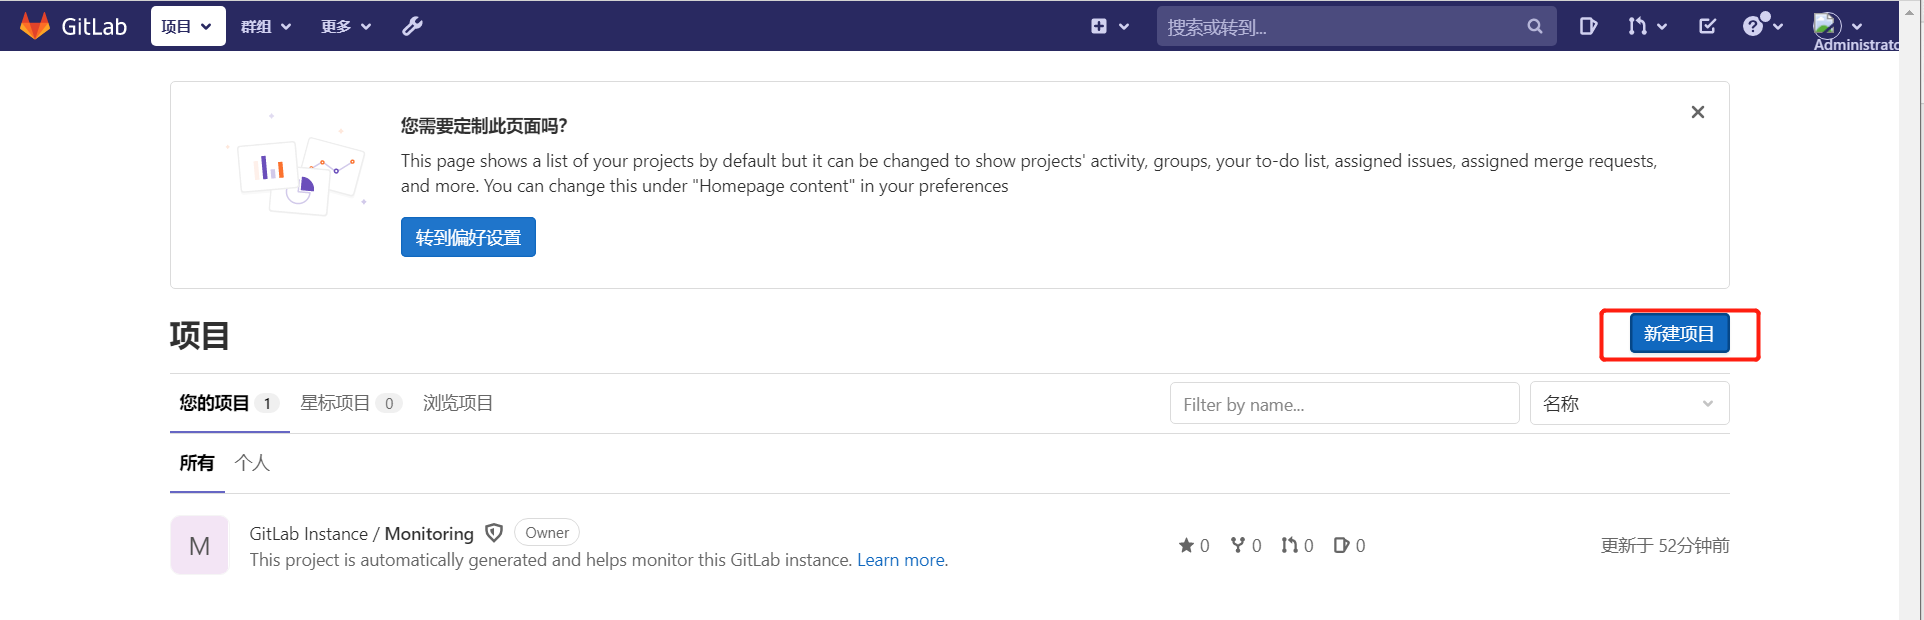
2) Create a blank item

3) Fill in project information
The visibility level is set to public
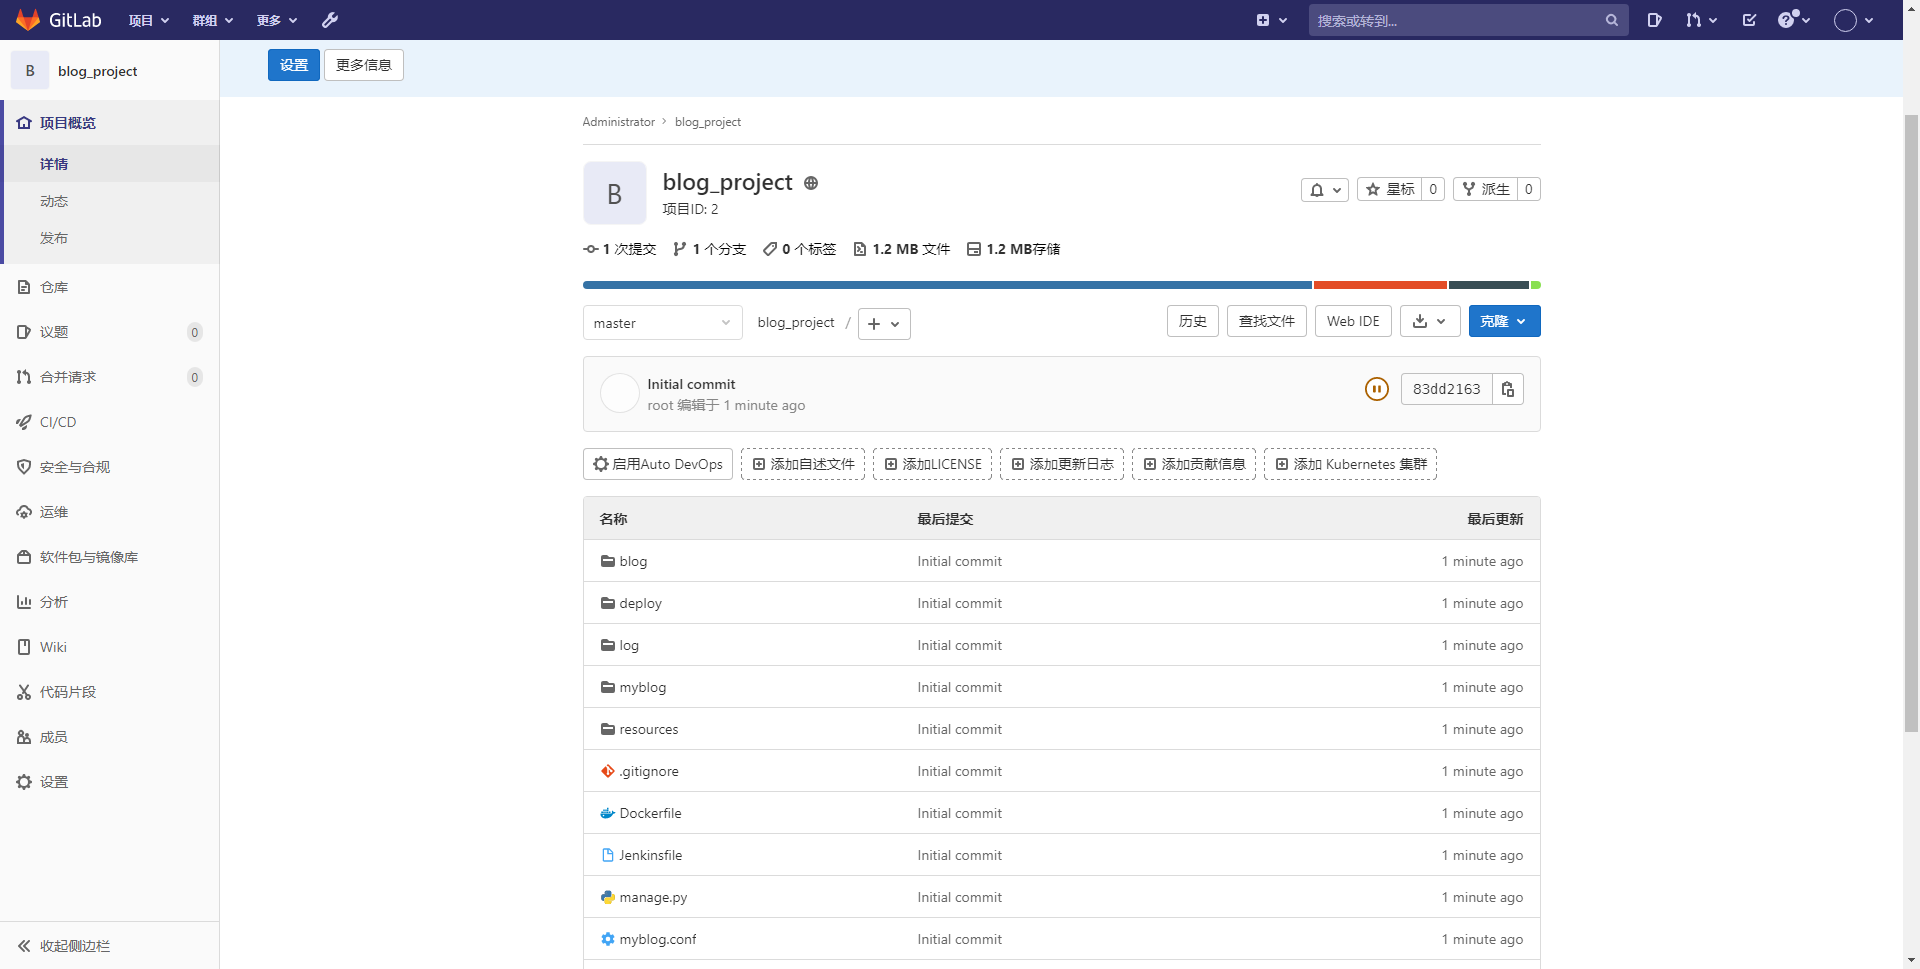
4) Creation complete

5.2. Submit the program code to gitlab
[root@k8s-master1 python-demo]# git init
 Initialize empty Git Version library at /root/gitlab_project/python-demo/.git/
[root@k8s-master1 python-demo]# git remote add origin http://192.168.16.106:30080/root/blog_project.git
[root@k8s-master1 python-demo]# git add .
[root@k8s-master1 python-demo]# git commit -m "Initial commit"
[root@k8s-master1 python-demo]# git push -u origin master
Username for 'http://192.168.16.106:30080': root 				# enter one user name
Password for 'http://root@192.168.16.106:30080':  				# Input password
Counting objects: 48, done.
Delta compression using up to 4 threads.
Compressing objects: 100% (44/44), done.
Writing objects: 100% (48/48), 978.49 KiB | 0 bytes/s, done.
Total 48 (delta 4), reused 0 (delta 0)
To http://192.168.16.106:30080/root/blog_project.git
 * [new branch]      master -> master
 branch master Set to track from origin Remote branch of master.
6.Jenkins integrated gitlab
gitlab address must be configured in jenkins, otherwise pipeline cannot find git lab address
6.1. Installing the gitlab plug-in on Jenkins
Modify Jenkins default source to Tsinghua source
1.Modify source
cd /data2/k8s/storageclassjenkins-jenkins-data-jenkins-master-0-pvc-9efb572b-d566-418d-bb6e-b225b43de4a5/updates
sed -i 's/http:\/\/updates.jenkins- ci.org\/download/https:\/\/mirrors.tuna.tsinghua.edu.cn\/jenkins/g' default.json
sed -i 's/http:\/\/www.google.com/https:\/\/www.baidu.com/g' default.json

2.restart Jenkins
[root@k8s-master1 ~]# kubectl replace -f /root/k8s1.19/jenkins/jenkins-statefulset.yaml
statefulset.apps/jenkins-master replaced
System management - > plug-in management - > optional plug-ins - > search gitlab - > install

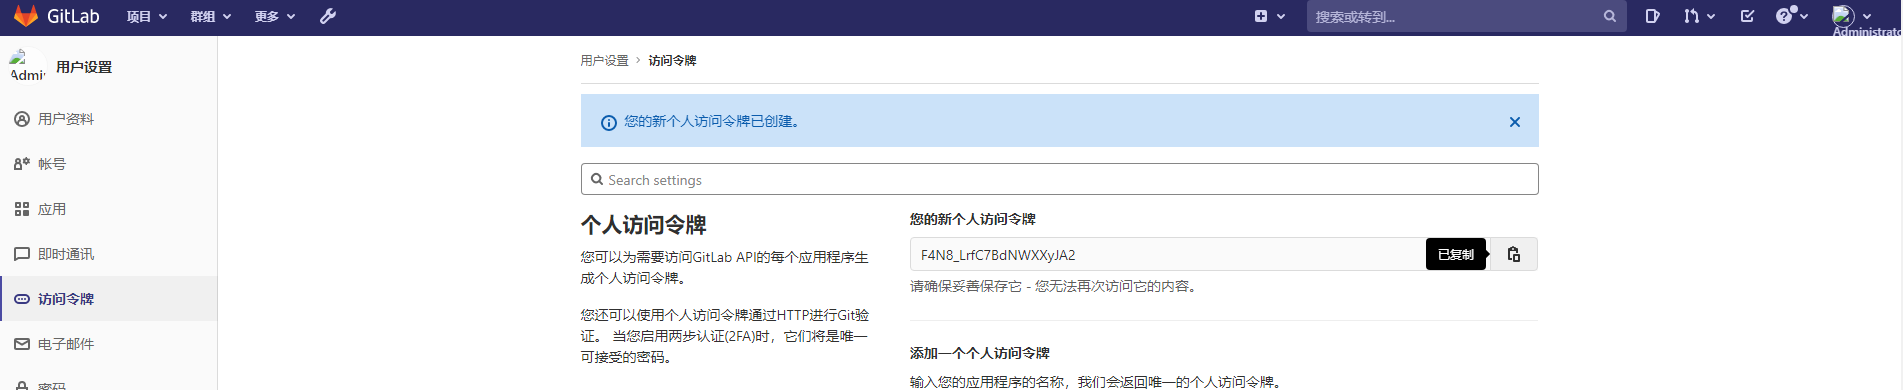
6.2. Generate token on gitlab
edit profile - > access token - > fill in the token name - > check the permission range
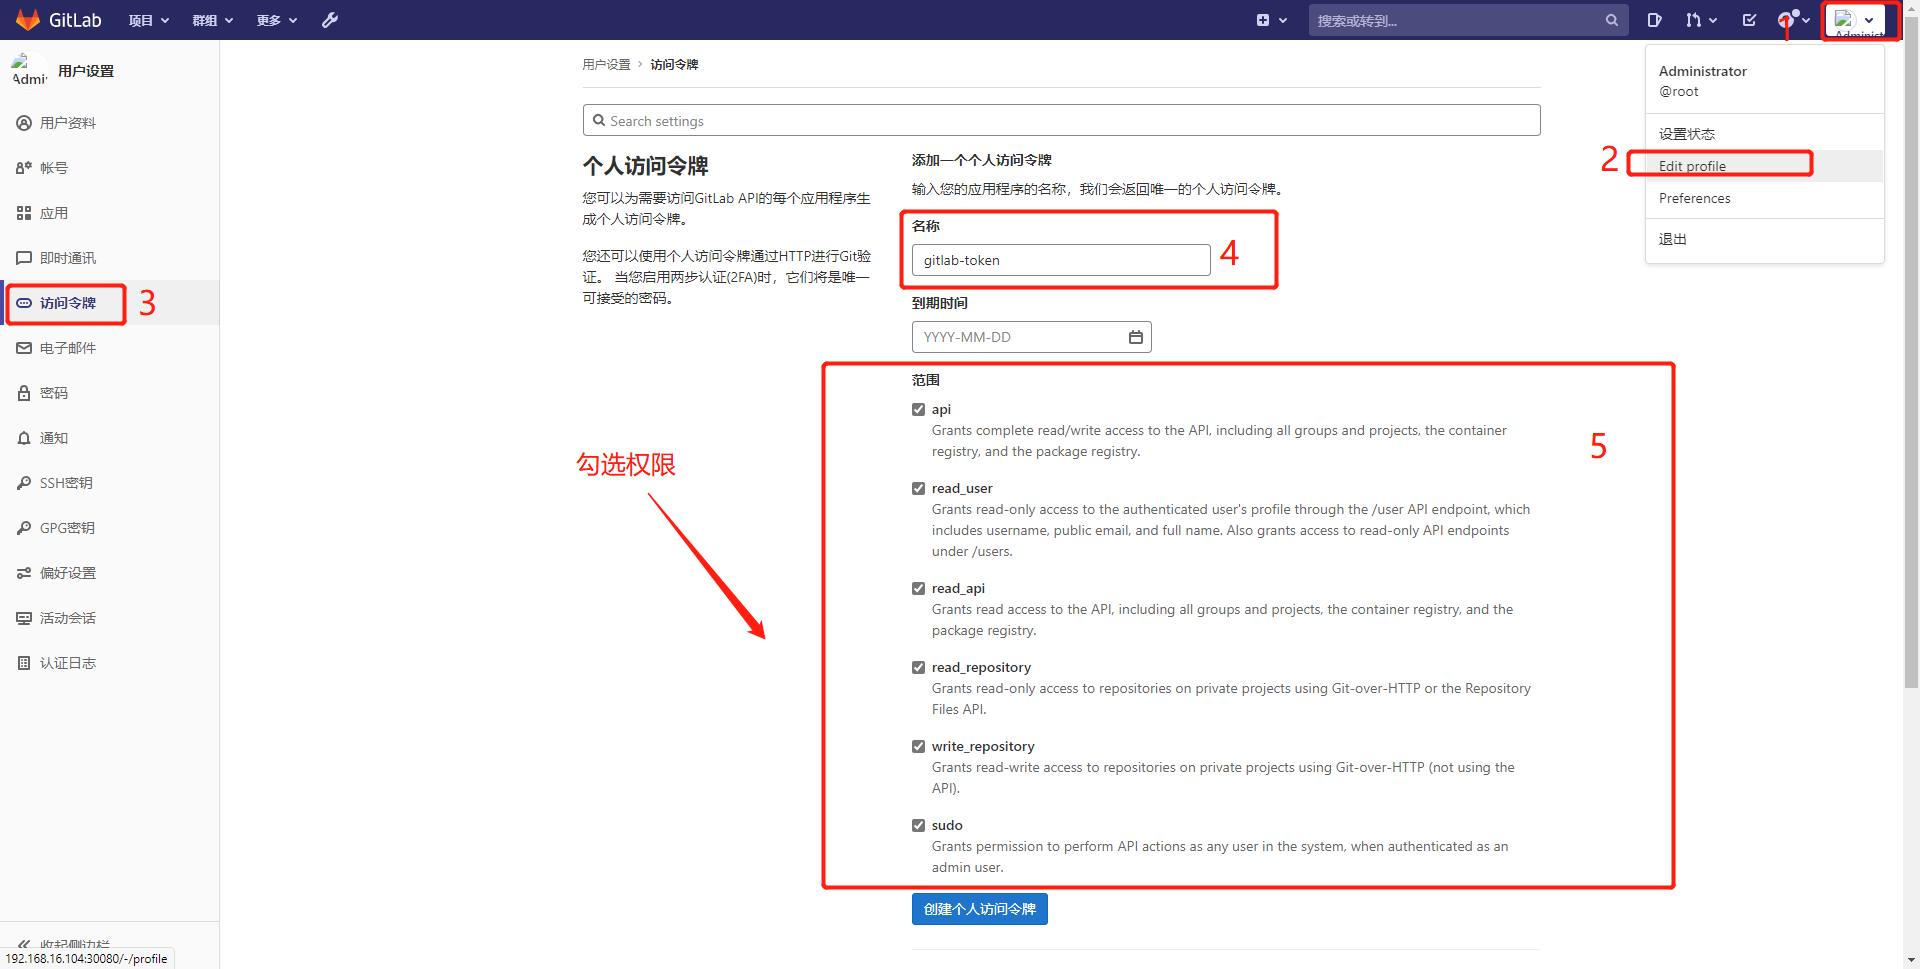
The token is displayed only once and kept properly: F4N8_LrfC7BdNWXXyJA2
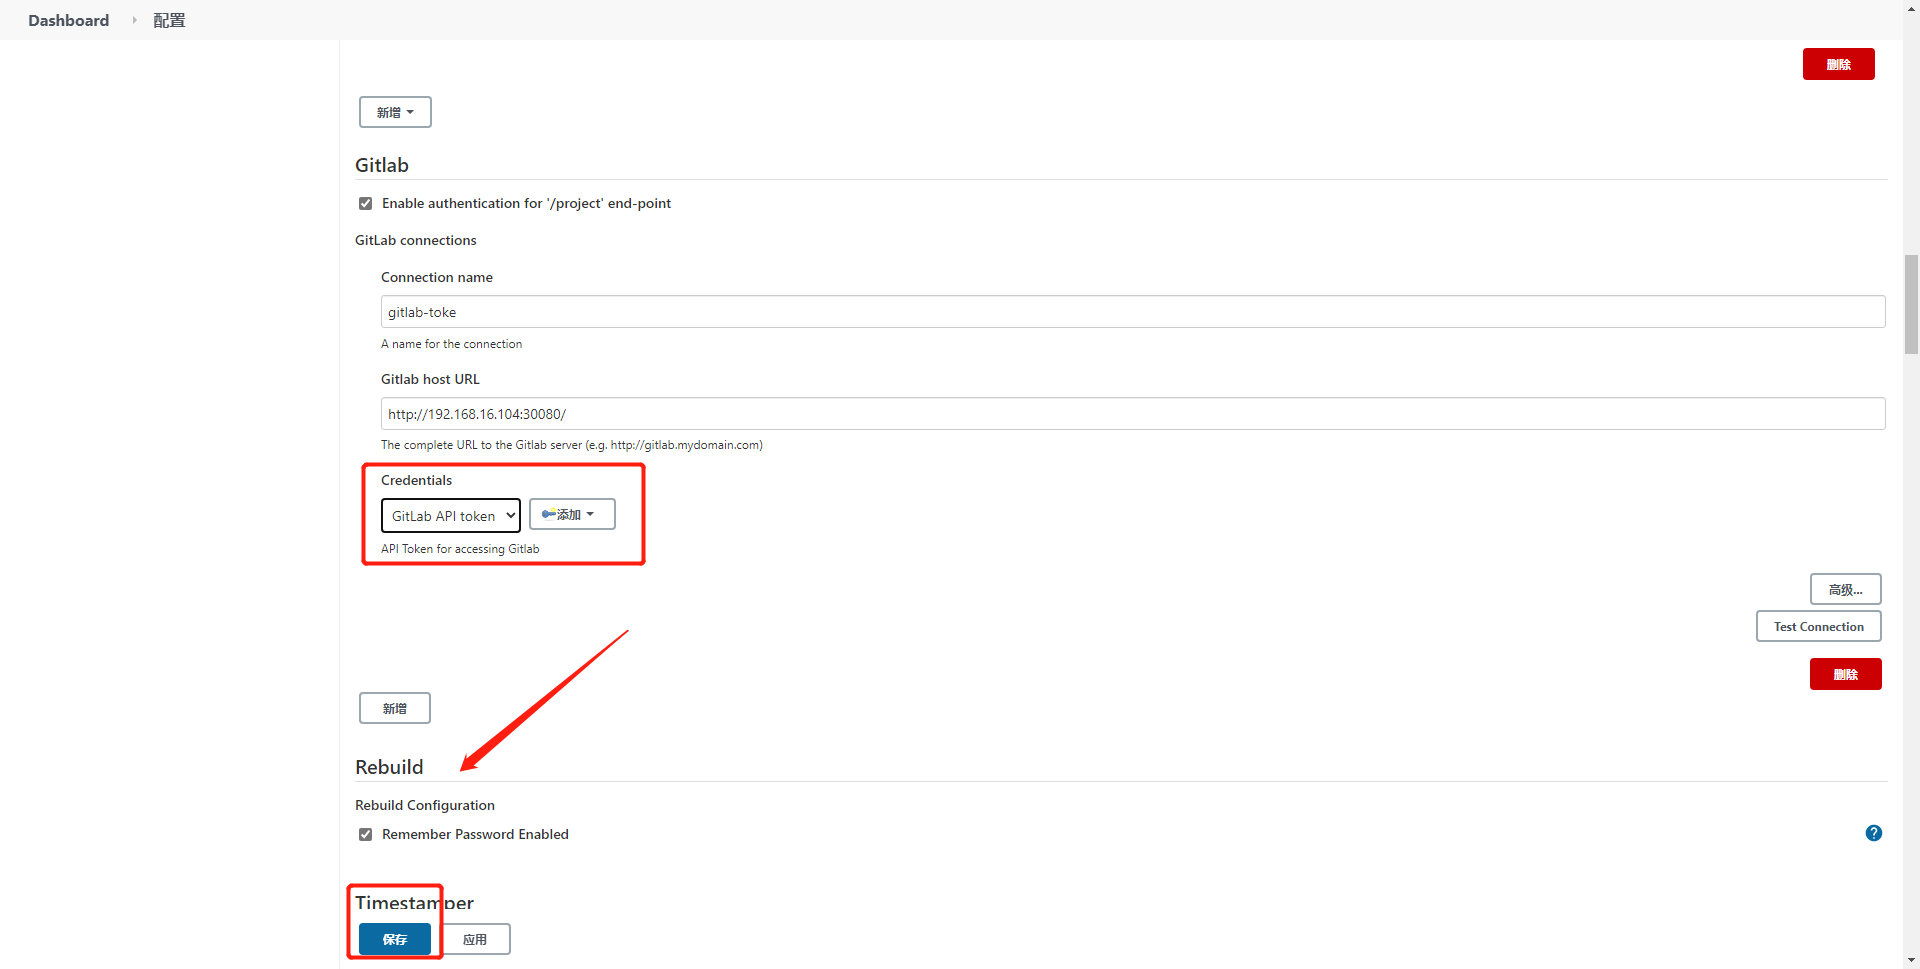
6.3. Add gitlab api token in Jenkins
System management - > find gitlab - > configure it
Connection name: gitlab-token
Gitlab host URL: http://192.168.16.104:30080/

After filling in the basic information, click add gitlab token. You can only select gitlab api token as the type and paste it in

After adding the token, select the token just added from the drop-down list. It will no longer turn red, indicating that the connection to gitlab is successful
7.Jenkins distributed master slave mode
Jenkins distributed means that there are multiple slave nodes. When there are many projects to be built, the performance of the master will be affected. The slave will bear the workload of the master and create projects on the slave. The difference between the slave node and the master node is that the slave does not need to install Jenkins
slave nodes can be deployed in many ways. We use
7.1. Add Jenkins node
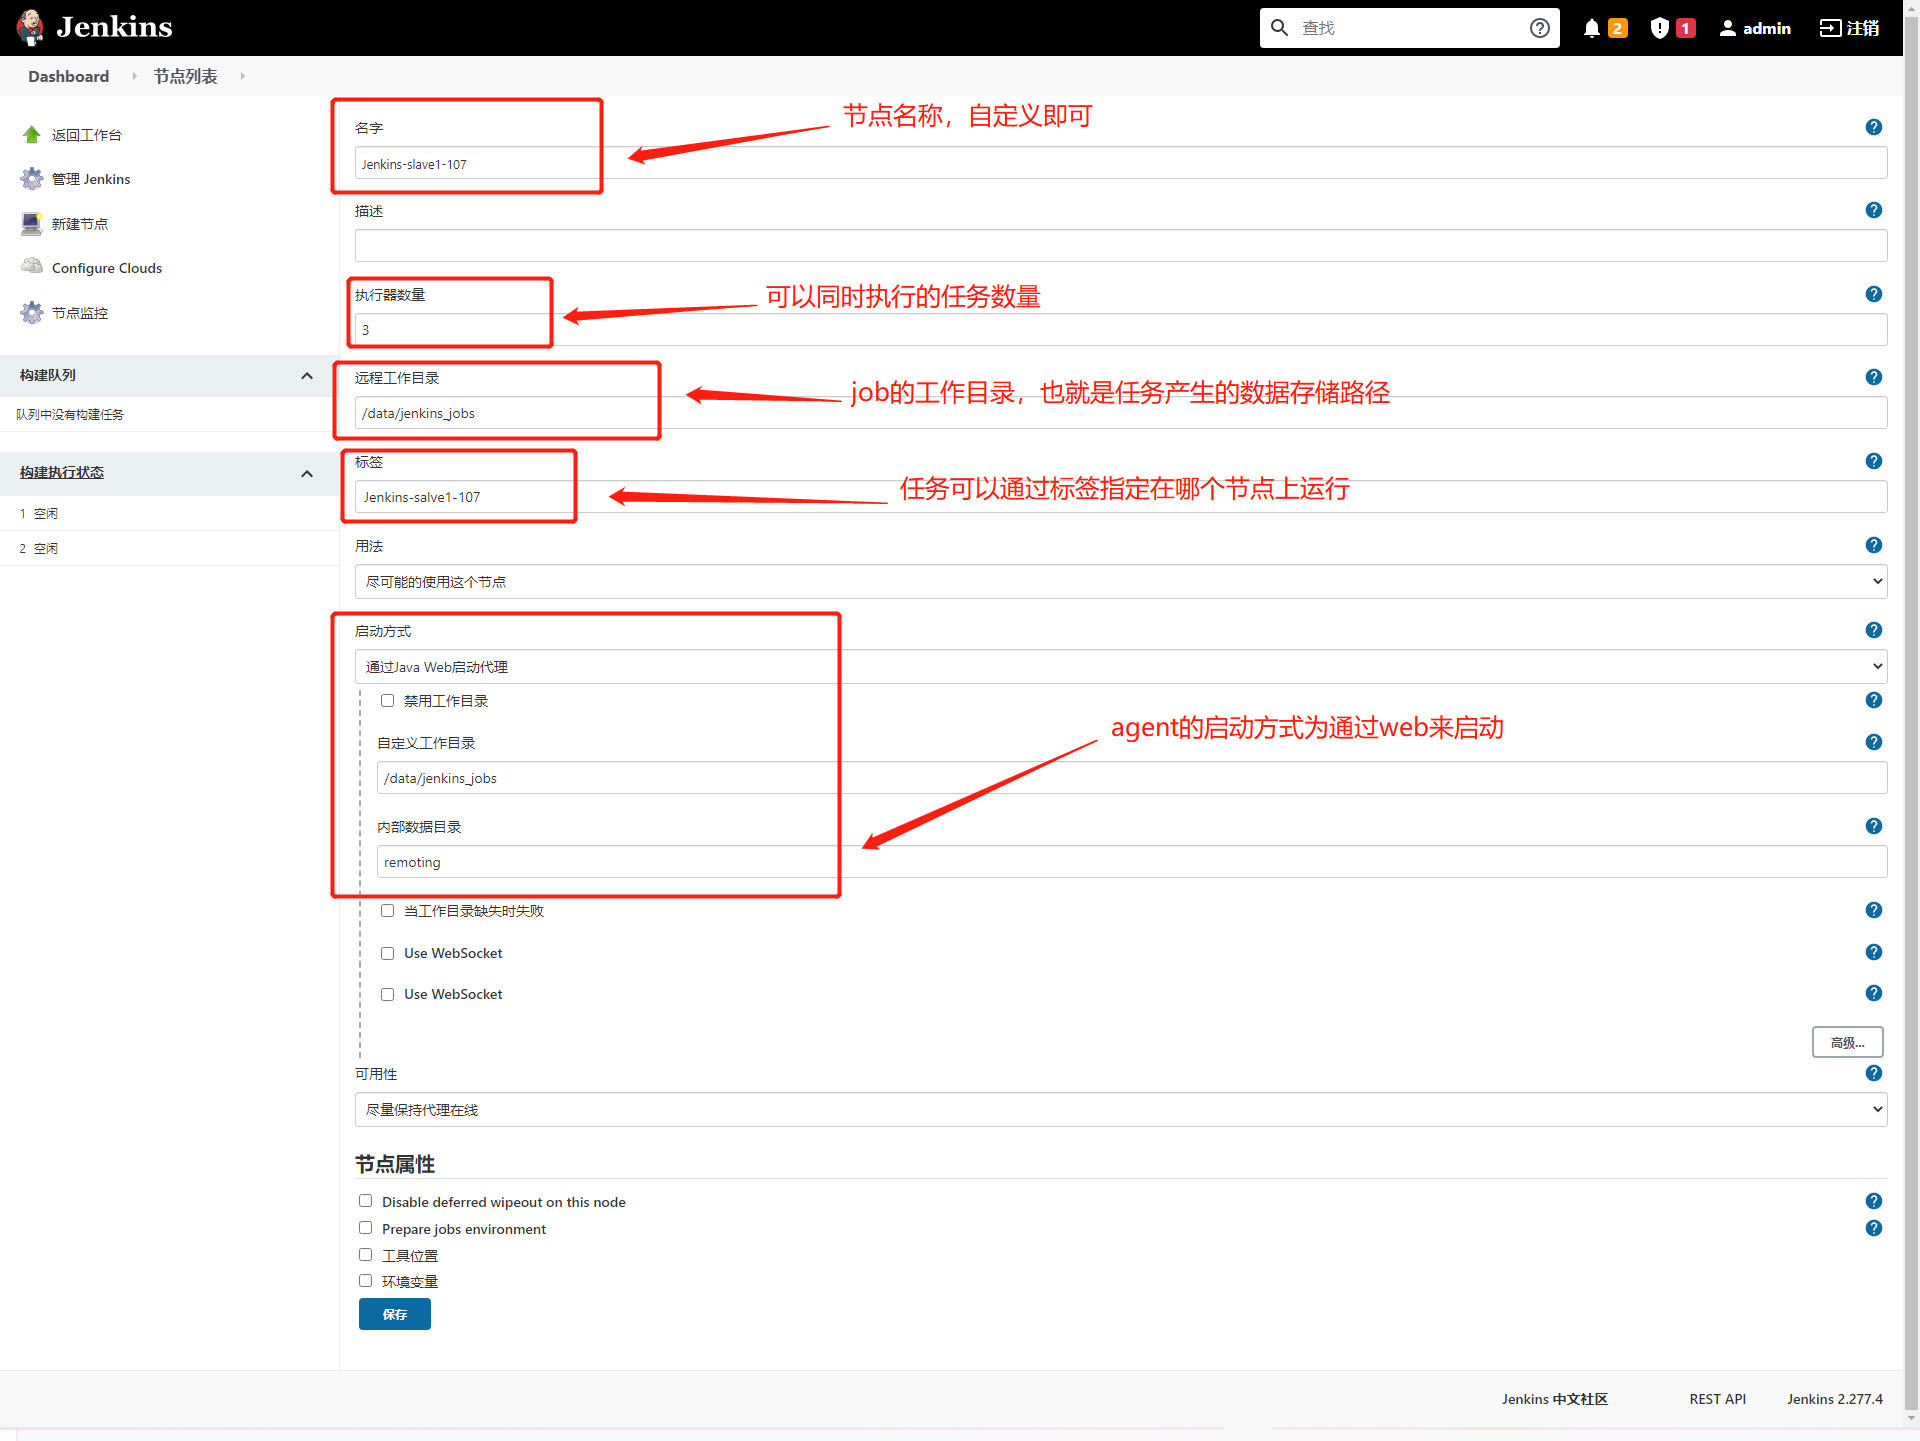
1) System management - > node management - > new node - > fill in node name - > fixed node - > OK

2) Add node details
Name: Jenkins-slave1-107
Number of actuators: 3
Remote working directory: / data/jenkins_jobs
Label: Jenkins-slave1-107 # is used to make Jenkins run a task on a node
Usage: use this node as much as possible
Start method: start the agent through java web
Custom working directory: / data/jenkins_jobs
3) After adding the node, it is found that the node is red, which indicates that the agent has not been started, and Jenkins does not know who the node is

Click the node and you will see how to start the agent. Right click to copy the agent Get the link address of jar, download the jar package on the corresponding server, and then start to successfully add the node
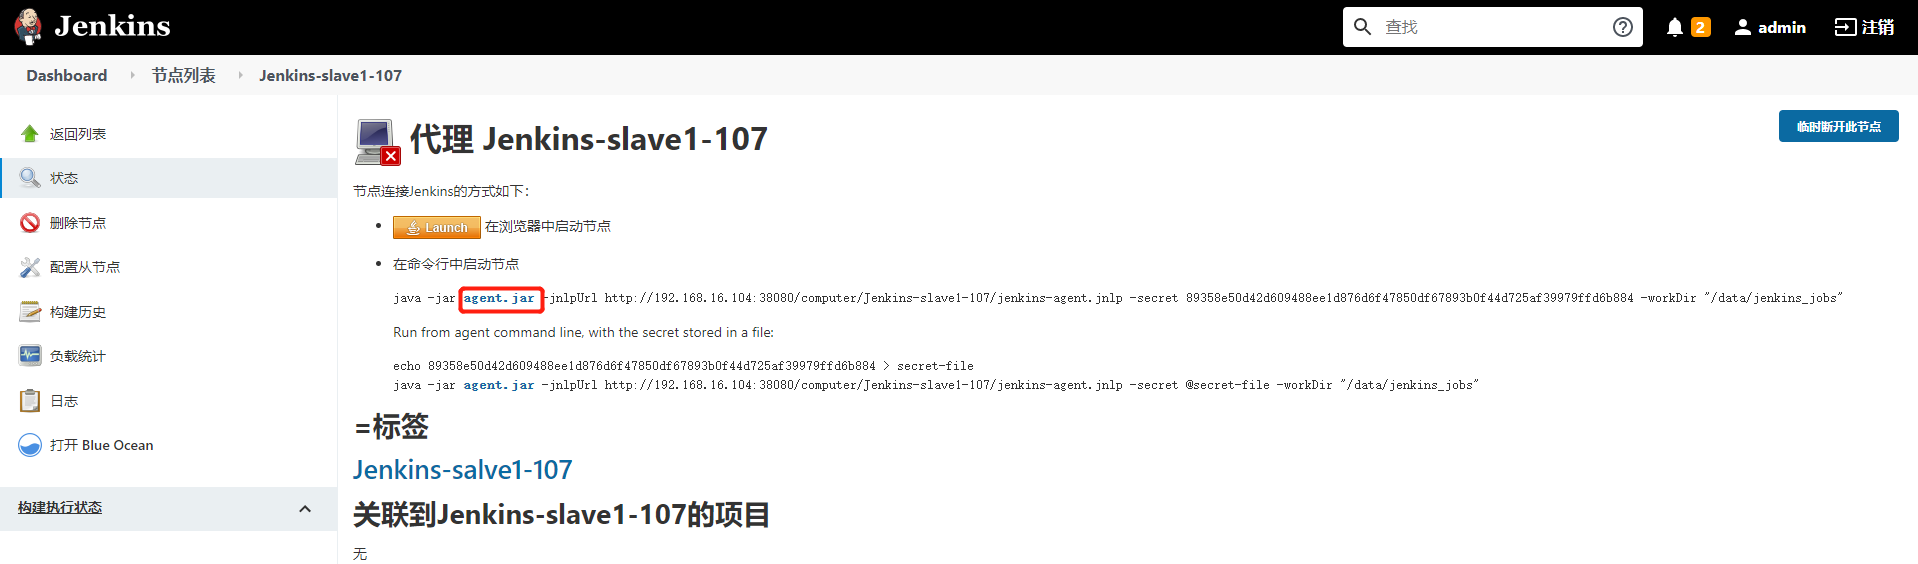
1.Create node working directory
[root@k8s-node2 ~]# mkdir /data/jenkins_jobs
[root@k8s-node2 ~]# cd /data/jenkins_jobs

2.download agent program
[root@k8s-node2 /data/jenkins_jobs]# wget http://192.168.16.104:38080/jnlpJars/agent.jar

3.start-up agent
[root@k8s-node2 /data/jenkins_jobs]# nohup java -jar agent.jar -jnlpUrl http://192.168.16.104:38080/computer/Jenkins-slave1-107/jenkins-agent.jnlp -secret efbde6c51590ca2c9097e6866de9f2d18520bfc05440a1872135e78b47283721 -workDir "/data/jenkins_jobs" &


Command interpretation:
 java -jar agent.jar \			#Start the jar package
 -jnlpUrl http://192.168.16.104:38080/computer/Jenkins-slave1-107/jenkins-agent.jnlp \  	# This path is the path of the node after we create a new node on Jenkins. If it is not specified, Jenkins does not know which server this node corresponds to
 -secret efbde6c51590ca2c9097e6866de9f2d18520bfc05440a1872135e78b47283721 \		#authentication
 -workDir "/data/jenkins_obs" &			#working directory
After the agent is started, observe the node on the Jenkins page and find that it is already available

7.2. Create a new task to run on the slave1 node
1) Configure task - > General - > restrict the running node of the project - > fill in the label set by the node

2) Run the task to observe which node it is running on
Select the master branch to start building

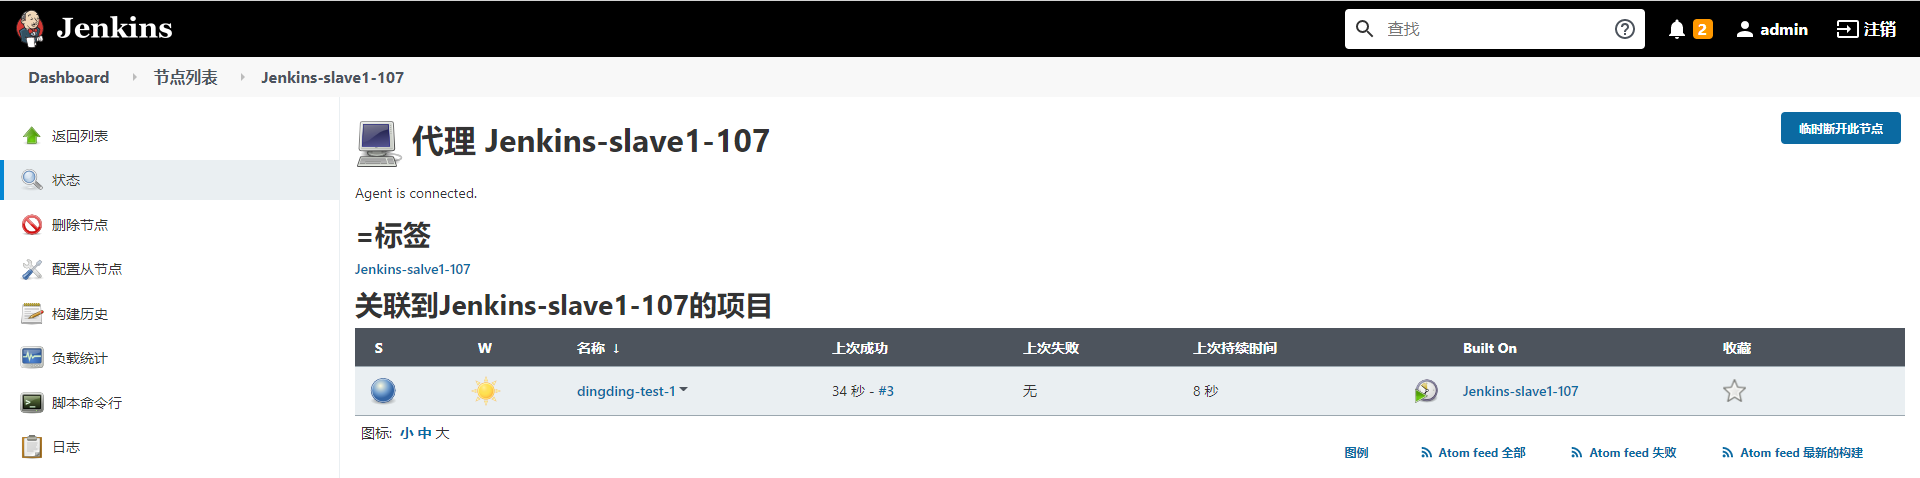
The task has been run on the jenkins-slave 1-107 node
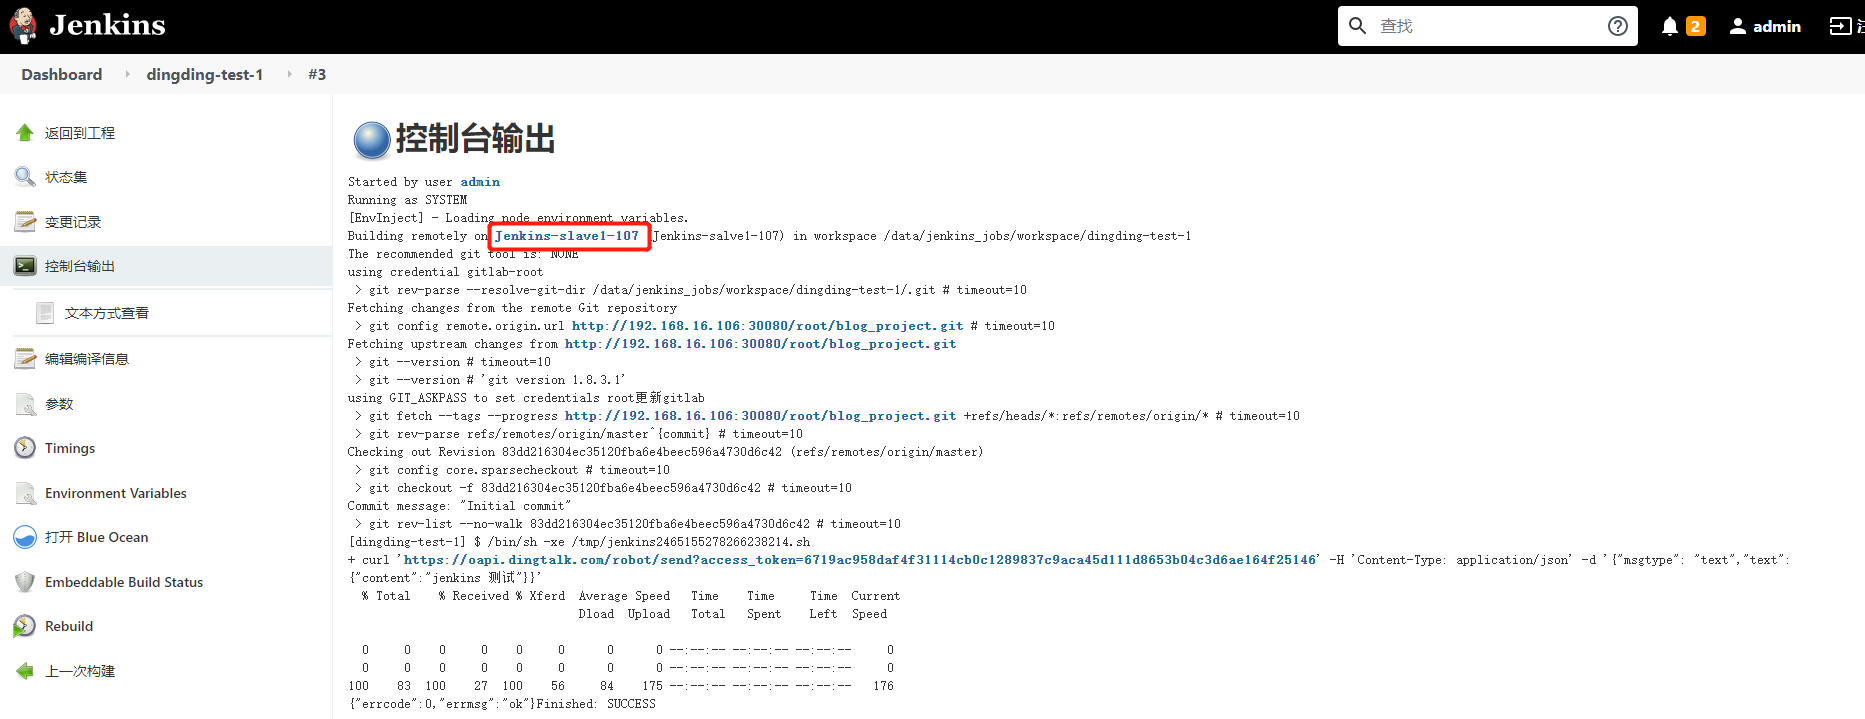
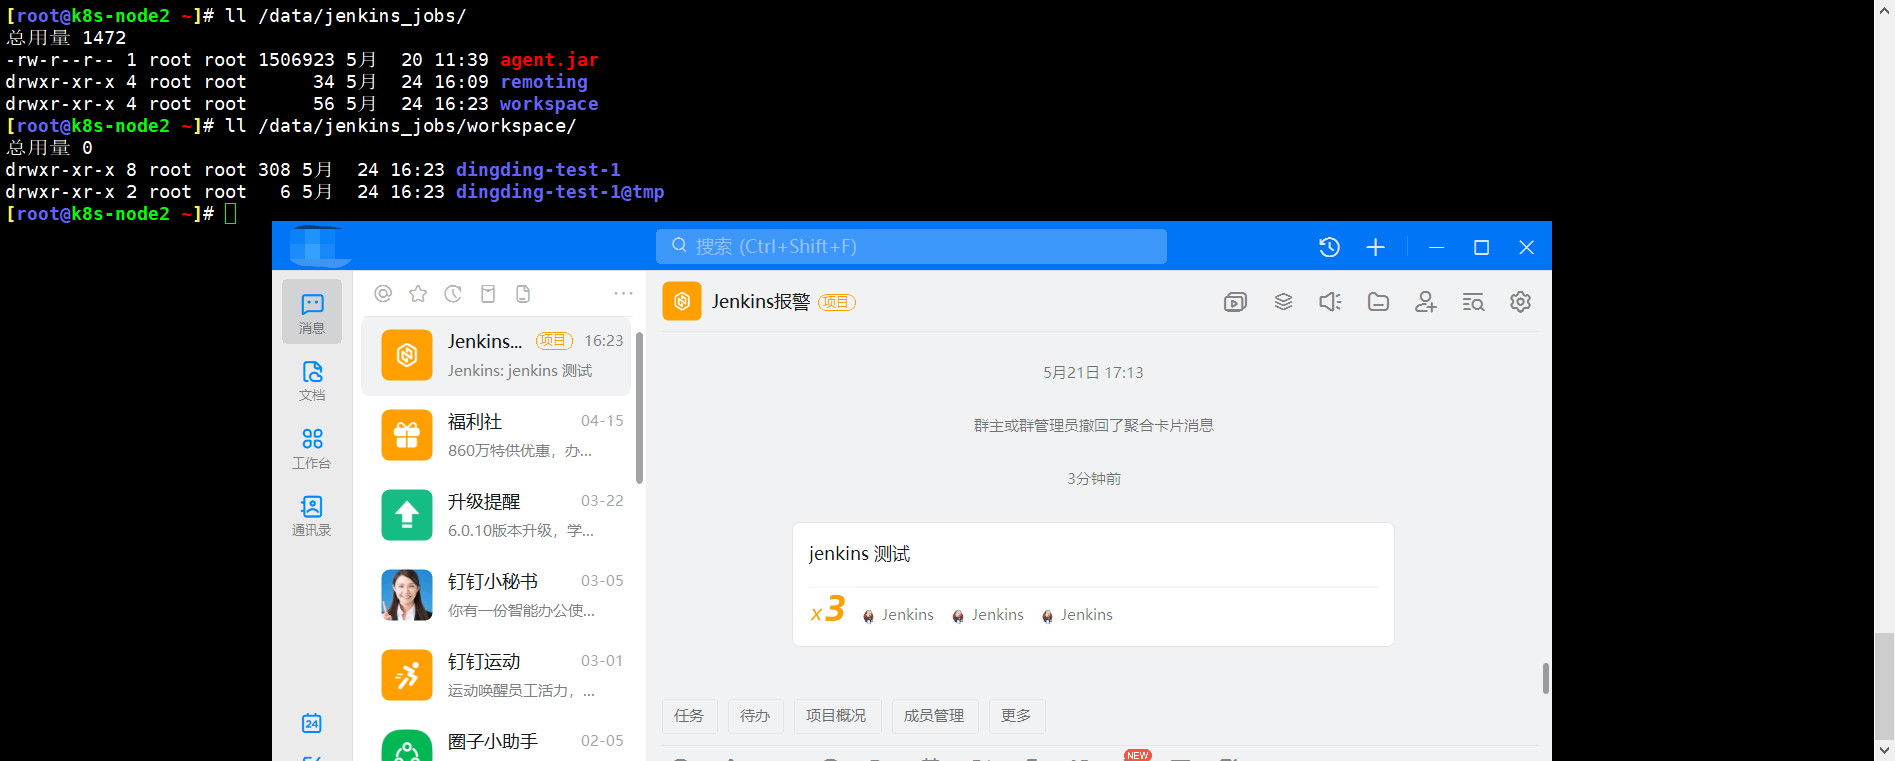
The nail has received the information and has generated data in the node working directory
7.3. Execution tasks associated with observation nodes
At this stage, the CI/CD platform has been deployed. We can create a new process and update the program to the kubernetes platform
8. Update the know system project to the kubernetes environment using the pipeline pipeline
There are two ways to update k8s
1. Upload the resource yaml file to the code warehouse. After the project is mirrored, we can replace the latest version of the image into the deployment resource by replacing the string of the image specified by the deployment resource. Finally, execute kubectl apply/ Update complete
2. Execute the kubectl command to update the image of the deployment resource
Since our construction tasks are run through agent s, which are deployed on the k8s node and inherit the docker and kubectl commands, there is no need to worry about the failure of the kubectl command
8.1. Realization idea
1. First, deploy the know system in k8s to realize the accessible state
2. Copy the yaml file of the deployment know system to the code directory, and change the image corresponding to the container image in the deployment resource to a string, so that when the pipeline is updated, the latest image version can be replaced into the deployment resource by replacing the string, and finally push the code and deployment file to gitlab
3. Optimize pipeline script and add k8s deployment steps
4. Update the code and use the pipeline to update the project to k8s
8.2. Deploy the know system in k8s
1) Prepare project yaml files
1.prepare deployment resources
[root@k8s-master1 know-system]# cat nginx-depoly.yaml
apiVersion: apps/v1
kind: Deployment
metadata:
  name: know-system
  namespace: know-system
spec:
  replicas: 3
  selector:
    matchLabels:
      app: know-system
  template:
    metadata:
      labels:
        app: know-system
    spec:
      containers:
      - name: nginx
        image: harbor.jiangxl.com/project/nginx-project:v1-code
        ports:
        - containerPort: 80
        volumeMounts:
        - name: nginx-data
          mountPath: /data/code
        - name: nginx-config
          mountPath: /data/nginx/conf/conf.d/
      volumes:
        - name: nginx-config
          configMap:
            name: nginx-configmap
        - name : nginx-data
          persistentVolumeClaim:
            claimName: pvc-know
            readOnly: false

2.prepare configmap resources
[root@k8s-master1 know-system]# cat nginx-configmap.yaml
apiVersion: v1
kind: ConfigMap
metadata:
  name: nginx-configmap
  namespace: know-system
data:
  know.jiangxl.com.conf: |
    server {
      listen 80;
      server_name know.jiangxl.com;
      location / {
        root /data/code/know_system;
        index index.html;
      }
    }

3.prepare svc resources
[root@k8s-master1 know-system]# cat nginx-svc.yaml
apiVersion: v1
kind: Service
metadata:
  name: nginx-service
  namespace: know-system
spec:
  selector:
    app: know-system
  type: NodePort
  ports:
  - port: 80
    targetPort: 80
2) Create all resources
[root@k8s-master1 know-system]# kubectl apply -f ./
configmap/nginx-configmap unchanged
deployment.apps/know-system configured
service/nginx-service configured
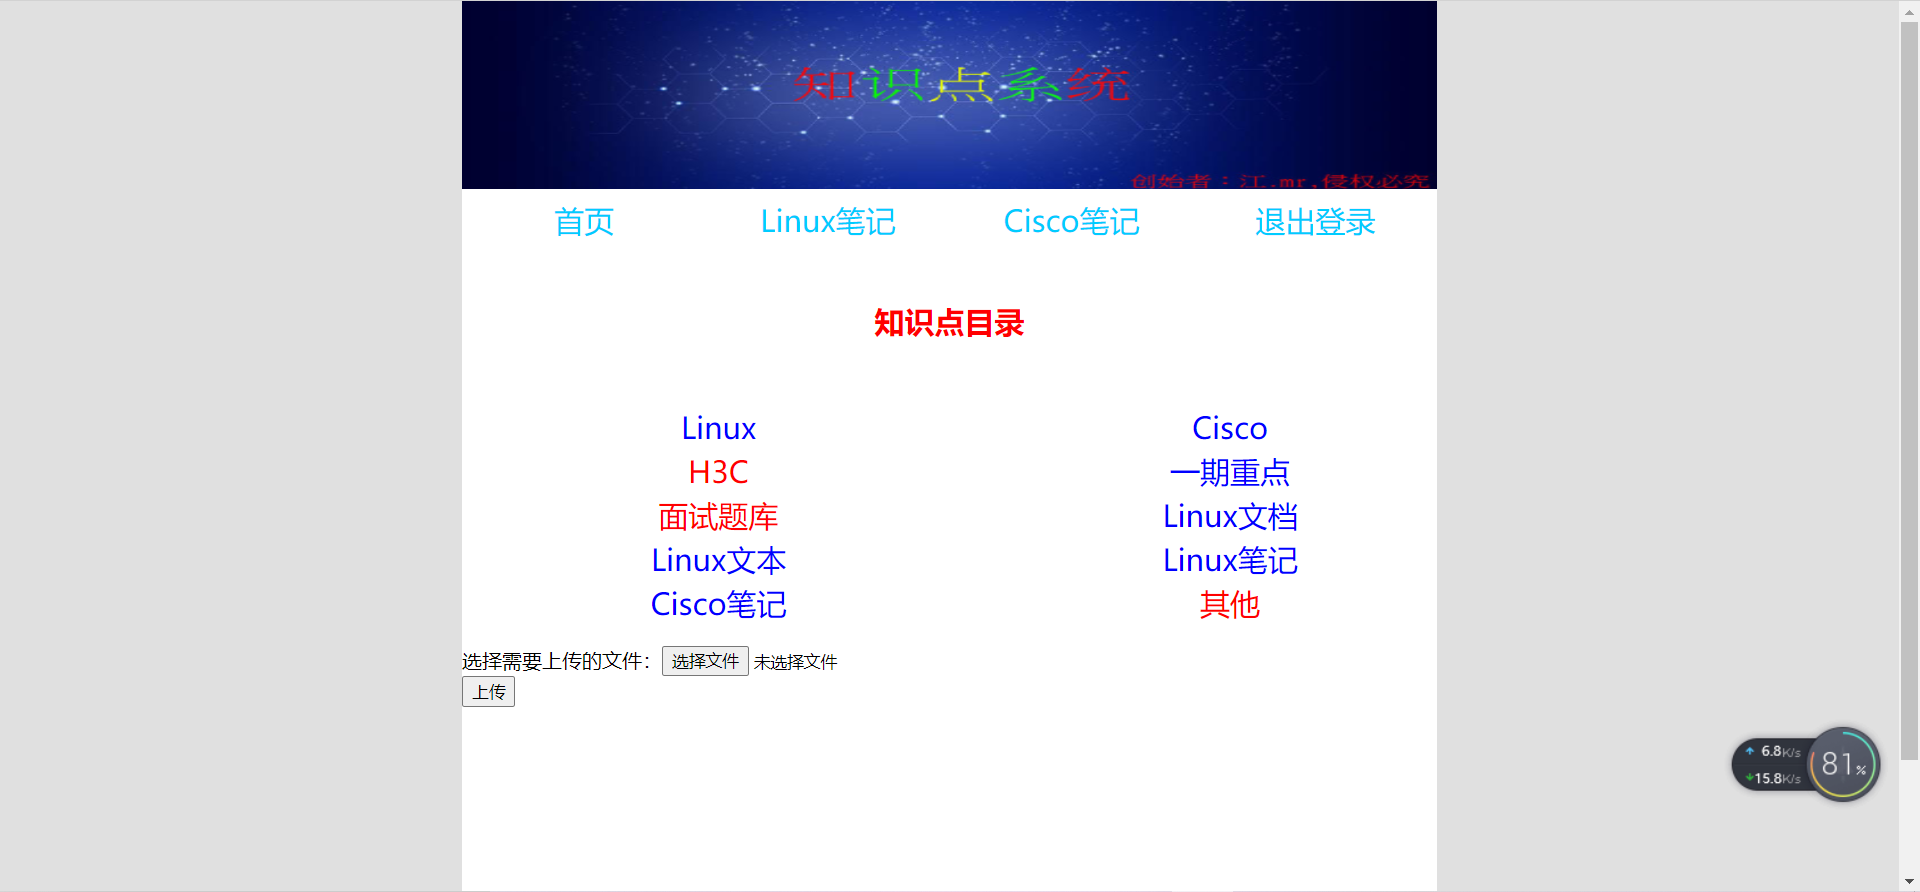
3) View project home page
8.3. Submit the k8s resource file to gitlab
1.Copy the deployment file to the code directory
[root@k8s-master1 know_system]# mkdir deploy
[root@k8s-master1 know_system]# cp /root/k8s1.19/know-system/* deploy/

2.modify deployment In resources image
#Change the image corresponding to the image into a string. When updating the pipeline, you can replace the latest image into the deployment resource by replacing this string
[root@k8s-master1 know_system]# vim deploy/nginx-depoly.yaml
        image: {{updateimage}}

2.Submit to gitlab
[root@k8s-master1 know_system]# git add .
[root@k8s-master1 know_system]# git commit -m "deploy"
[root@k8s-master1 know_system]# git push origin master
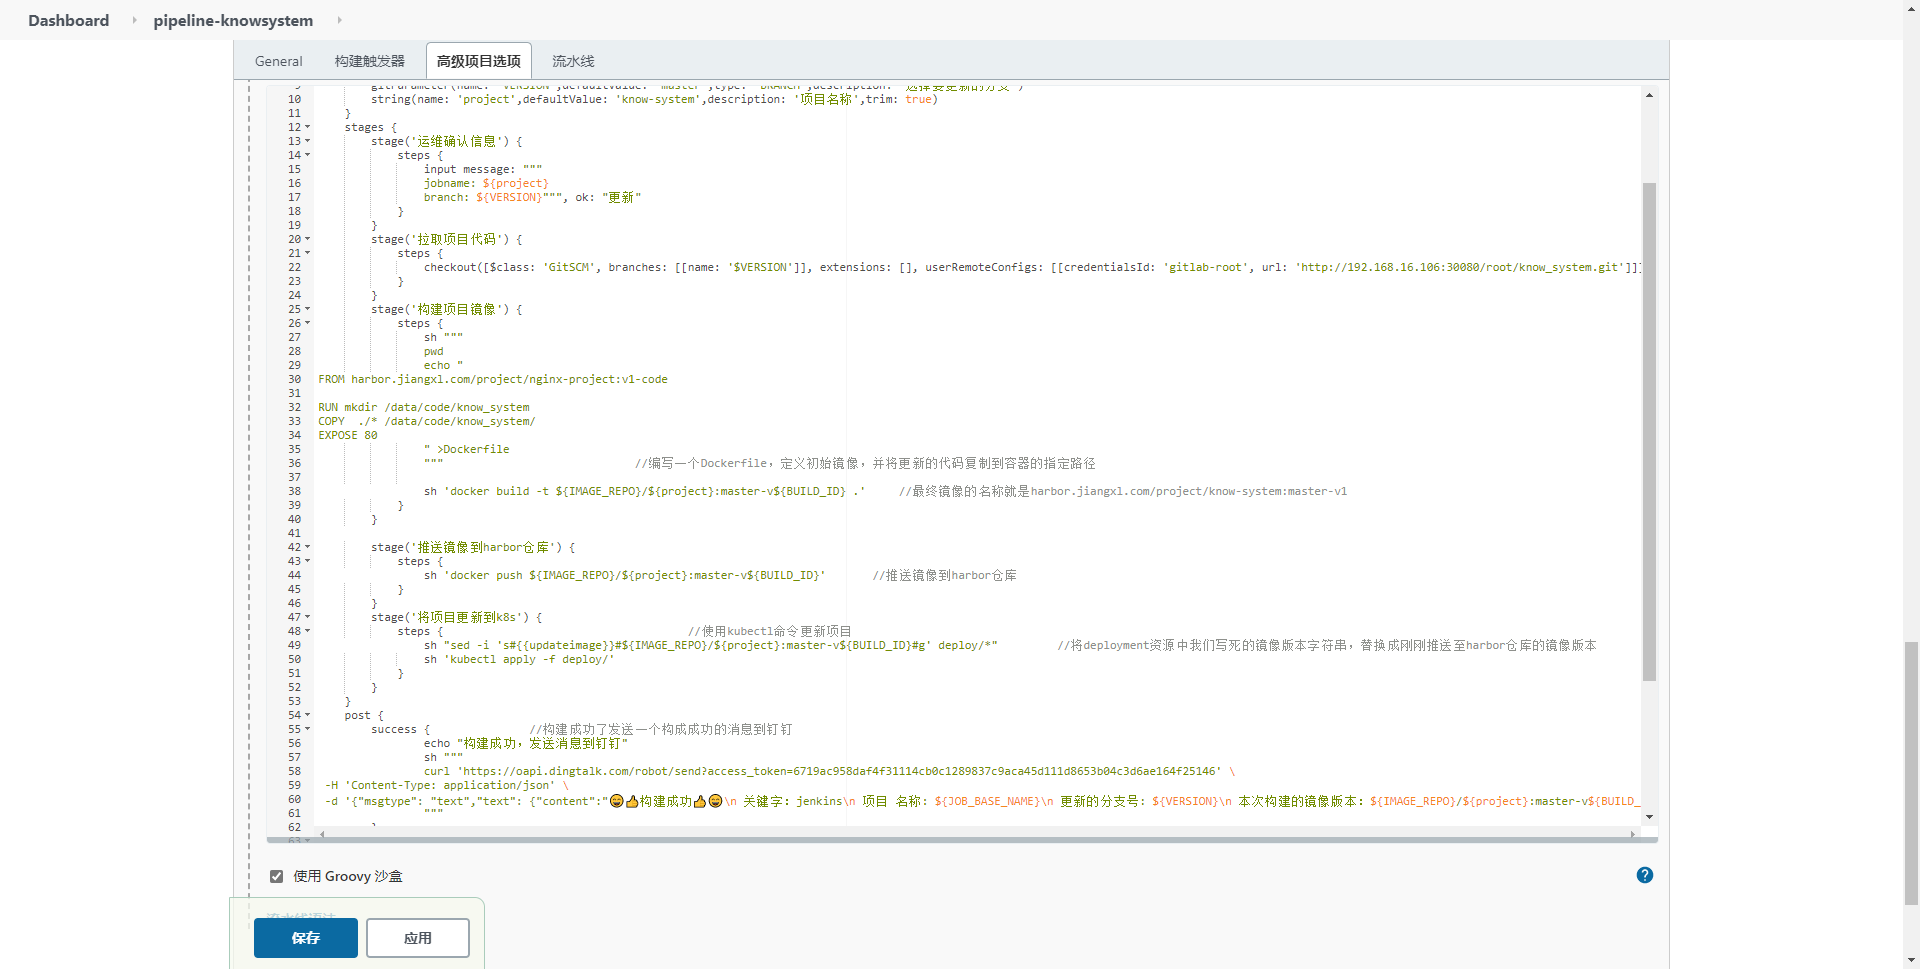
8.4. Write Jenkins pipeline to update the project to k8s
The current pipeline script mainly updates the project pod created with yaml file
pipeline {
agent { label 'Jenkins-slave1-107' } //Make the pipeline always run on the Jenkins-slave1-107 Jenkins agent node, because the server where this node is located can run the docker and kubelet commands of the k8s cluster
environment { //Environment is mainly used to define environment variables. Some commonly used values can be made into environment variables
IMAGE_REPO="harbor.jiangxl.com/project"
}
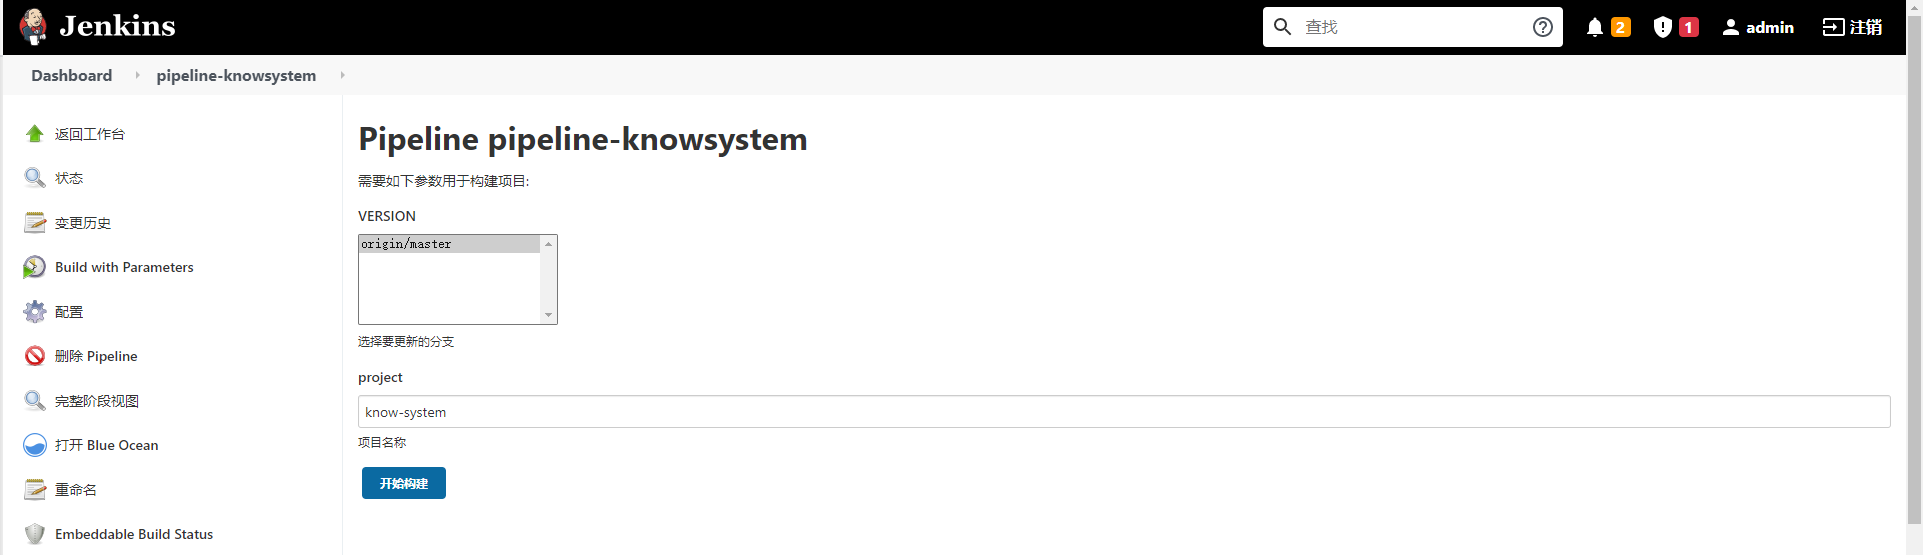
parameters { //Define parametric build process
gitParameter(name: 'VERSION',defaultValue: 'master',type: 'BRANCH',description: 'Select the branch to update') //Define a gitparamters parameterized build process for selecting updated code
string(name: 'project',defaultValue: 'know-system',description: 'entry name',trim: true) //Define a blank string to declare the project name
}
stages { //Define pipeline execution phase
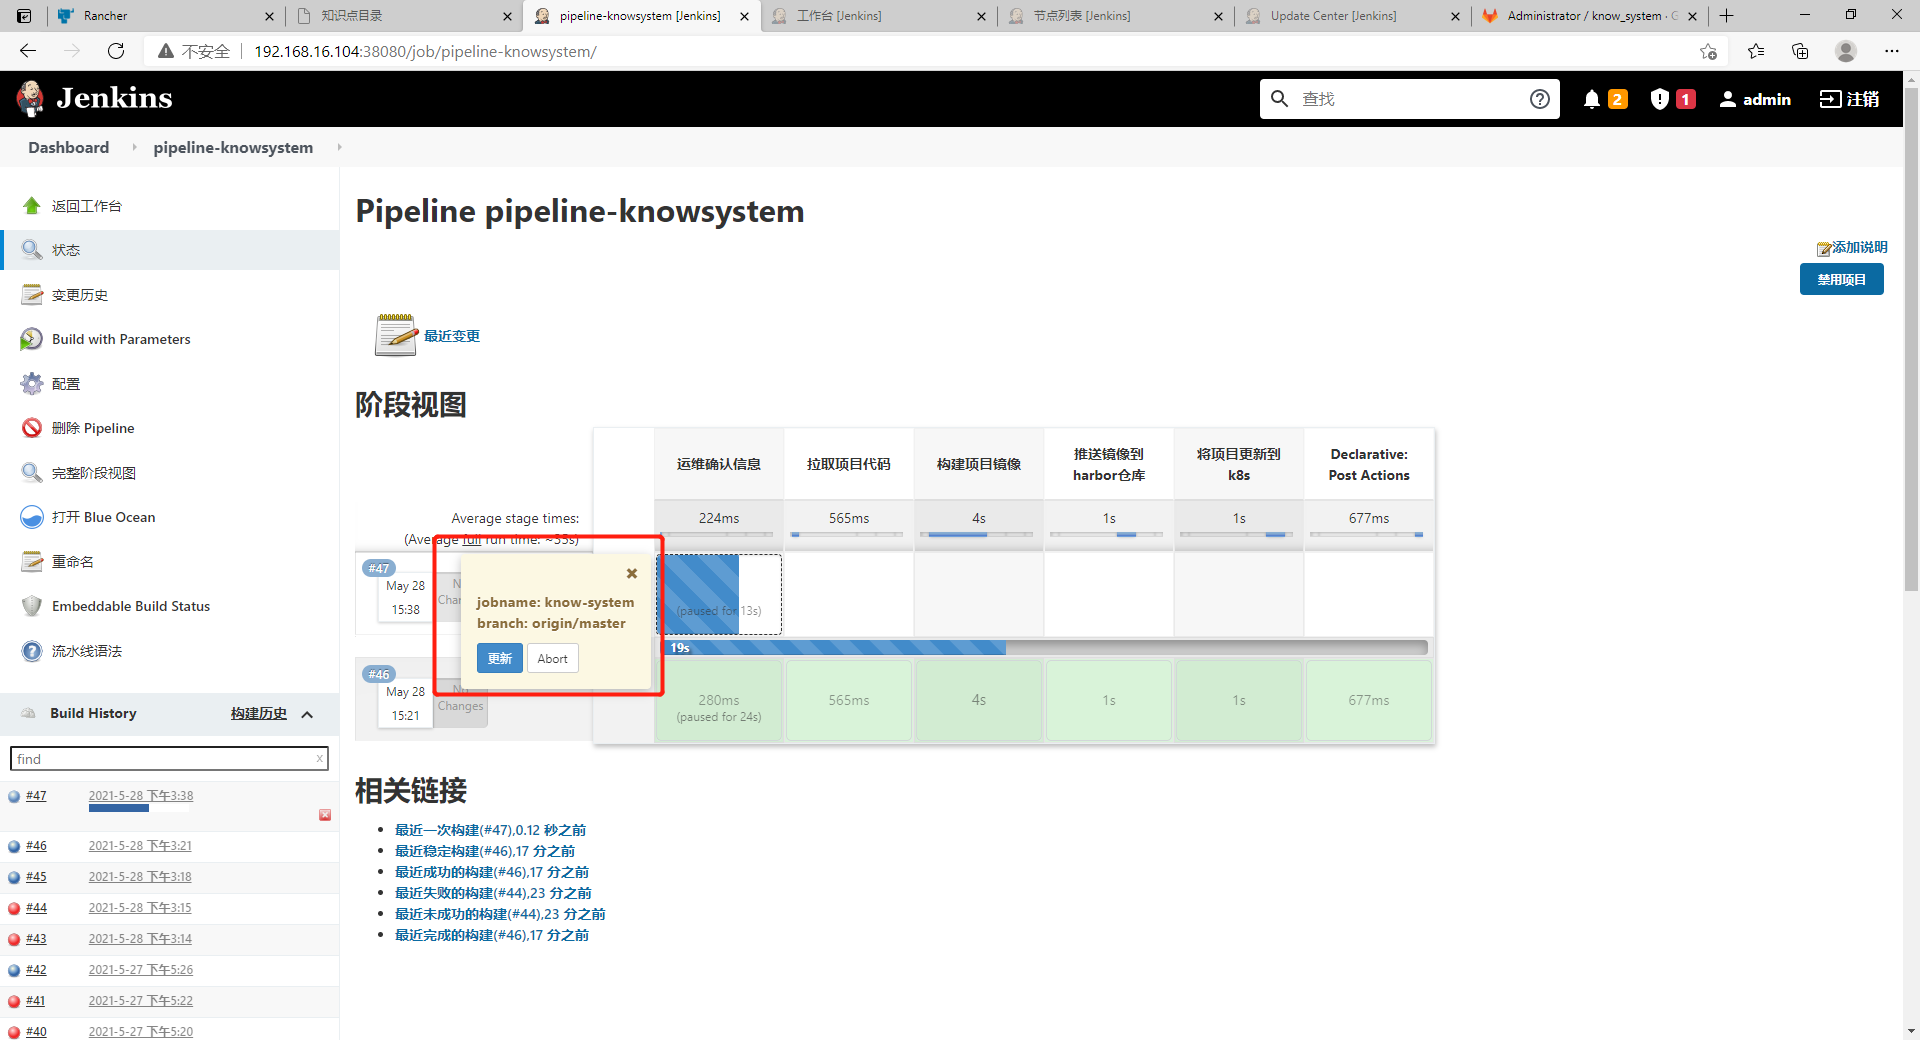
stage('Operation and maintenance confirmation information') { //In phase 1, an interactive is used to let the operation confirm the update information. If there is an error, you can directly exit the update to avoid the update error
steps {
input message: """
jobname: ${project}
branch: ${VERSION}""", ok: "to update" //Interactively output an updated item and branch number
}
}
stage('Pull item code') { //Phase 2 is used to pull the corresponding project code on git
steps {
checkout([$class: 'GitSCM', branches: [[name: '$VERSION']], extensions: [], userRemoteConfigs: [[credentialsId: 'gitlab-root', url: 'http://192.168.16.106:30080/root/know_system.git']]])
}
}
stage('Build project image') { //Phase 3 It is used to update the project code to the initial docker image. The main step is to produce a dockerfile, copy the code to the image, and finally build the image according to the dockerfile
steps {
sh """
pwd
echo "
FROM harbor.jiangxl.com/project/nginx-project:v1-code
RUN mkdir /data/code/know_system
COPY ./* /data/code/know_system/
EXPOSE 80
" >Dockerfile
""" //Write a Dockerfile, define the initial image, and copy the updated code to the specified path of the container
sh 'docker build -t ${IMAGE_REPO}/${project}:master-v${BUILD_ID} .' //The name of the final image is harbor jiangxl. com/project/know-system:master-v1
}
}
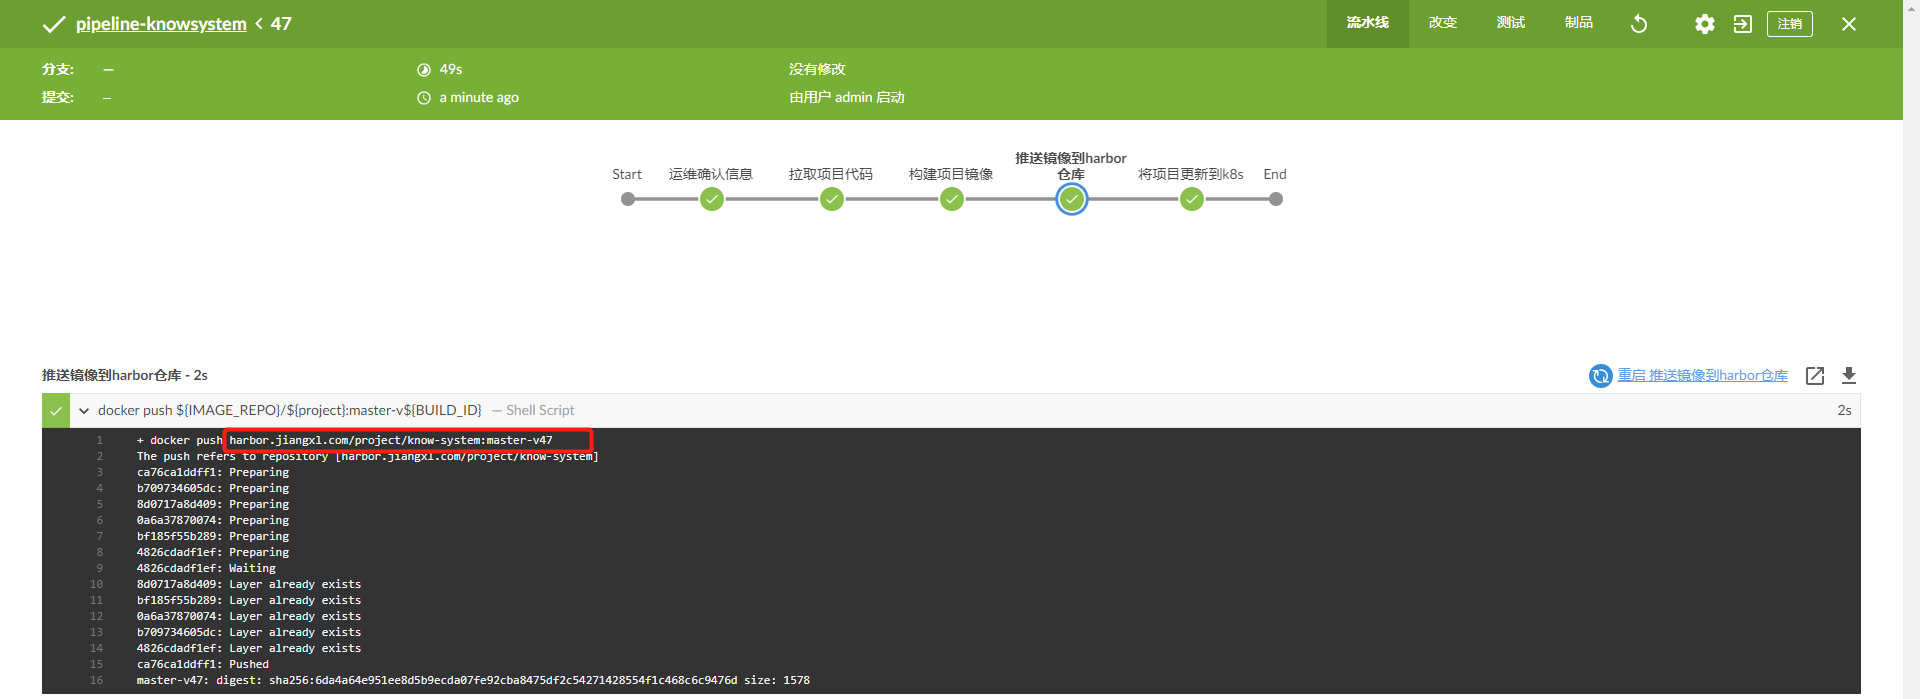
stage('Push mirror to harbor Warehouse') { //In phase 4, the constructed image is pushed to the harbor warehouse to k8s pull the update program
steps {
sh 'docker push ${IMAGE_REPO}/${project}:master-v${BUILD_ID}' //Push image to harbor warehouse
}
}
stage('Update project to k8s') { //Phase 5 is mainly to update k8s the container used by the project, replace the newly built image with the project pod, and then update the pod
steps { //Update the project using the kubectl command
sh "sed -i 's#{{updateimage}}#${IMAGE_REPO}/${project}:master-v${BUILD_ID}#g' deploy/*" // Replace the image version string we wrote in the deployment resource with the image version just pushed to the harbor warehouse
sh 'kubectl apply -f deploy/' //When the image version is replaced, the project update can be completed by updating the yaml file of the resource
}
}
}
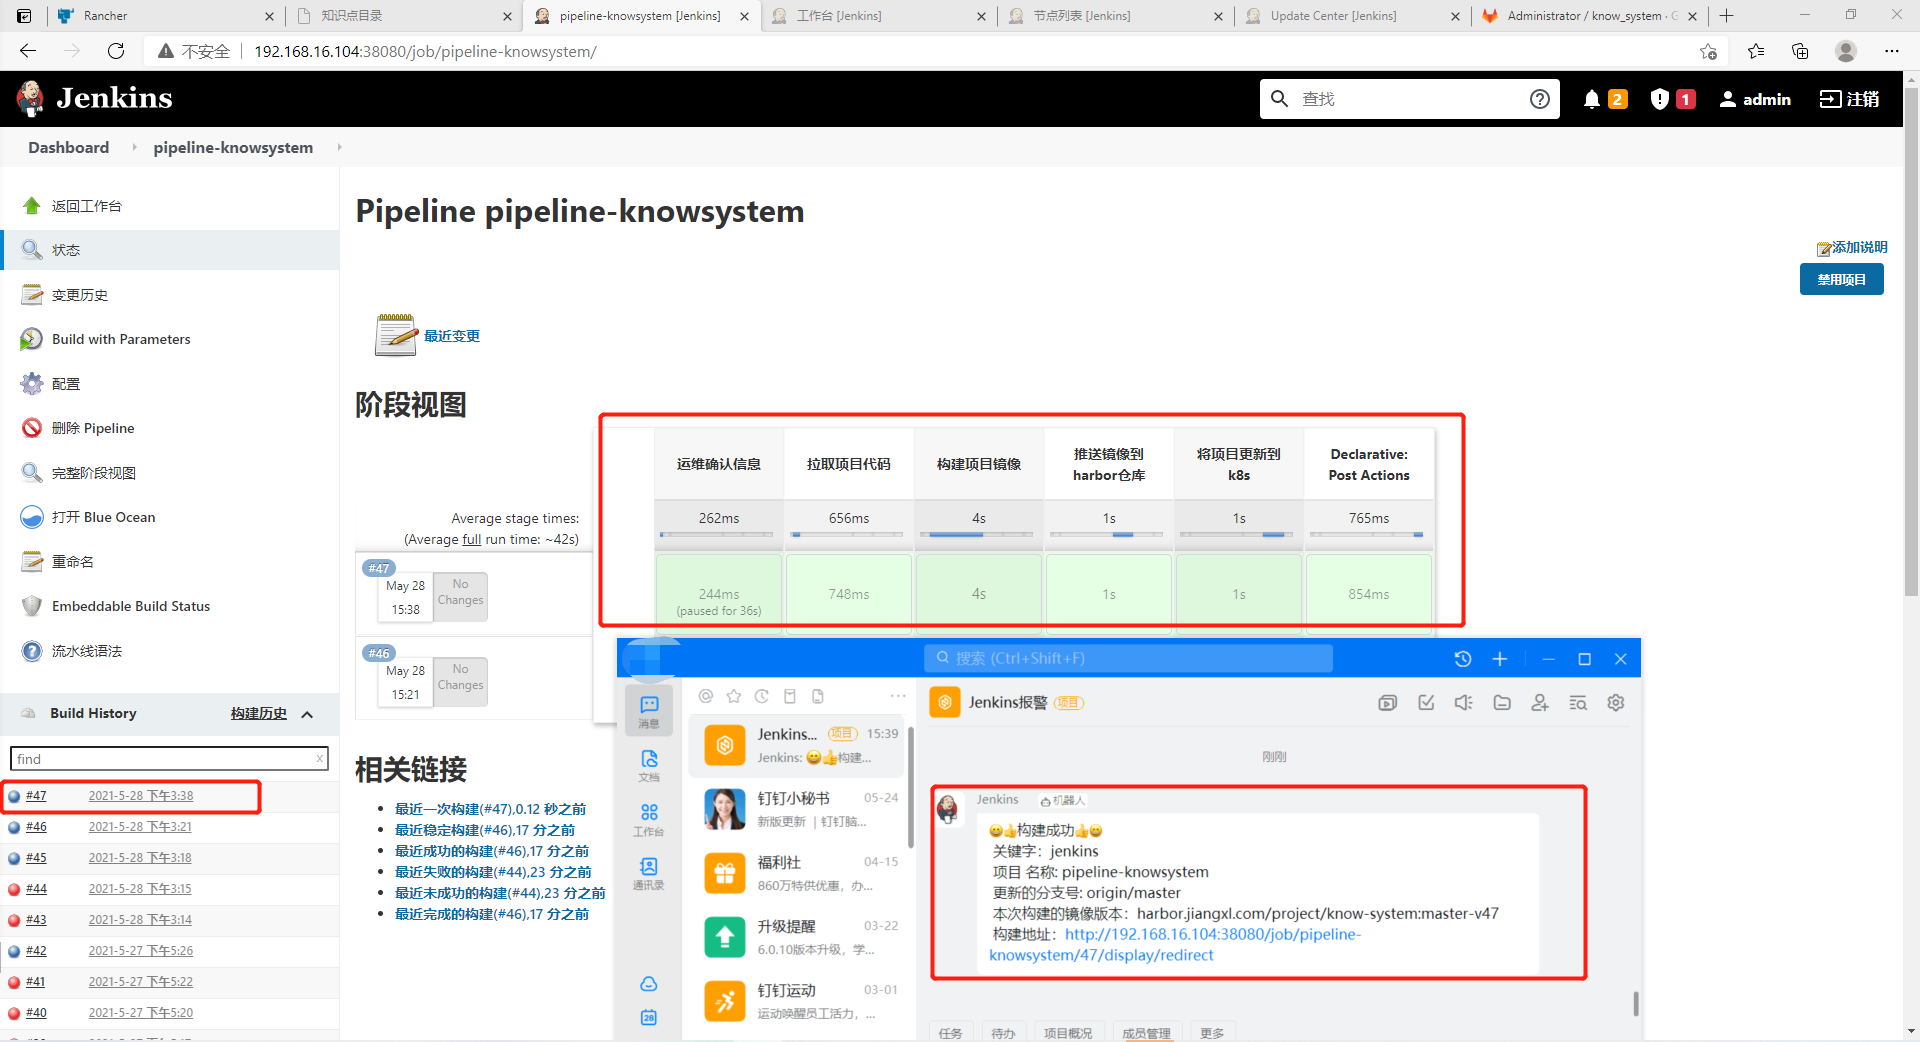
post {
success { //The build successfully sends a message constituting success to the nail
echo "Build succeeded, send message to nail"
sh """
curl 'https://oapi.dingtalk.com/robot/send?access_token=6719ac958daf4f31114cb0c1289837c9aca45d111d8653b04c3d6ae164f25146' \
-H 'Content-Type: application/json' \
-d '{"msgtype": "text","text": {"content":"😄👍Build successful👍😄\n keyword: jenkins\n Project name: ${JOB_BASE_NAME}\n Updated branch number: ${VERSION}\n Image version of this build: ${IMAGE_REPO}/${project}:master-v${BUILD_ID}\n Build address: ${RUN_DISPLAY_URL} "}}'
"""
}
failure { //The build failed. Send a success message to the nail
echo "Build failed, send message to pin"
sh """
curl 'https://oapi.dingtalk.com/robot/send?access_token=6719ac958daf4f31114cb0c1289837c9aca45d111d8653b04c3d6ae164f25146' \
-H 'Content-Type: application/json' \
-d '{"msgtype": "text","text": {"content":"😖❌Build failed❌😖\n keyword: jenkins\n Project name: ${JOB_BASE_NAME}\n Updated branch number: ${VERSION}\n Image version of this build: ${IMAGE_REPO}/${project}:master-v${BUILD_ID}\n Build address: ${RUN_DISPLAY_URL} "}}'
"""
}
always { //Perform this step regardless of success or failure
echo "End of construction process"
}
}
}
8.5. Paste pipeline into pipeline task
8.6. Build master branch to complete project update
1) Select update information
2) Operation and maintenance confirmation information
3) pipeline task updated successfully
4) View the updated image version in blue ocean
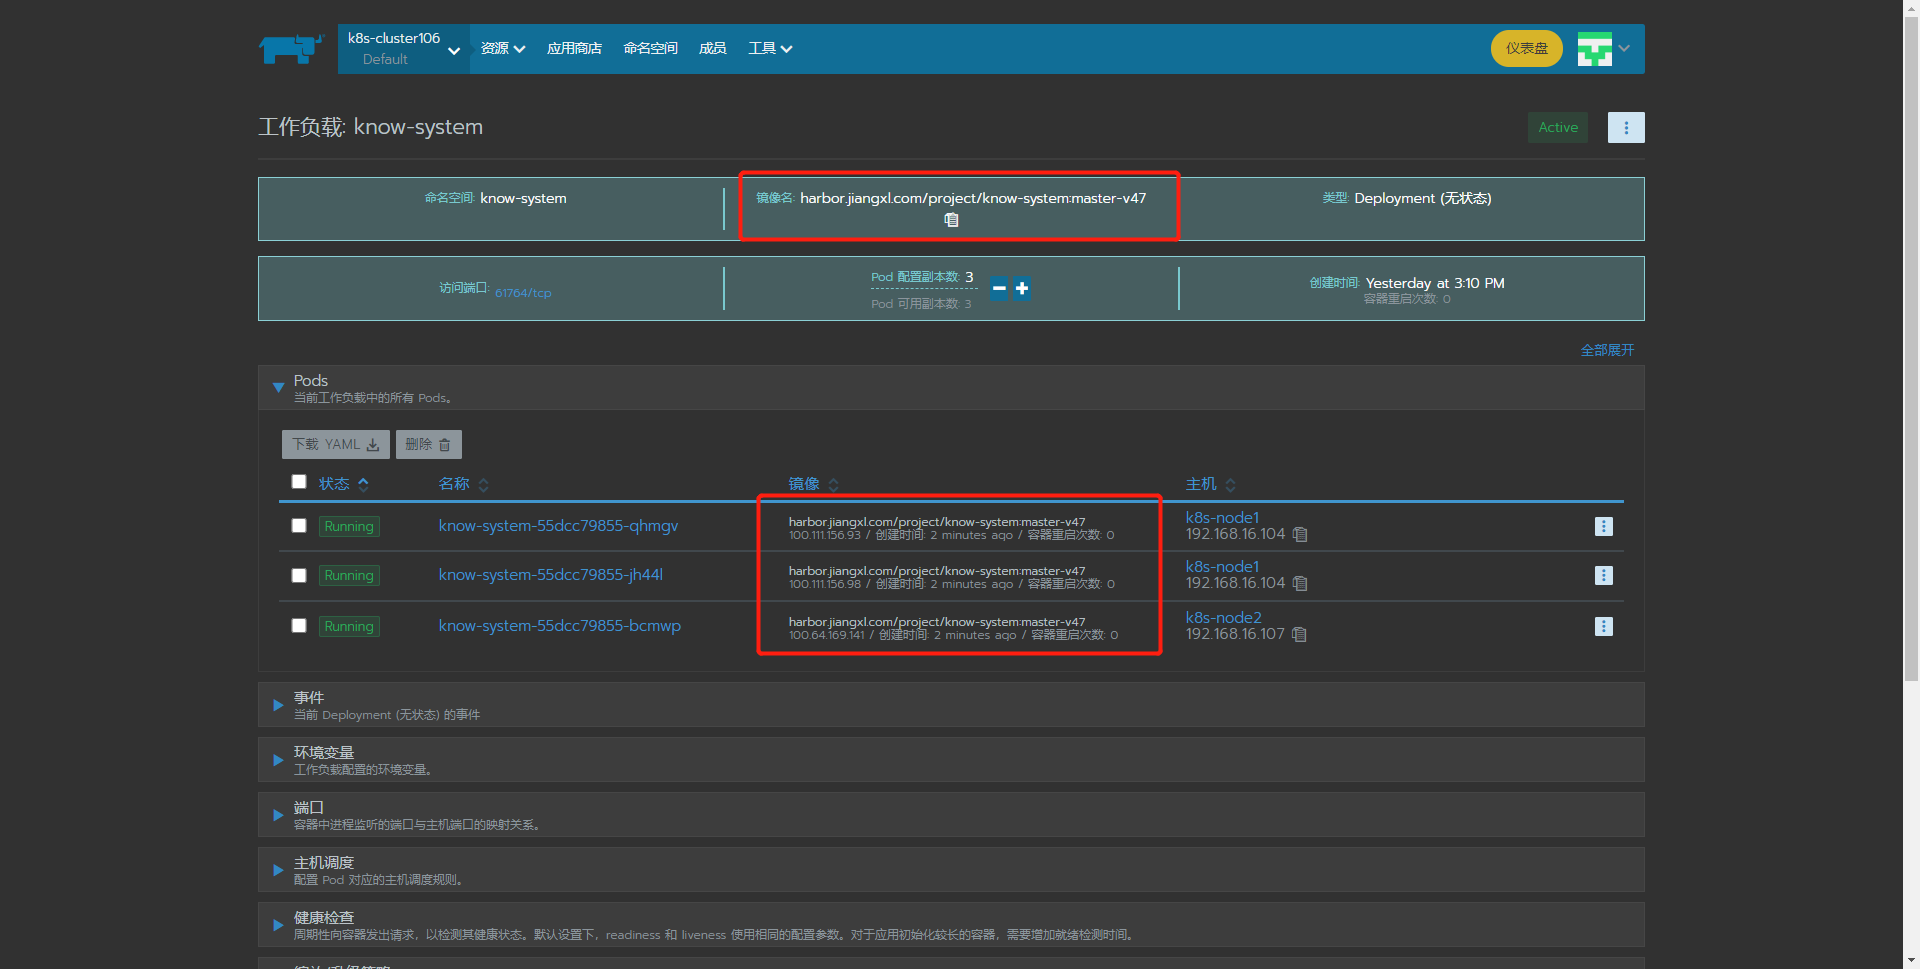
5) Observe whether the project is updated to the latest mirror version on rancher
The update process completed successfully!