Page function development
It has been said before that the online Q & a system is divided into two user functions, one is a registered user and the other is a tourist
Registered users: answer, post questions, comment, edit my
Visitor: browse page function
Today, let's first realize the pages that visitors can browse, the question list page and the question details page
1. Problem list page function development (paging function is not completed)
1.1 transform the detail page using template syntax
We've transformed this before
1.2 extract the problem list information to be displayed from the database
qa-online/templates/qa/view.py
@qa.route('/follow')
def follow():
    """ follow """
    qa_list = Question.query.filter_by(is_valid=True).all()# Remove valid data from the question table
# Don't forget to import: from model import Question
    return render_template('follow.html',qa_list=qa_list)# Transfer the extracted question list to ` follow HTML page
1.3 page display
The page display only shows the main function development
qa-online/templates/qa/templates/follow.html
<div class="qa-ls">
              {% for question in qa_list %}
            <div class="qa-item">
              <a href="{{ url_for('qa.detail',q_id = question.id) }}" class="title">{{ question.title }}</a>
              <div class="desc">
                  {% if question.img %}
                <div class="left">
                  <img src="{{ question.img }}" alt="" srcset="">
                </div>
                  {% endif %}
                <div class="right">
                  <p class="show-desc">{{ question.desc |d("No description",True)}}...
                    <span class="more">Read the original text<i class="glyphicon glyphicon-menu-down"></i></span>
                  </p>
                  <p class="show-all hidden">
                   {% autoescape false %}
                      {{ question.content }}
                     {% endautoescape %}
                    <span class="more">Put away<i class="glyphicon glyphicon-menu-up"></i></span>
                  </p>
                </div>
              </div>
              <div class="qa-footer">
                <div>
                  <button type="button" class="btn btn-info btn-sm">Attention</button>
                </div>
                <div class="txt-menu"><i class="glyphicon glyphicon-comment"></i> {{ question.comment_count|d('0',True) }}Comments</div>
                <div class="txt-menu"><i class="glyphicon glyphicon-send"></i>share</div>
                <div class="txt-menu"><i class="glyphicon glyphicon-flag"></i>report</div>
                <div class="txt-menu btn-group">
                  <i class="glyphicon glyphicon-option-horizontal dropdown-toggle" data-toggle="dropdown"
                    aria-haspopup="true" aria-expanded="false"></i>
                  <ul class="dropdown-menu">
                    <li><a href="#"> not interested</a></li>
                  </ul>
                </div>
              </div>
            </div>
              {% endfor %}
          </div>
- Turn off auto escape
Automatic escape refers to the automatic escape of special characters. Special characters refer to &, >, <, 'and' in HTML (or XML and XHTML). Because these special characters represent special meaning, if you want to use them in text, you must replace them with "entities". If you do not escape, users will not be able to use these characters, and there will be security problems.
-
There are three ways to control automatic escape
- In Python code, you can wrap the HTML string with a Markup object before passing it to the template. This method is generally recommended.
- In the template, a string is explicitly marked as safe HTML using the | safe filter
{{question.content|safe}} - Temporarily turn off the automatic escape of the whole system.
To turn off the auto escape system in a template, you can use the {% autoescape%} block:
 {% autoescape false %}
    {{ question.content }}
 {% endautoescape %}
- Comment number display
<div class="txt-menu"><i class="glyphicon glyphicon-comment"></i> {{ question.comment_count|d('0',True) }}Comments</div>
Question. Is involved in the above code comment_ Count, how did it come from? Don't worry, please look below
qa-online/model.py
class Question(db.Model):
    """ problem """
    __tablename__ = 'qa_question'
    id = db.Column(db.Integer, primary_key=True)  # Primary key
    # Question title
    title = db.Column(db.String(128), nullable=False)
    # Problem description
    desc = db.Column(db.String(256))
    # Problem picture
    img = db.Column(db.String(256))
    # Question details
    content = db.Column(db.Text, nullable=False)
    # Number of visitors
    view_count = db.Column(db.Integer, default=0)
    # Logical deletion
    is_valid = db.Column(db.Boolean, default=True)
    # sort
    reorder = db.Column(db.Integer, default=0)
    # Creation time
    created_at = db.Column(db.DateTime, default=datetime.now)
    # Last modified time
    updated_at = db.Column(db.DateTime, default=datetime.now, onupdate=datetime.now)
    # Associated user
    user_id = db.Column(db.Integer, db.ForeignKey('accounts_user.id'))
    # Create a one to many attribute with the user, user question_ list
    user = db.relationship('User', backref=db.backref('question_list', lazy='dynamic'))

    @property
    def comment_count(self):
        """ Number of comments """
        return self.question_comment_list.filter_by(is_valid=True).count()
class AnswerComment(db.Model):
    """ Comments answered """
    __tablename__ = 'qa_answer_comment'
    id = db.Column(db.Integer, primary_key=True)  # Primary key
    # Comment content
    content = db.Column(db.String(512), nullable=False)
    # Number of endorsements
    love_count = db.Column(db.Integer, default=0)
    # Is the comment public
    is_public = db.Column(db.Boolean, default=True)
    # Logical deletion
    is_valid = db.Column(db.Boolean, default=True)
    # Creation time
    created_at = db.Column(db.DateTime, default=datetime.now)
    # Last modified time
    updated_at = db.Column(db.DateTime, default=datetime.now, onupdate=datetime.now)
    # Reply ID
    reply_id = db.Column(db.Integer, db.ForeignKey('qa_answer_comment.id'), nullable=True)
    # Associated user
    user_id = db.Column(db.Integer, db.ForeignKey('accounts_user.id'))
    # Relevance answer
    answer_id = db.Column(db.Integer, db.ForeignKey('qa_answer.id'))
    # Correlation problem
    q_id = db.Column(db.Integer, db.ForeignKey('qa_question.id'))

    # Establish one to many attributes with users
    user = db.relationship('User', backref=db.backref('answer_comment_list', lazy='dynamic'))
    # Establish one to many attributes with answers
    answer = db.relationship('Answer', backref=db.backref('answer_comment_list', lazy='dynamic'))
    # Establish one to many attributes of the problem
    question = db.relationship('Question', backref=db.backref('question_comment_list', lazy='dynamic'))
We need the ORM model PY_ count
  def comment_count(self):
      return self.question_comment_list.filter_by(is_valid_.count()# Where ` question_comment_list 'is the data table we created before, which is a binding foreign key relationship,
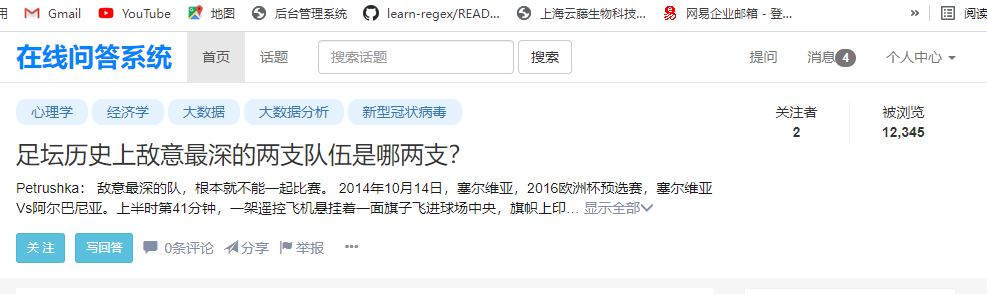
2. Function development of problem details page
The question details page is slightly more complex than the question list page Let's abbreviate it here
Like the question list page, our first step is to transform the details page using template syntax. We have completed this step
2.1 take the comments that need to be displayed and the information concerned from the database
If we need to check the details of a problem, we first know the problem, so we have such an operation on the problem list page
<a href="{{ url_for('qa.detail',q_id = question.id) }}" class="title">{{ question.title }}</a>
therefore
qa-online/templates/qa/view.py
@qa.route('/detail/<int:q_id>')
def detail(q_id):
    """ Question details """
    # 1. Query problem information
    qa_info = Question.query.get(q_id)# Retrieve the problem information according to the primary key
    if not qa_info.is_valid:
        abort(404)# Don't forget to import abort: from false import abort
    return render_template('detail.html',question=qa_info)
```python
qa-online/templates/qa/templates/detail.html
```html
  <h3>{{ question.title }}</h3>
                <div class="show-desc ">
                    {{ question.desc|d('Not yet', True) }}...
                    <span class="btn-show-more">Show all<i class="glyphicon glyphicon-menu-down"></i></span>
                </div>
                <div class="show-all  hidden">
                    {% autoescape false %}
                    {{ question.content|safe }}
                    {% endautoescape %}
                    <span class="btn-show-less">Put away<i class="glyphicon glyphicon-menu-up"></i></span>
                </div>
                <!-- menu bar -->
                <div class="qa-footer">
                    <div>
                        <button type="button" class="btn btn-info btn-sm">Attention</button>
                    </div>
                    <div>
                        <button type="button" class="btn btn-info btn-sm" data-toggle="modal" data-target="#addComment">
                            Write answers
                        </button>
                    </div>
                    <div class="txt-menu"><i class="glyphicon glyphicon-comment"></i> {{ question.comment_count|d('0',True) }}Comments
                    </div>
                    <div class="txt-menu"><i class="glyphicon glyphicon-send"></i>share</div>
                    <div class="txt-menu"><i class="glyphicon glyphicon-flag"></i>report</div>
                    <div class="txt-menu"></div>
                    <div class="txt-menu btn-group">
                        <i class="glyphicon glyphicon-option-horizontal dropdown-toggle" data-toggle="dropdown"
                           aria-haspopup="true" aria-expanded="false"></i>
                        <ul class="dropdown-menu">
                            <li><a href="#"> not interested</a></li>
                        </ul>
                    </div>
                </div>
                <!-- //Menu bar -- >
            </div>
            <div class="col-md-3">
                <div class="que-stats-box">
                    <!-- Followers -->
                    <div>
                        <span>Followers</span>
                        <strong>{{ question.follow_count|number_split }}</strong>
                    </div>
                    <!-- //Followers -- >
                    <!-- Be browsed -->
                    <div>
                        <span>Be browsed</span>
                        <strong>{{ question.view_count|number_split }}</strong>
                    </div>
                    <!-- //Browsed -- >
                </div>
            </div>
- Number of followers
Number of followers, we can qa_question_follow, because it is used for foreign key management and reverse with the question table,
# Correlation problem
    q_id = db.Column(db.Integer, db.ForeignKey('qa_question.id'))
 # Establish one to many attributes of the problem
    question = db.relationship('Question', backref=db.backref('question_follow_list', lazy='dynamic'))
So we can pass the question_follow_list, and write the following in the question table:
@property
    def follow_count(self):
        """ Number of concerns """
        return self.question_follow_list.filter_by(is_valid=True).count()
- Focus on number formatting for number and number of views
Among them, the number of our attention and the number of views displayed on the page should be: for example: 1234566 = = > 1234566
So here we say that we use the str.format() format number in python to operate
print("{:,2f}".format(3.14159265))# 3.14 = = > two decimal places are reserved
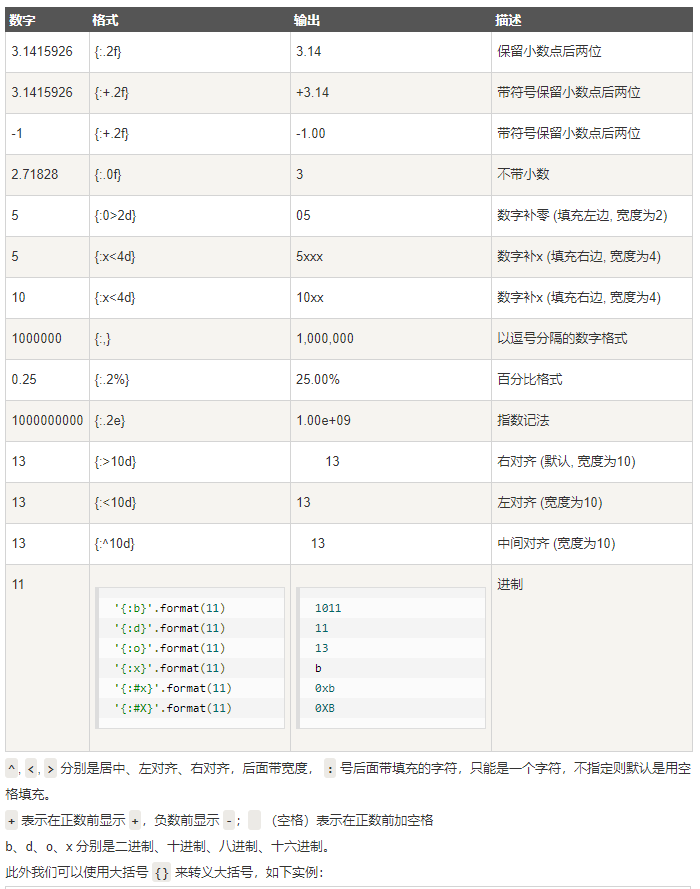
You can know how to format numbers through str.format above
  <span>Be browsed</span>
   <strong>{{ "{:,}".format(question.view_count) }}</strong>
For ease of operation, we encapsulate it into the tool class, filter. In utils py
qa-online/utils/filter.py
def number_split(num):
    """
    Number formatting
    12345678 => 12,345,678
    :param num: Number to format
    :return: Formatted string
    """
    return '{:,}'.format(int(num))
However, this alone is not enough. It should be in our detail Number cannot be known in HTML_ How did the split () method come from?
So we need to be on the app PY
from utils.filter import number_split
# register
app.jinja_env.filters['number_split']=number_split
So in this way, we can in detail Write in HTML page
<!-- Followers -->
                    <div>
                        <span>Followers</span>
                        <strong>{{ question.follow_count|number_split }}</strong>
                    </div>
                    <!-- //Followers -- >
                    <!-- Be browsed -->
                    <div>
                        <span>Be browsed</span>
                        <strong>{{ question.view_count|number_split }}</strong>
                    </div>
                    <!-- //Browsed -- >
The next part mainly shows the meeting band of the question, but here we only show the first question and answer and the comments of the first answer
2.2 take out the first answer and show how many answers are left
- First, we have to take the first answer to the question from the output library
view.py
answer =qa_info.answer_list.filter_by(is_valid=True).first()#
return render_template('detail.html',question=qa_info,answer=answer)
detail.html
2. Show how many answers remain
<a class="link-more" href="#"> view all {{question.answer_count|number_split}} answers</a>
- answer_count
@property
def answer_count(self):
  return self.answer_list.filter_by(is_valid=True).count()
- The first answer is displayed
detail.html
<div class="answer-content box-wrap">
                    <div class="user-info">
                        <div class="avater">
                            {% if answer.user.avatar %}
                                <img src="{{ answer.user.avatar }}" alt="User Avatar">
                            {% else %}
                                <img src="/assets/home/qa/user_head.jpg" alt="User Avatar">
                            {% endif %}
                        </div>
                        <div class="desc">
                            <h4>{{ answer.user.nickname }}</h4>
                            <p><The new book "notes on actual combat of Internet marketers" is on the market; The official account: Shu Dake.</p>
                        </div>
                    </div>
                    <div class="answer-stats">5,550 People agreed with the answer</div>
                    <div class="answer-txt">
                        {% autoescape false %}
                        {{ answer.content|safe }}
                        {% endautoescape %}
                    </div>
                    <div class="answer-time">Published in{{ answer.updated_at|dt_format_show}}</div>
                    <!-- Bottom menu -->
                    <div class="qa-footer">
                        <div>
                            <button type="button" class="btn btn-info btn-sm">
                                <i class="glyphicon glyphicon-thumbs-up"></i> Agree 1780
                            </button>
                            <button type="button" class="btn btn-info btn-sm"><i
                                    class="glyphicon glyphicon-thumbs-down"></i></button>
                        </div>
                        <div class="txt-menu"><i
                                class="glyphicon glyphicon-comment"></i> {{ answer.answer_comment_count |d('0',True)}}Comments
                        </div>
                        <div class="txt-menu"><i class="glyphicon glyphicon-send"></i>share</div>
                        <div class="txt-menu"><i class="glyphicon glyphicon-heart"></i>Collection</div>
                        <div class="txt-menu"><i class="glyphicon glyphicon-flag"></i>report</div>
                        <div class="txt-menu"></div>
                        <div class="txt-menu btn-group">
                            <i class="glyphicon glyphicon-option-horizontal dropdown-toggle" data-toggle="dropdown"
                               aria-haspopup="true" aria-expanded="false"></i>
                            <ul class="dropdown-menu">
                                <li><a href="#"> not interested</a></li>
                            </ul>
                        </div>
                    </div>
- User avatar, nickname
Why do we get the content of the first answer and how to display user information such as user avatar and nickname?
I don't know how to explain here, probably because our Answer table has a bound user ID foreign key, directly on the code
 # Associated user
    user_id = db.Column(db.Integer, db.ForeignKey('accounts_user.id'))
 # Establish one to many attributes with users
    user = db.relationship('User', backref=db.backref('answer_list', lazy='dynamic'))# Because of backref, we have the user key in the answer table to access the information in the 'user' table
such as
<div class="user-info">
                        <div class="avater">
                            {% if answer.user.avatar %}
                                <img src="{{ answer.user.avatar }}" alt="User Avatar">
                            {% else %}
                                <img src="/assets/home/qa/user_head.jpg" alt="User Avatar">
                            {% endif %}
                        </div>
                        <div class="desc">
                            <h4>{{ answer.user.nickname }}</h4>
- Time formatting
The time format here is different from what we said above. Its specific meaning is: a few minutes ago, an hour ago
Here we use timeago
# 1. Download timeago
pip install timegao
# 2. Use, import
import timeago # The usage of timeago is not discussed in detail here
We will talk about the function of formatting time. As before, we uninstall the filter in the utils tool class pyt
def dt_format_show(dt):
    """
    Date and time, formatted display
    3 Minutes ago
    1 Hours ago
    :param dt: datetime time
    """
    now = datetime.now()
    return timeago.format(dt, now, 'zh_CN')
Similarly, we need to be in app Py
from utils.filter import dt_format_show
# Register filter

app.jinja_env.filters['dt_format_show'] = dt_format_show
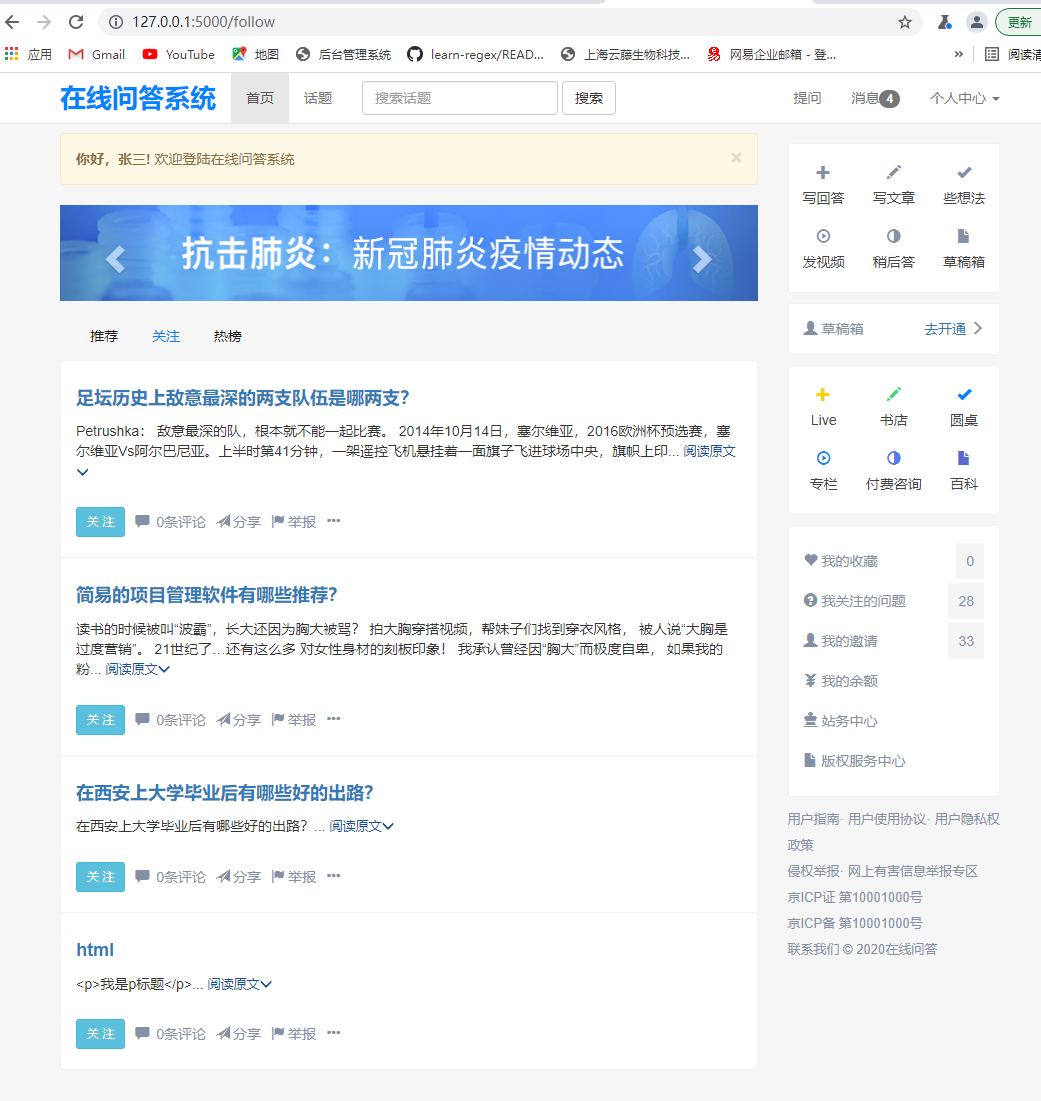
3. Page display
-
Question list page
-
Question details page
