Geometric transformation
Geometric transformation refers to the operation of mapping one image to another.
zoom
Use function CV2 Resize() to zoom the image
dst = cv2.resize( src, dsize[, fx[, fy[, interpolation]]] )
-
dst represents the output target image. The type of the image is the same as src, and its size is dsize (when the value is non-zero), or it can be through src Size (), fx and fy are calculated.
-
src represents the original image that needs to be scaled
-
dsize represents the size of the output image.
-
fx represents the scale in the horizontal direction.
-
fy represents the scaling in the vertical direction.
In CV2 In the resize() function, the size of the target image can be specified through "parameter dsize" or one of "parameters fx and fy". The details are as follows.
Case 1: specified by parameter dsize
If the value of the parameter dsize is specified, whether the values of the parameters fx and fy are specified or not, the size of the target image is determined by the parameter dsize.
The first parameter in dsize corresponds to the width of the scaled image (width, i.e. the number of columns cols, which is related to parameter fx), and the second parameter corresponds to the height of the scaled image (height, i.e. the number of rows, which is related to parameter fy)
When specifying the value of the parameter dsize, the scaling size in the x direction (parameter fx) is:
(double)dsize.width/src.cols
At the same time, the scaling size in the y direction (parameter fy) is:
(double)dsize.height/src.rows
Case 2: specified by parameters fx and fy
If the value of the parameter dsize is None, the size of the target image is determined by the parameters fx and fy. At this time, the size of the target image is:
dsize=Size(round(fx*src.cols), round(fy*src.rows))
The final size and type of the target image dst are specified by src, dsize, fx, fy.
-
Interpolation stands for interpolation method
Interpolation refers to assigning values to pixels that cannot be mapped directly during geometric processing of images.
The pixel on the target image cannot correspond to a specific position of the original image. At this time, these pixels should also be interpolated to complete the mapping.
-
When reducing the image, the best effect can be obtained by using the INTER_AREA method;
-
When enlarging an image, both cubic interpolation and bilinear interpolation can achieve good results.
The speed of cubic spline interpolation is slow, and the speed of bilinear interpolation is relatively fast and the effect is not inferior.
-
example
Use function CV2 Resize() simply scales an array.
import cv2
import numpy as np
img=np.ones([2,4,3], dtype=np.uint8)
size=img.shape[:2]
rst=cv2.resize(img, size)
print("img.shape=\n", img.shape)
print("img=\n", img)
print("rst.shape=\n", rst.shape)
print("rst=\n", rst)
be careful
- The number of rows of the target image is the number of columns of the original image.
- The number of columns of the target image is the number of rows of the original image.
Function CV2 The dsize parameter in resize() is inconsistent with the image shape attribute in the order of rows and columns
- In the shape attribute, the first value corresponds to the number of rows and the second value corresponds to the number of columns
- In the dsize parameter, the first value corresponds to the number of columns and the second value corresponds to the number of rows
When using CV2 When using the resize() function, pay extra attention to the attribute order of the parameter dsize.
example
- Use function CV2 Resize () completes a simple image scaling.
import cv2
img=cv2.imread("lena.jpg")
rows, cols=img.shape[:2]
size=(int(cols*0.9), int(rows*0.5))
rst=cv2.resize(img, size)
print("img.shape=", img.shape)
print("rst.shape=", rst.shape)
- Control function CV2 Resize() fx parameter and fy parameter to complete image scaling
import cv2
img=cv2.imread("lena.jpg")
rst=cv2.resize(img, None, fx=2, fy=0.5)
print("img.shape=", img.shape)
print("rst.shape=", rst.shape)
- fx scales horizontally
- fy scales vertically
Flip
The image is flipped using the function CV2 Flip () implementation
This function can flip the image in horizontal direction, vertical direction and both directions at the same time
dst = cv2.flip( src, flipCode )
-
dst represents a target image of the same size and type as the original image.
-
src represents the original image to be processed
-
flipCode represents the rotation type.

In this function, the relationship between the target pixel and the original pixel can be expressed as:

example
Use function CV2 Flip() completes the flipping of the image
import cv2
img=cv2.imread("lena.jpg")
x=cv2.flip(img,0)
y=cv2.flip(img,1)
xy=cv2.flip(img, -1)
cv2.imshow("img", img)
cv2.imshow("x", x)
cv2.imshow("y", y)
cv2.imshow("xy", xy)
cv2.waitKey()
cv2.destroyAllWindows()
affine
Affine transformation means that images can be translated, rotated and other operations through a series of geometric transformations.
The transformation can maintain the straightness and parallelism of the image.
Straightness refers to that the straight line of the image is still a straight line after affine transformation; Parallelism refers to that after the affine transformation of the image, the parallel lines are still parallel lines.
The affine function in OpenCV is CV2 Warpaffine(), which realizes transformation through a transformation matrix (mapping matrix) M, specifically:
dst(x, y)=src(M11x+M12y+M13, M21x+M22y+M23)
The original image O is transformed into an affine image R through a transformation matrix M.
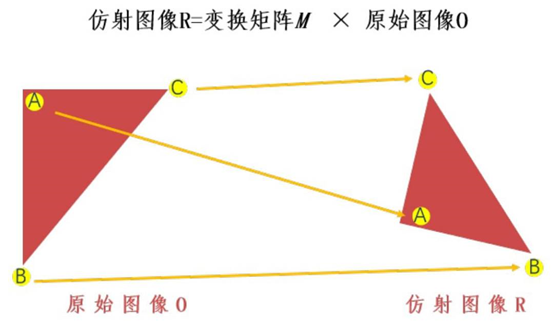
Using affine function CV2 Warpaffine() implements image transformation. The syntax format of this function is as follows:
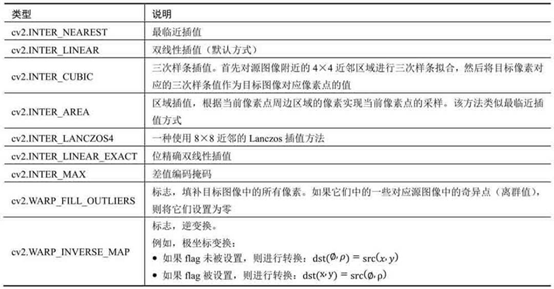
dst = cv2.warpAffine( src, M, dsize[, flags[, borderMode[, borderValue]]] )
- dst represents the affine output image, and the type of the image is the same as that of the original image. dsize determines the actual size of the output image.
- src represents the original image to be affine.
- M stands for a 2 × 3 transformation matrix. Different affine transformations can be realized by using different transformation matrices.
- dsize represents the size of the output image.
- flags represents the interpolation method, and the default is INTER_LINEAR. When the value is WARP_INVERSE_MAP means that M is the type of inverse transformation, which realizes the inverse transformation from the target image dst to the original image src.
- borderMode represents the edge type, and the default is BORDER_CONSTANT. When the value is BORDER_TRANSPARENT means that the values in the target image do not change, and these values correspond to the abnormal values in the original image.
- borderValue represents the boundary value, which is 0 by default.
Using the function cv2.0 in OpenCV Warpaffine() implements affine transformation. The syntax format after ignoring its optional parameters is:
dst = cv2.warpAffine( src , M , dsize )
It converts the original image src into the target image dst through the conversion matrix M:
dst(x, y)=src(M11x+M12y+M13, M21x+M22y+M23)
The form of affine transformation depends entirely on the transformation matrix M.
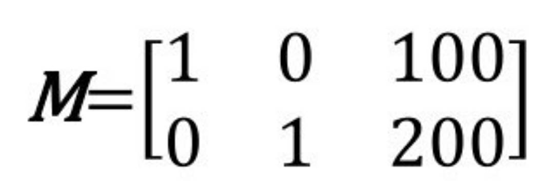
translation
Move the original image src 100 pixels to the right and 200 pixels to the bottom, and the corresponding relationship is:
dst (x, y)=src (x+ 100, y+ 200)
Complete the above expression, namely:
dst (x, y)=src (1·x+ 0·y+ 100, 0·x+ 1·y+ 200)
It can be determined that the values of each element in the corresponding conversion matrix M are:
example
Image translation
import cv2
import numpy as np
img=cv2.imread("lena.jpg")
height, width=img.shape[:2]
x=100
y=200
M = np.float32([[1, 0, x], [0, 1, y]])
move=cv2.warpAffine(img, M, (width, height))
cv2.imshow("original", img)
cv2.imshow("move", move)
cv2.waitKey()
cv2.destroyAllWindows()
rotate
You can use the function CV2 Getrotationmatrix2d() gets the transformation matrix. The syntax format of this function is:
retval=cv2.getRotationMatrix2D(center, angle, scale)
- Center is the center point of rotation.
- Angle is the rotation angle. A positive number indicates counterclockwise rotation and a negative number indicates clockwise rotation.
- Scale is the transformation scale (scale size).
If you want to take the center of the image as the dot, rotate 45 ° counterclockwise and reduce the target image to 0.6 times of the original image, call the function CV2 The statements used when getrotationmatrix2d() generates the transformation matrix M are:
M=cv2.getRotationMatrix2D((width/2,height/2),45,0.6)
example
Image rotation
import cv2
img=cv2.imread("lena.jpg")
height, width=img.shape[:2]
M=cv2.getRotationMatrix2D((width/2, height/2),45,0.6)
rotate=cv2.warpAffine(img, M, (width, height))
cv2.imshow("original", img)
cv2.imshow("rotation", rotate)
cv2.waitKey()
cv2.destroyAllWindows()
More complex affine transformation
For more complex affine transformations, OpenCV provides the function CV2 Getaffinetransform() to generate affine function CV2 Transformation matrix M used by warpaffine().
The syntax format of this function is:
retval=cv2.getAffineTransform(src, dst)
- src represents the three point coordinates of the input image.
- dst represents the three point coordinates of the output image.
The parameter values src and dst are arrays containing three two-dimensional array (x, y) points.
Refers to the three vertices (upper left corner, upper right corner and lower left corner) of the parallelogram in the original image and the target image
The above parameters are passed through the function CV2 Getaffinetransform () defines two parallelograms.
The three points in src and dst correspond to the upper left corner, upper right corner and lower left corner of the parallelogram respectively.
Function CV2 Warpaffine() takes the function CV2 The transformation matrix M obtained by getaffinetransform() is used as a parameter to affine the points in src to dst.
Function CV2 After getaffinetransform() completes the mapping of the specified points, calculate and determine the mapping relationship of all other points according to the relationship of the specified points.
import cv2
import numpy as np
img=cv2.imread('lena.bmp')
rows, cols, ch=img.shape
p1=np.float32([[0,0], [cols-1,0], [0, rows-1]])
p2=np.float32([[0, rows*0.33], [cols*0.85, rows*0.25], [cols*0.15, rows*0.7]])
M=cv2.getAffineTransform(p1, p2)
dst=cv2.warpAffine(img, M, (cols, rows))
cv2.imshow("origianl", img)
cv2.imshow("result", dst)
cv2.waitKey()
cv2.destroyAllWindows()
perspective
- Affine transformation can map a rectangle to any parallelogram
- Perspective transformation can map a rectangle to any quadrilateral
The perspective transformation passes through the function CV2 Implementation of wapperspective()
dst = cv2.warpPerspective( src, M, dsize[, flags[, borderMode[, borderValue]]] )
- dst represents the output image after perspective processing, which has the same type as the original image. dsize determines the actual size of the output image.
- src represents the image to be perspective.
- M stands for a 3 × 3 transformation matrix.
- dsize represents the size of the output image.
- flags represents the interpolation method, and the default is INTER_LINEAR. When the value is WARP_INVERSE_MAP means that M is the type of inverse transformation, which can realize the inverse transformation from the target image dst to the original image src.
- borderMode represents the edge type, and the default is BORDER_CONSTANT. When the value is BORDER_TRANSPARENT means that the values in the target image do not change, and these values correspond to the abnormal values in the original image.
- borderValue represents the boundary value, which is 0 by default.
Like affine transformation, a function can also be used to generate function CV2 The transformation matrix used by warmperspective().
This function is CV2 Getperspectivetransform(), whose syntax format is:
retval = cv2.getPerspectiveTransform( src, dst )
- src represents the coordinates of the four vertices of the input image.
- dst represents the coordinates of the four vertices of the output image.
src parameters and dst parameters are arrays containing four points, which are the same as affine transformation function CV2 The three points in getaffinetransform () are different.
Image perspective
import cv2
import numpy as np
img=cv2.imread('demo.bmp')
rows, cols=img.shape[:2]
pts1 = np.float32([[150,50], [400,50], [60,450], [310,450]])
pts2 = np.float32([[50,50], [rows-50,50], [50, cols-50], [rows-50, cols-50]])
M=cv2.getPerspectiveTransform(pts1, pts2)
dst=cv2.warpPerspective(img, M, (cols, rows))
cv2.imshow("img", img)
cv2.imshow("dst", dst)
cv2.waitKey()
cv2.destroyAllWindows()
Remapping
The process of placing pixels in one image at a specified position in another image is called remapping.
Remapping function CV2 in OpenCV Remap() has the following syntax format:
dst = cv2.remap( src, map1, map2, interpolation[, borderMode[, borderValue]] )
-
dst represents the target image, which has the same size and type as src.
-
src represents the original image.
-
There are two possible values for the map1 parameter:
- Represents a mapping of (x, y) points.
- Represents cv_ 16SC2 , CV_ 32FC1, CV_ 32x value of type FC2 (x, y) point.
-
The map2 parameter also has two possible values:
- When map1 represents (x, y), the value is empty.
- When map1 represents the x value of (x, y) point, the value is cv_ 16UC1, CV_ 32y value of type FC1 (x, y) point.
MAP1 and MAP2 can represent more than one point
-
Interpolation stands for interpolation mode. Inter is not supported here_ Area method
-
borderMode represents the boundary mode. When the value is border_ When transmitting, the pixels representing the corresponding outliers in the source image in the target image will not be modified.
-
borderValue represents the boundary value, which is 0 by default.
Understanding of mapping parameters
Remapping gets a new image by modifying the position of pixels.
When constructing a new image, it is necessary to determine the position of each pixel in the new image in the original image. Therefore, the function of mapping function is to find the position of new image pixels in the original image. This process is the process of mapping new image pixels to the original image, so it is called reverse mapping.
Parameter map1 and parameter map2 are used to describe the reverse mapping. map1 is for coordinate X and map2 is for coordinate y. The values of map1 and map2 are both floating point numbers. Therefore, the target image can be mapped back to a non integer value, which means that the target image can be "inversely mapped" to the position between two pixels in the original image (where there is no pixel value). Different methods can be used to realize interpolation, and the interpolation parameter in the function can control the interpolation mode.
Since the values of parameter map1 and parameter map2 are floating-point numbers, through the function CV2 Remamp () can realize more arbitrary mapping relations, and different forms of mapping can be realized through custom mapping parameters.
Function CV2 In remap(), parameter map1 refers to the column number where the pixel is located, and parameter map2 refers to the row number where the pixel is located.
For example, if you want to map A point A in the target image (mapping result image) to the pixel point B in row 0 and column 3 in the original image, you need to set the value on the corresponding position of parameter map1 corresponding to point A to 3 and the value on the corresponding position of parameter map2 to 0. Therefore, in general, map1 is written as mapx and map2 is written as mapy.
If you want to map all pixels in the target image (mapping result image) to pixel B in row 0 and column 3 in the original image, you need to set the values in parameter map1 to 3 and the values in parameter map2 to 0.
If you want to map all pixels in the target image (mapping result image) to pixel B in row 0 and column 3 in the original image, you need to set the values in parameter map1 to 3 and the values in parameter map2 to 0.
example
Map all pixels in the target array to pixels in row 0 and column 3 of the original image,
It can be determined that:
- The value in the parameter map1 (mapx) used to specify the column is 3.
- The values in the parameter map2 (mapy) used to specify the row are all 0.
import cv2
import numpy as np
img=np.random.randint(0,256, size=[4,5], dtype=np.uint8)
rows, cols=img.shape
mapx = np.ones(img.shape, np.float32)*3
mapy = np.ones(img.shape, np.float32)*0
rst=cv2.remap(img, mapx, mapy, cv2.INTER_LINEAR)
print("img=\n", img)
print("mapx=\n", mapx)
print("mapy=\n", mapy)
print("rst=\n", rst)
# All values in the target image (array) dst are derived from the pixel value 252 on row 0 and column 3 in the original image.
copy
This function is used to copy the image
During mapping, the parameters are processed as follows:
- Set the value of map1 to the x-axis coordinate value at the corresponding position.
- Set the value of map2 to the y-axis coordinate value at the corresponding position.
import cv2
import cv2
import numpy as np
img=cv2.imread("img\\lena.jpg")
rows, cols=img.shape[:2]
mapx = np.zeros(img.shape[:2], np.float32)
mapy = np.zeros(img.shape[:2], np.float32)
for i in range(rows):
    for j in range(cols):
        mapx.itemset((i, j), j)
        mapy.itemset((i, j), i)
rst=cv2.remap(img, mapx, mapy, cv2.INTER_LINEAR)
cv2.imshow("original", img)
cv2.imshow("result", rst)
cv2.waitKey()
cv2.destroyAllWindows()
Flip around the x axis
If you want to flip the image around the x axis, it means that during the mapping process:
- The value of the x axis remains unchanged.
- The values of the y axis are exchanged with the x axis as the axis of symmetry.
Reflected on map1 and map2:
- The value of map1 remains unchanged.
- The value of map2 is adjusted to "total number of rows - 1 - current line number".
import cv2
import numpy as np
img=cv2.imread("img\\lena.jpg")
rows, cols=img.shape[:2]
mapx = np.zeros(img.shape[:2], np.float32)
mapy = np.zeros(img.shape[:2], np.float32)
for i in range(rows):
	for j in range(cols):
		mapx.itemset((i, j), j)
		mapy.itemset((i, j), rows-1-i)
rst=cv2.remap(img, mapx, mapy, cv2.INTER_LINEAR)
cv2.imshow("original", img)
cv2.imshow("result", rst)
cv2.waitKey()
cv2.destroyAllWindows()
Flip around the y axis
If you want to flip the image around the y axis, it means that during the mapping process:
- The value of the y axis remains unchanged.
- The values of the x-axis are exchanged with the y-axis as the axis of symmetry.
Reflected on map1 and map2:
- The value of map2 remains unchanged.
- The value of map1 is adjusted to "total number of columns - 1 - current column number".
import cv2
import numpy as np
img=cv2.imread("img\\lena.jpg")
rows, cols=img.shape[:2]
mapx = np.zeros(img.shape[:2], np.float32)
mapy = np.zeros(img.shape[:2], np.float32)
for i in range(rows):
	for j in range(cols):
		mapx.itemset((i, j), cols-1-j)
		mapy.itemset((i, j), i)
rst=cv2.remap(img, mapx, mapy, cv2.INTER_LINEAR)
cv2.imshow("original", img)
cv2.imshow("result", rst)
cv2.waitKey()
cv2.destroyAllWindows()
Flip around x-axis and y-axis
- The values of the x-axis are exchanged with the y-axis as the axis of symmetry.
- The values of the y axis are exchanged with the x axis as the axis of symmetry.
Reflected on map1 and map2:
- The value of map1 is adjusted to "total number of columns - 1 - current column number".
- The value of map2 is adjusted to "total number of rows - 1 - current line number".
import cv2
import numpy as np
img=cv2.imread("img\\lena.jpg")
rows, cols=img.shape[:2]
mapx = np.zeros(img.shape[:2], np.float32)
mapy = np.zeros(img.shape[:2], np.float32)
for i in range(rows):
	for j in range(cols):
		mapx.itemset((i, j), cols-1-j)
		mapy.itemset((i, j), rows-1-i)
rst=cv2.remap(img, mapx, mapy, cv2.INTER_LINEAR)
cv2.imshow("original", img)
cv2.imshow("result", rst)
cv2.waitKey()
cv2.destroyAllWindows()
x-axis and y-axis are interchangeable
If you want the x-axis and Y-axis of the image to be interchanged, it means that the x-axis and y-axis coordinates of any point need to be interchanged in the mapping process.
Reflected on mapx and mapy:
- The value of mapx is adjusted to the line number of the line.
- The value of mapy is adjusted to the column number of the column.
If the number of rows and columns are inconsistent, the above operations may have values that cannot be mapped. By default, values that cannot be mapped are processed to 0.
import cv2
import numpy as np
img=cv2.imread("img\\lena.jpg")
rows, cols=img.shape[:2]
mapx = np.zeros(img.shape[:2], np.float32)
mapy = np.zeros(img.shape[:2], np.float32)
for i in range(rows):
	for j in range(cols):
		mapx.itemset((i, j), i)
		mapy.itemset((i, j), j)
rst=cv2.remap(img, mapx, mapy, cv2.INTER_LINEAR)
cv2.imshow("original", img)
cv2.imshow("result", rst)
cv2.waitKey()
cv2.destroyAllWindows()
Image scaling
Use function CV2 Remap() reduces the image.
After reducing the image, you can fix the image in an area around its center.
-
Generating a reduced image within the x-axis (0.25 · X-axis length, 0.75 · X-axis length) interval of the target image; The points in the rest of the x-axis are sampled from the value of any point on the x-axis.
-
Generating a reduced image in the y-axis (0.25 · Y-axis length, 0.75 · Y-axis length) interval of the target image; The points in the rest of the y-axis are sampled from the value of any point on the y-axis.
For the convenience of processing, all points not in the above area take the value of (0,0) coordinate points.
import cv2
import numpy as np
img=cv2.imread("img\\lena.jpg")
rows, cols=img.shape[:2]
mapx = np.zeros(img.shape[:2], np.float32)
mapy = np.zeros(img.shape[:2], np.float32)
for i in range(rows):
	for j in range(cols):
		if 0.25*cols< i <0.75*cols and 0.25*rows< j <0.75*rows:
			mapx.itemset((i, j),2*( j - cols*0.25 ) + 0.5)   # x1 mapping function on x (x:0,x1:0.25) (x:1,x1:0.75)
			mapy.itemset((i, j),2*( i - rows*0.25 ) + 0.5)
		else:
			mapx.itemset((i, j),0)
			mapy.itemset((i, j),0)
rst=cv2.remap(img, mapx, mapy, cv2.INTER_LINEAR)
cv2.imshow("original", img)
cv2.imshow("result", rst)
cv2.waitKey()
cv2.destroyAllWindows()