Image operation
Image addition
-
The image can be added by the plus operator "+" or CV2 The add() function adds the image.
-
The sum obtained is likely to exceed 255. The above two different addition operation methods have different processing methods for values exceeding 255.
Plus operator

"mod(a+b, 256)" means calculating "the sum of a+b divided by 256"
By defining the numeric type of the array as dtype = NP Uint8 can ensure that the range of array values is between [0255].
cv2.add

- Calculation result = CV2 Add (image 1, image 2). Both parameters are images. At this time, the size and type of images involved in the operation must be consistent.
- Calculation result = CV2 Add (value, image). The first parameter is the value and the second parameter is the image. At this time, the value exceeding the image saturation value is processed as the saturation value (maximum value).
- Calculation result = CV2 Add (image, value). The first parameter is the image and the second parameter is the value. At this time, the value exceeding the image saturation value is processed as the saturation value (maximum value).
Image weighted sum
When calculating the sum of pixel values of two images, the weight of each image is taken into account
dst=saturate(src1×α+src2×β+γ)
saturate() means to take the saturation value (maximum value)
When calculating the weighted sum of images, src1 and src2 must be the same size and type, but there are no special restrictions on the specific type and channel.
The function CV2 is provided in OpenCV Addweighted() is used to realize the weighted sum (mixing and fusion) of images
dst=cv2.addWeighted(src1, alpha, src2, beta, gamma)
-
The parameters alpha and beta are the coefficients corresponding to src1 and src2. Their sum can be equal to or not equal to 1. The function implemented by this function is dst = src1 × alpha + src2 × beta + gamma
-
In the formula, the value of parameter gamma can be 0, but this parameter is a required parameter and cannot be omitted
The above formula can be understood as "result image = image 1" × Coefficient 1 + image 2 × Factor 2 + brightness adjustment ".
Bitwise logical operation
Common bit operation functions

Bitwise AND
Bitwise and operation refers to the and operation at the corresponding position after converting the numerical value into binary value.
Use CV2 bitwise_ And() function to realize bitwise and operation
dst = cv2.bitwise_and( src1, src2[, mask] )
- dst represents the array output value with the same size as the input value
- src1 represents the input value of the first array or scalar type
- src2 represents the input value of the second array or scalar type
- Mask indicates optional operation mask, 8-bit single channel array
The specified part is extracted using a mask for the color image in BGR mode.
Because the bitwise operation requires that the data involved in the operation have the same channel, it is impossible to directly bitwise and operate the color image and the mask image of a single channel. In general, the mask operation can be realized by converting the mask image into the color image in BGR mode and performing bit-by-bit and operation between the color image and the mask image
a. Get dimension data of a image by shape
Bitwise OR
dst = cv2.bitwise_or( src1, src2[, mask] )
- dst represents the array output value with the same size as the input value.
- src1 represents the first input value of type array or scalar.
- src2 represents the input value of the second array or scalar type.
- Mask indicates the optional operation mask, 8-bit single channel array value.
Bitwise non
Bitwise non operation refers to the non operation at the corresponding position after converting the numerical value into binary value
dst = cv2.bitwise_not( src[, mask] )
- dst represents the array output value with the same size as the input value.
- src represents an input value of type array.
- Mask indicates the optional operation mask, 8-bit single channel array value.
Bitwise XOR
XOR operation is also called semi addition operation. Its algorithm is similar to binary addition without carry
After conversion to binary value, XOR operation is performed at the corresponding position
dst = cv2.bitwise_xor( src1, src2[, mask] )
- dst represents the array output value with the same size as the input value.
- src1 represents the first input value of type array or scalar.
- src2 represents the input value of the second array or scalar type.
- Mask indicates the optional operation mask, 8-bit single channel array value.
Mask
For example:
Calculation result = CV2 Add (parameter 1, parameter 2, mask)
When the mask parameter is used, the operation will only be performed on the pixels whose mask value is not empty, and the values of other pixels will be set to 0.
The mask parameter used in the function can be an 8-bit single channel image. Therefore, the mask image can be used as a bitwise sum function CV2 bitwise_ And (SRC1, src2 [, mask]]) to complete the mask operation.
At this time, let the color image to be processed be the function CV2 at the same time bitwise_ And (src1, src2 [, mask]]), using the mask image as the mask parameter and completing the bitwise sum operation, the color image controlled by the mask can be obtained.
The mask parameters used control which regions in the target image are the values of the color image and which regions are 0.
Image and numerical operation
In addition operation and bitwise operation, the two operators (parameters) involved in the operation can be two images, one image and one value.
img4=cv2.add(img1,6)
Bit plane decomposition
The binary pixel values on the same bit in the gray image are combined to obtain a binary value image. The image is called a bit plane of the gray image. This process is called bit plane decomposition
For example, the "least significant bit" bit plane can be formed by combining the values on the lowest bit in the binary bit on all pixels in a gray image.
The bit plane composed of ai values of all pixel values in the image is called the ith bit plane (layer i)
In the 8-bit gray image, 8 binary images can be formed, that is, the original image can be decomposed into 8 bit planes.
The weight of each ai in the pixel value is different
- a7 has the highest weight, and its bit plane has the highest correlation with the original image. This bit plane usually looks most similar to the original image.
- a0 has the lowest weight, and the bit plane formed has the lowest correlation with the original image. The plane usually looks chaotic.
For RGB images, if the bit planes corresponding to each of the R channel, G channel and B channel are combined, a new RGB color image can be formed. For example, for an RGB image, combining the third bit plane of R channel, the third bit plane of G channel and the third bit plane of B channel can form a new RGB color image, which we call the third bit plane of the original image.
Specific steps of bit plane decomposition
-
Image preprocessing
Read the original image O and obtain the width M and height N of the original image o.
-
Construct extraction matrix
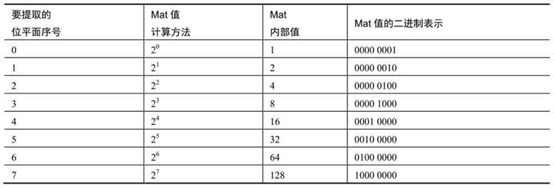
Using bitwise and operation can easily extract the number on the specified bit of a numerical value.
A Mat with values of 2n is established as the extraction matrix (array) to perform bitwise sum operation with the original image to extract the nth bit plane.
-
Extract bit plane
The gray image and the extraction matrix are bitwise summed to obtain each bit plane.
By bitwise summing the pixel value with a value of 2n, the nth bit of the pixel value can remain unchanged and the rest bits can be set to zero. Therefore, through the bitwise sum operation between the pixel value and the specific value, the value of the specified binary bit of the pixel value can be extracted. Similarly, through bitwise and operation, the finger positioning plane of the image can be extracted.
The extracted bit plane can also be obtained by moving the binary pixel value to the right, pointing to the lowest position, and then taking the modulus of 2. For example, to extract the nth bit plane, move the pixel to the right by n bits, and then take the modulus of 2 to obtain the nth bit plane. (note the lack of corresponding coefficient obtained at this time)
-
Threshold processing
If the weights of different bit planes are different, threshold processing is not required
The bit plane obtained by calculation is a binary image. If the bit plane obtained above is displayed directly, an approximate black image will be obtained.
In other words, after extracting the bit plane each time, if you want the binary bit plane to be displayed in black and white, you need to threshold the obtained binary bit plane and process the value greater than zero to 255.
For example, threshold the obtained bit plane RD, and adjust the bit plane greater than 0 to 255. The specific statement is as follows:
# With numpy
mask=RD[:, :, i]>0
RD[mask]=255
First, use mask = RD [:,:, I] > 0 to process RD:
- Processes values greater than 0 in RD as logical True.
- Treat values less than or equal to 0 in RD as logical False.
- Use RD[mask]=255 to replace the value on the corresponding "logical value in mask is true" position in RD with 255
-
Display image
Example: the 8 channels of matrix X are used to extract 8 bit planes of gray image respectively. For example, x [:,:, 0] is used to extract the 0th bit plane of gray image.
The seventh bit plane is the binary image closest to the original image.
import cv2
import numpy as np
lena=cv2.imread("img/lena.jpg",0) # Set the parameter to 0, that is, read it in gray mode
cv2.imshow("lena", lena)
r, c=lena.shape
x=np.zeros((r, c,8), dtype=np.uint8)
for i in range(8):
    x[:, :, i]=2**i
    x[:, :, i]=cv2.bitwise_and(lena, x[:, :, i])
    # mask=x[:, :, i]>0
    # x[mask]=255
    cv2.imshow(str(i), x[:, :, i])
cv2.waitKey()
cv2.destroyAllWindows()
Image encryption and decryption
Image encryption and decryption can be realized by bitwise XOR operation.
#Face coding and decoding using mask and bit-by-bit operation
import cv2
import numpy as np
#Read the original carrier image
lena=cv2.imread("img/lena.jpg",0)
#Read the shape value of the original carrier image
r, c=lena.shape
mask=np.zeros((r, c), dtype=np.uint8)
mask[220:400,250:350]=1
#Get a key, the key used for coding and decoding
key=np.random.randint(0,256, size=[r, c], dtype=np.uint8)
#============Get code face============
#Use the key to encrypt the lena of the original image
lenaXorKey=cv2.bitwise_xor(lena, key)
#Obtain the face information of the encrypted image encryptFace
encryptFace=cv2.bitwise_and(lenaXorKey, mask*255)
#Set the face value in the image lena to 0 to obtain noFace1
noFace1=cv2.bitwise_and(lena, (1-mask)*255)
#Get the coded lena image
maskFace=encryptFace+noFace1
#============Decode the coded face============
#XOR the face coded lena with the key to obtain the original information of the face
extractOriginal=cv2.bitwise_xor(maskFace, key)
#Extract the decoded facial information extractOriginal to obtain extractFace
extractFace=cv2.bitwise_and(extractOriginal, mask*255)
#Extract the lena image without face information from the lena of face coding to obtain noFace2
noFace2=cv2.bitwise_and(maskFace, (1-mask)*255)
#Get the decoded lena image
extractLena=noFace2+extractFace
#============Display image============
cv2.imshow("lena", lena)
cv2.imshow("mask", mask*255)
cv2.imshow("1-mask", (1-mask)*255)
cv2.imshow("key", key)
cv2.imshow("lenaXorKey", lenaXorKey)
cv2.imshow("encryptFace", encryptFace)
cv2.imshow("noFace1", noFace1)
cv2.imshow("maskFace", maskFace)
cv2.imshow("extractOriginal", extractOriginal)
cv2.imshow("extractFace", extractFace)
cv2.imshow("noFace2", noFace2)
cv2.imshow("extractLena", extractLena)
cv2.waitKey()
cv2.destroyAllWindows()
digital watermarking
Least significant bit (LSB) refers to the 0th bit (i.e. the lowest bit) of a binary number.
Least significant bit information hiding refers to embedding a binary image information that needs to be hidden into the least significant bit of the carrier image, that is, replacing the least significant bit layer of the carrier image with the binary image that needs to be hidden, so as to achieve the purpose of hiding the binary image.
Because the binary image is in the least significant bit of the carrier image, the influence on the carrier image is very insignificant, and it has high concealment.
If necessary, the least significant bit layer of the carrier image is directly extracted to obtain the binary image embedded in the bit, so as to achieve the purpose of extracting secret information.
This kind of information hiding is also called digital watermark. In this way, the functions of information hiding, copyright authentication, identity authentication and so on can be realized
In gray-scale binary images, there are only two types of pixel values: 0 and 255, which are used to represent black and white respectively.
Since the least significant bit of information has limited influence on the size of the value, after replacing the value of the least significant bit of the carrier image with the watermark information, the value of the pixel of the carrier image does not change much, the human eye is not enough to see the difference, and the watermark has high concealment.
To retain the top seven bits of the image, there is another implementation method, that is, first move the pixel one bit to the right, and then move the pixel one bit to the left.
The least significant bit of the pixel value can be obtained by modulo 2 of the pixel value. Therefore, the "least significant bit" bit plane of the image can be obtained by making the carrier image with watermark model 2, and the extracted bit plane is the watermark information.
import cv2
import numpy as np
#Read the original carrier image
lena=cv2.imread("img/lena.jpg",0)
#Read watermark image
watermark=cv2.imread("img/watermark.jpg",0)
#The value 255 in the watermark image is processed to 1 to facilitate embedding
#The use of threshold processing will be described in subsequent chapters
w=watermark[:, :]>0
watermark[w]=1
#Read the shape value of the original carrier image
r, c=lena.shape
#============Embedding process============
#Generate an array with element values of 254
t254=np.ones((r, c), dtype=np.uint8)*254
#Get the top seven bits of lena image
lenaH7=cv2.bitwise_and(lena, t254)
#Embed watermark into lenaH7
e=cv2.bitwise_or(lenaH7, watermark)
#============Extraction process============
#Generate an array with element values of 1
t1=np.ones((r, c), dtype=np.uint8)
#Extracting watermark image from carrier image
wm=cv2.bitwise_and(e, t1)
print(wm)
#The value 1 in the watermark image is processed to 255 to facilitate display
#The following chapters will introduce the implementation of threshold
w=wm[:, :]>0
wm[w]=255
#============Display============
cv2.imshow("lena", lena)
cv2.imshow("watermark", watermark*255)   #The maximum value in the current watermark is 1
cv2.imshow("e", e)
cv2.imshow("wm", wm)
cv2.waitKey()
cv2.destroyAllWindows()