1, Draw simple geometry and add text
Drawing graphics in opencv is very simple. We only need to use the following common functions.
#Draw a line
cv2.line()
#Draw a circle
cv2.circle()
#Draw rectangle
cv. rectangle()
#Draw an ellipse
cv.ellipse()
#Add text to image
cv.putText()
In all the above functions, we can see some common parameters, as shown below:
- img: we want to draw an image of the shape
- Color: the color of the shape. For BGR, pass it as a tuple. For example: (255, 0, 0) is blue. For grayscale images, we only need to pass scalar values.
- Thickness: the thickness of a line or circle. If you pass - 1 to a closed shape, such as a circle, it fills the entire shape. Default thickness = 1
- line Type: type of line, whether it is 8 connecting line, anti aliasing line, etc. By default, it is 8 connectors. (for curves, * CV. LINE AA * can be selected, which is an anti aliasing line)
Let's take a look at the specific applications of each function:
Draw lines:
To draw a line, we need to transfer the start and end coordinates of the line. Next, we will create a black image and draw a blue line on it from the upper left corner to the lower right corner.
import numpy as np
import cv2 as cv

# Create a black image
img = np.zeros((512,512,3), np.uint8)
# Draw a blue diagonal with a thickness of 5
cv.line(img,(0,0),(511,511),(255,0,0),5)
Draw rectangle:
To draw a rectangle, we need the coordinates of the upper left and lower right corners of the rectangle. This time, we will draw a green rectangle in the upper right corner of the image.
cv.rectangle(img,(384,0),(510,128),(0,255,0),3)
Draw a circle:
To draw a circle, we need its center coordinates and radius. Next, we will draw a circle in the rectangle drawn above.
cv.circle(img,(447,63), 63, (0,0,255), -1)
Draw an ellipse:
To draw an ellipse, we need to pass several parameters. One parameter is the center position (x, y). The next parameter is the shaft length (L)
Shaft length (minor shaft length). Angle is the angle at which the ellipse rotates counterclockwise. startAngle and endAngle represent slave spindles
The beginning and end of an elliptical arc measured in a clockwise direction. If we pass 0 and 360, we can get a complete ellipse. Let's draw an ellipse in the center of the image.
cv.ellipse(img,(256,256),(100,50),0,0,180,255,-1)
What should we do if we want to draw irregular polygons?
Draw polygon:
To draw a polygon, we first need the coordinates of the vertices. Form these points into an array with the shape ROWSx1x2, where ROWS is the vertex number and its type should be int32. Next, we draw a small yellow polygon with four vertices.
pts = np.array([[10,5],[20,30],[70,20],[50,10]], np.int32)
pts = pts.reshape((-1,1,2))
cv.polylines(img,[pts],True,(0,255,255))
Note: CV Polylines() can be used to draw multiple lines. Just create a list of all the lines to draw and pass it to the function. If the third parameter is False, a polyline connecting all points is obtained instead of a closed shape.
To add text to an image:
To put text into an image, we need to pass the following parameters:
- Text data to be written.
- The coordinates where you want to place it (that is, the lower left corner of the beginning of the text).
- Font type (we can check the * * cv.putText * * document for supported fonts).
- Font scale (we can specify the font size)
- General content, such as color, thickness, line type, etc. For a better look, we can use linetype = cv LINE_ AA.
Let's write opencv on the image:
font = cv.FONT_HERSHEY_SIMPLEX
cv.putText(img,'OpenCV',(10,500), font, 4,(255,255,255),2,cv.LINE_AA)
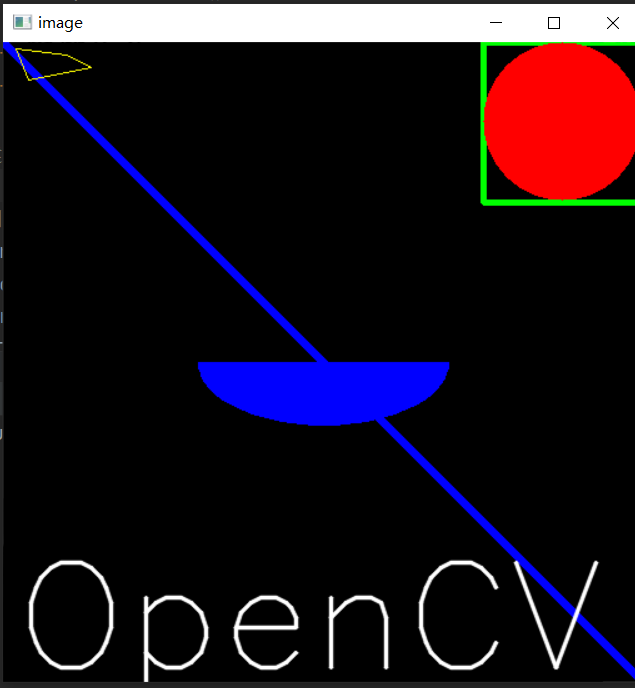
Let's look at the final image:
# Create a black image
img = np.zeros((512, 512, 3), np.uint8)
# Draw a blue diagonal with a thickness of 5
cv.line(img, (0, 0), (511, 511), (255, 0, 0), 5)
cv.rectangle(img, (384, 0), (510, 128), (0, 255, 0), 3)
cv.circle(img, (447, 63), 63, (0, 0, 255), -1)
cv.ellipse(img, (256, 256), (100, 50), 0, 0, 180, 255, -1)
pts = np.array([[10, 5], [20, 30], [70, 20], [50, 10]], np.int32)
pts = pts.reshape((-1, 1, 2))
cv.polylines(img, [pts], True, (0, 255, 255))
font = cv.FONT_HERSHEY_SIMPLEX
cv.putText(img, 'OpenCV', (10, 500), font, 4, (255, 255, 255), 2, cv.LINE_AA)
cv.imshow('image', img)
cv.waitKey(0)
cv.destroyAllWindows()
Final effect: