I. contour detection
Although edge detection can detect edges, its edges are not continuous. The image contour is used to detect a whole for subsequent processing. opencv provides two functions to complete these operations:
findContours(): this function can find contours
drawContours(): draw contours
The difference between contour and edge is that contour is a complete and continuous edge. Pixels on the contour represent continuous curves in the actual image - that is, the contour of the object.
Specific usage of function:
contours, hierarchy = cv2.findContours(img, mode=, method=)
Description of incoming parameters:
img: incoming image
Mode: the retrieval mode of the contour. The specific parameters are as follows:
RETR_EXTERNAL:Retrieve only the outermost contour

RETR_LIST:Retrieve all contours and save them to a linked list
.The simplest way to create a contour is not to save its parent-child relationship.
At this time hierarchy in Fist_Child,Parent All values are-1 Storage.

RETR_CCOMP:Retrieve all contours and organize them into two layers. The top layer is the outer boundary of each part, and the second layer is the boundary of the cavity;

RETR_TREE:Retrieve all contours and reconstruct the whole hierarchy of nested contours; More commonly used
Method: contour approximation method. Its parameters are as follows:
CHAIN_APPROX_NONE:with Freeman The contour is output by chain code, and the sequence of polygons (vertices) is output by all other methods).
CHAIN_APPROX_SIMPLE:Compress the horizontal, vertical, and oblique parts, and the function retains only the end part
 wait
Return Parameter Description:
Contours: this return value returns a set of contour information. Each contour is composed of several points. Its type is list, so you can use the index to find the ith point on the ith contour. Each element stored in the variable is of type ndarray. To obtain the number of contours, you can use:
len(contours)
Get the number of points per contour using:
len(contours[The number of pages you want to index i Elements]
use. shape gets the properties of each profile
hierarchy: the contour in the image may have an inclusion relationship, which forms a parent-child contour. Generally, the surrounded contour is called the parent contour, and the inner contour is called the child contour.
Each contour has four elements to illustrate its relationship, and its idea can refer to the idea of binary tree. The form is:
[
Next: next contour number
Previous: previous contour index
Fist_Child: first sub contour number
Parent: parent profile index number
]
2, Code implementation
1. The code is as follows:
For higher accuracy, use binary images:
def f_contours():
    img = cv.imread("cup.jpg")
    # draw will change the original image. Here is a backup
    img_copy = img.copy()
    gray = cv.cvtColor(img, cv.COLOR_BGR2GRAY)
    ret, thresh = cv.threshold(gray, 128, 255, cv.THRESH_BINARY)
    cv_show(thresh)
    # This function only supports receiving single color channel images, otherwise an error is reported
    contours, hierarchy = cv.findContours(thresh, cv.RETR_TREE, cv.CHAIN_APPROX_NONE)
    print(len(contours))
    result = cv.drawContours(img_copy, contours, -1, (0, 0, 255), 2)
    cv_show(result)
Possible errors in self implementation:
error: (-210:Unsupported format or combination of formats) [Start]FindContours supports only CV_8UC1 images
It is interpreted that the findContours function only supports accepting cv_ A picture in 8uc1 format means that 8 indicates that the storage space of a pixel is 8bit, U indicates unsigned integer when data is used, C indicates color channel, and C1 indicates that the number of color channels is 1. Remember to use gray-scale image here!
The code effect is as follows:

2. Calculate the features of the profile
Profile geometry:
# The area cnt represents the current contour to be calculated and can be indexed using cnt = contours[i]
cv2.contourArea(cnt)
# Perimeter True indicates closure
cv2.arcLength(cnt, True)
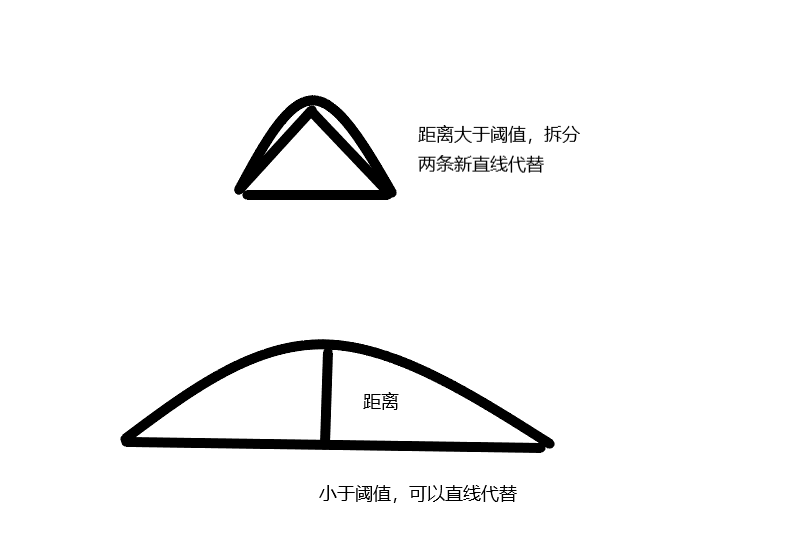
Contour approximation: sometimes the overall contour is rectangular, but there are some line burrs on the contour boundary. If you want a regular contour, you can use contour approximation.
The idea is to approximate the fine curve with a straight line. For the points on the curve, the distance from the two ends of the straight line can be measured, and then by setting a reasonable threshold, the points less than the threshold distance can be approximate to the points on the straight line composed of the end points. When the distance is greater than the threshold, you can connect the points at both ends to form two straight lines, and then see if the middle point can be replaced by these two straight lines.
The code is as follows:
def f_contours():
"""
Contour finding and drawing
:return:
"""
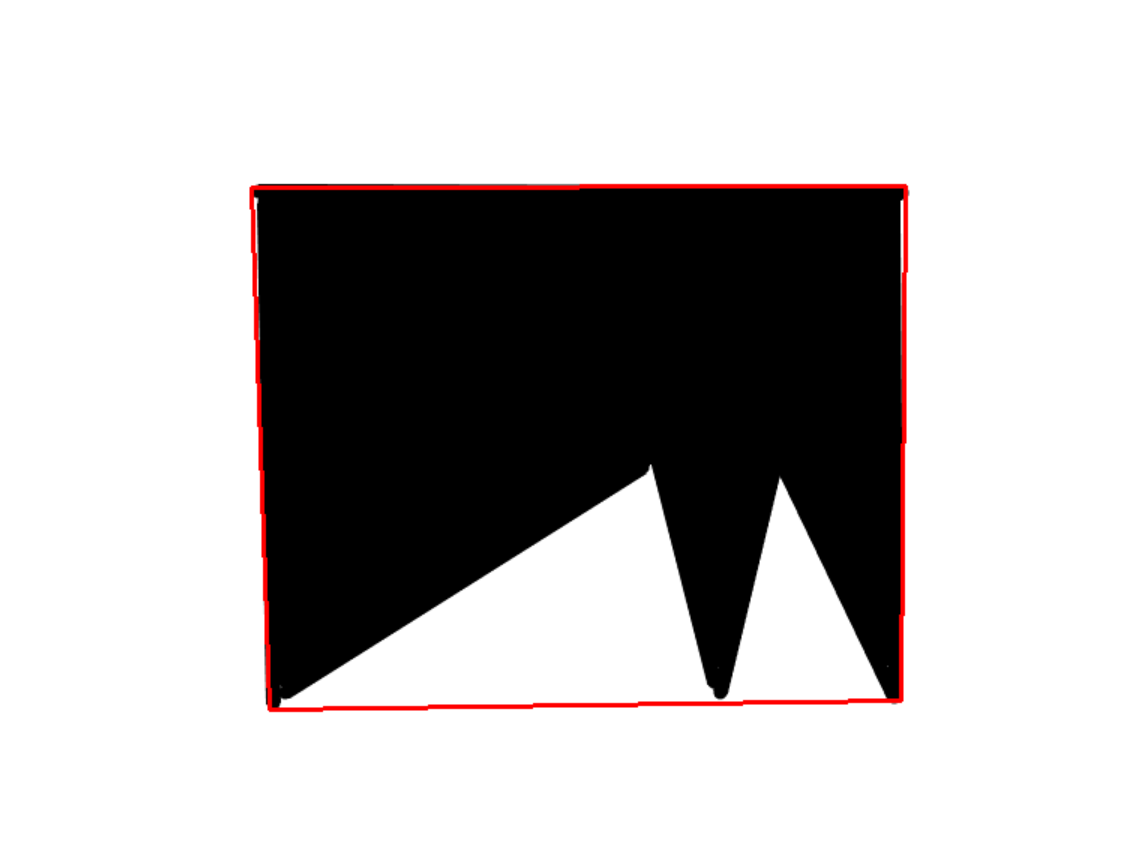
# Temporarily draw the following picture with a drawing board to demonstrate the boundary
img = cv.imread("kk.png")
# draw will change the original image. Here is a backup
img_copy = img
draw_img = img.copy()
# Converted gray image
gray = cv.cvtColor(img, cv.COLOR_BGR2GRAY)
# Threshold binarization
ret, thresh = cv.threshold(gray, 100, 255, cv.THRESH_BINARY)
cv_show(thresh)
# This function only supports receiving single color channel images, otherwise an error is reported
contours, hierarchy = cv.findContours(thresh, cv.RETR_TREE, cv.CHAIN_APPROX_NONE)
print(len(contours))
result = cv.drawContours(img_copy, contours, -1, (0, 0, 255), 2)
cv_show(result)
cnt = contours[1]
# The 0.1 is an adjustable parameter. The smaller the parameter, the more boundary details
epsilon = 0.1*cv.arcLength(cnt, True)
approx = cv.approxPolyDP(cnt, epsilon, True)
result1 = cv.drawContours(draw_img, [approx], -1, (0, 0, 255), 2)
cv_show(result1)
The effect is as follows:
0.1 parameter, which can be understood as a concept similar to learning rate or step size:
The larger the step, the larger the span, and the original boundaries are replaced by straight lines.