Original link: http://www.juzicode.com/opencv-python-matchtemplate
Return to opencv Python tutorial
Template matching can find the feature image in the source image. The feature image is generally a rectangular image. In the previous article, orange fungus also introduced some methods about "matching" function, such as morphological transformation Hit or miss , its requirements are very high. If there is any small difference in pixel values, it will lead to miss, that is, it can not be matched. In addition, for example, the histogram reflection can be used to match the area of a certain color.
The process of matchTemplate() template matching is to use the template image as a sliding window to slide in the source image. For each pixel, record the matching degree at that pixel. This matching degree is a floating-point value. After matchTemplate() calculates the matching degree, you can use minMaxLoc() Calculate the value and position with the greatest matching degree, or use thresholding to find the position that meets a certain threshold.
1. Function interface
Interface form of template matching:
cv2.matchTemplate(image,templ,method[,result[,mask]])->result
- Parameter meaning:
- Image: source image, image to be matched, 8bit integer type, 32bit floating point type, single channel or multi-channel;
- templ: template image, type homologous image, size must be smaller than source image;
- Method: matching method;
- mask: mask;
- Result: the returned result is 32bit floating-point type, and the source image is w × H. The template image is w × h. The generated image object is (w − w+1) × (H−h+1);
There are 6 matching methods TemplateMatchModes, which can use the corresponding CV2 TM_ XXX incoming Python interface:
enum  	cv::TemplateMatchModes {
  cv::TM_SQDIFF = 0,
  cv::TM_SQDIFF_NORMED = 1,
  cv::TM_CCORR = 2,
  cv::TM_CCORR_NORMED = 3,
  cv::TM_CCOEFF = 4,
  cv::TM_CCOEFF_NORMED = 5
}
2. Template matching usage
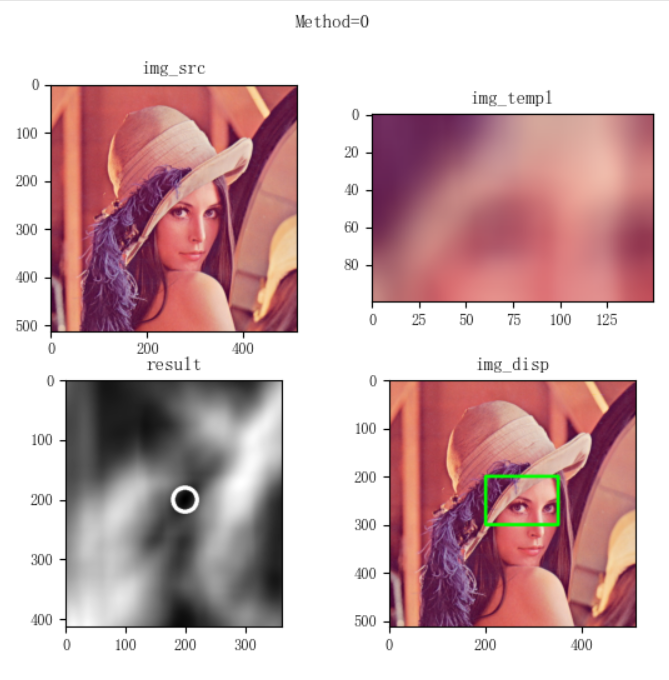
The following example reads out the lena diagram from the file, intercepts part of it as the template image, and then uses the above six modes for template matching. After matching, find the maximum matching position, mark and display it:
import numpy as np
import matplotlib.pyplot as plt
import cv2
print('VX official account: Orange code / juzicode.com')
print('cv2.__version__:',cv2.__version__)
plt.rc('font',family='Youyuan',size='9')
plt.rc('axes',unicode_minus='False')

#Read in the image and take the screenshot as the template image
img_src = cv2.imread('..\\lena.jpg' )
img_templ = img_src[200:300,200:350].copy()
print('img_src.shape:',img_src.shape)
print('img_templ.shape:',img_templ.shape)

for method in range(6):
    #template matching
    result = cv2.matchTemplate(img_src, img_templ, method)
    print('result.shape:',result.shape)
    print('result.dtype:',result.dtype)
    #Calculate matching position
    min_max = cv2.minMaxLoc(result)
    if method == 0 or method == 1:   #According to different patterns, the best matching location has different methods
        match_loc = min_max[2]
    else:
        match_loc = min_max[3]
    #Note that when calculating the coordinates of the lower right corner, the width represented by the template image shape[1] shall be added to the x coordinate and the height shall be added to the y coordinate
    right_bottom = (match_loc[0] + img_templ.shape[1], match_loc[1] + img_templ.shape[0])
    print('result.min_max:',min_max)
    print('match_loc:',match_loc)
    print('right_bottom',right_bottom)
    #marking position
    img_disp = img_src.copy()
    cv2.rectangle(img_disp, match_loc,right_bottom, (0,255,0), 5, 8, 0 )
    cv2.normalize( result, result, 0, 255, cv2.NORM_MINMAX, -1 )
    cv2.circle(result, match_loc, 10, (255,0,0), 2 )
    #Display image
    fig,ax = plt.subplots(2,2)
    fig.suptitle('Method=%d'%method)
    ax[0,0].set_title('img_src')
    ax[0,0].imshow(cv2.cvtColor(img_src,cv2.COLOR_BGR2RGB))
    ax[0,1].set_title('img_templ')
    ax[0,1].imshow(cv2.cvtColor(img_templ,cv2.COLOR_BGR2RGB))
    ax[1,0].set_title('result')
    ax[1,0].imshow(result,'gray')
    ax[1,1].set_title('img_disp')
    ax[1,1].imshow(cv2.cvtColor(img_disp,cv2.COLOR_BGR2RGB))
    #ax[0,0].axis('off');ax[0,1].axis('off');ax[1,0].axis('off');ax[1,1].axis('off')
    plt.show()
Here is an example:
First, read in the image and intercept part of it as a template image:
img_src = cv2.imread('..\\lena.jpg' )
img_templ = img_src[200:300,200:350].copy()
print('img_src.shape:',img_src.shape)
print('img_templ.shape:',img_templ.shape)

-----
img_src.shape: (512, 512, 3)
img_templ.shape: (100, 150, 3)
matchTemplate() passes in the image to be matched, the template image and the matching method. The result is a single channel floating-point image of float32 type. Its width is source image width template width + 1 = 512-150 + 1 = 363, and its height is 512-100 + 1 = 363:
    result = cv2.matchTemplate(img_src, img_templ, method)
    print('result.shape:',result.shape)
    print('result.dtype:',result.dtype)
-----
result.shape: (413, 363)
result.dtype: float32
Next, use minMaxLoc() to calculate the best match position. When the method input parameter of matchTemplated() is CV2 TM_ Sqdiff and CV2 TM_ SQDIFF_ When normalized (integer values are 0 and 1 respectively), the best matching position is at the minimum value position calculated by minMaxLoc, and the others are at the maximum value position; in addition, note that when calculating the coordinates of the lower right corner of the matching position, the x coordinate should add the width represented by the template image shape[1], and the y coordinate should add the height:
#Calculate matching position
min_max = cv2.minMaxLoc(result)
if method == 0 or method == 1: #According to different patterns, the best matching location has different methods
match_loc = min_max[2]
else:
match_loc = min_max[3]
#Note that when calculating the coordinates of the lower right corner, the width represented by the template image shape[1] shall be added to the x coordinate and the height shall be added to the y coordinate
right_bottom = (match_loc[0] + img_templ.shape[1], match_loc[1] + img_templ.shape[0])
print('result.min_max:',min_max)
print('match_loc:',match_loc)
print('right_bottom',right_bottom)
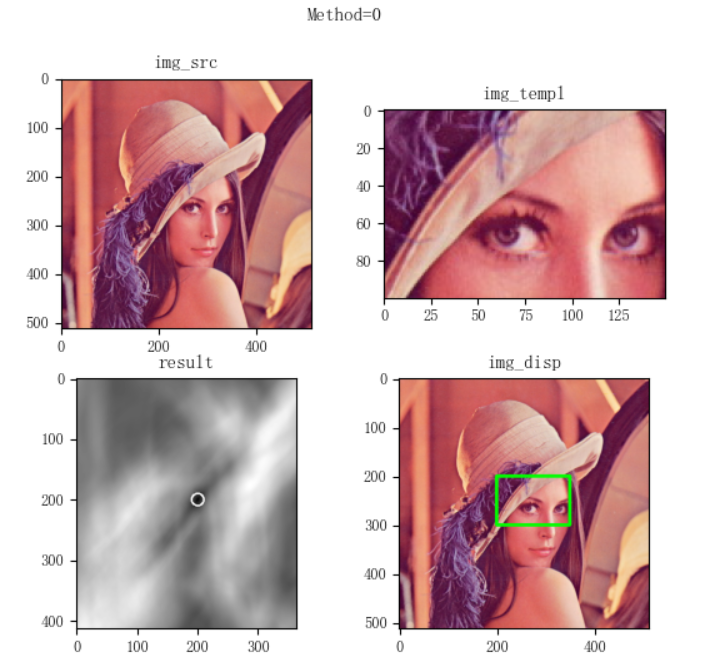
-----method=0 When:
result.min_max: (0.0, 366265728.0, (200, 200), (286, 176))
match_loc: (200, 200)
right_bottom (350, 300)
-----method=5 When:
result.min_max: (-0.42276841402053833, 1.0, (275, 233), (200, 200))
match_loc: (200, 200)
right_bottom (350, 300)Finally, use the calculated starting point and the lower right corner to mark the matching position, mark the square area matched with the template in the original image, and mark the point with the highest matching degree with a circle in the matching result image:
    #marking position
    img_disp = img_src.copy()
    cv2.rectangle(img_disp, match_loc,right_bottom, (0,255,0), 5, 8, 0 )
    cv2.normalize( result, result, 0, 255, cv2.NORM_MINMAX, -1 )
    cv2.circle(result, match_loc, 10, (255,0,0), 2 )
The rest is to plot and display with matplotlib:
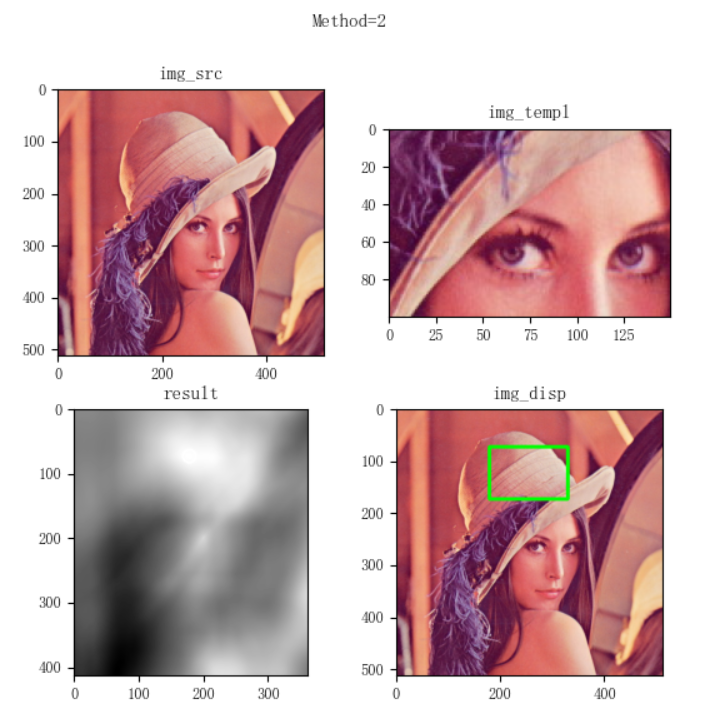
However, the results obtained from the orange fungus experiment show that when method=2 (cv2.TM_CCORR), the calculated best matching position is very different from other methods. From the printed matching position, when method=2, the best matching position is (178, 74), and other matching correct methods are (200200):
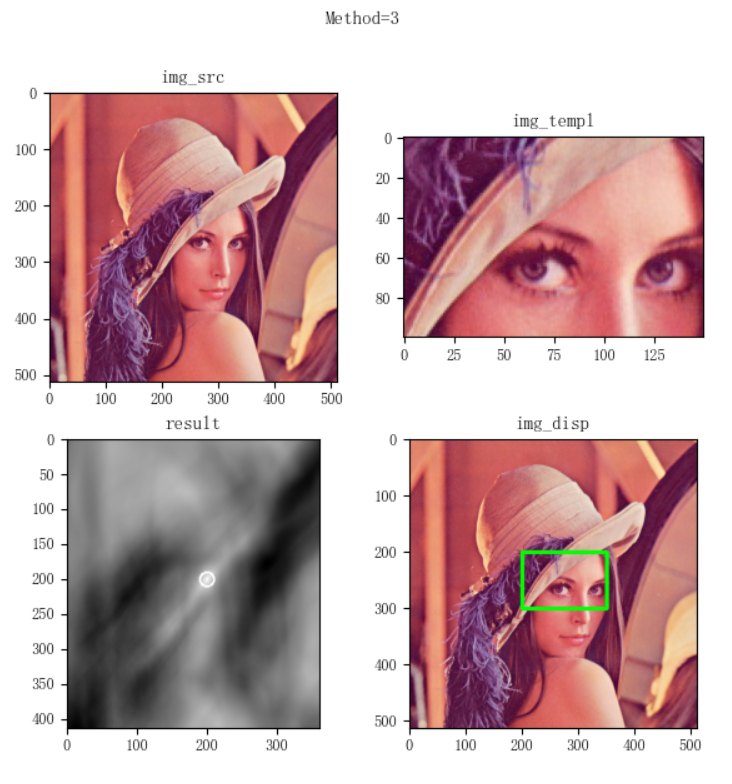
-----method=2
result.shape: (413, 363)
result.dtype: float32
result.min_max: (545996224.0, 1132292608.0, (67, 405), (178, 74))
match_loc: (178, 74) -----Different from other methods, the location is(178, 74)
right_bottom (328, 174)
-----method=3
result.shape: (413, 363)
result.dtype: float32
result.min_max: (0.8143631219863892, 1.0, (285, 178), (200, 200))
match_loc: (200, 200) -----Several other matching methods are based on(200, 200)
right_bottom (350, 300)
-----method=4
result.shape: (413, 363)
result.dtype: float32
result.min_max: (-52557180.0, 115222456.0, (286, 178), (200, 200))
match_loc: (200, 200)
right_bottom (350, 300)
-----method=5
result.shape: (413, 363)
result.dtype: float32
result.min_max: (-0.42276841402053833, 1.0, (275, 233), (200, 200))
match_loc: (200, 200)
right_bottom (350, 300)
In addition, from the displayed image, the marked matching image is also wrong:
3. There is a difference between the source image and the template image
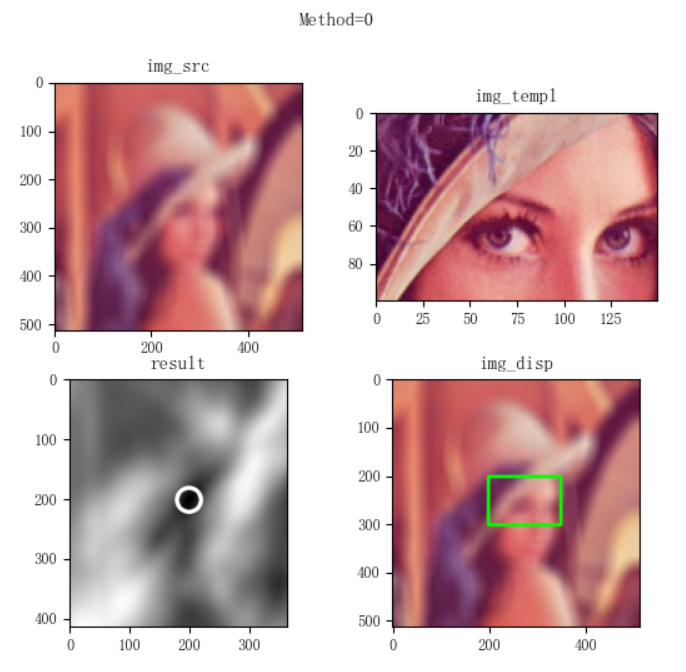
The template image used in the above example is exactly the same as part of the source image. In order to demonstrate the matching ability of matchTemplate(), we will slightly modify the previous example, intercept the template, smooth the source image, and then see the matching results. For example, do the source image once × 33. Match after smoothing the mean value of the size:
#Read in the image and take the screenshot as the template image
img_src = cv2.imread('..\\lena.jpg' )
img_templ = img_src[200:300,200:350].copy()
img_src = cv2.blur(img_src,(33,33)) ##### Smoothing
The matching results show that, except for method=2, the matching results of other methods are almost the same position as before smoothing, with a difference of only one or two pixels, all around (200200):
-----method: 0
result.min_max: (42581476.0, 292872064.0, (199, 201), (25, 412))
match_loc: (199, 201)
-----method: 1
result.min_max: (0.04254355654120445, 0.4597490131855011, (199, 202), (77, 386))
match_loc: (199, 202)
-----method: 2
result.min_max: (560473088.0, 1119551744.0, (71, 399), (190, 74))
match_loc: (190, 74)
-----method: 3
result.min_max: (0.8539454936981201, 0.97953861951828, (292, 179), (199, 201))
match_loc: (199, 201)
-----method: 4
result.min_max: (-43949496.0, 62591044.0, (292, 180), (198, 200))
match_loc: (198, 200)
-----method: 5
result.min_max: (-0.5016737580299377, 0.8062169551849365, (279, 225), (199, 202))
match_loc: (199, 202)
Similarly, we do not change the source image, but only smooth the template image to create the difference between the template image and the source image:
#Read in the image and take the screenshot as the template image
img_src = cv2.imread('..\\lena.jpg' )
img_templ = img_src[200:300,200:350].copy()
img_templ = cv2.blur(img_templ,(33,33))
The best matching position obtained is still around (200200), except for the special case of method=2:
-----method: 0
result.min_max: (43080640.0, 286917440.0, (199, 201), (292, 173))
match_loc: (199, 201)
-----method: 1
result.min_max: (0.04257318750023842, 0.42100536823272705, (199, 201), (71, 395))
match_loc: (199, 201)
-----method: 2
result.min_max: (549533312.0, 1130334720.0, (69, 400), (203, 76))
match_loc: (203, 76)
-----method: 3
result.min_max: (0.8450157046318054, 0.9792083501815796, (13, 412), (199, 201))
match_loc: (199, 201)
-----method: 4
result.min_max: (-45648052.0, 61790392.0, (292, 178), (199, 198))
match_loc: (199, 198)
-----method: 5
result.min_max: (-0.5532243251800537, 0.8041226863861084, (291, 182), (199, 199))
match_loc: (199, 199)
4. Multiple matching objects
Next, let's look at the search method for multiple matching objects in the source image. The matching result of matchTemplate() is a matching degree value. The result "image" obtained after executing matchTemplate() can be thresholded once. The position greater than or less than a certain threshold is considered to be the position of successful matching.
In the following example, all orange icons are found and marked from the source image. The processing process is similar to that of finding a single matching object. Read the source image and template image, match the template with matchTemplate(), threshold processing to find the matching point, and finally find the starting point and the lower right corner for marking and drawing. The whole process is different only in finding the matching point:
import numpy as np
import matplotlib.pyplot as plt
import cv2
print('VX official account: Orange code / juzicode.com')
print('cv2.__version__:',cv2.__version__)
plt.rc('font',family='Youyuan',size='9')
plt.rc('axes',unicode_minus='False')

#Read in the image and take the screenshot as the template image
img_src = cv2.imread('..\\samples\\picture\\game-link.jpg' )
img_templ = cv2.imread('..\\samples\\picture\\game-link-templ.jpg' )
print('img_src.shape:',img_src.shape)
print('img_templ.shape:',img_templ.shape)

#template matching
result_t = cv2.matchTemplate(img_src, img_templ, cv2.TM_CCOEFF_NORMED)
#Filter points greater than a certain matching value
val,result = cv2.threshold(result_t,0.9,1.0,cv2.THRESH_BINARY)
match_locs = cv2.findNonZero(result)
print('match_locs.shape:',match_locs.shape)
print('match_locs:\n',match_locs)

img_disp = img_src.copy()
for match_loc_t in match_locs:
    #match_locs is a three-dimensional array with a fixed length of 1 in the second dimension. Take the array corresponding to its subscript 0
    match_loc = match_loc_t[0]
    #Note that when calculating the coordinates of the lower right corner, the width represented by the template image shape[1] shall be added to the x coordinate and the height shall be added to the y coordinate
    right_bottom = (match_loc[0] + img_templ.shape[1], match_loc[1] + img_templ.shape[0])
    print('match_loc:',match_loc)
    print('result_t:',result_t[match_loc[1],match_loc[0]])
    #marking position
    cv2.rectangle(img_disp, match_loc, right_bottom, (0,255,0), 5, 8, 0 )
    cv2.circle(result, match_loc, 10, (255,0,0), 3 )

#Display image
fig,ax = plt.subplots(2,2)
fig.suptitle('Multi-target matching')
ax[0,0].set_title('img_src')
ax[0,0].imshow(cv2.cvtColor(img_src,cv2.COLOR_BGR2RGB))
ax[0,1].set_title('img_templ')
ax[0,1].imshow(cv2.cvtColor(img_templ,cv2.COLOR_BGR2RGB))
ax[1,0].set_title('result')
ax[1,0].imshow(result,'gray')
ax[1,1].set_title('img_disp')
ax[1,1].imshow(cv2.cvtColor(img_disp,cv2.COLOR_BGR2RGB))
#ax[0,0].axis('off');ax[0,1].axis('off');ax[1,0].axis('off');ax[1,1].axis('off')
plt.show()
Operation results:
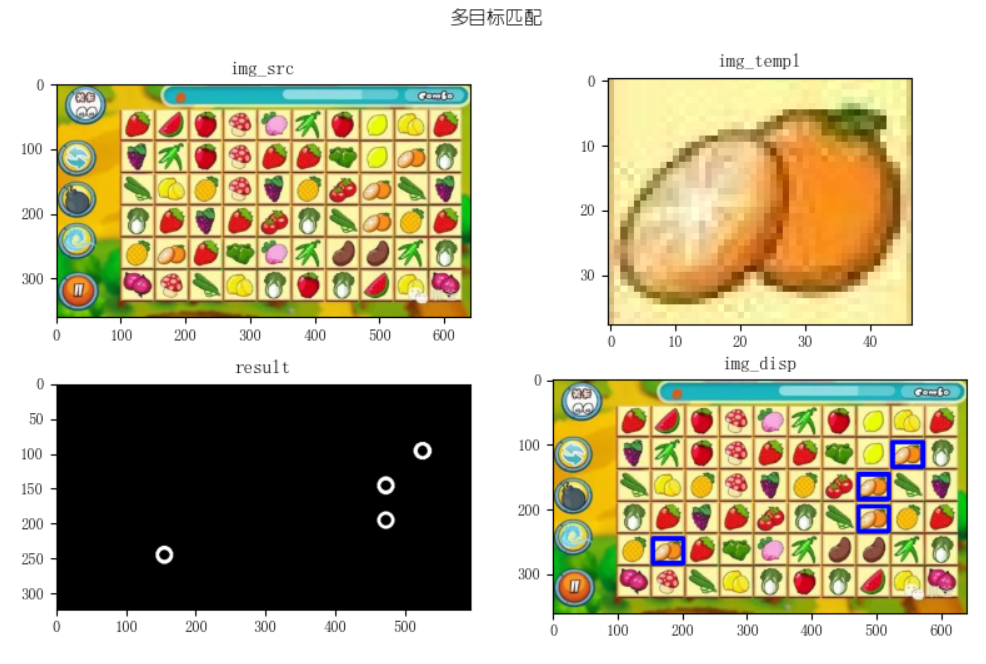
When finding a match point, you can no longer use the minMaxLoc() method to find the best match point, because this method can only find the best match value. Thresholding is used here. It is considered that if it is greater than a certain threshold, it is a match. After thresholding, find the point with non-zero value with findNonZero() is the match point we want to find:
#Filter points greater than a certain matching value
val,result = cv2.threshold(result_t,0.9,1.0,cv2.THRESH_BINARY)
match_locs = cv2.findNonZero(result)
print('match_locs.shape:',match_locs.shape)
print('match_locs:\n',match_locs)
Operation results:
match_locs.shape: (7, 1, 2)
match_locs:
 [[[523  96]]
 [[524  96]]
 [[471 145]]
 [[471 146]]
 [[471 195]]
 [[154 244]]
 [[154 245]]]
From the above results, match_locs is a three-dimensional array. The number 7 in the first dimension of (7, 1, 2) indicates that there are seven location points matching, the number 1 in the second dimension is a fixed value, and the number 2 in the third dimension represents the two coordinate values of x and y at each location point. To get one of these coordinates, you need to use match_locs [i] [0], where the x coordinate value is match_locs[i][0][0], y coordinate value is match_locs[i][0][1].
From the printed matching point position, 7 points are actually matched, but from img_ From the blue box marked with disp, there are only four positions, because there are three groups of positions that differ from other coordinates by only a few pixels or two, img_ The blue boxes marked on disp overlap when displayed.