target
In this chapter, you will learn
- Use kNN to build a basic OCR application
- Use the numeric and alphabetic data sets that come with OpenCV
OCR of handwritten digits
The goal is to build an application that can read handwritten digits. To do this, you need some trains_ Data and test_data . OpenCV git project has a picture digits Png (in opencv/samples/data /), which contains 5000 handwritten digits (500 for each digit), and each digit is an image with a size of 20x20.
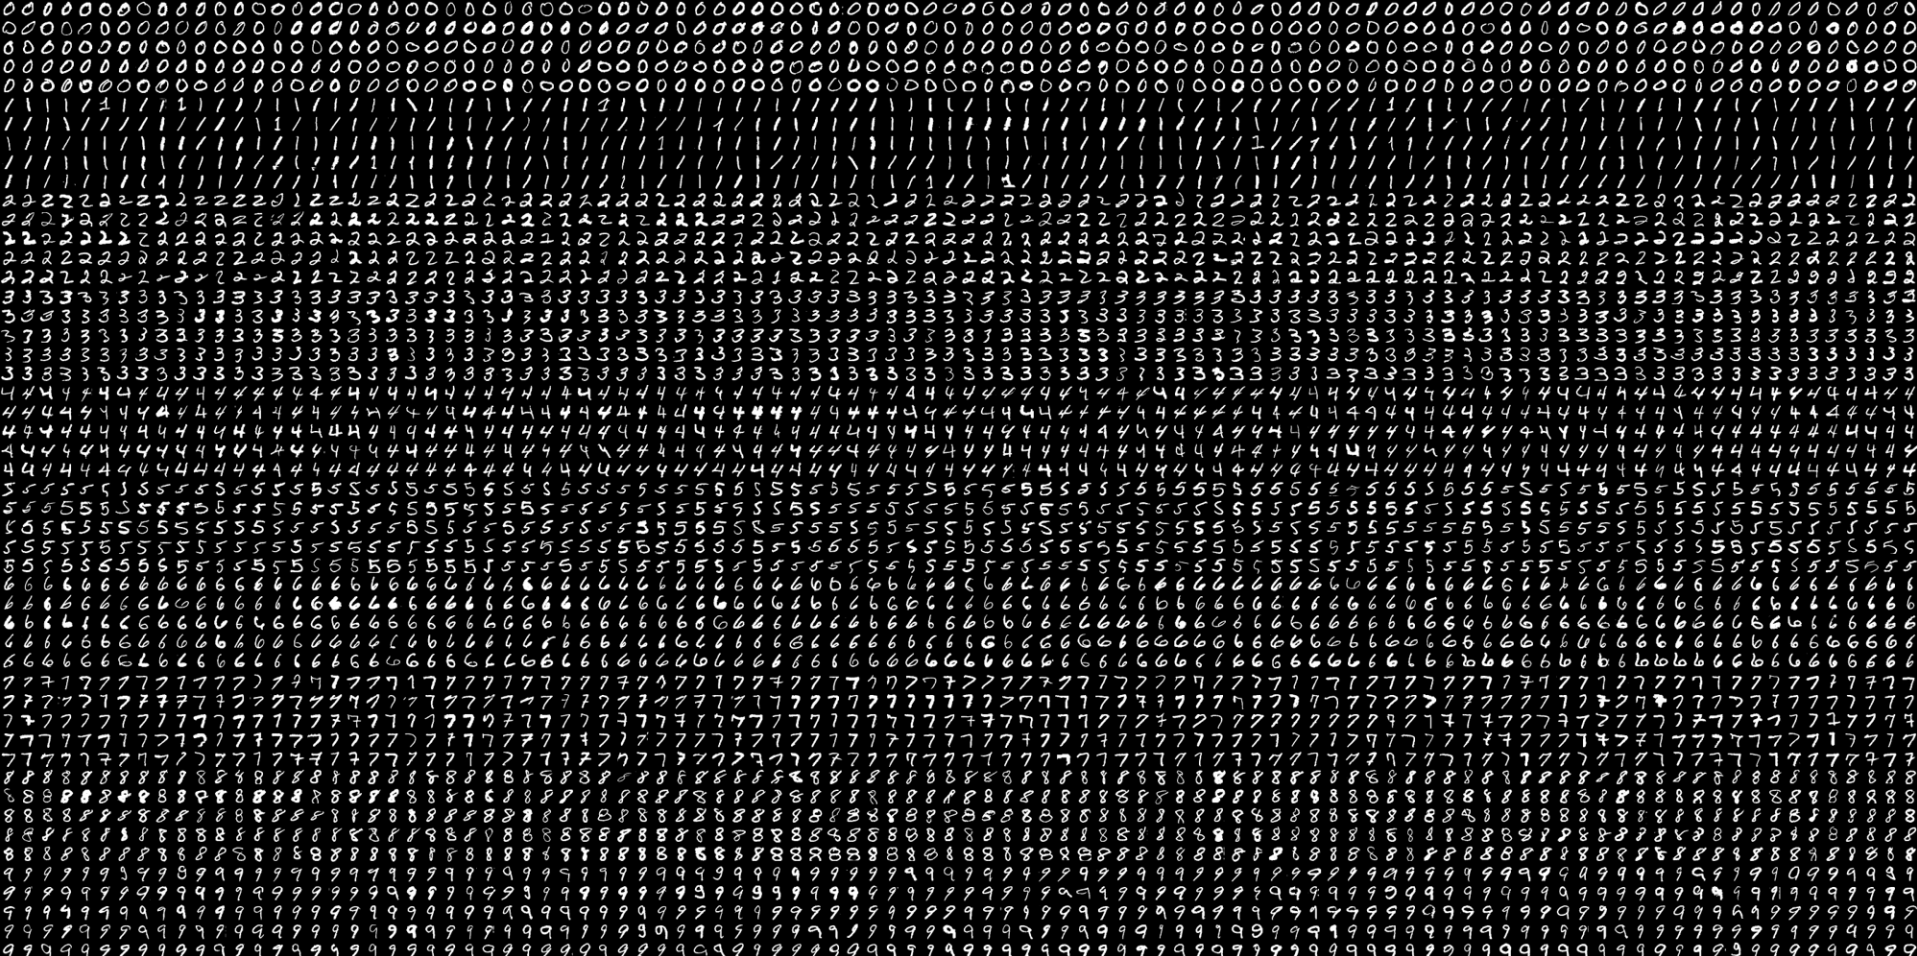
Therefore, the first step is to divide the above image into 5000 (500 * 10) different numbers. For each number, flatten it to a line of 400 pixels, which is the training set, that is, the intensity values of all pixels. This is the simplest feature set you can create. The first 250 samples of each number are used as the training set train_data, and then 250 samples are used as the test set test_data .
import cv2
import numpy as np

img = cv2.imread('digits.png')
gray = cv2.cvtColor(img, cv2.COLOR_BGR2GRAY)

# Now we split the image to 5000 cells, each 20x20 size
cells = [np.hsplit(row, 100) for row in np.vsplit(gray, 50)]

# Make it into a numpy array: its size will be (50, 100, 20, 20)
x = np.array(cells)

# Now we prepare the training data and test data
train = x[:,:50].reshape(-1,400).astype(np.float32) # Size = (2500,400)
test = x[:,50:100].reshape(-1,400).astype(np.float32) # Size = (2500,400)

# Create labels for train and test data
k = np.arange(10)
train_labels = np.repeat(k, 250)[:, np.newaxis]
test_labels = train_labels.copy()

# Initiate kNN, train it on the training data, then test it with the test data with k=1
knn = cv2.ml.KNearest_create()
knn.train(train, cv2.ml.ROW_SAMPLE, train_labels)
ret, result, neighbours, dist = knn.findNearest(test, k=5)

# Now we check the accuracy of classification
# For that, compare the result with test_labels and check which are wrong
matches = result==test_labels
correct = np.count_nonzero(matches)
accuracy = correct * 100.0/result.size
print( accuracy )  # 91.76
As you can see, the above build a basic digital handwritten OCR application is ready. The accuracy in this particular example is 91.76%.
Methods to improve accuracy:
-
One option to improve accuracy is to add more data for training, especially wrong data.
-
The other is to replace the better algorithm
In this article, the training data can't be found every time the application is started. It's better to save it so that you can read the data directly from the file and start classification next time. You can do this with some Numpy functions (such as np.savetxt, np.savez, np.load, etc.).
# Save the data
np.savez('knn_dight_data.npz', train=train, train_labels=train_labels)

# Now load the data
whit np.load('knn_data.npz') as data:
    print(data.files)
    train = data['train']
    train_labels = data['train_labels']
On windows systems, about 3.82 MB of memory is required. Since only the intensity value (uint8 data) is used as the feature, if the memory problem needs to be considered, the data can be converted to NP Uint8, and then save it. In this case, only 0.98MB is used. It can then be converted back to float32 when loading.
train_uint8 = train.astype(np.uint8)
train_labels_uint8 = train_labels.astype(np.uint8)
np.savez('knn_dight_data_int8.npz', train=train_uint8, train_labels=train_labels_uint8)


It can also be used to predict a single number
# Get an element in the test set
single_data = testData[0].reshape(-1, 400)
single_label = labels[0]

ret, result, neighbours, dist = knn.findNearest(data, k=5)
print(result)  # [[0]]
print(label)   # [[0.]]
print(result==label)  # True
OCR of English letters
Next, do the same for English letters, but the data and feature set change slightly. OpenCV uses the file letter recognition Data (/ data / samples / data / letter recognition. Data) replaces the image. If you open it, you will see 20000 lines, which may look like junk numbers at first glance.
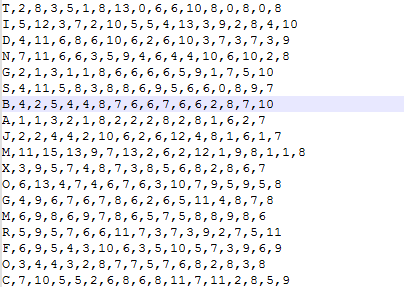
In fact, in each row, the first column is the letter, which is the label. The next 16 numbers are its different features, which are obtained from the UCI machine learning repository. Can be in This page Details of these features can be found in.
There are 20000 samples, the first 10000 data are used as training samples, and the remaining 10000 are used as test samples. Letters should be changed to ASCII characters because letters cannot be used directly.
import numpy as np
import cv2

#  Load the data and convert the letters to numbers
data = np.loadtxt('letter-recognition.data', dtype='float32', delimiter=',', converters={0: lambda ch: ord(ch)-ord('A')})

# Split the dataset in two, with 10000 samples each for training and test sets
train, test = np.vsplit(data, 2)

# Split trainData and testData into features and responses
responses, trainData = np.hsplit(train, [1])
labels, testData = np.hsplit(test, [1])

# Initiate the kNN, classify, measure accuracy
knn = cv2.ml.KNearest_create()
knn.train(trainData, cv2.ml.ROW_SAMPLE, responses)
ret, result, neighbours, dist = knn.findNearest(testData, k=5)

correct = np.count_nonzero(result==labels)
accuracy = correct * 100 / result.size
print(accuracy)  # 93.06
It gives me an accuracy of 93.06%. Similarly, if you want to improve accuracy, you can iteratively add error data to each category.