1. Introduction
- Definition
-
OpenVPN is a software package for creating virtual private network encryption channels, originally written by James Yonan.OpenVPN allows created VPNs to authenticate using public keys, electronic certificates, or user names/passwords.
-
It makes extensive use of the SSLv3/TLSv1 protocol function library in the OpenSSL encryption library.
-
OpenVPN currently runs on Solaris, Linux, OpenBSD, FreeBSD, NetBSD, Mac OS X and Microsoft Windows, as well as Android and iOS, and includes many security features.It is not a Web-based VPN software and is not compatible with IPsec and other VPN packages.
- principle
-
The core of OpenVPN technology is virtual network card, followed by the implementation of SSL protocol.
-
Virtual Network Card in OpenVPN
The virtual network card is a driver software that is implemented using the underlying network programming technology.Installing such programs adds an unreal network card to the host and can be configured like any other network card.A service program can open a virtual network card in the application layer, and if the application software (such as a network browser) sends data to the virtual network card, the service program can read the data.If the service program writes the appropriate data to the virtual network card, the application software can also receive it.Virtual network cards are implemented in many operating systems, which is an important reason OpenVPN can be used across platforms.
In OpenVPN, if a user accesses a remote virtual address (belonging to the address family used by the virtual network card, different from the real address), the operating system sends the data package (TUN mode) or data frame (TAP mode) to the virtual network card through the routing mechanism. After the service program receives the data and processes it accordingly, it sends it from the outside network through SOCKETGo.This completes a one-way transmission and vice versa.When the remote service program receives data from the external network through SOCKET and processes it accordingly, it is sent back to the virtual network card, then the application software can receive it.
- Encrypt What Authentication
- encryption
OpenVPN uses OpenSSL libraries to encrypt data and control information.This means that it can use any OpenSSL-supported algorithm.It provides optional packet HMAC capabilities to improve connection security.In addition, hardware acceleration of OpenSSL can improve its performance.PolarSSL was introduced after 2.3.0.
- Authentication
OpenVPN provides a variety of authentication methods to confirm the identity of both parties to the connection, including:
Pre-shared private key
(2) Third-party certificates
(3) User name/password combination
Pre-shared keys are the simplest, but at the same time they can only be used to create point-to-point VPNs; PKI-based third-party certificates provide the most complete functionality, but require an additional PKI certificate system to be maintained.OpenVPN2.0 introduced a combination of username and password authentication, which omits client certificates, but still requires a server certificate for encryption.
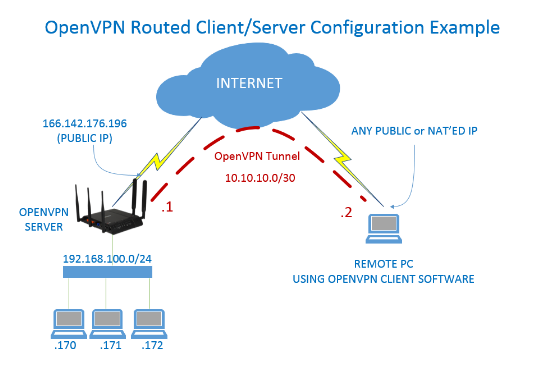
2. Build on the server
Build on a Linux virtual machine within the headquarters LAN, with public network ip, or dynamic domain name with third-party software without public network IP
1. Install openvpn and easy-rsa (this package is used to make a ca certificate)
(1) Install epel warehouse source
wget http://dl.fedoraproject.org/pub/epel/6/i386/epel-release-6-8.noarch.rpm

rpm -Uvh epel-release-6-8.noarch.rpm
(2) Install openvpn
[root@aly01 ~]# yum install openvpn
(3) On github, download the latest easy-rsa
wget https://github.com/OpenVPN/easy-rsa/archive/master.zip
//Download the latest easy-rsa installation package
[root@aly01]# mkdir openvpn
[root@aly01 openvpn]# unzip easy-rsa-3.0.5.zip
[root@aly01 openvpn]# mv easy-rsa-3.0.5 easy-rsa
2. Configuration/etc/openvpn/directory (1) Create a directory and copy the easy-rsa directory
[root@aly01 ~]# mkdir -p /etc/openvpn/
[root@aly01 openvpn]# cp -a easy-rsa /etc/openvpn/
(2) Configure, edit vars files, configure according to your environment
[root@aly01 test]# cd /etc/openvpn/easy-rsa/easyrsa3
[root@aly01 easyrsa3]# cp vars.example vars
[root@aly01 easy-rsa3]# vim vars
------------
vars Configuration Content
set_var EASYRSA_REQ_COUNTRY     "CN"
set_var EASYRSA_REQ_PROVINCE    "Sichuan"
set_var EASYRSA_REQ_CITY        "Cengdu"
set_var EASYRSA_REQ_ORG         "aly01"
set_var EASYRSA_REQ_EMAIL       "zenghong133@163.com"
set_var EASYRSA_REQ_OU          "My OpenVPN"
3. Create a server-side certificate and key
Enter / etc/openvpn/easy-rsa/easyrsa3/directory
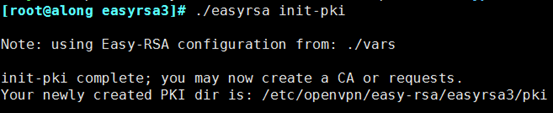
(1) Initialization
[root@along ~]# cd /etc/openvpn/easy-rsa/easyrsa3/
[root@along easyrsa3]# ./easyrsa init-pki
(2) Create root certificate
[root@along easyrsa3]# ./easyrsa build-ca
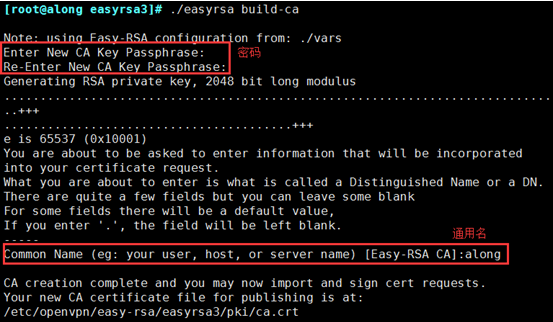
Note: In the above section, you need to enter the PEM password PEM pass phrase twice. This password must be remembered or you will not be able to sign the certificate in the future.You also need to enter a common name, which you can set up as unique as you like.
(3) Create server-side certificates
[root@along easyrsa3]# ./easyrsa gen-req server nopass
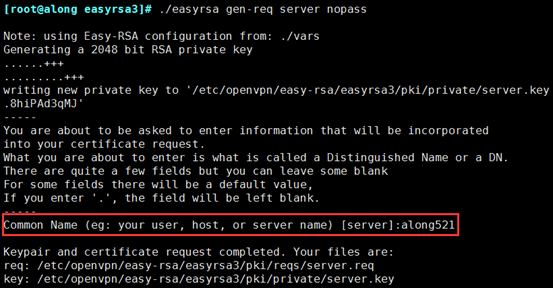
You need to enter a common name during this process, but don't follow the same root certificate as before
(4) Signing service-side certificate
[root@along easyrsa3]# ./easyrsa sign server server

In this command, you are required to confirm the build, enter yes, and provide the password we used to create the CA.If you forget your password, start over and try again
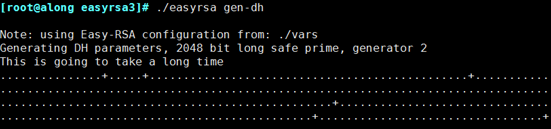
_Create Diffie-Hellman to ensure that key traverses unsecured networks
[root@along easyrsa3]# ./easyrsa gen-dh
4. Create client certificate 1. Enter the root directory to create a new client folder. The folder can be named as you like. Then copy the easy-ras folder extracted earlier to the client folder and enter the following directory
[root@along ~]# mkdir client
[root@along ~]# cp /etc/openvpn/easy-rsa client/
[root@along ~]# cd client/easy-rsa/easyrsa3/
(2) Initialization
[root@along easyrsa3]# . /easyrsa init-pki //need to enter yes to determine
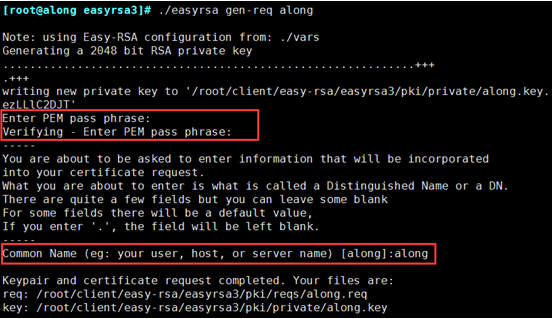
(3) Create a client key and generate a certificate (remember to generate the password entered by your client login)
[root@along easyrsa3]# . /easyrsa gen-req along //name self-defined
(4) Import the arriving qingliu.req and sign the certificate
a. Enter / etc/openvpn/easy-rsa/easyrsa3/
[root@along easyrsa3]# cd /etc/openvpn/easy-rsa/easyrsa3/
b. Import req
[root@along easyrsa3]# ./easyrsa import-req /root/client/easy-rsa/easyrsa3/pki/reqs/along.req along

c. Signing certificate
[root@along easyrsa3]# ./easyrsa sign client along
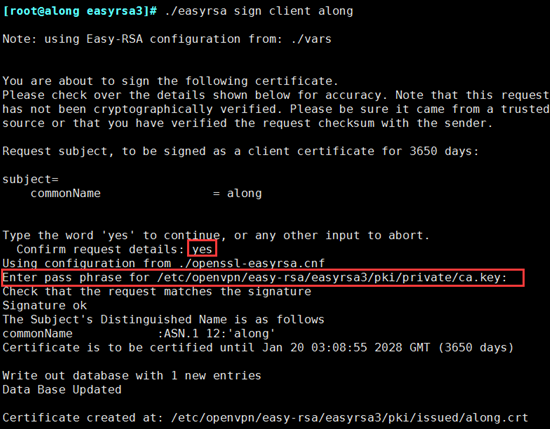
//client must be generated here so along should have the same name as the previous import The above signing certificate is similar to server, so no screenshots will be taken, but the CA password will be entered during the period
5. Place server-side necessary files in etc/openvpn/directory
ca's certificate, server-side certificate, secret key
[root@along ~]# cp /etc/openvpn/easy-rsa/easyrsa3/pki/ca.crt /etc/openvpn/
[root@along ~]# cp /etc/openvpn/easy-rsa/easyrsa3/pki/private/server.key /etc/openvpn/
[root@along ~]# cp /etc/openvpn/easy-rsa/easyrsa3/pki/issued/server.crt /etc/openvpn/
[root@along ~]# cp /etc/openvpn/easy-rsa/easyrsa3/pki/dh.pem /etc/openvpn/
6. Place client necessary files in root/openvpn/directory
Client's certificate, secret key
[root@along ~]# cp /etc/openvpn/easy-rsa/easyrsa3/pki/ca.crt /root/client/
[root@along ~]# cp /etc/openvpn/easy-rsa/easyrsa3/pki/issued/along.crt /root/client/
[root@along ~]# cp /root/client/easy-rsa/easyrsa3/pki/private/along.key /root/client
//Note the certificate name
7. Write configuration files for the server side
(1) When you install openvpn, he will provide an example of the server configuration file. Under / usr/share/doc/openvpn-2.3.2/sample/sample-config-files, there will be a server.conf file, which we will copy to / etc/openvpn
[root@along ~]# rpm -ql openvpn |grep server.conf
[root@along ~]# cp /usr/share/doc/openvpn-2.4.4/sample/sample-config-files/server.conf /etc/openvpn

(2) Modify the configuration file
[root@along ~]# vim /etc/openvpn/server.conf
[root@along ~]# grep '^[^#|;]'/etc/openvpn/server.conf was modified as follows:
------------
vim /etc/openvpn/server.conf configuration file
local 0.0.0.0     #Listening Address
port 1194     #Listening Port
proto tcp     #snoopy protocol
dev tun     #Use Routing Tunneling Mode
ca /etc/openvpn/ca.crt      #ca certificate path
cert /etc/openvpn/server.crt       #Server Certificate
key /etc/openvpn/server.key  # This file should be kept secret server secret key
dh /etc/openvpn/dh.pem     #Key Exchange Protocol File
server 10.8.0.0 255.255.255.0     #Assign address pool to client, note: cannot have same network segment as VPN server Intranet
ifconfig-pool-persist ipp.txt
push "redirect-gateway def1 bypass-dhcp"      #To Gateway
push "dhcp-option DNS 8.8.8.8"        #dhcp allocates dns
client-to-client       #Communication between clients
keepalive 10 120       #Lifetime, ping once in 10 seconds, 120 counts as disconnected if no response is received
comp-lzo      #Transmission data compression
max-clients 100     #Allow up to 100 client connections
user openvpn       #user
group openvpn      #user group
persist-key
persist-tun
status /var/log/openvpn/openvpn-status.log
log         /var/log/openvpn/openvpn.log
verb 3
//Each project is covered in a bunch, and with all the above modifications, server.conf provided by openvpn is already available. We just need to remove the previous comment# and modify our own configuration
(3) Configured settings
[root@along ~]# mkdir /var/log/openvpn
[root@along ~]# chown -R openvpn.openvpn /var/log/openvpn/
[root@along ~]# chown -R openvpn.openvpn /etc/openvpn/*
8. iptables set nat rules and turn on routing forwarding
[root@along ~]# iptables -t nat -A POSTROUTING -s 10.8.0.0/24 -j MASQUERADE
[root@along ~]# iptables -vnL -t nat
[root@along ~]# Vim/etc/sysctl.conf //Turn on routing forwarding
net.ipv4.ip_forward = 1
[root@along ~]# sysctl -p
9. Open openvpn Service
[root@along ~]# Openvpn/etc/openvpn/server.conf Open Service
[root@along ~]# ss -nutl |grep 1194

If port 1194 is not opened after opening, the service fails to open, either because there is a mistake in the configuration file or because there is insufficient permission to query the log for resolution.
3. Client Connection openvpn
1. Download openvpn Client Installation
2. Unzip the installation and configure the client side profile
Under the sample-config file, there is the client.ovpn template
Modify it and copy it to the config directory as follows
client
dev tun
proto tcp     //Change to tcp
remote 39.xxx.xxx.xxx 1194    //The OpenVPN server's external IP and port, IP and domain name will work
resolv-retry infinite
nobind
persist-key
persist-tun
ca ca.crt
cert client.crt     //client1 Certificate
key client.key        //Key for client1
comp-lzo
verb 3
3. Copy the server-side certificate file to the config directory
ca.crt along.crt along.key //These three files

Note: Certificate file name.
4. Start Client
(1) Start, note that startup needs to be started with administrator privileges
(2) Enter your own password
(3) Successful connection
5. Test Success
(1) Query ip in client, it is really the ip given by openvpn