1.Docker introduction
The appearance of Docker is simply to solve the inconsistency between the running environment and software configuration, and package the running environment required by the software by using Docker image. Containers are created through Docker build and run, which are deployed and run on the corresponding host hardware machine.
Docker is a lightweight container technology. Unlike virtual machines, containers do not need to be bound with a complete set of operating systems, but only need the resources and settings required for software work. Therefore, the system becomes efficient and can ensure that the software deployed in any environment can run consistently.
1.1. Containerization Technology
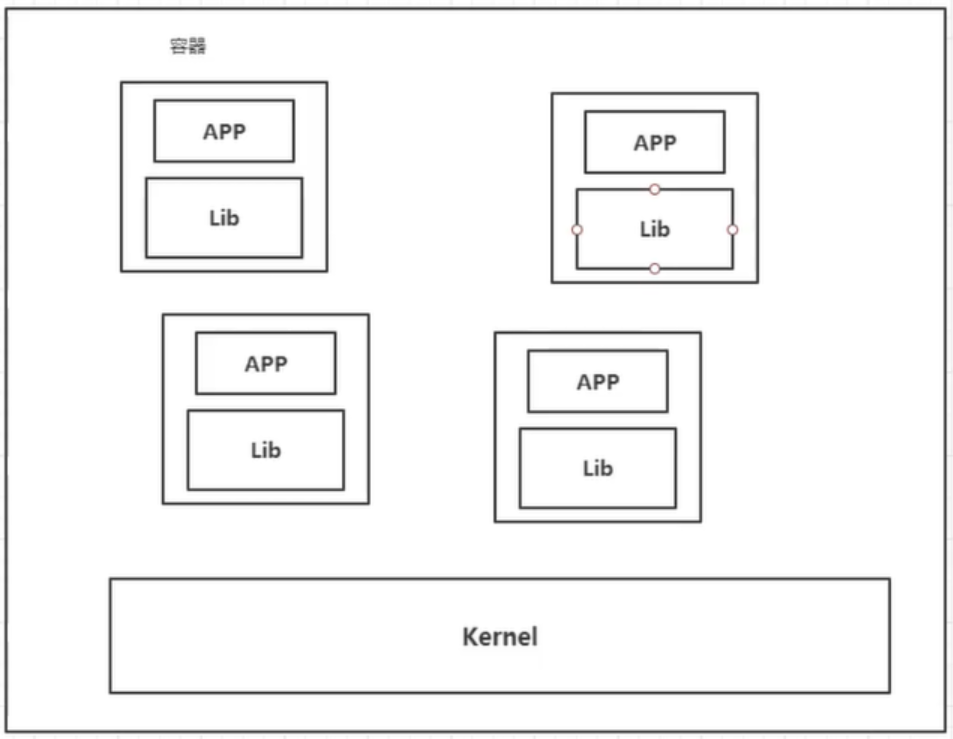
Containerization technology is not a complete operating system for simulation.
Compare Docker and virtual machine technologies:
-
The traditional virtual machine virtualizes a piece of hardware, runs a complete operating system, and then installs and runs software on this system.
-
The applications in the container run directly in the kernel of the host, and the container does not have its own kernel. There is no virtual hardware, so it's light
-
Each container is isolated from each other. Each container has its own file system and does not affect each other.
1.2. Basic composition
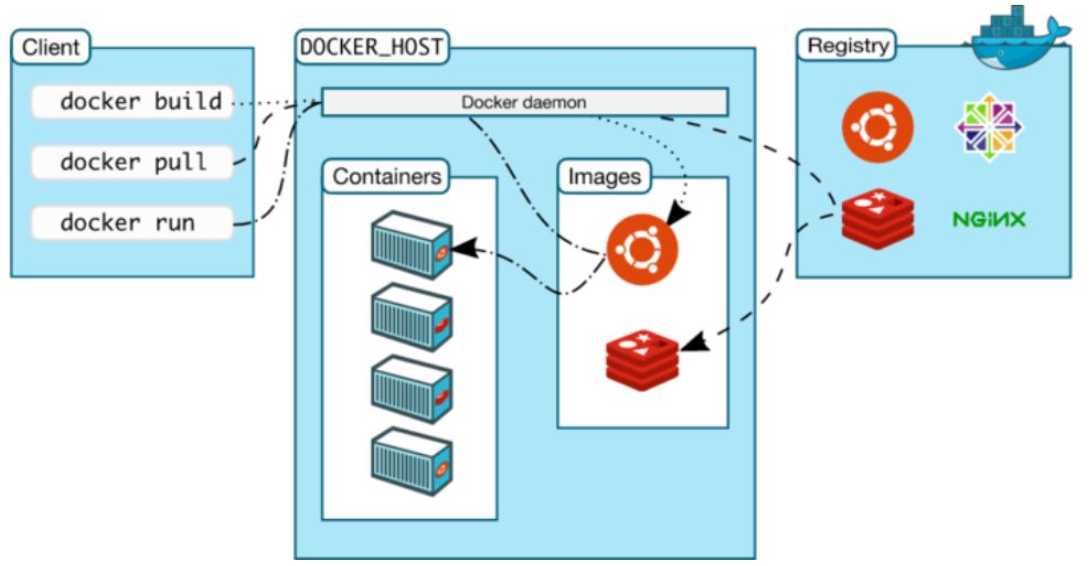
As can be seen from the above figure, docker mainly depends on docker client, docker host (main body: including container and docker image running in container)
docker hub (similar to github, which is a docker image repository).
image:
The docker image is like a template, which can be used to create container services. The Tomcat image -- > run -- > tomcat01 container (provides the server). Through this image, multiple containers can be created (the final service or project is running in the container).
container:
Docker uses container technology to run one or a group of applications independently and create them through image.
Start, stop, delete, basic commands.
At present, this container can be understood as a simple linux system.
repository:
The warehouse is where the images are stored.
Warehouses are divided into public warehouses and private warehouses. (Docker Hub is foreign by default, and Alibaba cloud has container services -- image acceleration needs to be configured)
2. Play Docker
After understanding the concept of docker, we can try to play docker and learn about its installation, deployment and common commands on linux
2.1.Docker installation
- Environmental preparation
CentOS7
Docker official website address: https://www.docker.com/get-started
Docker Hub address: https://hub.docker.com , which is equivalent to github and Docker image warehouse. You can upload and download images.
- Environment view
#The system kernel is above 3.10
[root@yifcloud ~]# uname -r
3.10.0-1127.19.1.el7.x86_64
#System version
[root@yifcloud ~]# cat /etc/os-release
NAME="CentOS Linux"
VERSION="7 (Core)"
ID="centos"
ID_LIKE="rhel fedora"
VERSION_ID="7"
PRETTY_NAME="CentOS Linux 7 (Core)"
ANSI_COLOR="0;31"
CPE_NAME="cpe:/o:centos:centos:7"
HOME_URL="https://www.centos.org/"
BUG_REPORT_URL="https://bugs.centos.org/"

CENTOS_MANTISBT_PROJECT="CentOS-7"
CENTOS_MANTISBT_PROJECT_VERSION="7"
REDHAT_SUPPORT_PRODUCT="centos"
REDHAT_SUPPORT_PRODUCT_VERSION="7"
- install
Check the official docker documentation: https://docs.docker.com/engine/install/centos/
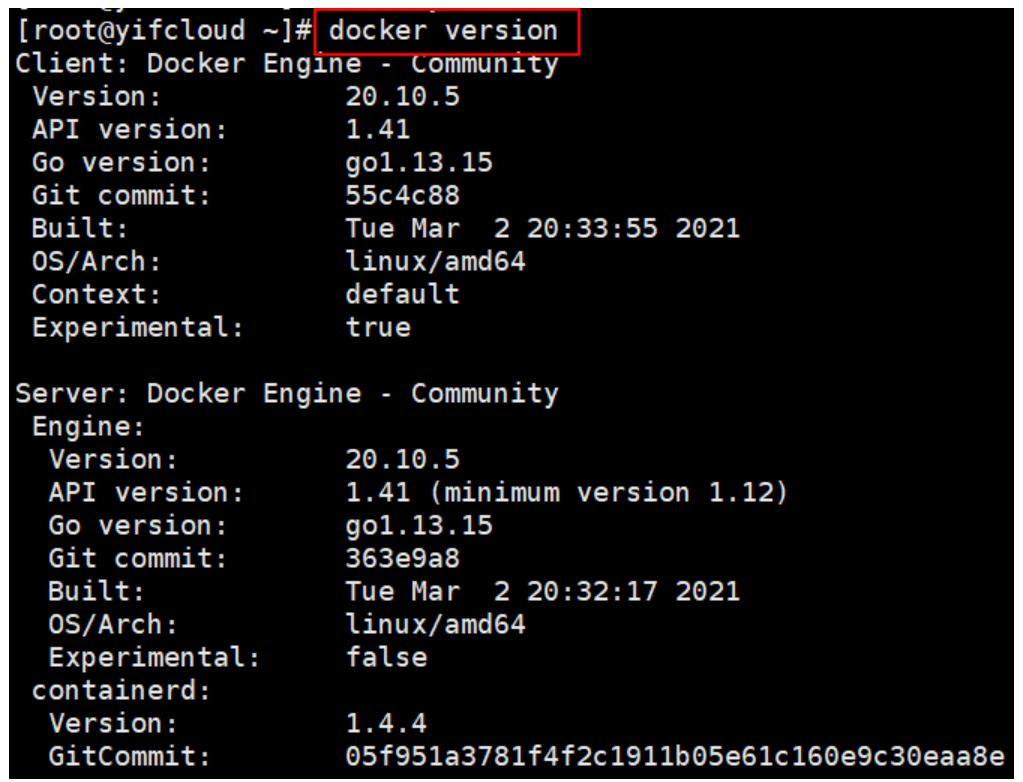
#1.Uninstall old version
sudo yum remove docker \
                  docker-client \
                  docker-client-latest \
                  docker-common \
                  docker-latest \
                  docker-latest-logrotate \
                  docker-logrotate \
                  docker-engine

#2.Install required packages
sudo yum install -y yum-utils

#3.Set the warehouse of the image
 sudo yum-config-manager \
   --add-repo \
   https://download.docker.com/linux/centos/docker-ce.repo  #The default is from abroad, which is very slow

#It is recommended to use the image address of domestic Alibaba cloud
 sudo yum-config-manager \
    --add-repo \
    http://mirrors.aliyun.com/docker-ce/linux/centos/docker-ce.repo

#Update the yum package index before installing docker
yum makecache fast

#4.install docker
# docker-ce Community Edition    docker-ee Enterprise Edition
sudo yum install docker-ce docker-ce-cli containerd.io

#5.start-up docker
sudo systemctl start docker

#6.use docker version Test whether the installation is successful
docker version
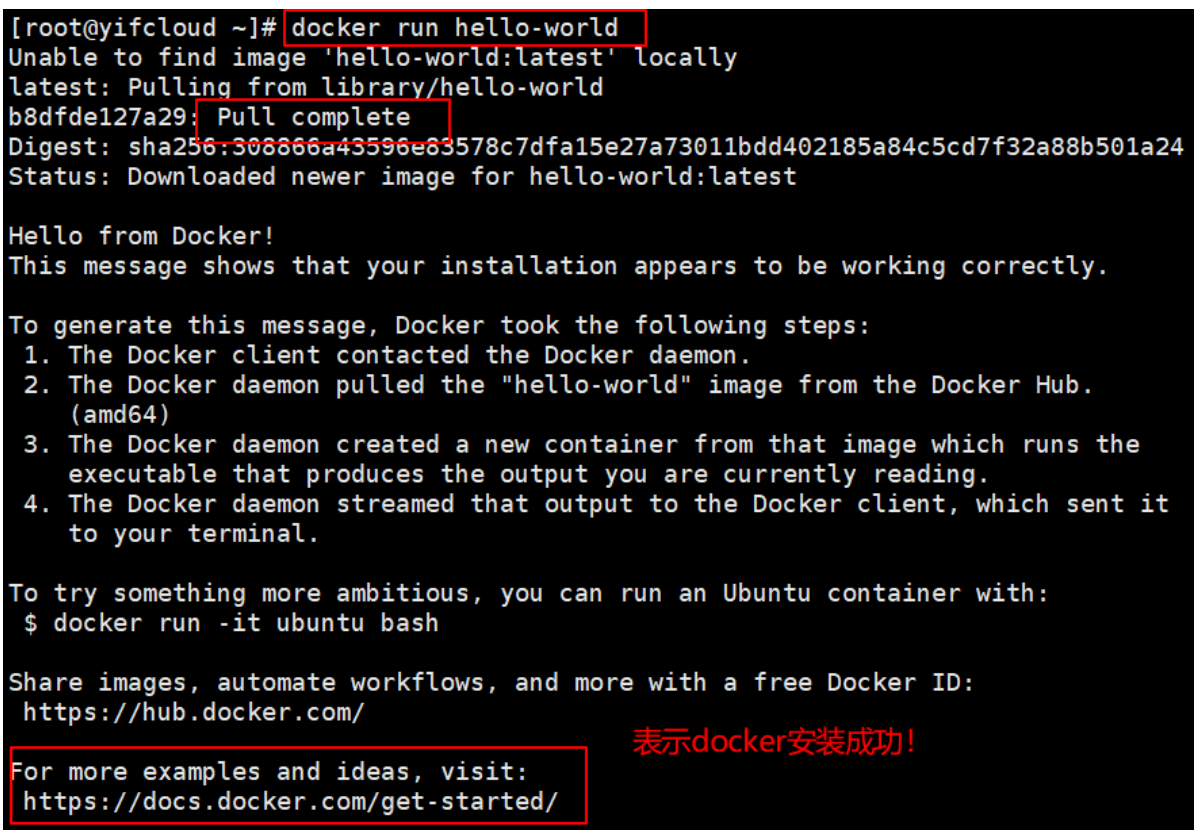
#7.hello-world
docker run hello-world
#8.Check out this download hello-world image
[root@yifcloud ~]# docker images
REPOSITORY    TAG       IMAGE ID       CREATED       SIZE
hello-world   latest    d1165f221234   4 weeks ago   13.3kB
2.2. Uninstall docker
#1.Stop operation docker container
systemctl stop docker
#2.Unload dependency
sudo yum -y remove docker-ce docker-ce-cli containerd.io
#2.Delete resource
# /var/lib/docker   docker Default working path for
sudo rm -rf /var/lib/docker
sudo rm -rf /var/lib/containerd
2.3. Configure image acceleration
- Tencent cloud image source acceleration
After installing Docker software, you can directly pull the image through the docker pull command. If you do not configure the image acceleration source, directly pull the image in DockerHub, and the download speed is usually slow. Therefore, we recommend that you use Tencent cloud Docker image source to speed up image download. The detailed operation steps of different operating systems are slightly different. Please use the corresponding operation steps for configuration.
Examples for Linux operating system:
1. Execute the following command to open / etc / docker / daemon JSON configuration file.
vim /etc/docker/daemon.json
2. Press i to switch to editing mode, add the following contents and save them.
{
"registry-mirrors": [
 "https://mirror.ccs.tencentyun.com"
]
}
3. Execute the following command and restart Docker. The example command takes CentOS 7 as an example.
sudo systemctl restart docker
- Alibaba cloud image acceleration
1. Log in to alicloud, access the container and middleware, and the container image service ACR;
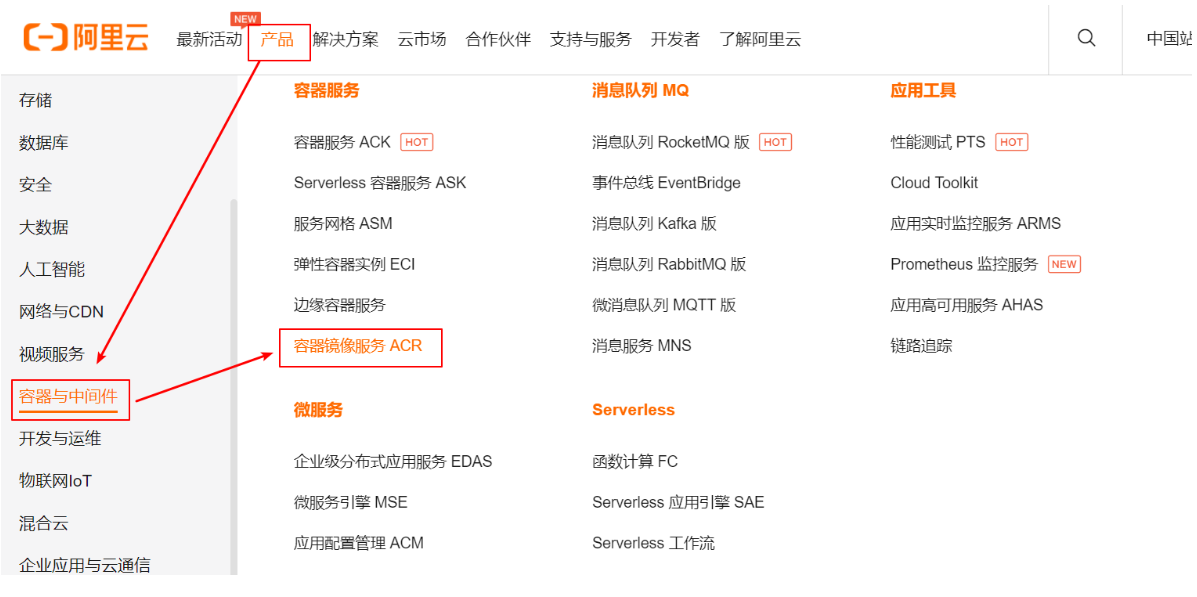
2. Find the official image acceleration service:
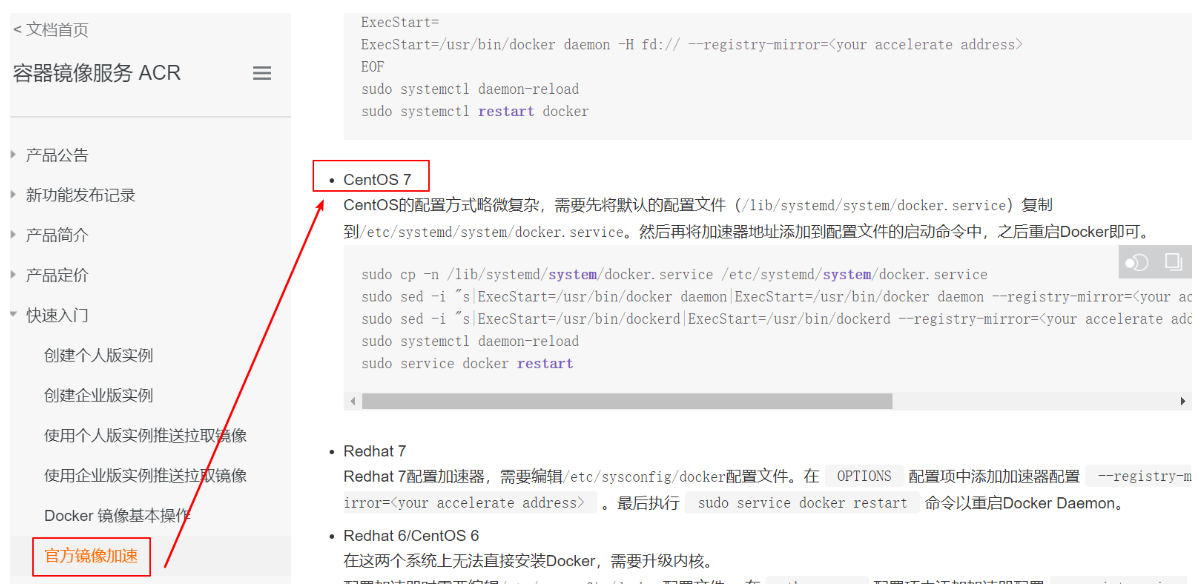
3. Configuration use
sudo mkdir -p /etc/docker
sudo tee /etc/docker/daemon.json <<-'EOF'
{
  "registry-mirrors": ["https://qiyb9988.mirror.aliyuncs.com"]
}
EOF

sudo systemctl daemon-reload
sudo systemctl restart docker
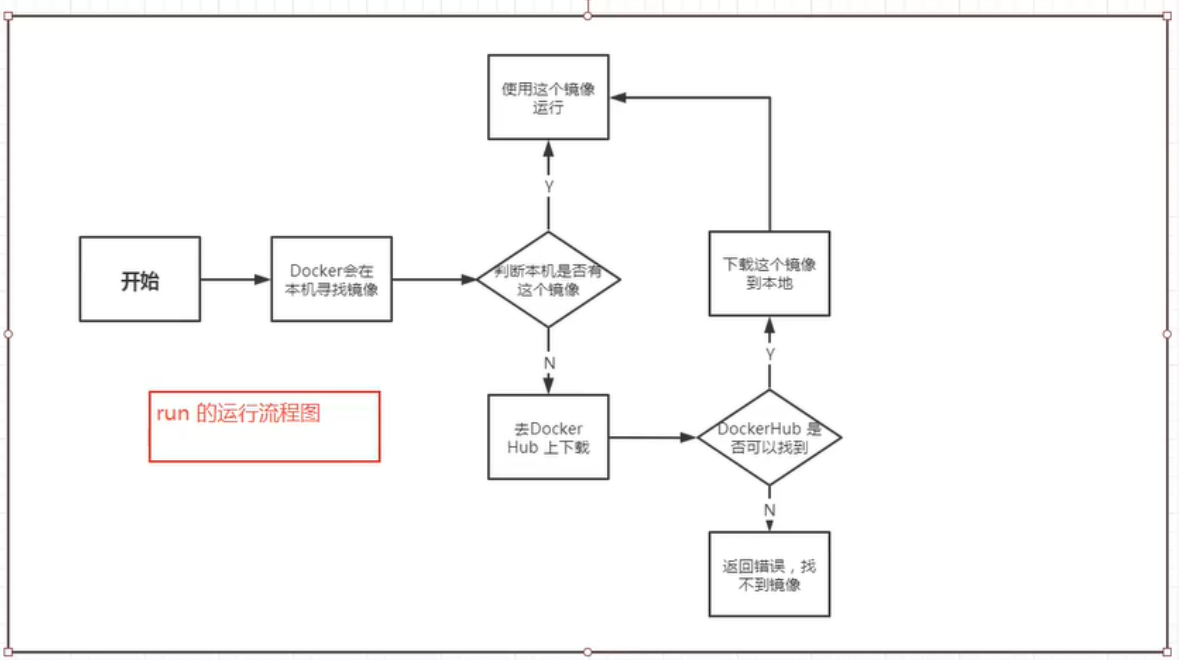
2.4.docker run run process
- Underlying principle
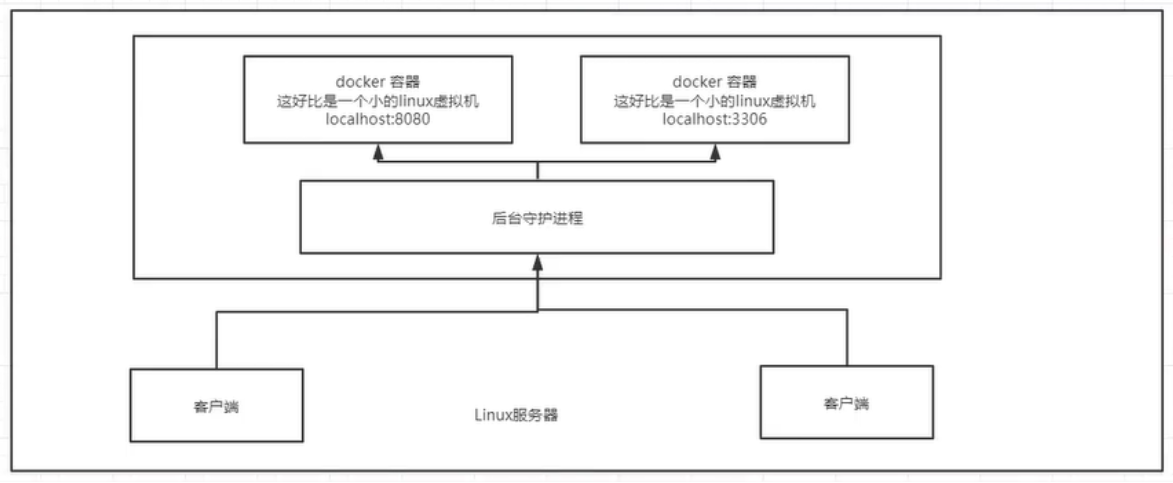
How does docker work?
Docker is a client server system. The daemon of docker runs on the host. Access from the client through Socket!
DockerServer will execute this command after receiving the docker client instruction!
Why is Docker faster than VM?
1.Docker has fewer abstraction layers than virtual machines. (virtual machine level is missing);
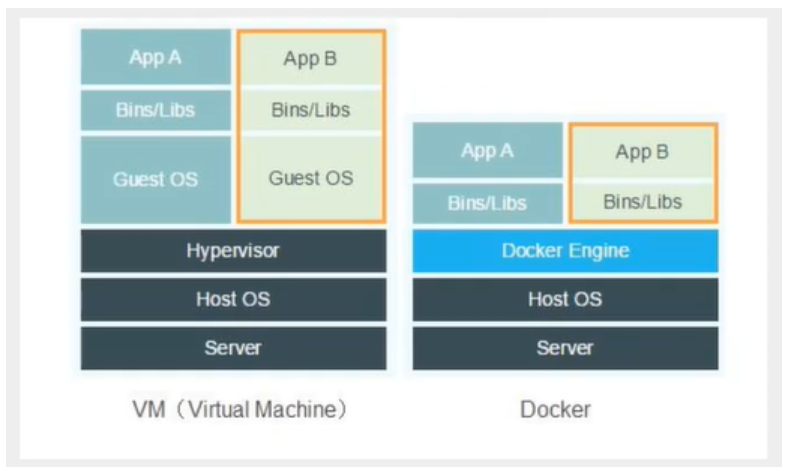
2.Docker uses the kernel of the host, and the VM needs the Guest OS.
Therefore, when creating a new container, docker does not need to reload an operating system kernel like a virtual machine to avoid boot operation.
The virtual machine loads the Guest OS at the minute level, while docker uses the host operating system, omitting this complex process, which is at the second level.
| Docker container | LXC | VM | |
| Virtualization type | OS virtualization | OS virtualization | Hardware virtualization |
| performance | =Physical machine performance | =Physical machine performance | 5% - 20% loss |
| Isolation | NS isolation | NS isolation | strong |
| QoS | Cgroup weak | Cgroup weak | strong |
| Security | in | difference | strong |
| GuestOS | Only Linux is supported | Only Linux is supported | whole |
3. Common docker commands
3.1. Help command
docker version      #Display the version information of docker
docker info         #Displays the system information of docker, including the number of images and containers
docker command --help  #Help command
Command review: https://docs.docker.com/engine/reference/commandline/cli/
3.2. Mirror command
-
docker images: view images on all local hosts
[root@yifcloud docker]# docker images
REPOSITORY    TAG       IMAGE ID       CREATED       SIZE
hello-world   latest    d1165f221234   4 weeks ago   13.3kB

# explain
REPOSITORY  Mirrored warehouse source
TAG         Mirrored label
IMAGE ID    mirrored  ID
CREATED     Creation time of image
SIZE        Mirror size

# Optional
Options:
  -a, --all             #List all mirrors
  -q, --quiet           #Only the id of the image is displayed
-
docker search: search for images
[root@yifcloud docker]# docker search mysql
NAME                              DESCRIPTION                                     STARS     OFFICIAL   AUTOMATED
mysql                             MySQL is a widely used, open-source relation...   10706     [OK]
mariadb                           MariaDB Server is a high performing open sou...   4026      [OK]

# Optional, filter by collection
--filter=STARS=3000  #The images searched are those with STARS greater than 3000
Corresponding dockerhub website: https://hub.docker.com/search
-
docker pull: Download Image
# Download Image docker pull image name [: tag]
[root@yifcloud docker]# docker pull mysql
Using default tag: latest  #If you do not write tag, the default version is latest
latest: Pulling from library/mysql
75646c2fb410: Pull complete   # Layered download, the core of docker imgae, federated file system
878f3d947b10: Pull complete
1a2dd2f75b04: Pull complete
8faaceef2b94: Pull complete
b77c8c445ec2: Pull complete
074029aeaa5f: Pull complete
5a1122545c6c: Pull complete
6c95ccd00139: Pull complete
60a719448fdb: Pull complete
f31898a387a3: Pull complete
bcf402a978dc: Pull complete
cf0bc7da512e: Pull complete
Digest: sha256:c35eb76bbccfd0138c8c68ccb9b4cffe42c488a27f64ddc31a2b5f65aa93fce6  # autograph
Status: Downloaded newer image for mysql:latest
docker.io/library/mysql:latest  # Real address

# The following two commands are equivalent
docker pull mysql
docker pull docker.io/library/mysql:latest

#Specified version download
[root@yifcloud docker]# docker pull mysql:5.7  #Using the tag command
5.7: Pulling from library/mysql
75646c2fb410: Already exists
878f3d947b10: Already exists
1a2dd2f75b04: Already exists
8faaceef2b94: Already exists
b77c8c445ec2: Already exists
074029aeaa5f: Already exists
5a1122545c6c: Already exists
0539e5d96e0a: Pull complete
5bf3befab801: Pull complete
a8ba39ab191f: Pull complete
d472d441f7e9: Pull complete
Digest: sha256:dce7f54b744d09e95525ff8c767c5ba1c6a5a54d04c208fa55e3052ded713453
Status: Downloaded newer image for mysql:5.7
docker.io/library/mysql:5.7

-
Image: RMI docker delete
[root@yifcloud docker]# docker rmi -f container id                   #Deletes the specified container
[root@yifcloud docker]# docker rmi -f container id container id container id      #Delete multiple containers
[root@yifcloud docker]# docker rmi -f $(docker images -aq)    #Delete all mirrors
3.3. Container command
Note: only when we have an image can we create a container. For linux, download a centos image to test and learn
docker pull centos
- Create a new container and start
docker run [Optional parameters] image
# Parameter description
--name="Name"    Container name  tomcat01  tomcat02,Used to distinguish containers
-d               Run in background mode
-it              Run in interactive mode and enter the container to view the content
-p               Specify the port of the container -p 8080:8080
    -p ip:Host port:Container port
    -p Host port:Container port (common)
    -p Container port
-P               Randomly assigned port

# Test, start and enter the container
[root@yifcloud /]# docker run -it centos /bin/bash
#Check the centos of the container class, the basic version, and many commands are imperfect
[root@4419343d4c5a /]# ls
bin  dev  etc  home  lib  lib64  lost+found  media  mnt  opt  proc  root  run  sbin  srv  sys  tmp  usr  var
#Return the host from the container
[root@4419343d4c5a /]# exit
exit
-
List all running containers
# docker ps command
      #Lists the currently running containers
-a    #Lists the currently running containers+Bring out containers that have been run in history
-n=?  #Display recently created containers, - n=1 Indicates that only one item is listed
-q    #Displays only the number of the container
[root@yifcloud /]# docker ps
CONTAINER ID   IMAGE     COMMAND   CREATED   STATUS    PORTS     NAMES
[root@yifcloud /]# docker ps -a
CONTAINER ID   IMAGE          COMMAND       CREATED         STATUS                     PORTS     NAMES
4419343d4c5a   centos         "/bin/bash"   5 minutes ago   Exited (0) 2 minutes ago             intelligent_davinci
12e76cfae025   d1165f221234   "/hello"      13 hours ago    Exited (0) 13 hours ago              frosty_pike
[root@yifcloud /]# docker ps -n=1
CONTAINER ID   IMAGE     COMMAND       CREATED         STATUS                     PORTS     NAMES
4419343d4c5a   centos    "/bin/bash"   8 minutes ago   Exited (0) 6 minutes ago             intelligent_davinci
-
Exit container
exit       #Container stop and exit
ctrl+P+Q   #The container does not stop exiting
[root@3393124f1c1f /]# [root@yifcloud /]# docker ps
CONTAINER ID   IMAGE     COMMAND       CREATED          STATUS          PORTS     NAMES
3393124f1c1f   centos    "/bin/bash"   28 seconds ago   Up 27 seconds             magical_williamson
-
Delete container
docker rm container id        #Delete the specified container. You cannot delete the running container. If you want to force the deletion, use rm-f
docker rm -f $(docker ps -aq)    #Delete all containers
docker ps -a -q|xargs docker rm  #Delete all containers
-
Start and stop container operation
docker start container id      #Start container
docker restart container id    #Restart container
docker stop container id       #Stop the currently running container
docker kill container id       #Force stop of current container
3.4. Other common commands
-
Background startup container
#Command docker run-d Image name
[root@yifcloud /]# docker run -d centos
b70f8ad27e215087e543f535941f0f4ef31fb6b932815d3d99e18da84d90ff4e
#Problem docker ps,find centos Stopped
[root@yifcloud /]# docker ps
CONTAINER ID   IMAGE     COMMAND   CREATED   STATUS    PORTS     NAMES
#In the common pit, if the docker container runs in the background, there must be a foreground process. If docker finds that there is no application, it will automatically stop
#After the nignx container starts, if it finds that it does not provide services, it will stop immediately, that is, there is no program
-
View log information
docker logs #View container log
#Show log
-tf              #Show log
--tail number    #Number of log entries to display
[root@yifcloud /]# docker logs -tf --tail 10 3393124f1c1f
-
View process information in the container
#Command docker top container id
[root@yifcloud /]# docker top 93138a2af466
UID    PID     PPID    C       STIME   TTY     TIME       CMD
root   6006    5985    0       16:23   pts/0   00:00:00   /bin/bash
-
View image metadata
#command
docker inspect container id
#test
[root@yifcloud /]# docker inspect 93138a2af466
[
    {
        "Id": "93138a2af466c5d30364b4cdba77700aaef5c6a50d5dafc01a8d2a2965083fbb",
        "Created": "2021-04-06T08:23:53.545067675Z",
        "Path": "/bin/bash",
        "Args": [],
        "State": {
            "Status": "running",
            "Running": true,
            "Paused": false,
            "Restarting": false,
            "OOMKilled": false,
            "Dead": false,
            "Pid": 6006,
            "ExitCode": 0,
            "Error": "",
            "StartedAt": "2021-04-06T08:23:53.917131264Z",
            "FinishedAt": "0001-01-01T00:00:00Z"
        },
        "Image": "sha256:300e315adb2f96afe5f0b2780b87f28ae95231fe3bdd1e16b9ba606307728f55",
        "ResolvConfPath": "/var/lib/docker/containers/93138a2af466c5d30364b4cdba77700aaef5c6a50d5dafc01a8d2a2965083fbb/resolv.conf",
        "HostnamePath": "/var/lib/docker/containers/93138a2af466c5d30364b4cdba77700aaef5c6a50d5dafc01a8d2a2965083fbb/hostname",
        "HostsPath": "/var/lib/docker/containers/93138a2af466c5d30364b4cdba77700aaef5c6a50d5dafc01a8d2a2965083fbb/hosts",
        "LogPath": "/var/lib/docker/containers/93138a2af466c5d30364b4cdba77700aaef5c6a50d5dafc01a8d2a2965083fbb/93138a2af466c5d30364b4cdba77700aaef5c6a50d5dafc01a8d2a2965083fbb-json.log",
        "Name": "/determined_tharp",
        "RestartCount": 0,
        "Driver": "overlay2",
        "Platform": "linux",
        "MountLabel": "",
        "ProcessLabel": "",
        "AppArmorProfile": "",
        "ExecIDs": null,
        "HostConfig": {
            "Binds": null,
            "ContainerIDFile": "",
            "LogConfig": {
                "Type": "json-file",
                "Config": {}
            },
            "NetworkMode": "default",
            "PortBindings": {},
            "RestartPolicy": {
                "Name": "no",
                "MaximumRetryCount": 0
            },
            "AutoRemove": false,
            "VolumeDriver": "",
            "VolumesFrom": null,
            "CapAdd": null,
            "CapDrop": null,
            "CgroupnsMode": "host",
            "Dns": [],
            "DnsOptions": [],
            "DnsSearch": [],
            "ExtraHosts": null,
            "GroupAdd": null,
            "IpcMode": "private",
            "Cgroup": "",
            "Links": null,
            "OomScoreAdj": 0,
            "PidMode": "",
            "Privileged": false,
            "PublishAllPorts": false,
            "ReadonlyRootfs": false,
            "SecurityOpt": null,
            "UTSMode": "",
            "UsernsMode": "",
            "ShmSize": 67108864,
            "Runtime": "runc",
            "ConsoleSize": [
                0,
                0
            ],
            "Isolation": "",
            "CpuShares": 0,
            "Memory": 0,
            "NanoCpus": 0,
            "CgroupParent": "",
            "BlkioWeight": 0,
            "BlkioWeightDevice": [],
            "BlkioDeviceReadBps": null,
            "BlkioDeviceWriteBps": null,
            "BlkioDeviceReadIOps": null,
            "BlkioDeviceWriteIOps": null,
            "CpuPeriod": 0,
            "CpuQuota": 0,
            "CpuRealtimePeriod": 0,
            "CpuRealtimeRuntime": 0,
            "CpusetCpus": "",
            "CpusetMems": "",
            "Devices": [],
            "DeviceCgroupRules": null,
            "DeviceRequests": null,
            "KernelMemory": 0,
            "KernelMemoryTCP": 0,
            "MemoryReservation": 0,
            "MemorySwap": 0,
            "MemorySwappiness": null,
            "OomKillDisable": false,
            "PidsLimit": null,
            "Ulimits": null,
            "CpuCount": 0,
            "CpuPercent": 0,
            "IOMaximumIOps": 0,
            "IOMaximumBandwidth": 0,
            "MaskedPaths": [
                "/proc/asound",
                "/proc/acpi",
                "/proc/kcore",
                "/proc/keys",
                "/proc/latency_stats",
                "/proc/timer_list",
                "/proc/timer_stats",
                "/proc/sched_debug",
                "/proc/scsi",
                "/sys/firmware"
            ],
            "ReadonlyPaths": [
                "/proc/bus",
                "/proc/fs",
                "/proc/irq",
                "/proc/sys",
                "/proc/sysrq-trigger"
            ]
        },
        "GraphDriver": {
            "Data": {
                "LowerDir": "/var/lib/docker/overlay2/a49b7e336b7c3892f3f933d162798dab2d89600a9819e1318e1dc5f7f1b27080-init/diff:/var/lib/docker/overlay2/61a4f0d180efc1642f2dc0cec97a3b5333a231256fadd22723eeef4e95b79308/diff",
                "MergedDir": "/var/lib/docker/overlay2/a49b7e336b7c3892f3f933d162798dab2d89600a9819e1318e1dc5f7f1b27080/merged",
                "UpperDir": "/var/lib/docker/overlay2/a49b7e336b7c3892f3f933d162798dab2d89600a9819e1318e1dc5f7f1b27080/diff",
                "WorkDir": "/var/lib/docker/overlay2/a49b7e336b7c3892f3f933d162798dab2d89600a9819e1318e1dc5f7f1b27080/work"
            },
            "Name": "overlay2"
        },
        "Mounts": [],
        "Config": {
            "Hostname": "93138a2af466",
            "Domainname": "",
            "User": "",
            "AttachStdin": true,
            "AttachStdout": true,
            "AttachStderr": true,
            "Tty": true,
            "OpenStdin": true,
            "StdinOnce": true,
            "Env": [
                "PATH=/usr/local/sbin:/usr/local/bin:/usr/sbin:/usr/bin:/sbin:/bin"
            ],
            "Cmd": [
                "/bin/bash"
            ],
            "Image": "centos",
            "Volumes": null,
            "WorkingDir": "",
            "Entrypoint": null,
            "OnBuild": null,
            "Labels": {
                "org.label-schema.build-date": "20201204",
                "org.label-schema.license": "GPLv2",
                "org.label-schema.name": "CentOS Base Image",
                "org.label-schema.schema-version": "1.0",
                "org.label-schema.vendor": "CentOS"
            }
        },
        "NetworkSettings": {
            "Bridge": "",
            "SandboxID": "63102349b23ecd6e2010847962056df4132651b106ed28de8528e50d6a961c9c",
            "HairpinMode": false,
            "LinkLocalIPv6Address": "",
            "LinkLocalIPv6PrefixLen": 0,
            "Ports": {},
            "SandboxKey": "/var/run/docker/netns/63102349b23e",
            "SecondaryIPAddresses": null,
            "SecondaryIPv6Addresses": null,
            "EndpointID": "eeed2d848ba97279f514e161744414dc8dff922d395c6a8b0ae7bad5fbb88f7e",
            "Gateway": "172.17.0.1",
            "GlobalIPv6Address": "",
            "GlobalIPv6PrefixLen": 0,
            "IPAddress": "172.17.0.2",
            "IPPrefixLen": 16,
            "IPv6Gateway": "",
            "MacAddress": "02:42:ac:11:00:02",
            "Networks": {
                "bridge": {
                    "IPAMConfig": null,
                    "Links": null,
                    "Aliases": null,
                    "NetworkID": "511233d65ba29e0a71d9f1c712fb4de3aad881771488f988034d0eeb1559d3ae",
                    "EndpointID": "eeed2d848ba97279f514e161744414dc8dff922d395c6a8b0ae7bad5fbb88f7e",
                    "Gateway": "172.17.0.1",
                    "IPAddress": "172.17.0.2",
                    "IPPrefixLen": 16,
                    "IPv6Gateway": "",
                    "GlobalIPv6Address": "",
                    "GlobalIPv6PrefixLen": 0,
                    "MacAddress": "02:42:ac:11:00:02",
                    "DriverOpts": null
                }
            }
        }
    }
]
-
Enter the currently running container
# We usually use the background mode to run the container. We need to enter the container and modify some configurations

# command
docker exec -it container id bashShell

#test
[root@yifcloud /]# docker ps
CONTAINER ID   IMAGE     COMMAND       CREATED          STATUS          PORTS     NAMES
93138a2af466   centos    "/bin/bash"   23 minutes ago   Up 23 minutes             determined_tharp
[root@yifcloud /]# docker exec -it 93138a2af466 /bin/bash
[root@93138a2af466 /]# ls
bin  dev  etc  home  lib  lib64  lost+found  media  mnt  opt  proc  root  run  sbin  srv  sys  tmp  usr  var
[root@93138a2af466 /]# ps -ef
UID        PID  PPID  C STIME TTY          TIME CMD
root         1     0  0 08:23 pts/0    00:00:00 /bin/bash
root        15     0  0 08:48 pts/1    00:00:00 /bin/bash
root        30    15  0 08:48 pts/1    00:00:00 ps -ef

# Mode 2
docker attach container id
# test
[root@yifcloud /]# docker ps
CONTAINER ID   IMAGE     COMMAND       CREATED          STATUS          PORTS     NAMES
93138a2af466   centos    "/bin/bash"   28 minutes ago   Up 28 minutes             determined_tharp
[root@yifcloud /]# docker attach 93138a2af466

# docker exec      #After entering the container, open a new terminal, which can be operated inside (commonly used)
# docker attach    #Entering the terminal where the container is executing will not start a new process
-
Copy files from container to host
docker cp container id:Host path for in container destination  #Copy the files in the docker container to the destination host path

[root@yifcloud /]# docker ps
CONTAINER ID   IMAGE     COMMAND   CREATED   STATUS    PORTS     NAMES
[root@yifcloud /]# docker run -it centos /bin/bash
[root@b53c599f8830 /]# [root@yifcloud /]# docker ps
CONTAINER ID   IMAGE     COMMAND       CREATED          STATUS          PORTS     NAMES
b53c599f8830   centos    "/bin/bash"   16 seconds ago   Up 15 seconds             goofy_elion
[root@yifcloud /]# cd home/
#View files in the current directory
[root@yifcloud home]# ls
fengye  test
[root@yifcloud home]# touch fengye.java
[root@yifcloud home]# ls
fengye  fengye.java  test
[root@yifcloud home]# docker ps
CONTAINER ID   IMAGE     COMMAND       CREATED         STATUS         PORTS     NAMES
b53c599f8830   centos    "/bin/bash"   3 minutes ago   Up 3 minutes             goofy_elion
#Enter the docker container
[root@yifcloud home]# docker attach b53c599f8830
[root@b53c599f8830 /]# cd home/
#Create a new file in the container
[root@b53c599f8830 home]# touch test.java
[root@b53c599f8830 home]# ls
test.java
[root@b53c599f8830 home]# exit
exit
[root@yifcloud home]# docker ps
CONTAINER ID   IMAGE     COMMAND   CREATED   STATUS    PORTS     NAMES
#Copy this file to the host
[root@yifcloud home]# docker cp b53c599f8830:/home/test.java /home
[root@yifcloud home]# ls
fengye  fengye.java  test  test.java

# Note: copying here is a manual process, which we will use later -v Volume technology can realize data synchronization between host and container
4. Quick query of docker command
Here, the common commands of docker are listed in the order of letters a-z for quick check later:
attach      Attach to a running container           #The attach connection under the current shell specifies the running image
build       Build an image from a Dockerfile        #Customized image through Dockerfile
commit      create a new image from a container changes    #Commit the current container as a new image
cp          Copy files/folders from the containers filesystem to the host path  #Copy the specified file or directory from the container to the host
create      create a new container                 #Create a new container, the same as run, but do not start the container
diff        Inspect changes on a container's filesystem    #View docker container changes
events      Get real time events from the server      #Get container real-time events from docker service
exec        Run a command in an existing container    #Run the command on an existing container
export      Stream the contents of a container as a tar archive   #Export the contents of the container as a tar archive [corresponding to import]
history     Show the history of an image            #Show a mirror formation history
images      List images                             #Lists the current image of the system
import      Create a new filesystem image from the contents of a tarball  #Create a new file system image from the contents of the tar package [corresponding to export]
info        Display system-wide information        #Display system related information
inspect     Return low-level information on a container     #View container details
kill        kill a running container               #kill appoint docker container
load        Load an image from a tar archive       #Load an image from a tar package [corresponding to save]
login       Register or Login to the docker registry server   #Register or log in to a docker source server
logout      Log out from a Docker registry server      #Exit from the current Docker registry
logs        Fetch the logs of a container          #Output current container log information
port        Lookup the public-facing port which is NAT-ed to PRIVATE_PORT   #View the internal source port of the container corresponding to the mapped port
pause       Pause all processes within a container    #Pause container
ps          List containers                           #List containers
pull        Pull an image or a repository from the docker registry server  #Pull the specified image or library image from the docker image source server
push        Push an image or a repository to the docker regitsry server   #Push the specified image or library image to the docker source server
restart     Restart a running container              #Restart the running container
rm          Remove one or more containers            #Remove one or more containers
rmi         Remove one or more images                #Remove one or more images [no container can be deleted without using the image, otherwise the relevant container needs to be deleted before continuing or deleting-f Force deletion]
run         Run a command in a new container         #Create a new container and run a command
save        Save an image to a tar archive           #Save an image as a tar package [corresponding to load]
search      Search for an image on the Docker Hub    #Search for images in docker hub
start       Start a running containers               #Start container
stop        Stop a running containers                #Stop container
tag         Tag an image into a repository           #Label the image in the source
top         Lookup the running processes of a container     #View the process information running in the container
unpause     Unpause a paused container               #Unsuspend container
version     Show the docker version information      #View docker version number
wait        Block until a container stops, then print its exit code  #Intercept the exit status value when the container stops
5.Commit DIY image
docker commit  #Submit the container as a new copy
#The principle of the command is similar to that of git
docker commit -m="Description information submitted" -a="author" container id Target image name:[TAG]
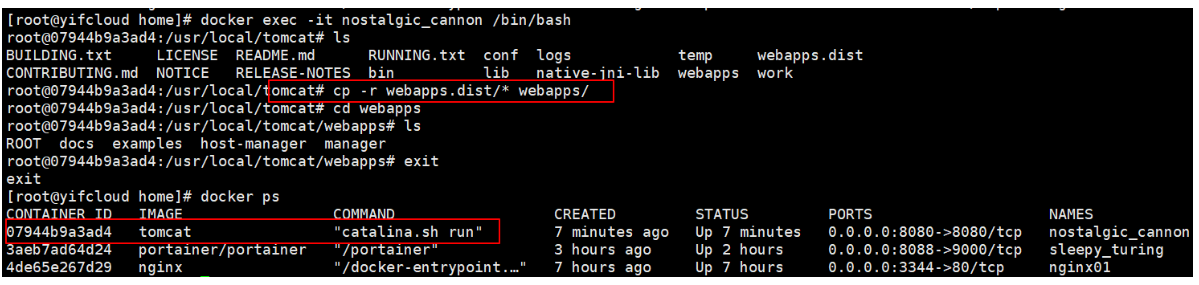
Here, you have created a webapps directory that you can start by copying. Now you can upload your own tomcat image.
Actual test:
[root@yifcloud home]# docker commit -m="tomcatplus" -a="fengye" 07944b9a3ad4 tomcat02:1.0
sha256:6ce798d173775d606beb3d0dec6d05b7a08ddb8b24790d3efcd319ce0e77bd92
[root@yifcloud home]# docker images
REPOSITORY            TAG       IMAGE ID       CREATED          SIZE
tomcat02              1.0       6ce798d17377   20 seconds ago   672MB
tomcat                9.0       bcd554d24cc5   5 days ago       667MB
tomcat                latest    bcd554d24cc5   5 days ago       667MB
nginx                 latest    7ce4f91ef623   6 days ago       133MB
portainer/portainer   latest    580c0e4e98b0   2 weeks ago      79.1MB
centos                latest    300e315adb2f   3 months ago     209MB
You can see that the docker image tomcat02 already exists in the container.
Therefore, if you want to save the state of the current container, you can commit through commit to obtain an image, just like a snapshot of the VM we studied before.
6. Container data volume
6.1. Data volume concept
docker packages the application and environment into an image. If the data is stored in the container, the data will be lost if we delete the container. At this time, we need to make the data persistent
Put Mysql in the container, delete the database and run away. Requirement: Mysql data needs to be stored locally
There can be a data sharing technology between containers. The data generated in the Docker container is synchronized to the local.
This is volume technology. Directory mount, mount the directory in our container to Linux!
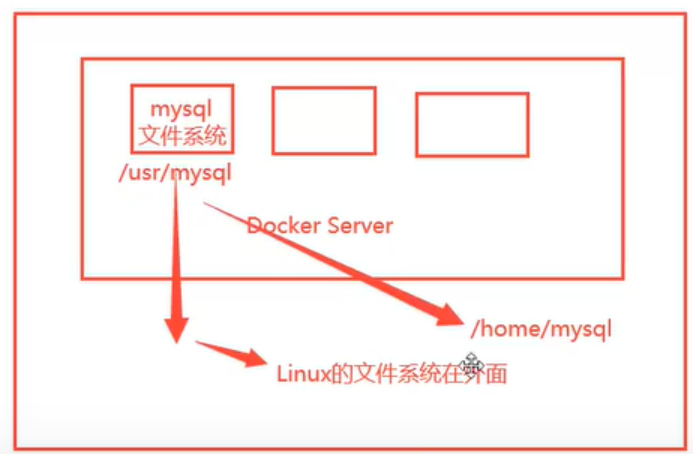
In a word: container persistence and synchronization! Data can also be shared between containers.
6.2. Using data volumes
- Method 1: directly use the command to mount - v
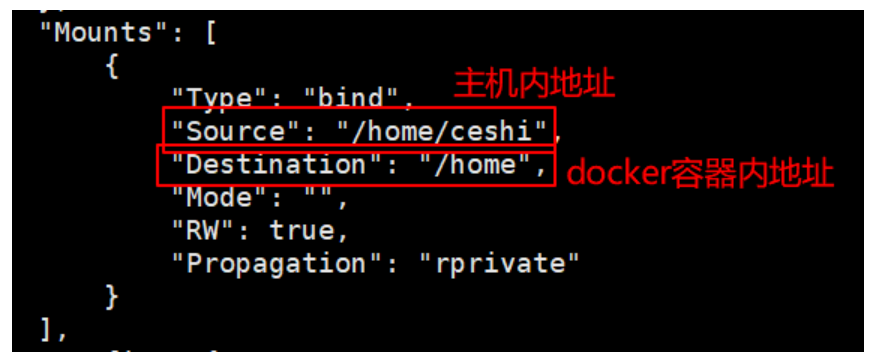
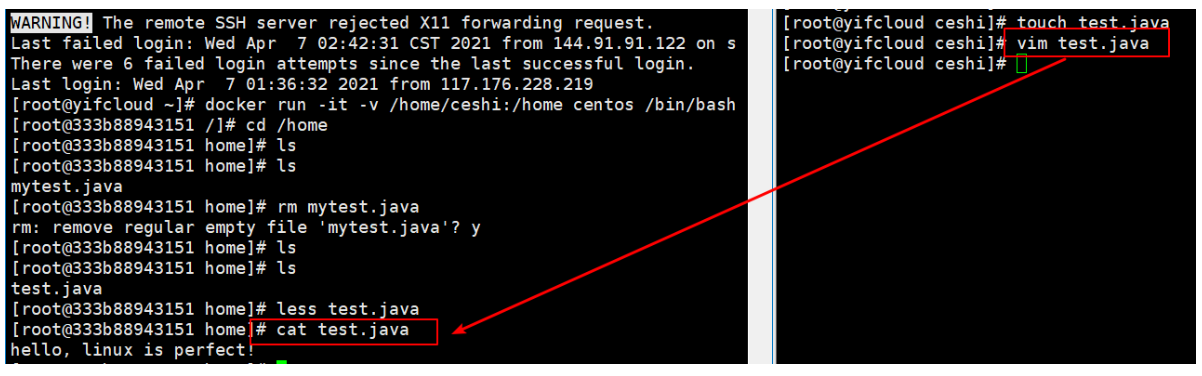
#Where / home is the docker container address/ home/ceshi yes linux Address in host
[root@yifcloud ~]# docker run -it -v /home/ceshi:/home centos /bin/bash
#We can view the mount through docker inspect container id
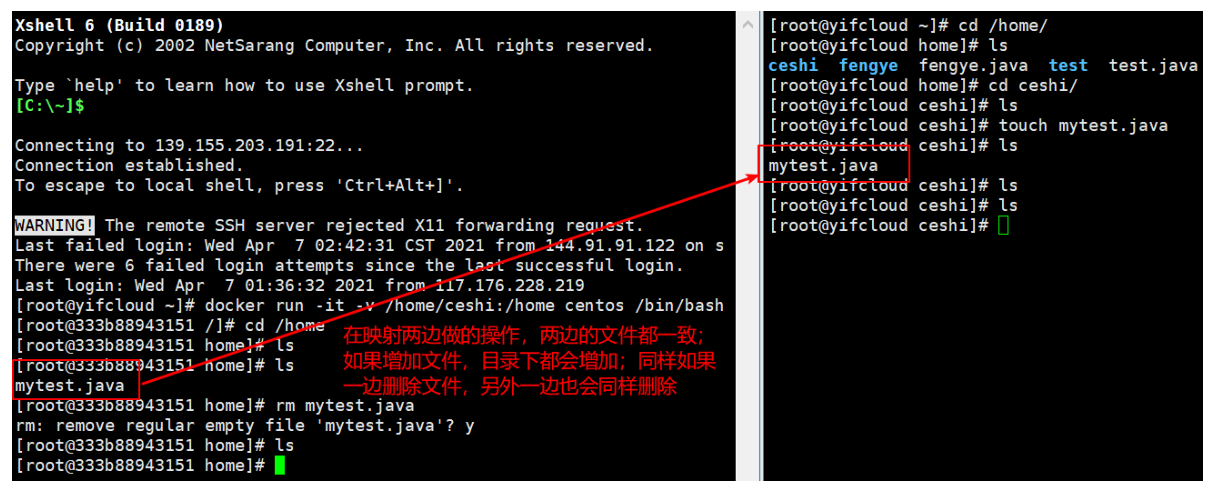
Test again!
1. Stop the container;
2. Modify the file on the host computer;
3. Start the container;
4. The data in the container is still synchronized!
6.3. Named and anonymous mount
#Anonymous mount
-v Path in container!
docker run -d -P --name nginx01 -v /ect/nginx nginx

#View all volume s
[root@yifcloud /]# docker volume ls
DRIVER    VOLUME NAME
local     05672ea78a0ea26e67072bc8af4a95bfbfe52e2b9b19586999e97be7c5bc6973
local     f8e2e398e59f01321393bead423d8c69c67a38c82c101f8575fc71b703af41a2
#It is found here that this is anonymous mount. We are-v Only the path inside the container is written, not the path outside the container!

#Named mount
[root@yifcloud /]# docker run -d -P --name nginx02 -v juming-nginx:/etc/nginx nginx
6232abbe4046e654254f62a407e54af96eaa01ea7185eb70d1a3147e290aac70
[root@yifcloud /]# docker volume ls
DRIVER    VOLUME NAME
local     05672ea78a0ea26e67072bc8af4a95bfbfe52e2b9b19586999e97be7c5bc6973
local     f8e2e398e59f01321393bead423d8c69c67a38c82c101f8575fc71b703af41a2
local     juming-nginx

#adopt -v Volume name:Path in container
#Take a look at this volume
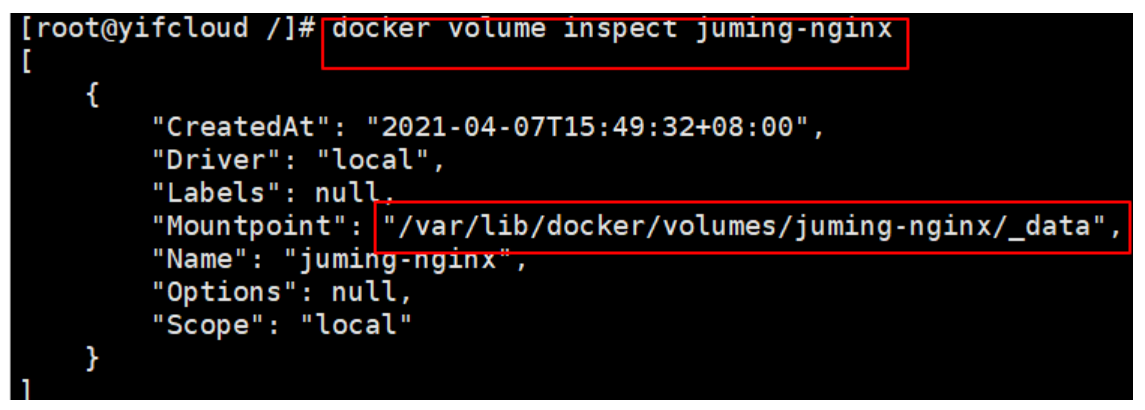
All volumes in the docker container are in '/ var / lib / docker / volumes / XXXX' without a specified directory/_ Under 'data'.
We can easily find one of our volumes through named mount. In most cases, it is recommended to use 'named mount'.
# How to determine whether it is a named mount or an anonymous mount, or a specified path mount
-v Path in container         # Anonymous mount
-v Volume name:Path in container     # Named mount
-v /Host path: path within container   #Specified path mount
expand:
#Pass-v Path in container: ro rw Change read and write permissions
ro   readonly     #read-only
rw   readwrite    #Readable and writable
#Once the container permission is set, the container will limit the content we mount!
docker run -d -P --name nginx02 -v juming-nginx:/etc/nginx:ro nginx
docker run -d -P --name nginx02 -v juming-nginx:/etc/nginx:rw nginx
#As long as ro sees ro, it means that this path can only be operated by the host, and it cannot be operated inside the container!
7.Dockerfile
Dockerfile is the build file used to build the docker image. Command script.
Through this script, you can generate an image. The image is layer by layer. The script commands one by one, and each command is a layer.
Construction steps:
1. Write a dockerfile file
2. Build docker build into an image
3.docker run run image
4.docker push publishing images (DockerHub, Alibaba cloud image warehouse)
7.1.Dockerfile construction process
1. Each reserved keyword (instruction) must be capitalized
2. Instructions are executed in order from top to bottom
3. # indicates a comment
4. Each instruction will create and submit a new image layer
Dockerfile is development oriented. In order to publish projects and make images in the future, you need to write dockerfile.
DockerFile: build a file that defines all the steps and source code.
DockerImages: images generated through DockerFile construction, and products finally released and run.
Docker container: a container is an image that runs to provide services.
7.2.Dockerfile instruction
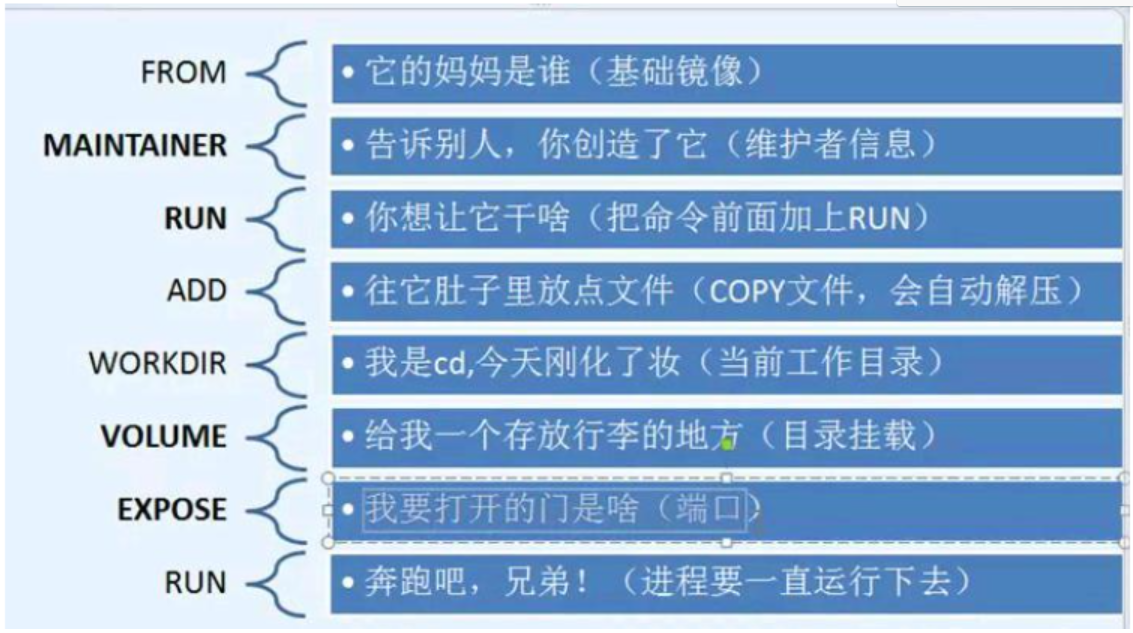
FROM    #Basic image, everything starts from here
MAINTAINER  #Who wrote the image? General format: name+mailbox
RUN     #Commands to run during image construction
ADD     #Step, tomcat image, this tomcat compressed package, add content
WORKDIR  #Mirrored working directory
VOLUME   #Mounted directory
EXPOSE   #Specify exposed port configuration
CMD      #Specify the command to run when the container starts. Only the last one will take effect and can be replaced
ENTRYPOINT  #Specify the commands to be run when the container is started, and you can append commands
ONBUILD     #When constructing an inherited DockerFile, the ONBUILD instruction will be run to trigger the instruction
COPY        #Similar to ADD, copy our files to the image
ENV         #Setting environment variables during construction
For example, you can use dockerfile to create your own centos:
#1.to write dockerfile Documents
[root@aliyunCloud docker-test-volume]# cat mydockerfile-centos
FROM centos
MAINTAINER fengye<2416675247@qq.com>

ENV MYPATH /usr/local
WORKDIR $MYPATH

RUN yum -y install vim
RUN yum -y install net-tools

EXPOSE 80

CMD echo $MYPATH
CMD echo "----end----"
CMD /bin/bash

#2.Build an image from this file
#Command: docker build -f dockerfile File path -t Image name:[tag]

#3.test run
You can view the creation process of the image through the command docker history:
[root@aliyunCloud docker-test-volume]# docker images
REPOSITORY      TAG       IMAGE ID       CREATED        SIZE
fengye/centos   1.0       d3a3ab46c15e   4 hours ago    209MB
centos          latest    300e315adb2f   4 months ago   209MB
[root@aliyunCloud docker-test-volume]# docker history 300e315adb2f
IMAGE          CREATED        CREATED BY                                      SIZE      COMMENT
300e315adb2f   4 months ago   /bin/sh -c #(nop)  CMD ["/bin/bash"]            0B
<missing>      4 months ago   /bin/sh -c #(nop)  LABEL org.label-schema.sc...   0B
<missing>      4 months ago   /bin/sh -c #(nop) ADD file:bd7a2aed6ede423b7...   209MB
- Difference between CMD and ENTRYPOINT
CMD     #Specify the command to run when the container starts. Only the last one will take effect and can be replaced
ENTRYPOINT      #Specify the commands to be run when the container is started, and you can append commands
Test cmd
[root@aliyunCloud docker-test-volume]# vim dockerfile-cmd-test
[root@aliyunCloud docker-test-volume]# docker build -f dockerfile-cmd-test -t cmdtest .
Sending build context to Docker daemon  3.072kB
Step 1/2 : FROM centos
 ---> 300e315adb2f
Step 2/2 : CMD ["ls", "-a"]
 ---> Running in f68f9538a93b
Removing intermediate container f68f9538a93b
 ---> ca751f13b6b6
Successfully built ca751f13b6b6
Successfully tagged cmdtest:latest
[root@aliyunCloud docker-test-volume]# docker run ca751f13b6b6
.
..
.dockerenv
bin
dev
etc
home
lib
lib64
lost+found
media
mnt
opt
proc
root
run
sbin
srv
sys
tmp
usr
var

#If you want to append a command, you can only use all the commands
[root@aliyunCloud docker-test-volume]# docker run ca751f13b6b6 -l
docker: Error response from daemon: OCI runtime create failed: container_linux.go:367: starting container process caused: exec: "-l": executable file not found in $PATH: unknown.
[root@aliyunCloud docker-test-volume]# docker run ca751f13b6b6 ls -al
total 56
drwxr-xr-x   1 root root 4096 May  3 06:05 .
drwxr-xr-x   1 root root 4096 May  3 06:05 ..
-rwxr-xr-x   1 root root    0 May  3 06:05 .dockerenv
lrwxrwxrwx   1 root root    7 Nov  3 15:22 bin -> usr/bin
drwxr-xr-x   5 root root  340 May  3 06:05 dev
drwxr-xr-x   1 root root 4096 May  3 06:05 etc
drwxr-xr-x   2 root root 4096 Nov  3 15:22 home
lrwxrwxrwx   1 root root    7 Nov  3 15:22 lib -> usr/lib
lrwxrwxrwx   1 root root    9 Nov  3 15:22 lib64 -> usr/lib64
drwx------   2 root root 4096 Dec  4 17:37 lost+found
drwxr-xr-x   2 root root 4096 Nov  3 15:22 media
drwxr-xr-x   2 root root 4096 Nov  3 15:22 mnt
drwxr-xr-x   2 root root 4096 Nov  3 15:22 opt
dr-xr-xr-x 111 root root    0 May  3 06:05 proc
dr-xr-x---   2 root root 4096 Dec  4 17:37 root
drwxr-xr-x  11 root root 4096 Dec  4 17:37 run
lrwxrwxrwx   1 root root    8 Nov  3 15:22 sbin -> usr/sbin
drwxr-xr-x   2 root root 4096 Nov  3 15:22 srv
dr-xr-xr-x  13 root root    0 Apr 28 06:51 sys
drwxrwxrwt   7 root root 4096 Dec  4 17:37 tmp
drwxr-xr-x  12 root root 4096 Dec  4 17:37 usr
drwxr-xr-x  20 root root 4096 Dec  4 17:37 var
Test ENTRYPOINT:
[root@aliyunCloud docker-test-volume]# docker build -f dockerfile-entrypoint-test -t entrypointtest .
Sending build context to Docker daemon  4.096kB
Step 1/2 : FROM centos
 ---> 300e315adb2f
Step 2/2 : ENTRYPOINT ["ls", "-a"]
 ---> Running in 2f373923b6ab
Removing intermediate container 2f373923b6ab
 ---> 89dd49fd6ba2
Successfully built 89dd49fd6ba2
Successfully tagged entrypointtest:latest
[root@aliyunCloud docker-test-volume]# docker run 89dd49fd6ba2
.
..
.dockerenv
bin
dev
etc
home
lib
lib64
lost+found
media
mnt
opt
proc
root
run
sbin
srv
sys
tmp
usr
var

#Our append command can be appended directly after run
[root@aliyunCloud docker-test-volume]# docker run 89dd49fd6ba2 -l
total 56
drwxr-xr-x   1 root root 4096 May  3 06:30 .
drwxr-xr-x   1 root root 4096 May  3 06:30 ..
-rwxr-xr-x   1 root root    0 May  3 06:30 .dockerenv
lrwxrwxrwx   1 root root    7 Nov  3 15:22 bin -> usr/bin
drwxr-xr-x   5 root root  340 May  3 06:30 dev
drwxr-xr-x   1 root root 4096 May  3 06:30 etc
drwxr-xr-x   2 root root 4096 Nov  3 15:22 home
lrwxrwxrwx   1 root root    7 Nov  3 15:22 lib -> usr/lib
lrwxrwxrwx   1 root root    9 Nov  3 15:22 lib64 -> usr/lib64
drwx------   2 root root 4096 Dec  4 17:37 lost+found
drwxr-xr-x   2 root root 4096 Nov  3 15:22 media
drwxr-xr-x   2 root root 4096 Nov  3 15:22 mnt
drwxr-xr-x   2 root root 4096 Nov  3 15:22 opt
dr-xr-xr-x 111 root root    0 May  3 06:30 proc
dr-xr-x---   2 root root 4096 Dec  4 17:37 root
drwxr-xr-x  11 root root 4096 Dec  4 17:37 run
lrwxrwxrwx   1 root root    8 Nov  3 15:22 sbin -> usr/sbin
drwxr-xr-x   2 root root 4096 Nov  3 15:22 srv
dr-xr-xr-x  13 root root    0 Apr 28 06:51 sys
drwxrwxrwt   7 root root 4096 Dec  4 17:37 tmp
drwxr-xr-x  12 root root 4096 Dec  4 17:37 usr
drwxr-xr-x  20 root root 4096 Dec  4 17:37 var
7.3. Publish image
- DockerHub
1. Address https://hub.docker.com/ , register your account;
2. Confirm that this account can be logged in;
3. Submit your own image on our server
[root@aliyunCloud docker-test-volume]# docker login --help

Usage:  docker login [OPTIONS] [SERVER]

Log in to a Docker registry.
If no server is specified, the default is defined by the daemon.

Options:
  -p, --password string   Password
      --password-stdin    Take the password from stdin
  -u, --username string   Username

[root@aliyunCloud docker-test-volume]# docker login -u fengye -p 123456
4. After logging in, you can submit the image, which is a one-step docker push
#push your own image to the server
[root@aliyunCloud docker-test-volume]# docker push fengye/diytomcat:1.0

#Docker pushes the image published by itself with the version number as much as possible
docker tag f8559daf1fc2 fengye/tomcat:1.0
docker push fengye/tomcat:1.0
When submitting, it is also submitted according to the image level!
- Publish to alicloud image library
1. Log in to alicloud
2. Find the container image service
3. Create namespace
4. Create container image
Detailed reference: https://help.aliyun.com/document_detail/60997.html?spm=a2c4g.11186623.6.597.17e372c0s9AmRb , Alibaba cloud builds warehouse and image
Flow chart summarizing dokerfile execution process:
