[Oracle] CentOS 7.4 installation and deployment Oracle19c
Project requirements
In the production environment, according to the business development and project requirements of the enterprise, the business database will be selected according to the importance of the business, and the data model and database design will be established. This is mainly aimed at installing and deploying Oracle19c database system on Linux operating system.
1, oracle Software Download
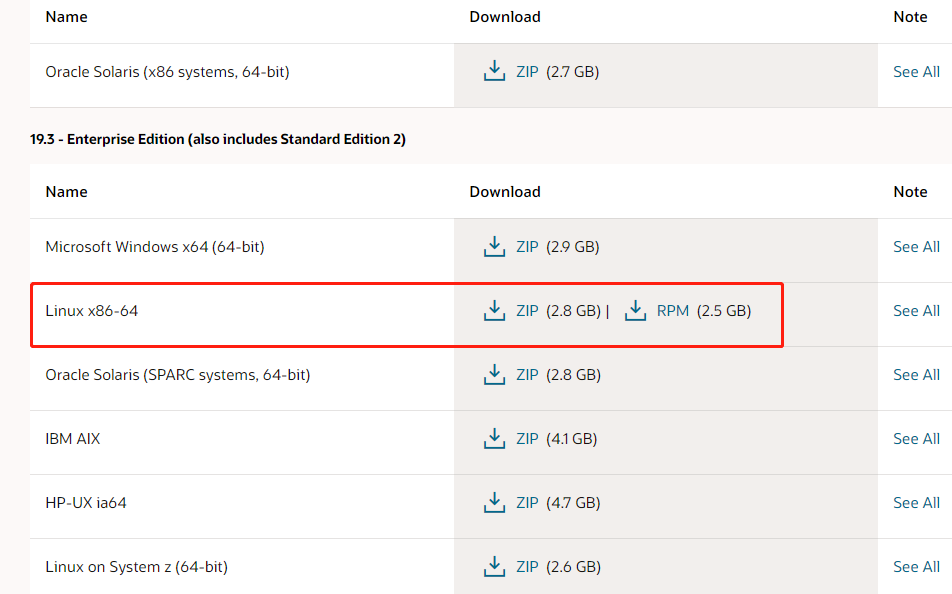
For oracle database system software download, enter oracle official website, select the corresponding operating system environment version and download oracle database software. Download address: Database Software Downloads | Oracle . 19c can be installed in two ways, one is silent installation, the other is graphical interface installation. This time, ZIP compression software is used for graphical installation. It is recommended to use graphical installation for the first time, so that you can clearly understand the installation process of the database. The software download is as follows:
2, Install deployment environment
2.1. Installation and deployment environment planning
| Environment introduction | edition |
| Host environment | CentOS Linux release 7.4.1708 (Core) |
| oracle environment | oracle19c |
| oracle instance name | orcl19c (common database: just like the database created by 11gr2) |
| Orcl pdb19c (container database: PDB) | |
| Server IP | 172.21.109.122 |
2.2 preparation of operating system environment
1,Prepare the server, virtual machine or physical machine and install the post operating system.


2,Set host name and/etc/hosts file

[root@manager oracle]# hostname
manager


[root@manager oracle]# cat /etc/hosts
127.0.0.1   localhost localhost.localdomain localhost4 localhost4.localdomain4
::1         localhost localhost.localdomain localhost6 localhost6.localdomain6

172.21.209.122 manager oracle

3,Turn off firewalls and selinux

Turn off firewall
systemctl stop firewalld.service
systemctl disable firewalld.service

close selinux
[root@manager oracle]# cat /etc/selinux/config

# This file controls the state of SELinux on the system.
# SELINUX= can take one of these three values:
#     enforcing - SELinux security policy is enforced.
#     permissive - SELinux prints warnings instead of enforcing.
#     disabled - No SELinux policy is loaded.
SELINUX=disabled                                            #Change to disabled
# SELINUXTYPE= can take one of three two values:
#     targeted - Targeted processes are protected,
#     minimum - Modification of targeted policy. Only selected processes are protected.
#     mls - Multi Level Security protection.
SELINUXTYPE=targeted
2.3. Configure local yum source
Download and upload ISO Mirror file
[root@manager data]# pwd
/data
[root@manager data]# ll|grep *.iso
-rw-r--r--  1 root    root    4588568576 May 19 14:30 CentOS-7.6-x86_64-DVD-1810.iso

Mount image file
[root@manager data]# mkdir  centos76
[root@manager data]# mount -o loop /data/CentOS-7.6-x86_64-DVD-1810.iso  /data/centos76/
mount: /dev/loop0 is write-protected, mounting read-only

[root@manager data]# df -h
Filesystem      Size  Used Avail Use% Mounted on
devtmpfs        1.9G     0  1.9G   0% /dev
tmpfs           1.9G  4.0K  1.9G   1% /dev/shm
tmpfs           1.9G  9.9M  1.9G   1% /run
tmpfs           1.9G     0  1.9G   0% /sys/fs/cgroup
/dev/vda3        96G   22G   70G  24% /
/dev/vda1       488M  262M  191M  58% /boot
tmpfs           379M   40K  379M   1% /run/user/1001
tmpfs           379M     0  379M   0% /run/user/0
/dev/loop0      4.3G  4.3G     0 100% /data/centos76
[root@manager data]#


edit repo file
vi redhat-base.repo

[local]
name=Red Hat Enterprise Linux 6.7
baseurl=file:///mnt
enabled=1
gpgcheck=1
gpgkey=file:///mnt/RPM-GPG-KEY-redhat-release
3, Operating system environment preparation
3.1. Create groups and users
/usr/sbin/groupadd -g 54321 oinstall
/usr/sbin/groupadd -g 54322 dba
/usr/sbin/groupadd -g 54323 oper
/usr/sbin/useradd -u 54321 -g oinstall -G dba,oper oracle
3.2. Modify the user's oracle password
passwd oracle
3.3. Create a working directory and give corresponding permissions.
stay root Execute command under user

mkdir -p /u01/app/oracle/product/19.2.0/db_1
chown -R oracle:oinstall /u01/
chmod -R 775 /u01/
3.4. Configure Oracle environment variables
Switch to oracle user
su - oracle

Open the environment variable file and enter the following
vi .bash_profile

ORACLE_SID=orcl19c;export ORACLE_SID
ORACLE_UNQNAME=orcl19c;export ORACLE_UNQNAME
ORACLE_BASE=/u01/app/oracle; export ORACLE_BASE
ORACLE_HOME=$ORACLE_BASE/product/19.2.0/db_1; export ORACLE_HOME

NLS_DATE_FORMAT="YYYY:MM:DDHH24:MI:SS"; export NLS_DATE_FORMAT
NLS_LANG=american_america.ZHS16GBK; export NLS_LANG
TNS_ADMIN=$ORACLE_HOME/network/admin; export TNS_ADMIN
ORA_NLS11=$ORACLE_HOME/nls/data; export ORA_NLS11
PATH=.:${JAVA_HOME}/bin:${PATH}:$HOME/bin:$ORACLE_HOME/bin:$ORA_CRS_HOME/bin
PATH=${PATH}:/usr/bin:/bin:/usr/bin/X11:/usr/local/bin
export PATH

LD_LIBRARY_PATH=$ORACLE_HOME/lib
LD_LIBRARY_PATH=${LD_LIBRARY_PATH}:$ORACLE_HOME/oracm/lib
LD_LIBRARY_PATH=${LD_LIBRARY_PATH}:/lib:/usr/lib:/usr/local/lib
export LD_LIBRARY_PATH

CLASSPATH=$ORACLE_HOME/JRE
CLASSPATH=${CLASSPATH}:$ORACLE_HOME/jlib
CLASSPATH=${CLASSPATH}:$ORACLE_HOME/rdbms/jlib
CLASSPATH=${CLASSPATH}:$ORACLE_HOME/network/jlib
export CLASSPATH

THREADS_FLAG=native; export THREADS_FLAG
export TEMP=/tmp
export TMPDIR=/tmp
umask 022
3.5. Modify kernel parameters
Exit to first root User, and then enter the content

vi /etc/sysctl.conf


fs.file-max = 6815744
kernel.sem = 250 32000 100 128
kernel.shmmni = 4096
kernel.shmall = 1073741824
kernel.shmmax = 4398046511104
kernel.panic_on_oops = 1
net.core.rmem_default = 262144
net.core.rmem_max = 4194304
net.core.wmem_default = 262144
net.core.wmem_max = 1048576
fs.aio-max-nr = 1048576
net.ipv4.ip_local_port_range = 9000 65500

Execute the following command to make it effective.
sysctl --system
3.6. Install oracle dependent packages
yum install bc gcc gcc-c++ binutils compat-libcap1 compat-libstdc++ dtrace-modules dtrace-modules-headers
dtrace-modules-provider-headers dtrace-utils elfutils-libelf elfutils-libelf-devel fontconfig-devel glibc glibc-devel
ksh libaio libaio-devel libdtrace-ctf-devel libX11 libXau libXi libXtst libXrender libXrender-devel libgcc librdmacm-devel
libstdc++ libstdc++-devel libxcb make smartmontools sysstat

Note: you need to configure local yum Source.
4. Installing Oracle 19C database system
4.1. Upload and unzip the downloaded software package
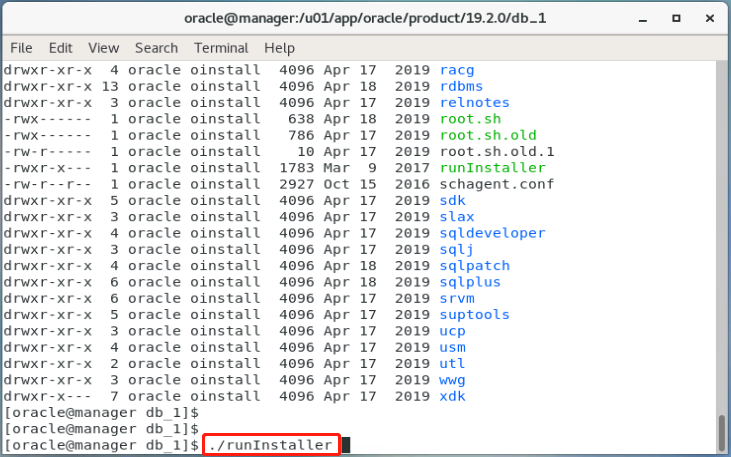
Upload files to the specified directory
[root@manager oracle]# pwd
/data/oracle
[root@manager oracle]# ll
total 2988000
-rw-r--r-- 1 root root 3059705302 May  8 15:38 LINUX.X64_193000_db_home.zip


Then unzip the compressed package. If there is no unzip tool, install it.
yum -y install zip unzip

su - oracle
unzip /data/oracle/LINUX.X64_193000_db_home.zip -d  /u01/app/oracle/product/19.2.0/db_1/  #-d means decompress to the specified directory.
4.2 graphical installation of Oracle Database
1. oracle login system
Log in to the graphical interface of the operating system and switch to Oracle user
[oracle@localhost db_1]$ export DISPLAY=:0
[oracle@localhost db_1]$ LANG=en_US ./runInstaller
be careful:
linux7 Graphical installation of operating system Oracle The software needs to be set DISPLAY Environment variable, if not set DISPLAY For environment variables, the following errors are likely to be encountered when starting the graphical interface.
[oracle@manager db_1]$ ./runInstaller
ERROR: Unable to verify the graphical display setup. This application requires X display. Make sure that xdpyinfo exist under PATH variable.

No X11 DISPLAY variable was set, but this program performed an operation which requires it.

Treatment method: root User view display environment variable
 see: xdpyinfo | head
 set up: export DISPLAY=:0
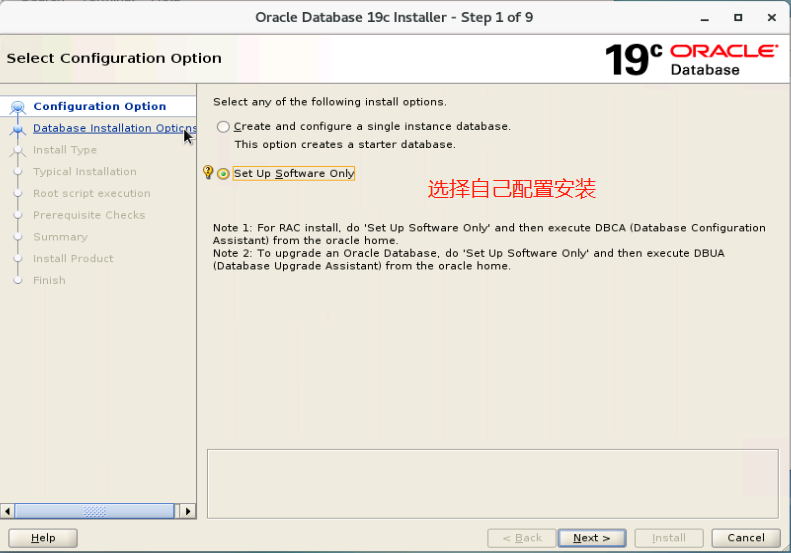
2. Execute the installation script to install the Oracle 19C database.
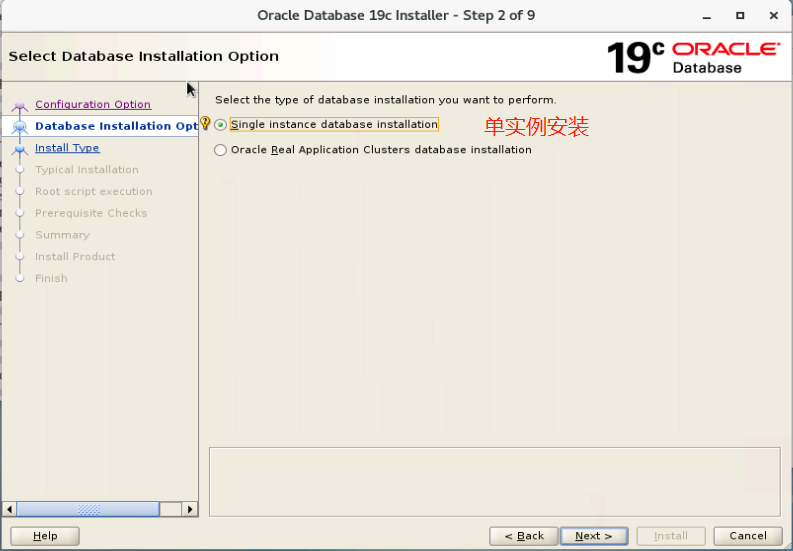
3. Select single instance installation
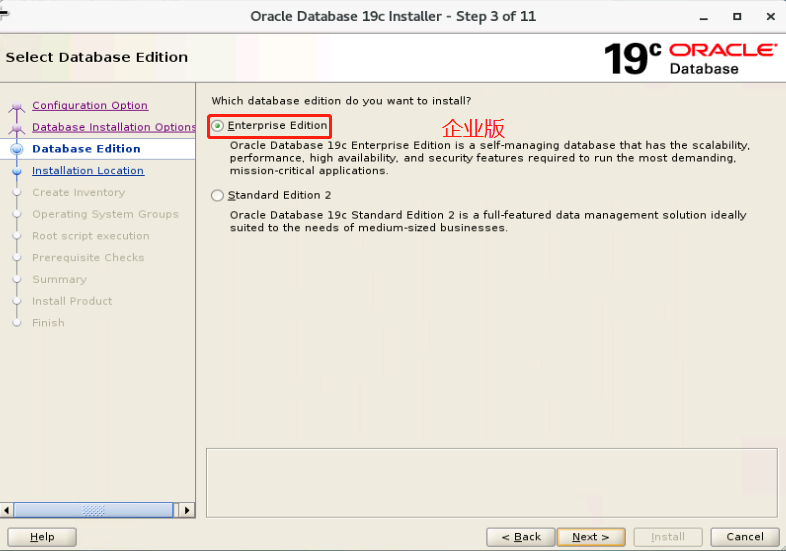
4. Select Enterprise Edition
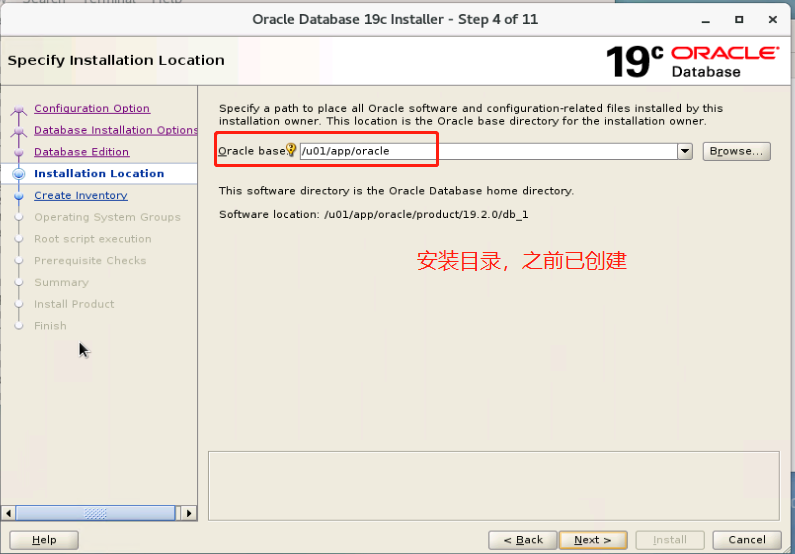
5. The base directory of oracle installation has been created before.
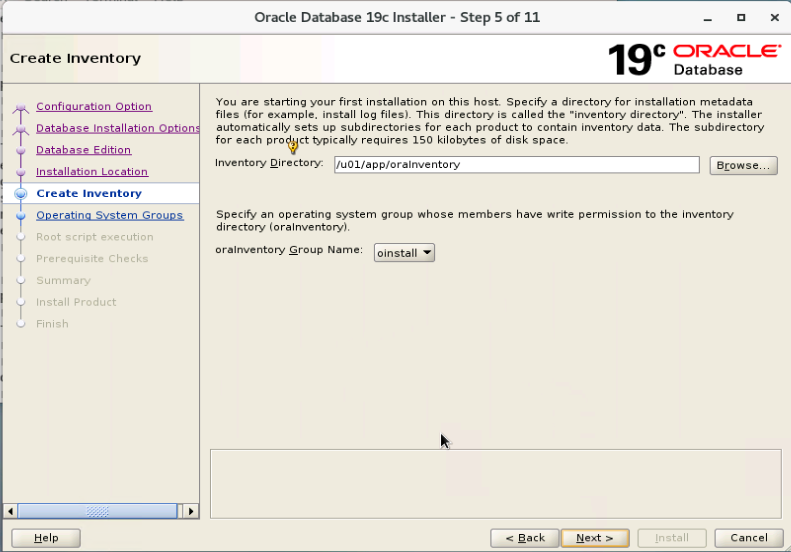
6. List directory, default
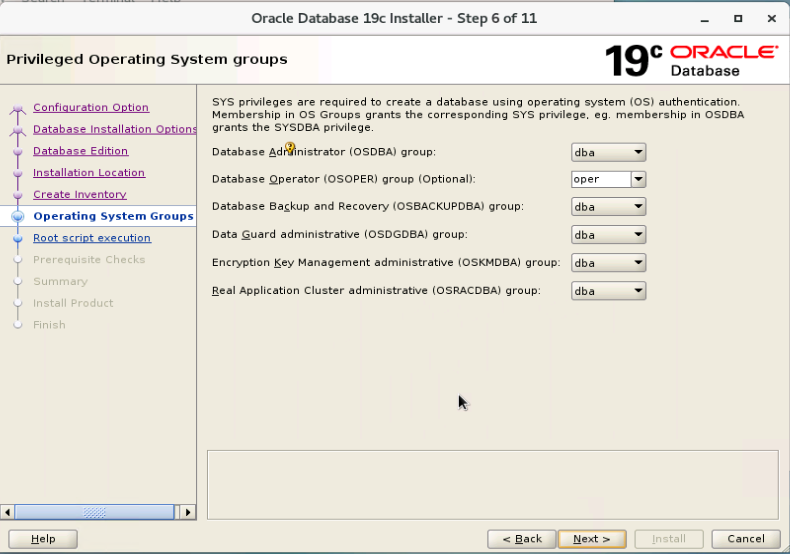
7. Database administrator, default.
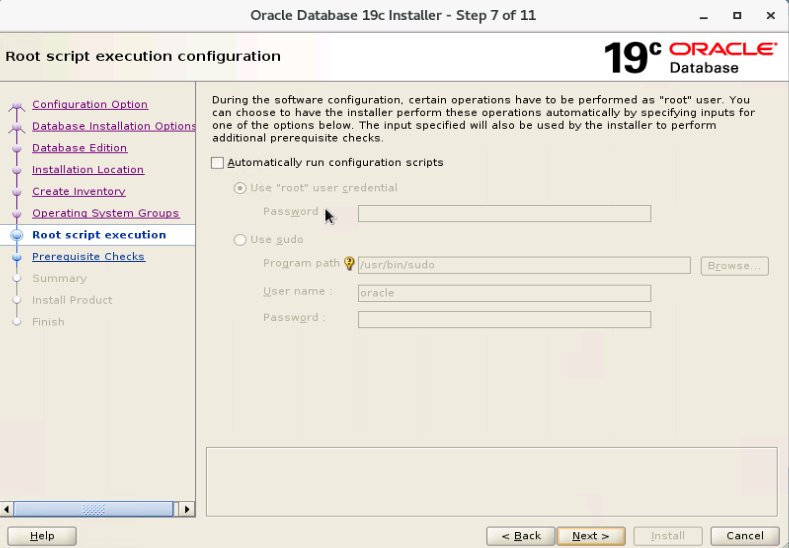
8. Authentication configuration script, default.
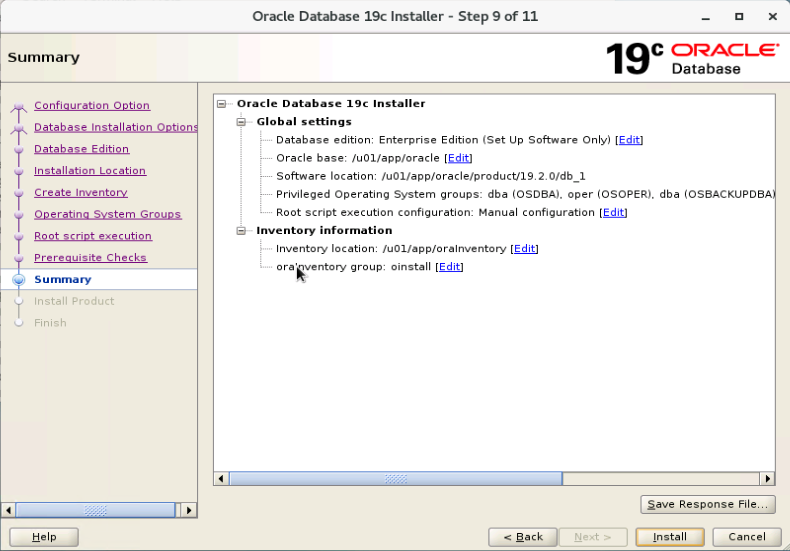
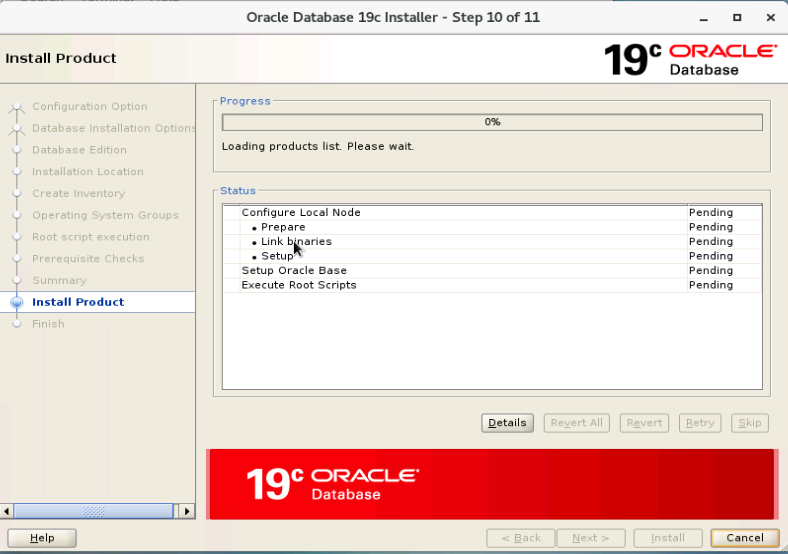
9. Enter the installation phase.
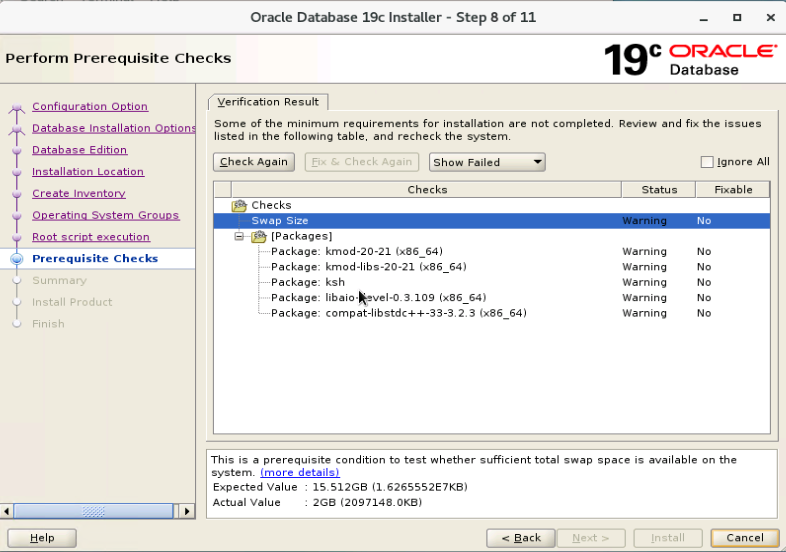
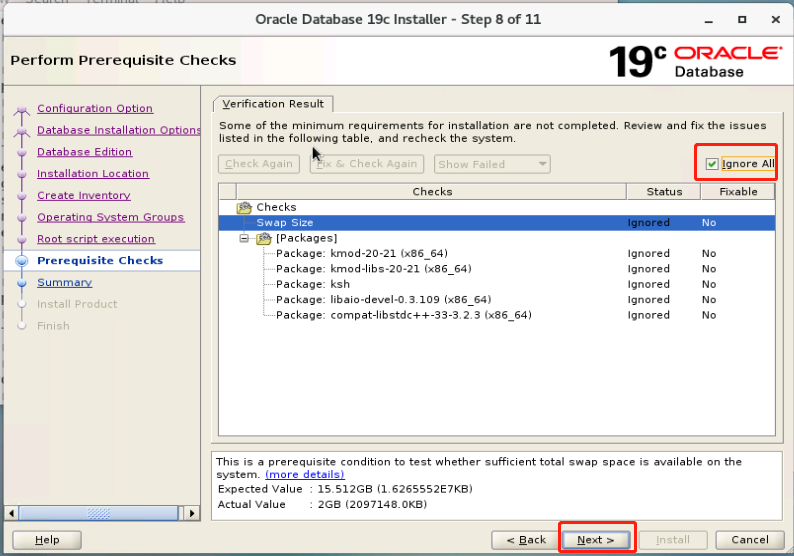
Note: when the installation progress reaches 63%, the following interface will pop up, and two scripts need to be executed manually.
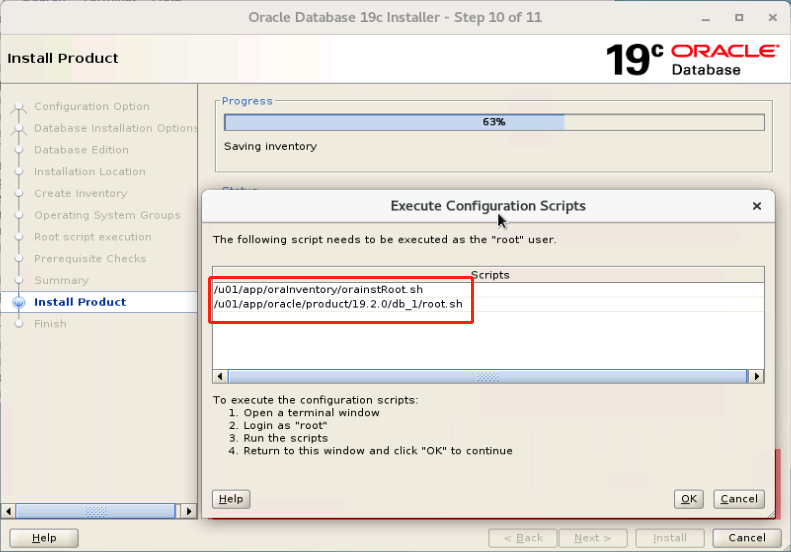
[root@manager ~]# sh /u01/app/oraInventory/orainstRoot.sh
[root@manager ~]# sh /u01/app/oracle/product/19.2.0/db_1/root.sh
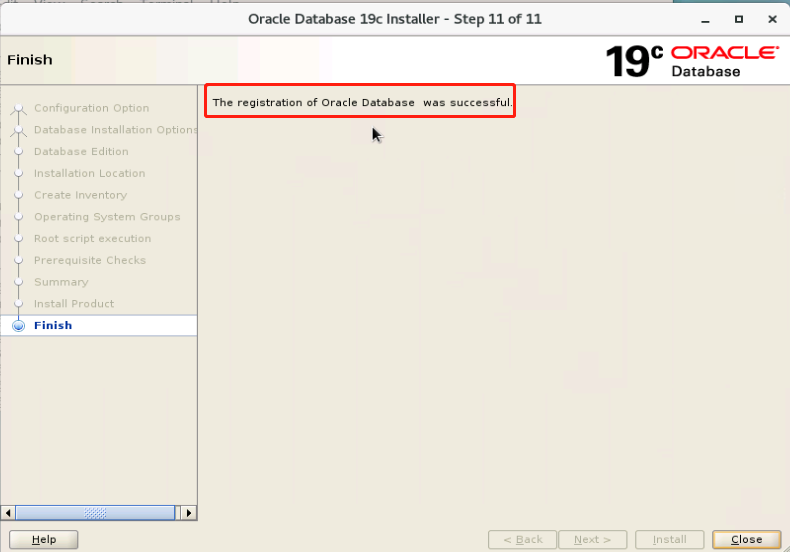
10. After executing the completion script, complete the installation.
5. Login database
After Oracle 19C has just been installed, when logging into the database, it is an empty database (there are no listeners and processes, so you need to create databases and listeners).
1. Login database
Switch to oracle user
[root@manager ~]# su - oracle
Last login: Thu May 20 12:24:52 CST 2021 on pts/1
[oracle@manager ~]$
Load environment variables
[oracle@manager ~]$ source .bash_profile

with dba Role login database.
[oracle@manager ~]$ sqlplus / as sysdba

SQL*Plus: Release 19.0.0.0.0 - Production on Thu May 20 12:27:41 2021
Version 19.3.0.0.0

Copyright (c) 1982, 2019, Oracle.  All rights reserved.

Connected to an idle instance.

SQL>
2. View listener.
[oracle@manager ~]$ lsnrctl status

LSNRCTL for Linux: Version 19.0.0.0.0 - Production on 20-MAY-2021 12:31:28

Copyright (c) 1991, 2019, Oracle.  All rights reserved.

Connecting to (ADDRESS=(PROTOCOL=tcp)(HOST=)(PORT=1521))
TNS-12541: TNS:no listener
 TNS-12560: TNS:protocol adapter error
  TNS-00511: No listener
   Linux Error: 111: Connection refused
3. View the oracle process,
[oracle@manager ~]$ ps -ef|grep orcl
oracle   14788 14372  0 12:32 pts/1    00:00:00 grep --color=auto orcl
[oracle@manager ~]$
4. View listening port
[oracle@manager ~]$ netstat  -lntp|grep orcl
(Not all processes could be identified, non-owned process info
 will not be shown, you would have to be root to see it all.)
[oracle@manager ~]$
6. Create database
1. Log in to the database as an oracle user, enter dbca on the command line, and the session box pops up.
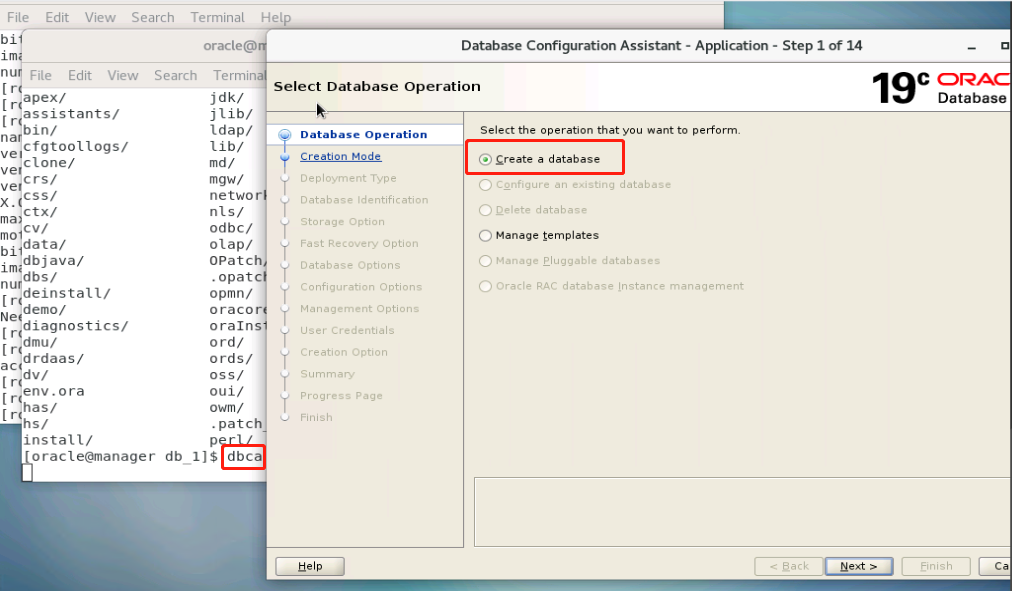
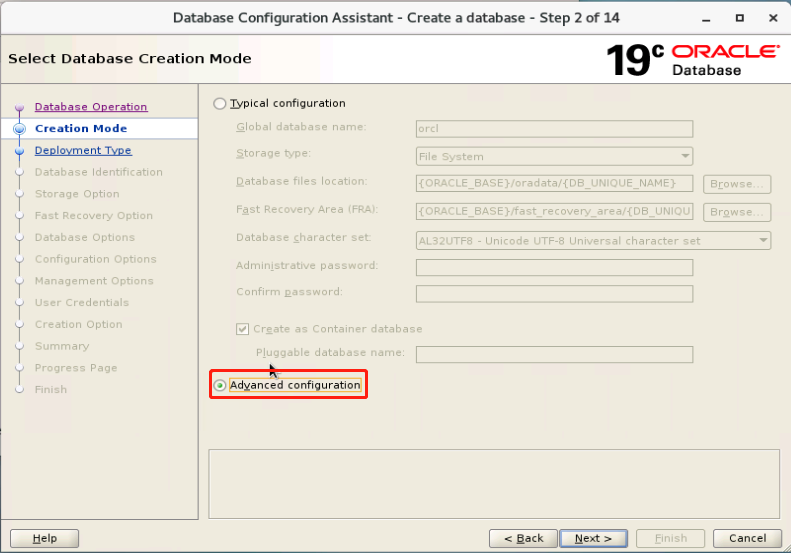
2. Select advanced configuration options
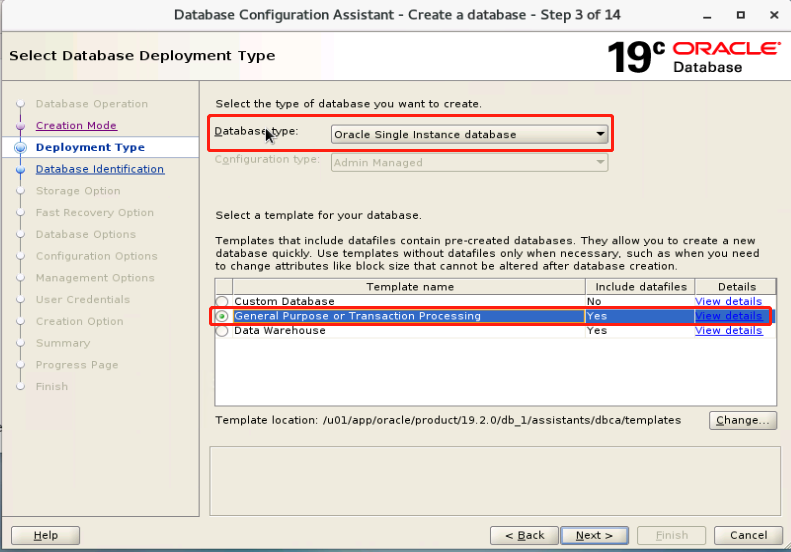
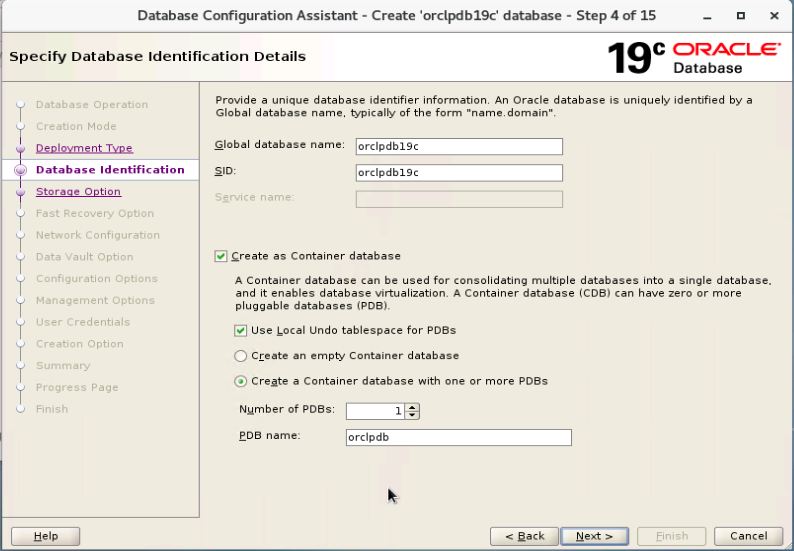
3. To create a container database, enter the database global name, SID, and PDB name
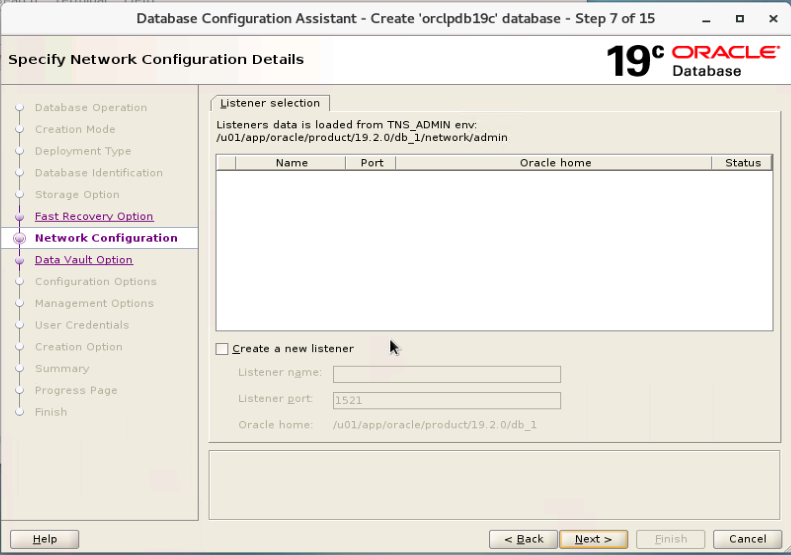
4. Whether to create a listener. Skip it temporarily and create it later.
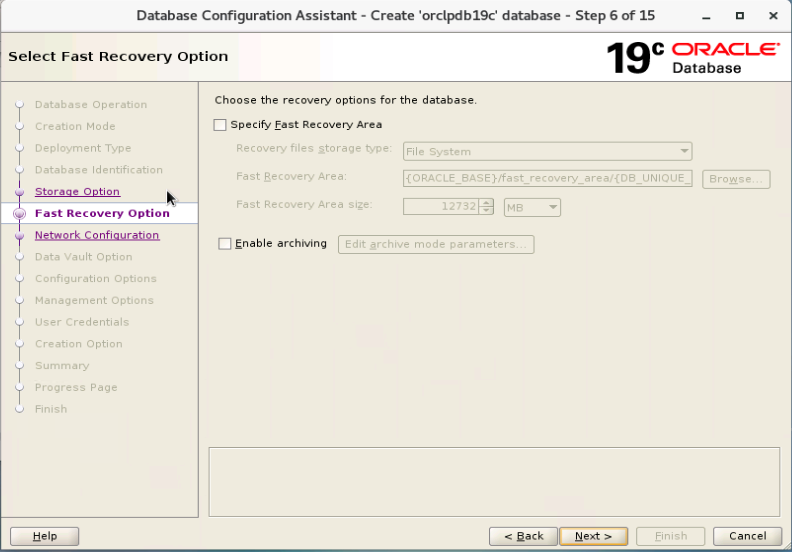
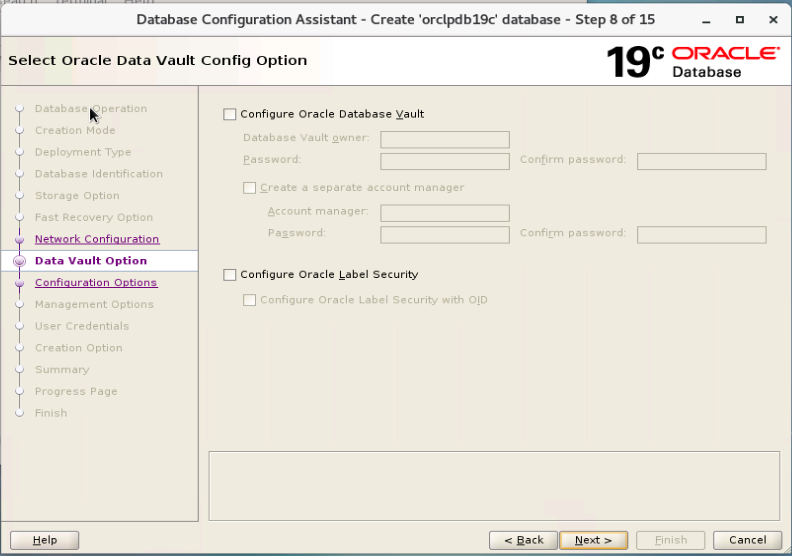
5. Select data Vault configuration, and the default is OK.
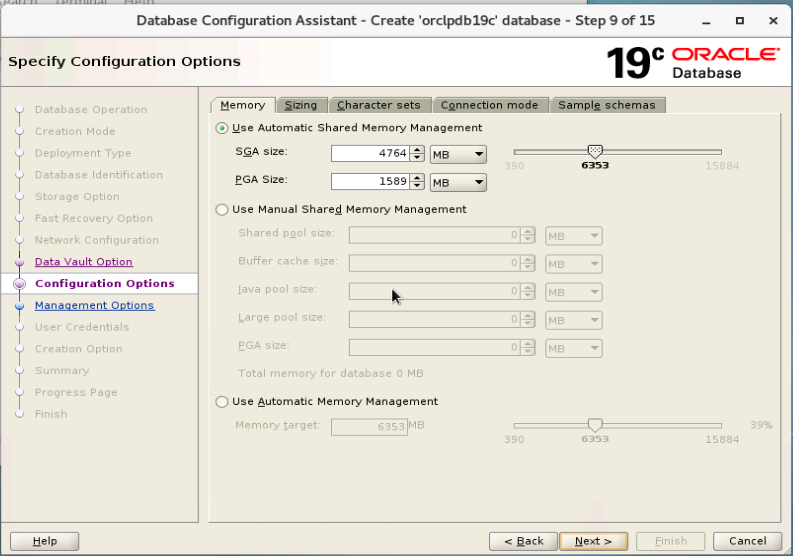
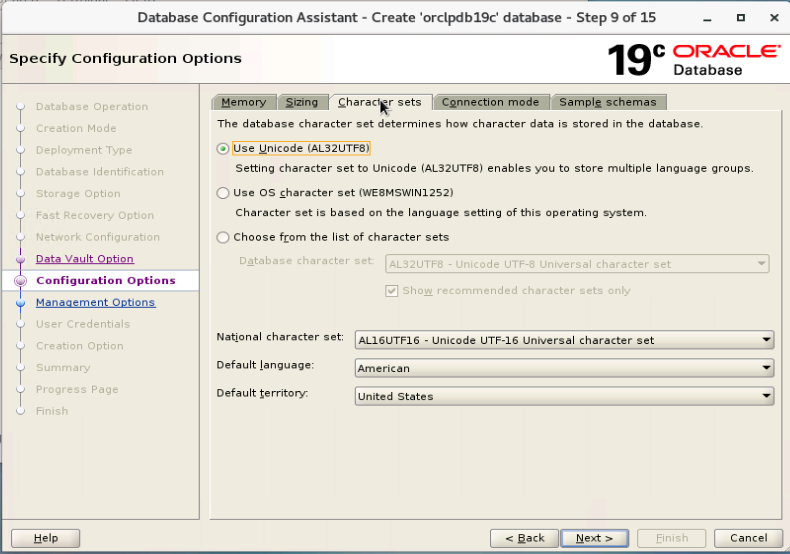
7. Memory area configuration and character set configuration of oracle
8. Uncheck the EM option

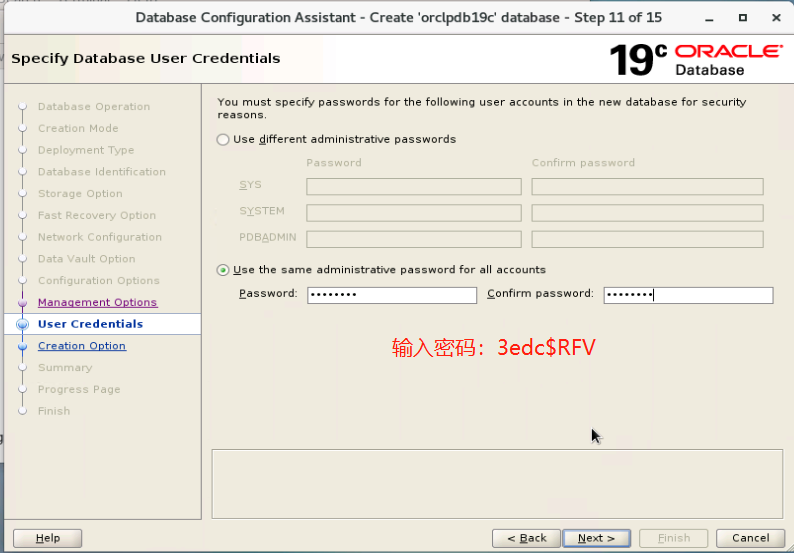
9. Enter administrator password
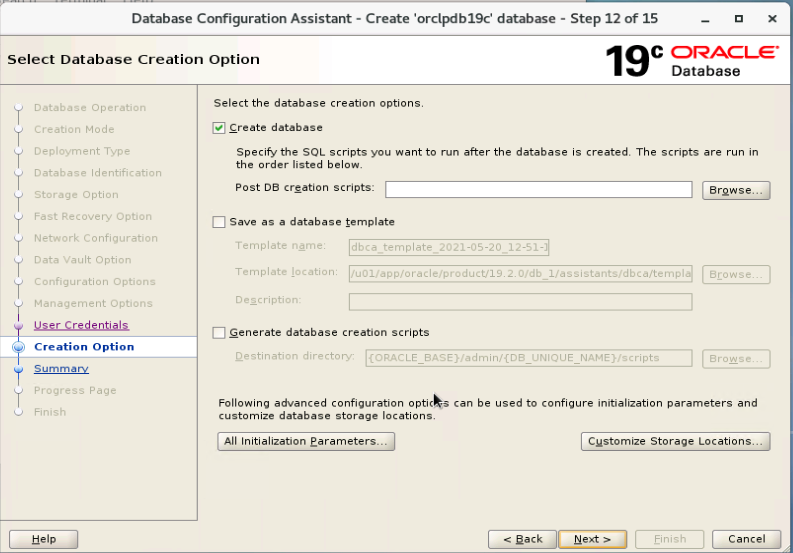
10. Create a database

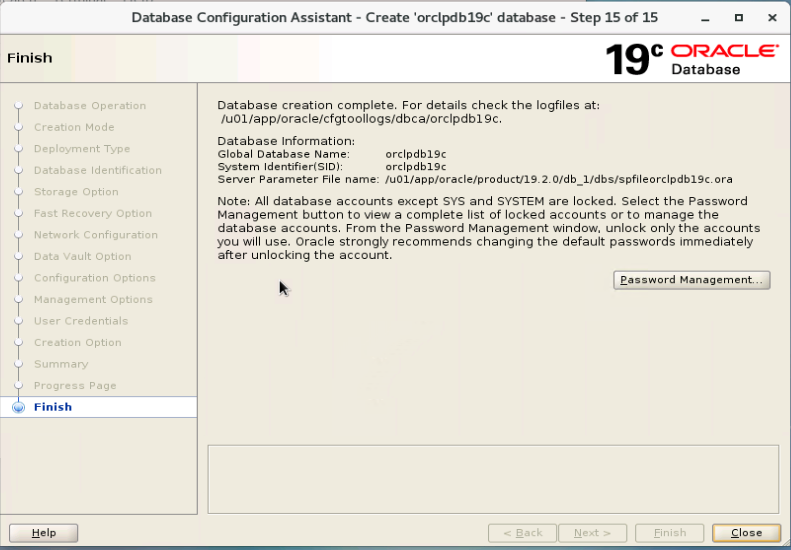
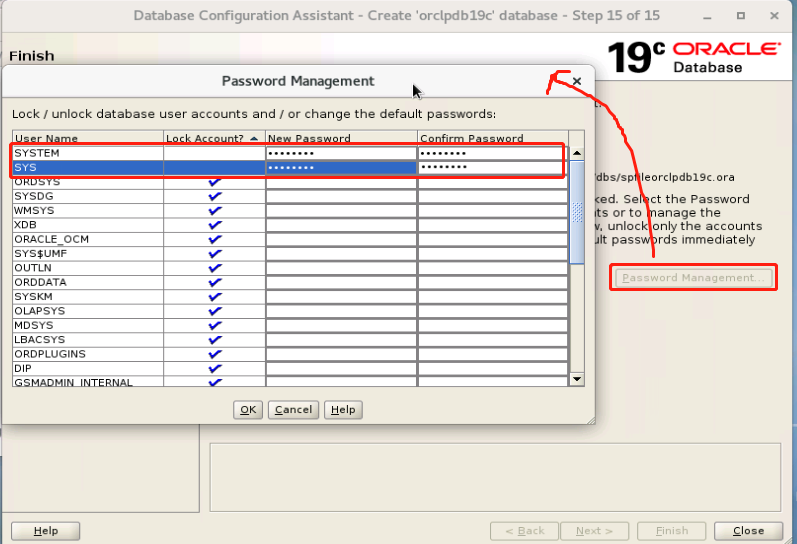
11. Set the user name and password of sys and system.
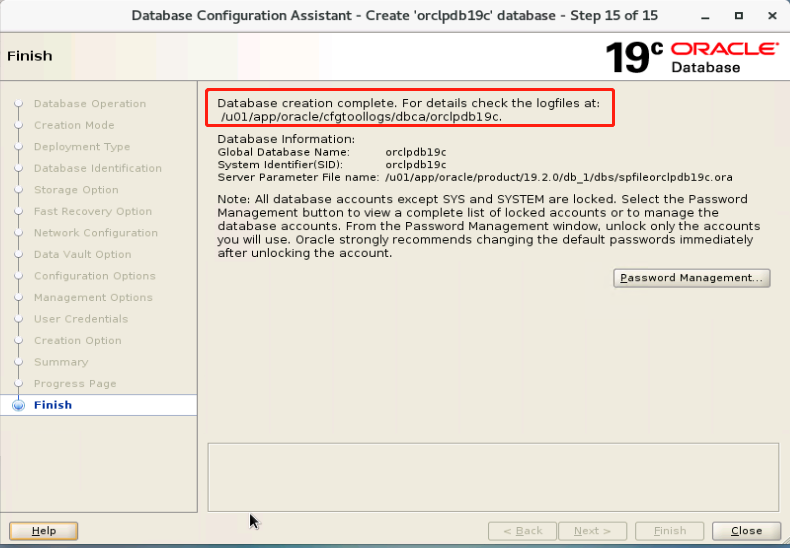
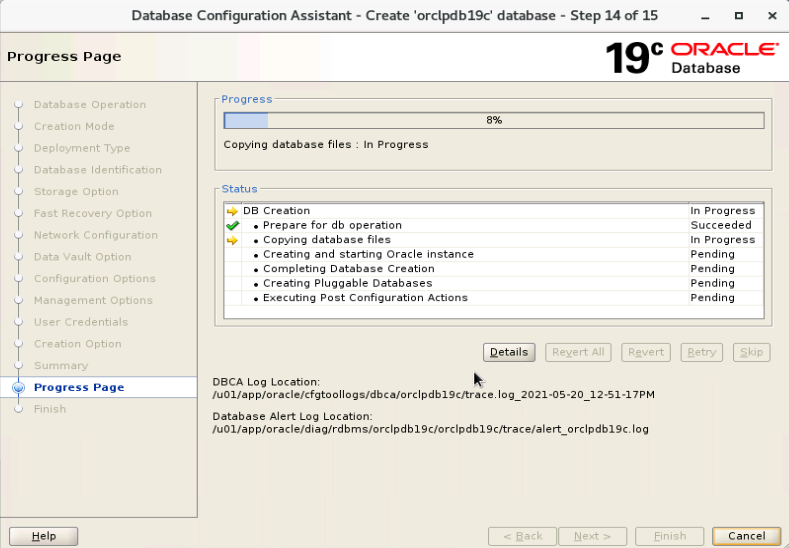
Wait until the database is created.
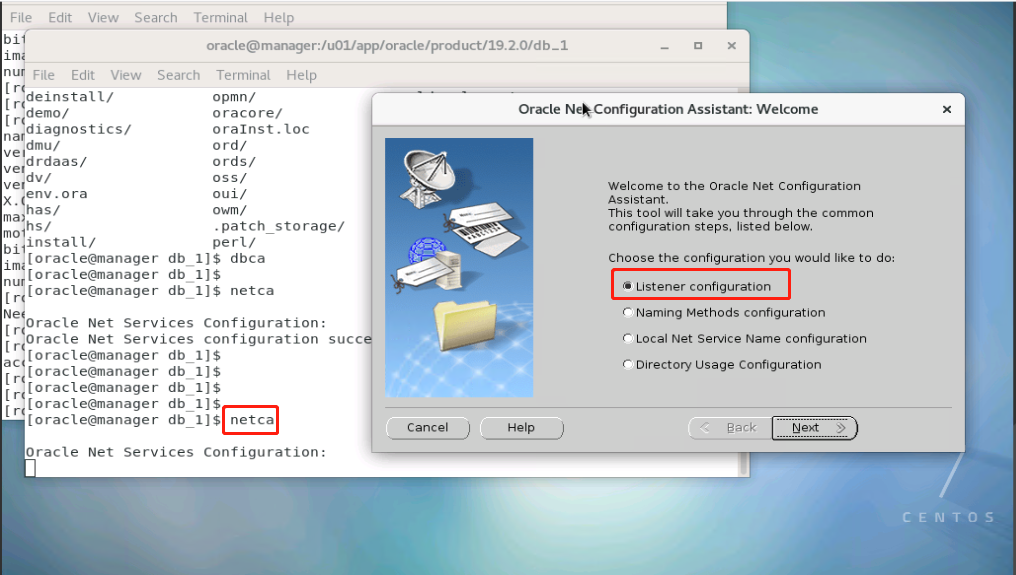
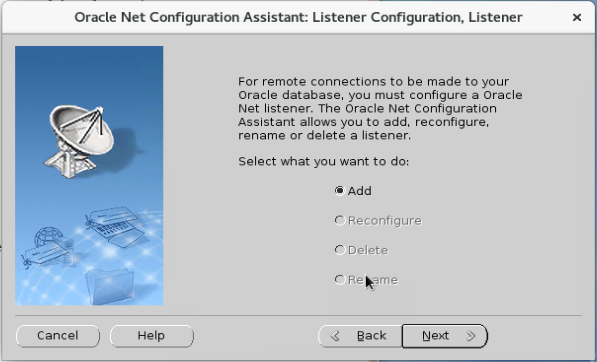
7. Create listener
1. After creating the database, if you need to connect remotely, you need to create a listener. Log in as an oracle user and enter netca on the command line to call up the session box. As follows;
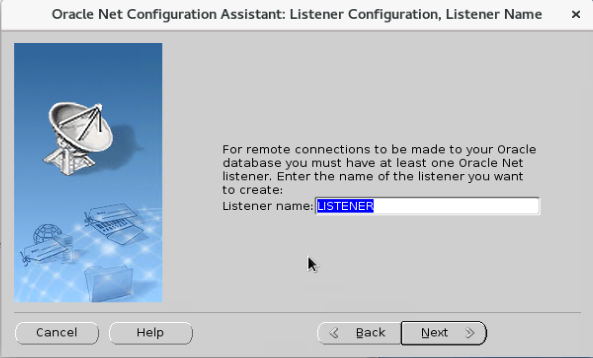
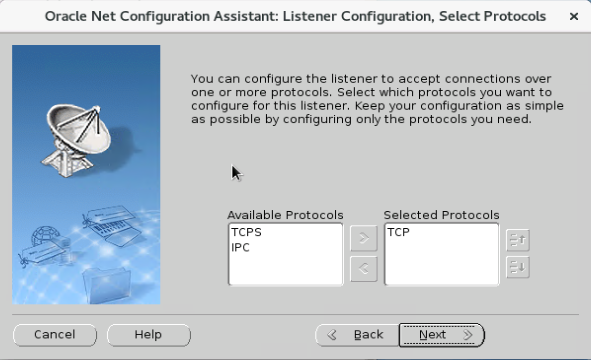
2. Add listening configuration
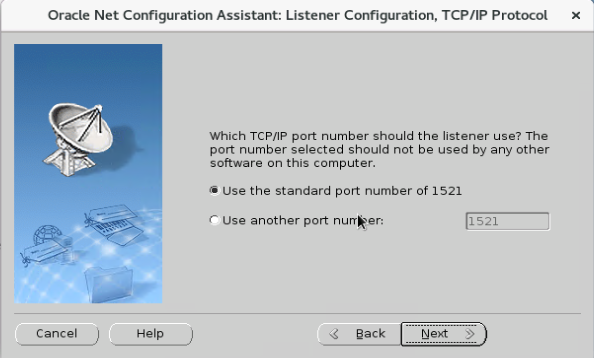
3. Select or configure the listening port, and then next, default.
8. Check the database process again and listen for ports and databases.
8.1. View database process
[oracle@manager oracle]$ ps -ef|grep orcl
oracle   21368     1  0 13:38 ?        00:00:00 ora_pmon_orclpdb19c
oracle   21370     1  0 13:38 ?        00:00:00 ora_clmn_orclpdb19c
oracle   21372     1  0 13:38 ?        00:00:00 ora_psp0_orclpdb19c
oracle   21375     1  2 13:38 ?        00:00:43 ora_vktm_orclpdb19c
oracle   21379     1  0 13:38 ?        00:00:00 ora_gen0_orclpdb19c
oracle   21381     1  0 13:38 ?        00:00:00 ora_mman_orclpdb19c
oracle   21385     1  0 13:38 ?        00:00:00 ora_gen1_orclpdb19c
oracle   21388     1  0 13:38 ?        00:00:00 ora_diag_orclpdb19c
oracle   21390     1  0 13:38 ?        00:00:00 ora_ofsd_orclpdb19c
oracle   21393     1  0 13:38 ?        00:00:02 ora_dbrm_orclpdb19c
oracle   21395     1  0 13:38 ?        00:00:00 ora_vkrm_orclpdb19c
oracle   21397     1  0 13:38 ?        00:00:00 ora_svcb_orclpdb19c
oracle   21399     1  0 13:38 ?        00:00:00 ora_pman_orclpdb19c
oracle   21401     1  0 13:38 ?        00:00:04 ora_dia0_orclpdb19c
oracle   21403     1  0 13:38 ?        00:00:00 ora_dbw0_orclpdb19c
oracle   21405     1  0 13:38 ?        00:00:00 ora_lgwr_orclpdb19c
oracle   21408     1  0 13:38 ?        00:00:00 ora_ckpt_orclpdb19c
oracle   21410     1  0 13:38 ?        00:00:00 ora_lg00_orclpdb19c
oracle   21412     1  0 13:38 ?        00:00:00 ora_smon_orclpdb19c
oracle   21414     1  0 13:38 ?        00:00:00 ora_lg01_orclpdb19c
oracle   21416     1  0 13:38 ?        00:00:00 ora_smco_orclpdb19c
oracle   21418     1  0 13:38 ?        00:00:00 ora_reco_orclpdb19c
oracle   21420     1  0 13:38 ?        00:00:00 ora_w000_orclpdb19c
oracle   21422     1  0 13:38 ?        00:00:00 ora_lreg_orclpdb19c
oracle   21424     1  0 13:38 ?        00:00:00 ora_w001_orclpdb19c
oracle   21426     1  0 13:38 ?        00:00:00 ora_pxmn_orclpdb19c
oracle   21430     1  0 13:38 ?        00:00:03 ora_mmon_orclpdb19c
oracle   21432     1  0 13:38 ?        00:00:00 ora_mmnl_orclpdb19c
oracle   21434     1  0 13:38 ?        00:00:00 ora_d000_orclpdb19c
oracle   21436     1  0 13:38 ?        00:00:00 ora_s000_orclpdb19c
oracle   21438     1  0 13:38 ?        00:00:00 ora_tmon_orclpdb19c
oracle   21443     1  0 13:38 ?        00:00:01 ora_m000_orclpdb19c
oracle   21445     1  0 13:38 ?        00:00:08 ora_m001_orclpdb19c
oracle   21452     1  0 13:38 ?        00:00:00 ora_tt00_orclpdb19c
oracle   21454     1  0 13:38 ?        00:00:00 ora_tt01_orclpdb19c
oracle   21456     1  0 13:38 ?        00:00:00 ora_tt02_orclpdb19c
oracle   21460     1  0 13:38 ?        00:00:00 ora_aqpc_orclpdb19c
oracle   21463     1  0 13:38 ?        00:00:00 ora_w002_orclpdb19c
oracle   21467     1  0 13:38 ?        00:00:00 ora_p000_orclpdb19c
oracle   21469     1  0 13:38 ?        00:00:00 ora_p001_orclpdb19c
oracle   21471     1  0 13:38 ?        00:00:01 ora_p002_orclpdb19c
oracle   21473     1  0 13:38 ?        00:00:00 ora_p003_orclpdb19c
oracle   21475     1  0 13:38 ?        00:00:00 ora_p004_orclpdb19c
oracle   21477     1  0 13:38 ?        00:00:00 ora_p005_orclpdb19c
oracle   21479     1  0 13:38 ?        00:00:00 ora_p006_orclpdb19c
oracle   21481     1  0 13:38 ?        00:00:00 ora_p007_orclpdb19c
oracle   21483     1  0 13:38 ?        00:00:00 ora_p008_orclpdb19c
oracle   21485     1  0 13:38 ?        00:00:00 ora_p009_orclpdb19c
oracle   21487     1  0 13:38 ?        00:00:00 ora_p00a_orclpdb19c
oracle   21489     1  0 13:38 ?        00:00:00 ora_p00b_orclpdb19c
oracle   21491     1  0 13:38 ?        00:00:00 ora_p00c_orclpdb19c
oracle   21493     1  0 13:38 ?        00:00:00 ora_p00d_orclpdb19c
oracle   21495     1  0 13:38 ?        00:00:00 ora_p00e_orclpdb19c
oracle   21497     1  0 13:38 ?        00:00:00 ora_p00f_orclpdb19c
oracle   21499     1  0 13:38 ?        00:00:02 ora_cjq0_orclpdb19c
oracle   21676     1  0 13:38 ?        00:00:00 ora_w003_orclpdb19c
oracle   21715     1  0 13:38 ?        00:00:00 ora_w004_orclpdb19c
oracle   21720     1  0 13:38 ?        00:00:02 ora_m002_orclpdb19c
oracle   21722     1  0 13:38 ?        00:00:00 ora_qm02_orclpdb19c
oracle   21732     1  0 13:38 ?        00:00:00 ora_q003_orclpdb19c
oracle   21752     1  0 13:38 ?        00:00:01 ora_m003_orclpdb19c
oracle   21755     1  0 13:38 ?        00:00:00 ora_q004_orclpdb19c
oracle   21758     1  0 13:38 ?        00:00:00 ora_w005_orclpdb19c
oracle   21826     1  0 13:38 ?        00:00:00 ora_w006_orclpdb19c
oracle   21853     1  0 13:39 ?        00:00:00 ora_w007_orclpdb19c
oracle   22376     1  0 13:48 ?        00:00:01 ora_m004_orclpdb19c
oracle   22382     1  0 13:48 ?        00:00:00 ora_w008_orclpdb19c
oracle   22387     1  0 13:48 ?        00:00:00 ora_w009_orclpdb19c
oracle   22391     1  0 13:48 ?        00:00:00 ora_w00a_orclpdb19c
oracle   22396     1  0 13:48 ?        00:00:00 ora_w00b_orclpdb19c
oracle   22400     1  0 13:48 ?        00:00:00 ora_w00c_orclpdb19c
oracle   22412     1  0 13:48 ?        00:00:00 ora_w00d_orclpdb19c
oracle   22417     1  0 13:48 ?        00:00:00 ora_w00e_orclpdb19c
oracle   22421     1  0 13:48 ?        00:00:00 ora_w00f_orclpdb19c
oracle   23700 14372  0 14:07 pts/1    00:00:00 grep --color=auto orcl
[oracle@manager oracle]$
8.2. View listener status
[oracle@manager oracle]$ lsnrctl  status

LSNRCTL for Linux: Version 19.0.0.0.0 - Production on 20-MAY-2021 14:08:44

Copyright (c) 1991, 2019, Oracle.  All rights reserved.

Connecting to (DESCRIPTION=(ADDRESS=(PROTOCOL=TCP)(HOST=manager)(PORT=1521)))
STATUS of the LISTENER
------------------------
Alias                     LISTENER
Version                   TNSLSNR for Linux: Version 19.0.0.0.0 - Production
Start Date                20-MAY-2021 13:59:04
Uptime                    0 days 0 hr. 9 min. 40 sec
Trace Level               off
Security                  ON: Local OS Authentication
SNMP                      OFF
Listener Log File         /u01/app/oracle/diag/tnslsnr/manager/listener/alert/log.xml
Listening Endpoints Summary...
  (DESCRIPTION=(ADDRESS=(PROTOCOL=tcp)(HOST=manager)(PORT=1521)))
Services Summary...
Service "86b637b62fdf7a65e053f706e80a27ca" has 1 instance(s).
  Instance "orclpdb19c", status READY, has 1 handler(s) for this service...
Service "c2bd59d85ecf53fce0537ad115acfd2a" has 1 instance(s).
  Instance "orclpdb19c", status READY, has 1 handler(s) for this service...
Service "orclpdb" has 1 instance(s).
  Instance "orclpdb19c", status READY, has 1 handler(s) for this service...
Service "orclpdb19c" has 1 instance(s).
  Instance "orclpdb19c", status READY, has 1 handler(s) for this service...
Service "orclpdb19cXDB" has 1 instance(s).
  Instance "orclpdb19c", status READY, has 1 handler(s) for this service...
The command completed successfully
[oracle@manager oracle]$
8.3. View the listening port
[oracle@manager oracle]$ netstat  -lntp|grep 1521
(Not all processes could be identified, non-owned process info
 will not be shown, you would have to be root to see it all.)
tcp6       0      0 :::1521                 :::*                    LISTEN      23076/tnslsnr
[oracle@manager oracle]$
8.4. Login database
Log in to the database.
[oracle@manager oracle]$ sqlplus  / as sysdba

SQL*Plus: Release 19.0.0.0.0 - Production on Thu May 20 14:26:52 2021
Version 19.3.0.0.0

Copyright (c) 1982, 2019, Oracle.  All rights reserved.

Connected to an idle instance.

SQL>


Start database
SQL> startup
ORACLE instance started.

Total System Global Area 4999609728 bytes
Fixed Size                  9145728 bytes
Variable Size             973078528 bytes
Database Buffers         4009754624 bytes
Redo Buffers                7630848 bytes
Database mounted.
Database opened.
SQL>

close database
SQL> shutdown immediate
Database closed.
Database dismounted.
ORACLE instance shut down.
SQL>

View container database
SQL> show pdbs

    CON_ID CON_NAME                       OPEN MODE  RESTRICTED
---------- ------------------------------ ---------- ----------
         2 PDB$SEED                       READ ONLY  NO
         3 ORCLPDB                        MOUNTED
SQL>
At this point, the Oracle 19C database installation is complete.