In normal project development, we often upload files, not only to achieve the basic needs, but also to take into account the user experience. According to the problems encountered in our work, we talk about the preview of image upload and the optimization of upload progress.
1. Construction project
Based on the project built by Vue.js+axios, create a new Index.Vue project as follows. For the basic structure, you can select files first and preview files.
<template>
    <div class="wrapper">
        <h2 class="text-center">Upload pictures</h2>
        //Select File: < input type = "file" multiple = "true" accept = "image / GIF, image / jpeg" @ change = "handlefilechange ($event)" >
        <p>Picture preview:</p>
        <img v-show="imgPreViewSrc" :src="imgPreViewSrc" alt="Picture preview">
        <button v-show="file" @click="uploadFile">Upload files to server</button>
    </div>
</template>
<script>
  ...
  data(){
      return{
          imgPreViewSrc:'', //File preview address
          file:null, //Upload files
      }
  }
  methods:{

  }
  ...
</script>
<style lang="less" scoped>
.text-center{
    text-align: center;
}
.wrapper{
    font-size: 16px;
    width: 60%;
    height: 100%;
    margin:  0 20%;
    border: 1px solid #ddd;
    img{
        width: 200px;
    }
    button{
        width:120px;
        height: 30px;
        margin-top: 30px;
        line-height: 30px;
        border: 1px solid #CCC;
        text-align: center;
    }
}
</style>
The type of input is set to file. You can select files. The multipe attribute is set to true. You can select multiple files at a time.
Run the project as follows:

2. Select file and Preview
Select a picture file (bg.jpg). Before that, change the listening method in the input binding file. The print event parameters are as follows:
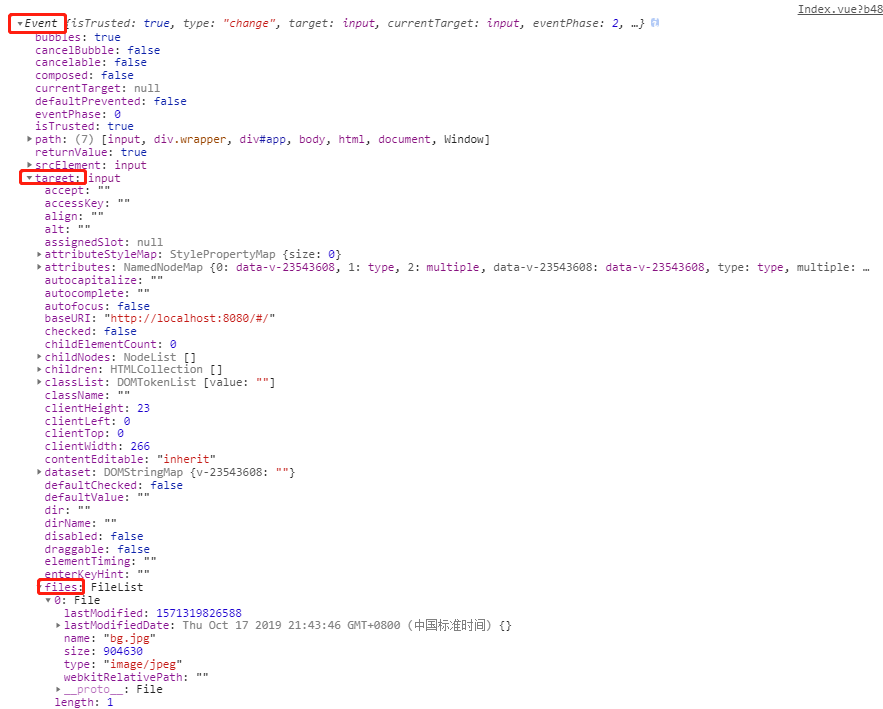
Find the file you just selected under event > target > files
files is an array. Just now, only one picture has been selected, so the length is 1. The name, size and type of the picture are all included.
2.1. Set file type
Set the file type in the input tag accept property. When the user opens the file explorer to select files, other types of files will be filtered out, which can avoid the user from selecting dirty files from the source and make it more convenient for the user to select files.
<input type="file" multiple="true" accept="image/gif, image/jpeg" @change="handleFileChange($event)">
2.2. Picture preview
Display the file selected by the user on the page to facilitate the user's next operation, because the user may select several more pictures from the selected file for operation, such as uploading to the server.
image preview to use URL The URL.createObjectURL(file) method of the object generates a Blob address, which is directly assigned to the src of the img tag, and the page can be displayed. (the URL.createObjectURL() static method creates a DOMString that contains a URL that represents the object given in the parameter. The lifecycle of this URL and the document binding in the window where it was created. This new URL object represents the specified File or Blob object. )
Add handleFileChange method in methods to preview the picture
...
// File change listening event
handleFileChange(evt){
    console.log(evt);
    let file=evt.target.files[0];
    this.file=file;
    let src=URL.createObjectURL(file);
    this.imgPreViewSrc=src;
},
...

3. Display the progress of uploaded files
After selecting a file, the file needs to be uploaded to the server. Sometimes when the file is large or the network speed is slow, the user needs to know the upload progress. If there is no upload progress, the user exits the page and the file fails to upload.
3.1. Modify script file
- Introducing axios, encapsulating and uploading Promise function
- Add upload method uploadFile in methods
<script>
  import axios from 'axios';
  // File upload service api
  const baseURL='http://127.0.0.1/api';
  function upload (params,cb=null) {
    return new Promise((resolve, reject) => {
      axios.create({
        baseURL,
      })({
        url:'/upload/uploadFile/image',
        method:'post',
        data:params,
        // Upload progress
        onUploadProgress:function(progressEvent){
          if(progressEvent.lengthComputable && cb){
            cb(progressEvent);
          }
        },
      }).then(res => {
        console.log(res.data);
        if(res.status===200){
          resolve(res.data);
        }else{
          reject(res.data);
        }
      }).catch(err => {
        reject(err);
      });
    });
  }
  ...
  // Upload files to server
  uploadFile(){
    let file=this.file;
    if(file){
        let formData = new FormData();
        formData.append('file', file);
        upload(formData,(progressEvent)=>{
         console.log(progressEvent);
        });
    }else{
        alert('Please select a file')
    }
  ...
</script>
3.2. Upload progress
Of ProgressEvent Some introductions of:
- ProgressEvent is an interface used to measure the progress of underlying operations. It can measure HTTP requests (for example, an XMLHttpRequest request, or a underlying resource such as img, audio, video, etc.). The common property values of ProgressEvent are:
- ProgressEvent.lengthComputable: it is a Boolean ID indicating whether the total amount of work to be done and the completed work can be calculated by the bottom layer. In other words, it means whether the process is measurable.
- ProgressEvent.loaded: is an unsigned long long type, indicating the amount of work that the underlying process has performed. The ratio of work done can be calculated using properties and ProgressEvent.total. When using HTTP to download resources, this represents only part of the content itself, not the header and other overhead.
- ProgressEvent.total: is of type unsigned long long, indicating the total amount of work being performed by the underlying process. When using HTTP to download resources, this only represents the content itself, not the header and other overhead.
Click upload to open the console:
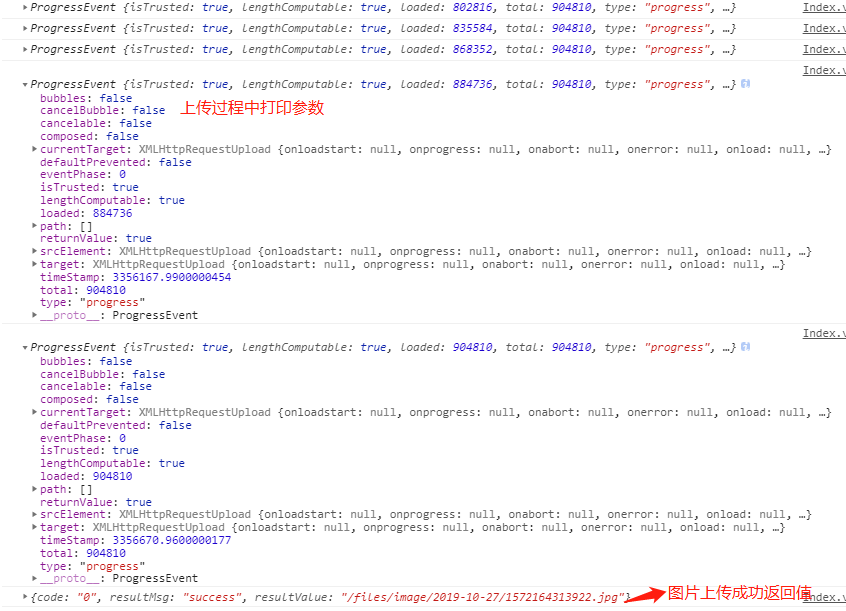
It can be found that the value of the loaded attribute in ProgressEvent is the upload size of the picture file, and the total is the file size.
3.3. Add progress bar to the page
For component generalization, create a new Progress.vue component and accept a progressValue progress parameter.
<template>
  <div class="progress-box">
    <div class="progress-content">
      <p v-if="progressValue<100">Upload progress:{{progressValue}}%</p>
      <p v-else>Upload success!</p>
      <progress :value="progressValue" max="100"></progress>
    </div>
  </div>
</template>
<script>
  export default {
    props:['progressValue'],
    name: 'Progress',
  };
</script>
<style lang="less" scoped>
.progress-box{
  position: fixed;
  top:0;
  left:0;
  bottom: 0;
  right:0;
  background: rgba(0,0,0,0.5);
  .progress-content{
    position: absolute;
    top:50%;
    left:50%;
    width: 300px;
    height: 76px;
    padding: 8px 30px;
    transform: translate(-150px,-38px);
    background: #fff;
    border-radius: 8px;
    p{
      margin-bottom: 5px;
    }
    progress{
      width: 100%;
      height: 22px;
    }
    progress::-webkit-progress-bar{
      background-color:#d7d7d7;
    }
    progress::-webkit-progress-value{
      background-color:orange;
    }
  }
}
</style>
Add the Progress component at the end of div, and then modify the upload method of Index.vue file methods:
<template>
  <div class="wrapper">
    ...
    <Progress :progressValue="progressValue" v-if="isShowProgressBox"></Progress>
  </div>
</template>
<script>
import Progress from '../components/Progress';
...
// Upload files to server
uploadFile(){
  let file=this.file;
  if(file){
    let formData = new FormData();
    formData.append('file', file);
    upload(formData,(progressEvent)=>{
      this.isShowProgressBox=true;
      this.progressValue=parseFloat((progressEvent.loaded/progressEvent.total*100).toFixed(2));
      if(this.progressValue===100){
        let timer=setTimeout(()=>{
        this.isShowProgressBox=false;
        clearTimeout(timer);
        timer=null;
        },500);
      }
    });
  }else{
    alert('Please select a file');
  }
...
</script>
Then upload the picture as follows:
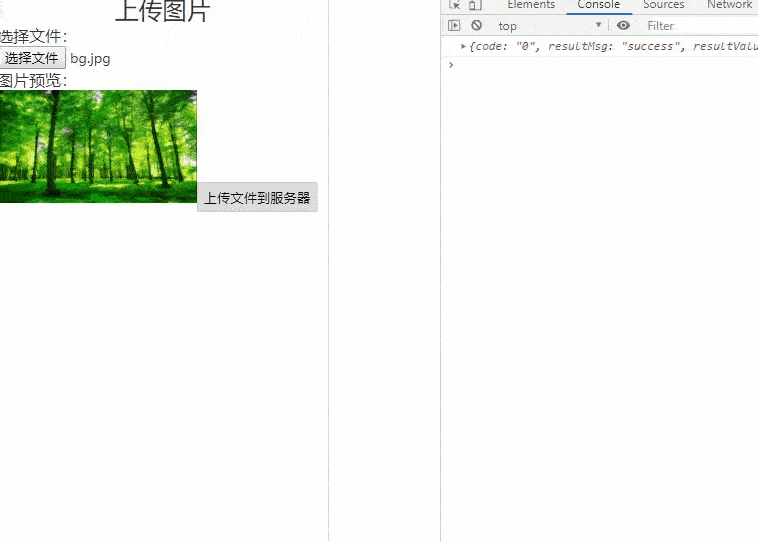
It can be seen that after clicking upload, the progress mode box will appear on the page to let the user know the percentage uploaded and optimize the user experience.