This article is also published in my WeChat official account. It can scan the two-dimensional code at the bottom of the article or search for Guo Lin in WeChat.
Good morning, guys.
With the official release of Android 11, the Jetpack family has also introduced many new members. I promised before that I would write an article to introduce the newly introduced App Startup, Hilt and Paging 3.
Now, I have finished writing articles about App Start and Hilt. Please refer to A new member of Jetpack, you can understand it in one article of App Startup and Jetpack new member, an article takes you to play with Hilt and dependency injection .
So in this article, the nature we want to learn is Paging 3.
Paging 3 Introduction
Paging is a page loading library launched by Google and applied to Android platform.
In fact, Paging is not just launched now, but has launched two versions before.
But Paging 3 has changed a lot from the previous two versions, and it can even be said to be completely different. So even if you haven't learned the usage of Paging before, it doesn't matter. Just learn Paging 3 as a new library.
I believe that many friends will have the same idea as me when learning Paging 3: the Paging function on Android is not difficult to realize, and we can do it completely without Paging library, but why should Paging 3 design such a simple function?
Yes, Paging 3 is complicated, at least if you don't know it yet. When I first learned Paging 3, I was directly discouraged. I thought, why should I use this thing to aggrieve myself? It's not that I can't write paging function myself.
Later, with the attitude of embracing new technology, I learned Paging 3 again. This time, I basically mastered it and was still working on my new open source project Glance Paging 3 technology is applied.
If I can make complaints about Paging 3 now, then I probably experienced a process from Tucao to real fragrance. After understanding paging 3, you will find that it provides a set of very reasonable paging architecture. We only need to write business logic according to the architecture it provides, and we can easily realize the paging function. I hope that after reading this article, you can also feel that paging 3 smells better.
However, I cannot guarantee the intelligibility of this article. Although many friends think the article I wrote is simple and easy to understand, the complexity of Paging 3 is that it is associated with too many other knowledge, such as collaborative process, Flow, MVVM, RecyclerView, DiffUtil, etc. if you can't understand all the related knowledge, it will be more difficult to grasp Paging 3.
In addition, since Paging 3 is a newly rewritten library by Google based on the Kotlin collaboration, it is mainly applied to the Kotlin language (Java can also be used, but it will be more complex), and there will be more and more such libraries in the future, such as Jetpack Compose and so on. If you don't know much about Kotlin, you can refer to my new book First line code Android version 3.
Getting started Paging 3
After my own summary, I find it difficult to master this library if I introduce some knowledge points of Paging 3 in a scattered way. The best way to learn is to start directly. Use Paging 3 to do a project. After the project is completed, you will basically master it. In this article, we will learn in this way.
In addition, I believe everyone should have done paging function before. As I said, this function is not difficult to implement. But now, please completely forget the pagination scheme you used to know, because it will not help you understand Paging 3, but will affect your understanding of Paging 3 to a great extent.
Yes, don't think about listening to the list sliding event. When sliding to the bottom, launch a network request to load the data of the next page. Paging 3 is not used in this way at all. If you still keep this past implementation idea, you will be blocked when learning paging 3.
So let's start now.
First, create a new Android project. Here I call it Paging3Sample.
Next, we are in build Add necessary dependency libraries to gradle's dependencies:
dependencies {
    ...
    implementation 'androidx.paging:paging-runtime:3.0.0-beta01'
    implementation 'com.squareup.retrofit2:retrofit:2.9.0'
    implementation 'com.squareup.retrofit2:converter-gson:2.9.0'
}
Note that although I just said that Paging 3 is to work together with many other associated libraries, we do not need to manually import these associated libraries one by one. After introducing Paging 3, all associated libraries will be automatically downloaded.
In addition, the Retrofit library is also introduced here, because later we will request data from the network and display it in pages through Paging 3.
So before we officially start to talk about the usage of Paging 3, let's build the network related code to provide paging data for Paging 3.
Here, I'm going to use GitHub's public API as the data source of our project. Please note that although GitHub is generally accessible in China, sometimes the interface is unstable. If you can't request data normally, please surf the Internet scientifically by yourself.
We can try to request the following interface address in the browser:
https://api.github.com/search/repositories?sort=stars&q=Android&per_page=5&page=1
This interface indicates that it will return all Android related open source libraries on GitHub, sorted by the number of stars, and return 5 pieces of data per page. The current request is the first page.
The data of the server response is as follows. In order to facilitate reading, I simplified the response data:
{
  "items": [
    {
      "id": 31792824,
      "name": "flutter",
      "description": "Flutter makes it easy and fast to build beautiful apps for mobile and beyond.",
      "stargazers_count": 112819,
    },
    {
      "id": 14098069,
      "name": "free-programming-books-zh_CN",
      "description": ":books: Free computer programming Chinese books, welcome to contribute",
      "stargazers_count": 76056,
    },
    {
      "id": 111583593,
      "name": "scrcpy",
      "description": "Display and control your Android device",
      "stargazers_count": 44713,
    },
    {
      "id": 12256376,
      "name": "ionic-framework",
      "description": "A powerful cross-platform UI toolkit for building native-quality iOS, Android, and Progressive Web Apps with HTML, CSS, and JavaScript.",
      "stargazers_count": 43041,
    },
    {
      "id": 55076063,
      "name": "Awesome-Hacking",
      "description": "A collection of various awesome lists for hackers, pentesters and security researchers",
      "stargazers_count": 42876,
    }
  ]
}
The simplified data format is very easy to understand. The items array records which libraries are included in the first page, where name represents the name of the library, description represents the description of the library, and stargazers_count indicates the number of stars in the library.
Now let's write network related code according to this interface. Since this part belongs to the usage of Retrofit, I will introduce it briefly.
First, define the corresponding entity class according to the Json format of the server response, and create a new Repo class. The code is as follows:
data class Repo(
    @SerializedName("id") val id: Int,
    @SerializedName("name") val name: String,
    @SerializedName("description") val description: String?,
    @SerializedName("stargazers_count") val starCount: Int
)
Then define a RepoResponse class to wrap the Repo class in the form of a collection:
class RepoResponse(
    @SerializedName("items") val items: List<Repo> = emptyList()
)
Next, define a GitHubService to provide a network request interface, as shown below:
interface GitHubService {

    @GET("search/repositories?sort=stars&q=Android")
    suspend fun searchRepos(@Query("page") page: Int, @Query("per_page") perPage: Int): RepoResponse

    companion object {
        private const val BASE_URL = "https://api.github.com/"

        fun create(): GitHubService {
            return Retrofit.Builder()
                    .baseUrl(BASE_URL)
                    .addConverterFactory(GsonConverterFactory.create())
                    .build()
                    .create(GitHubService::class.java)
        }
    }

}
These are the standard usage of Retrofit. Now when the searchRepos() function is called, Retrofit will automatically help us launch a network request to the server interface of GitHub and parse the response data into the RepoResponse object.
Well, now that the network related code is ready, let's start using Paging 3 to realize the paging loading function.
Paging 3 has several key core components. We need to implement paging logic step by step in these core components.
First, the most important component is PagingSource. We need to customize a subclass to inherit PagingSource, then override the load() function and provide the data corresponding to the current number of pages here.
Create a new RepoPagingSource that inherits from PagingSource. The code is as follows:
class RepoPagingSource(private val gitHubService: GitHubService) : PagingSource<Int, Repo>() {

    override suspend fun load(params: LoadParams<Int>): LoadResult<Int, Repo> {
        return try {
            val page = params.key ?: 1 // set page 1 as default
            val pageSize = params.loadSize
            val repoResponse = gitHubService.searchRepos(page, pageSize)
            val repoItems = repoResponse.items
            val prevKey = if (page > 1) page - 1 else null
            val nextKey = if (repoItems.isNotEmpty()) page + 1 else null
            LoadResult.Page(repoItems, prevKey, nextKey)
        } catch (e: Exception) {
            LoadResult.Error(e)
        }
    }

    override fun getRefreshKey(state: PagingState<Int, Repo>): Int? = null

}
The code is not long, but it doesn't need a good explanation.
When inheriting PagingSource, we need to declare two generic types. The first type represents the data type of page number. We have no special requirements, so we can use integer directly. The second type represents the object type corresponding to each item of data (note that not every page). Here, the Repo just defined is used.
Then, in the load() function, first get the key through the params parameter, which represents the current number of pages. Note that the key may be null. If it is null, we will set the current page number as the first page by default. In addition, you can also get the loadSize through the params parameter, which indicates how many pieces of data each page contains. The size of this data can be set later.
Next, call the searchRepos() interface just defined in GitHubService, and pass in page and pageSize to get the data corresponding to the current page from the server.
Finally, you need to call LoadResult Page() function, build a LoadResult object and return it. Note LoadResult The page() function receives three parameters. The first parameter can be passed into the Repo list parsed from the response data, and the second and third parameters correspond to the pages of the previous page and the next page respectively. For the previous and next pages, we also made an additional judgment. If the current page is already the first or last page, its previous or next page is null.
In this way, the function of load() has been explained. You may find that the above code also rewrites a getRefreshKey() function. This function is new in paging version 3.0.0-beta01, but not in the previous alpha version. It belongs to the more advanced usage of Paging 3, which is not covered in this article, so it is OK to directly return null.
After writing the logic related to PagingSource, you need to create a Repository class. This is an important component of MVVM architecture. If you don't know it yet, you can refer to Chapter 15 of the first line of code Android version 3.
object Repository {

    private const val PAGE_SIZE = 50

    private val gitHubService = GitHubService.create()

    fun getPagingData(): Flow<PagingData<Repo>> {
        return Pager(
            config = PagingConfig(PAGE_SIZE),
            pagingSourceFactory = { RepoPagingSource(gitHubService) }
        ).flow
    }

}
Although this code is very short, it is not easy to understand because the Flow of the collaborative process is used. I can't explain what Flow is here. You can simply understand it as a technology of benchmarking RxJava in the collaborative process.
Of course, there is no complex Flow technology used here. As you can see, the above code is very short, which is more a fixed writing method than understanding.
We have defined a getPagingData() function. The return value of this function is flow < pagingdata < Repo > >. Note that except for the Repo part, it can be changed, other parts are fixed.
In the getPagingData() function, a Pager object is created and called Flow converts it into a flow object. When creating the Pager object, we specified PAGE_SIZE, that is, the amount of data contained in each page. The pagingSourceFactory is also specified, and our customized RepoPagingSource is passed in, so Paging 3 will use it as the data source for paging.
After the Repository is written, we also need to define a ViewModel, because the Activity cannot interact with the Repository directly, and only with the help of ViewModel. Create a new MainViewModel class with the following code:
class MainViewModel : ViewModel() {

    fun getPagingData(): Flow<PagingData<Repo>> {
        return Repository.getPagingData().cachedIn(viewModelScope)
    }

}
The code is very simple. It just calls the getPagingData() function defined in the Repository. However, a cachedIn() function is additionally called here, which is used to cache the data returned by the server within the scope of viewModelScope. If the horizontal and vertical screen of the mobile phone rotates, resulting in the re creation of the Activity, Paging 3 can directly read the data in the cache without re initiating the network request.
After writing here, we have completed more than half of this project. Next, we will start the work related to interface display.
Since Paging 3 must be used in combination with RecyclerView, let's define a layout of the children of RecyclerView. New repo_item.xml, the code is as follows:
<?xml version="1.0" encoding="utf-8"?>
<LinearLayout
    xmlns:android="http://schemas.android.com/apk/res/android"
    xmlns:tools="http://schemas.android.com/tools"
    android:layout_width="match_parent"
    android:layout_height="wrap_content"
    android:padding="10dp"
    android:orientation="vertical">

    <TextView
        android:id="@+id/name_text"
        android:layout_width="match_parent"
        android:layout_height="wrap_content"
        android:gravity="center_vertical"
        android:maxLines="1"
        android:ellipsize="end"
        android:textColor="#5194fd"
        android:textSize="20sp"
        android:textStyle="bold" />

    <TextView
        android:id="@+id/description_text"
        android:layout_width="match_parent"
        android:layout_height="wrap_content"
        android:layout_marginTop="10dp"
        android:maxLines="10"
        android:ellipsize="end" />

    <LinearLayout
        android:layout_width="match_parent"
        android:layout_height="wrap_content"
        android:layout_marginTop="10dp"
        android:gravity="end"
        tools:ignore="UseCompoundDrawables">

        <ImageView
            android:layout_width="wrap_content"
            android:layout_height="wrap_content"
            android:layout_gravity="center_vertical"
            android:layout_marginEnd="5dp"
            android:src="@drawable/ic_star"
            tools:ignore="ContentDescription" />

        <TextView
            android:id="@+id/star_count_text"
            android:layout_width="wrap_content"
            android:layout_height="wrap_content"
            android:layout_gravity="center_vertical" />

    </LinearLayout>

</LinearLayout>
This layout uses a picture resource, which can be obtained from the source code of this project. The source code address is shown at the bottom of the article.
Next, define the adapter of RecyclerView. Note that this adapter is also special and must inherit from PagingDataAdapter. The code is as follows:
class RepoAdapter : PagingDataAdapter<Repo, RepoAdapter.ViewHolder>(COMPARATOR) {

    companion object {
        private val COMPARATOR = object : DiffUtil.ItemCallback<Repo>() {
            override fun areItemsTheSame(oldItem: Repo, newItem: Repo): Boolean {
                return oldItem.id == newItem.id
            }

            override fun areContentsTheSame(oldItem: Repo, newItem: Repo): Boolean {
                return oldItem == newItem
            }
        }
    }

    class ViewHolder(itemView: View) : RecyclerView.ViewHolder(itemView) {
        val name: TextView = itemView.findViewById(R.id.name_text)
        val description: TextView = itemView.findViewById(R.id.description_text)
        val starCount: TextView = itemView.findViewById(R.id.star_count_text)
    }

    override fun onCreateViewHolder(parent: ViewGroup, viewType: Int): ViewHolder {
        val view = LayoutInflater.from(parent.context).inflate(R.layout.repo_item, parent, false)
        return ViewHolder(view)
    }

    override fun onBindViewHolder(holder: ViewHolder, position: Int) {
        val repo = getItem(position)
        if (repo != null) {
            holder.name.text = repo.name
            holder.description.text = repo.description
            holder.starCount.text = repo.starCount.toString()
        }
    }

}
Compared with a traditional RecyclerView Adapter, the most special thing here is to provide a COMPARATOR. Because Paging 3 internally uses DiffUtil to manage data changes, this COMPARATOR is necessary. If you have used DiffUtil before, you should not be unfamiliar with it.
In addition, we do not need to pass the data source to the parent class, because the data source is managed by paging 3 internally. At the same time, there is no need to rewrite the getItemCount() function. The reason is the same. Paging 3 can know how many pieces of data there are.
Other parts are no different from ordinary recyclerview adapters. I'm sure you can understand them.
Next, we are close to the last step. Let's integrate everything into the Activity.
Modify activity_main.xml layout, in which a RecyclerView and a ProgressBar are defined:
<?xml version="1.0" encoding="utf-8"?>
<FrameLayout xmlns:android="http://schemas.android.com/apk/res/android"
    xmlns:tools="http://schemas.android.com/tools"
    android:layout_width="match_parent"
    android:layout_height="match_parent"
    tools:context=".MainActivity">

    <androidx.recyclerview.widget.RecyclerView
        android:id="@+id/recycler_view"
        android:layout_width="match_parent"
        android:layout_height="match_parent" />

    <ProgressBar
        android:id="@+id/progress_bar"
        android:layout_width="wrap_content"
        android:layout_height="wrap_content"
        android:layout_gravity="center" />

</FrameLayout>
Then modify the code in MainActivity as follows:
class MainActivity : AppCompatActivity() {

    private val viewModel by lazy { ViewModelProvider(this).get(MainViewModel::class.java) }

    private val repoAdapter = RepoAdapter()

    override fun onCreate(savedInstanceState: Bundle?) {
        super.onCreate(savedInstanceState)
        setContentView(R.layout.activity_main)
        val recyclerView = findViewById<RecyclerView>(R.id.recycler_view)
        val progressBar = findViewById<ProgressBar>(R.id.progress_bar)
        recyclerView.layoutManager = LinearLayoutManager(this)
        recyclerView.adapter = repoAdapter
        lifecycleScope.launch {
            viewModel.getPagingData().collect { pagingData ->
                repoAdapter.submitData(pagingData)
            }
        }
        repoAdapter.addLoadStateListener {
            when (it.refresh) {
                is LoadState.NotLoading -> {
                    progressBar.visibility = View.INVISIBLE
                    recyclerView.visibility = View.VISIBLE
                }
                is LoadState.Loading -> {
                    progressBar.visibility = View.VISIBLE
                    recyclerView.visibility = View.INVISIBLE
                }
                is LoadState.Error -> {
                    val state = it.refresh as LoadState.Error
                    progressBar.visibility = View.INVISIBLE
                    Toast.makeText(this, "Load Error: ${state.error.message}", Toast.LENGTH_SHORT).show()
                }
            }
        }
    }

}
The most important part of the code that calls the adapter data() function here. This function is the core of the paging function of triggering Paging 3. After calling this function, Paging 3 starts to work.
submitData() receives a PagingData parameter, which we need to call the collect() function of the Flow object returned in ViewModel to obtain. The collect() function is somewhat similar to the subscribe() function in Rxjava. In short, after the subscription, the messages will continue to Flow here.
However, because the collect() function is a suspended function, it can only be called in the scope of the coroutine, so lifecyclescope is called here Launch() function to start a coroutine.
There should be nothing to explain in other places. They are all the usage of traditional RecyclerView, which I believe everyone can understand.
Well, then we'll finish the whole project. Before officially running the project, don't forget to put it in your Android manifest Add network permissions to the XML file:
<?xml version="1.0" encoding="utf-8"?>
<manifest xmlns:android="http://schemas.android.com/apk/res/android"
package="com.example.paging3sample">
<uses-permission android:name="android.permission.INTERNET" />
...
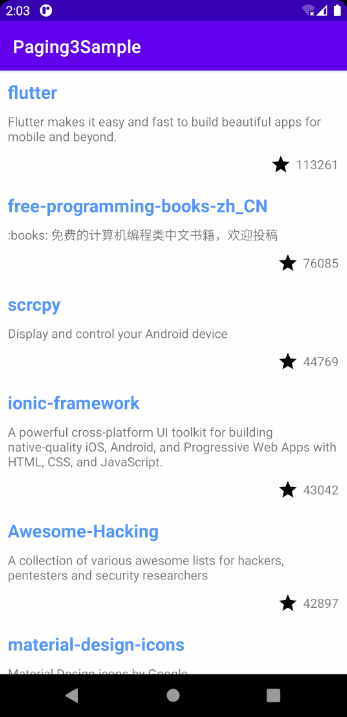
</manifest>Now run the following program, and the effect is shown in the following figure:

You can see that the Android related open source libraries on GitHub have been successfully displayed. And you can keep sliding down. Paging 3 will automatically load more data, as if you will never slide to the end.
In this way, the effect of paging loading with Paging 3 is successfully completed.
To sum up, compared with the traditional paging implementation scheme, Paging 3 hides some trivial details. For example, you don't need to listen to the sliding event of the list or know when to load the data of the next page. These are encapsulated by Paging 3. We just need to write the logic implementation according to the framework built by Paging 3, tell Paging 3 how to load data, and Paging 3 will help us complete other things automatically.
The loading status is displayed at the bottom
According to the design of Paging 3, in fact, in theory, we should not see the loading state at the bottom. Because Paging 3 will load more data in advance when the list is far from sliding to the bottom (this is the default attribute and configurable), resulting in a feeling that it will never slide to the end.
However, there are always surprises. For example, the current network speed is not very good. Although Paging 3 will load the data of the next page in advance, when it slides to the bottom of the list, the data responded by the server may not be returned. At this time, a loading status should be displayed at the bottom.
In addition, if the network conditions are very bad, there may be loading failure. At this time, a retry button should be displayed at the bottom of the list.
Then let's implement this function to make the project more perfect.
Create a footer_item.xml layout to display the loading progress bar and retry button:
<?xml version="1.0" encoding="utf-8"?>
<FrameLayout xmlns:android="http://schemas.android.com/apk/res/android"
    android:layout_width="match_parent"
    android:layout_height="wrap_content"
    android:padding="10dp">

    <ProgressBar
        android:id="@+id/progress_bar"
        android:layout_width="wrap_content"
        android:layout_height="wrap_content"
        android:layout_gravity="center" />

    <Button
        android:id="@+id/retry_button"
        android:layout_width="wrap_content"
        android:layout_height="wrap_content"
        android:layout_gravity="center"
        android:text="Retry" />

</FrameLayout>
Then create a FooterAdapter as the bottom adapter of RecyclerView. Note that it must inherit from LoadStateAdapter, as shown below:
class FooterAdapter(val retry: () -> Unit) : LoadStateAdapter<FooterAdapter.ViewHolder>() {

    class ViewHolder(itemView: View) : RecyclerView.ViewHolder(itemView) {
        val progressBar: ProgressBar = itemView.findViewById(R.id.progress_bar)
        val retryButton: Button = itemView.findViewById(R.id.retry_button)
    }

    override fun onCreateViewHolder(parent: ViewGroup, loadState: LoadState): ViewHolder {
        val view = LayoutInflater.from(parent.context).inflate(R.layout.footer_item, parent, false)
        val holder = ViewHolder(view)
        holder.retryButton.setOnClickListener {
            retry()
        }
        return holder
    }

    override fun onBindViewHolder(holder: ViewHolder, loadState: LoadState) {
        holder.progressBar.isVisible = loadState is LoadState.Loading
        holder.retryButton.isVisible = loadState is LoadState.Error
    }

}
This is still a very simple Adapter. There are only two points to note.
First, we use Kotlin's higher-order function to register the click event for the retry button, so that when the retry button is clicked, the function type parameter passed in the constructor will be recalled, and we will add the retry logic there later.
Second, in onBindViewHolder(), the bottom interface will be displayed according to the state of LoadState. If it is loading, the loading progress bar will be displayed. If it is loading failure, the retry button will be displayed.
Finally, modify the code in MainActivity to integrate FooterAdapter into RepoAdapter:
class MainActivity : AppCompatActivity() {

    override fun onCreate(savedInstanceState: Bundle?) {
        ...
        recyclerView.adapter = repoAdapter.withLoadStateFooter(FooterAdapter { repoAdapter.retry() })
        ...
    }

}
The code is very simple. You only need to change one line and call the withLoadStateFooter() function of the RepoAdapter to integrate the FooterAdapter into the RepoAdapter.
Also notice that the Lambda expression is used as a function type parameter passed to FooterAdapter. In the Lambda expression, the retry() function of RepoAdapter can be reloaded.
In this way, we have completed the function of displaying the loading status at the bottom. Now let's test it. The effect is shown in the figure below.
As you can see, first of all, I turned on the flight mode on the device, so that when I slide to the bottom of the list, the retry button will be displayed.
Then turn off the flight mode and click the retry button, so that the loading progress bar will be displayed and the new data will be loaded successfully.
last
This article ends here.
I have to say that the knowledge points I explained in this article are still only the basic usage of Paging 3, and many advanced usages are not covered in the article. Of course, these basic usages are also the most commonly used usages, so if you don't plan to become a master of Paging 3, mastering these knowledge points in this article is enough to deal with daily development work.
If you want to further study Paging 3, you can refer to Google's official Codelab project at:
https://developer.android.com/codelabs/android-paging
The Paging3Sample project we just wrote together actually evolved from Google's official Codelab project. I rewritten the project according to my own understanding and simplified it to some extent. If you study the original project directly, you will learn more knowledge.
Finally, if you need to obtain the source code of Paging3Sample project, please visit the following address:
GitHub - guolindev/Paging3Sample: A simple sample shows how to use paging 3 library.
In addition, if you want to learn Kotlin and the latest Android knowledge, you can refer to my new book first line of code version 3, Click here for details.
Make complaints about: Jetpack new member, Paging3 from Tucao to true fragrance - cloud + community - Tencent cloud
https://cloud.tencent.com/developer/article/1805834