Introduction to Redis cluster
-
Redis is an open source key value storage system. Due to its outstanding performance, most Internet enterprises use it for server-side cache.
-
Before version 3.0, Redis only supported single instance mode. Although it supported master-slave mode and sentinel mode deployment to solve single point of failure, now Internet enterprises are prone to hundreds of gigabytes of data, which can not meet the needs of business. Therefore, Redis launched cluster mode after version 3.0.
-
Redis cluster adopts P2P mode and is completely decentralized. Redis divides all keys into 16384 slots, and each redis instance is responsible for some of the slots. All information in the cluster (nodes, ports, slots, etc.) is updated through regular data exchange between nodes.
-
The Redis client can make a request in any Redis instance. If the required data is not in the instance, guide the client to access the required instance through the redirection command.
Casually build a cluster
-
Installing and deploying any application is actually very simple. Just install it step by step. Let's talk about the Redis cluster construction plan. Since the cluster needs at least 6 nodes (3 master and 3 slave mode), there are not so many machines for me to play, and I can't afford so many virtual machines locally (the computer is too bad). Now the plan is to simulate a cluster on one machine. Of course, this is no essential difference from the cluster construction of production environment.
-
Now I'm going to start cluster construction under a CentOS with Redis installed. If you don't know how to install Redis under Linux, you can go to this article "learn about Redis and install and configure under CentOS". [References] Please note that all cluster environments below are based on the installed Redis.
1. Create a folder
- We plan that the port number of Redis node in the cluster is 9001-9006, which is the instance folder under the cluster. The data is stored in the port number / data folder.

mkdir /usr/local/redis-cluster
cd redis-cluster/
mkdir -p 9001/data 9002/data 9003/data 9004/data 9005/data 9006/data
2. Copy execution script
- Create a bin folder under / usr / local / Redis cluster to store the cluster running script and copy the running script under the src path of the installed Redis. Look at the command:
mkdir redis-cluster/bin
cd /usr/local/redis/src
cp mkreleasehdr.sh redis-benchmark redis-check-aof redis-check-dump redis-cli redis-server redis-trib.rb /usr/local/redis-cluster/bin
3. Copy a new Redis instance
- Now we copy a new instance from the installed Redis to the 9001 folder and modify Redis Conf configuration.

cp /usr/local/redis/* /usr/local/redis-cluster/9001
- Note: modify redis The only difference between conf configuration and single point configuration is the following figure, and the rest are conventional items:
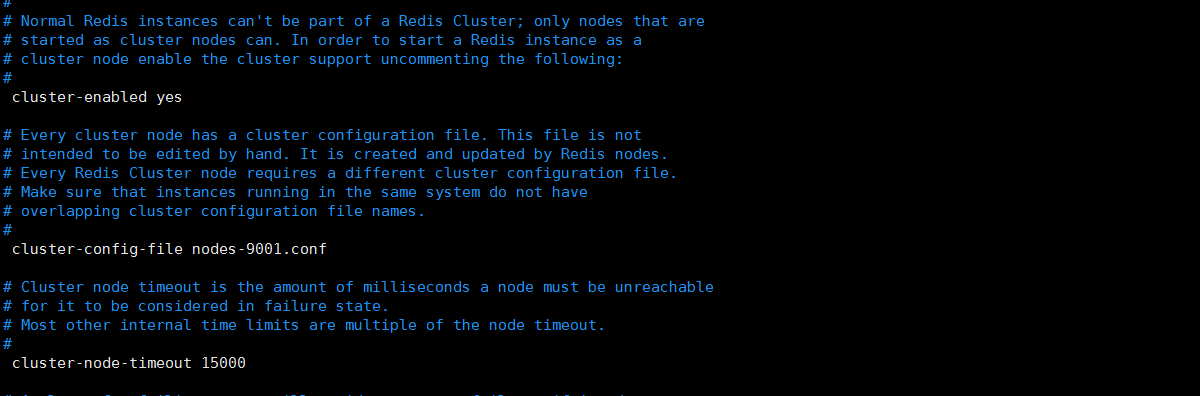
port 9001(Port number of each node)
daemonize yes
bind 192.168.119.131(Bind current machine IP)
dir /usr/local/redis-cluster/9001/data/(Data file storage location)
pidfile /var/run/redis_9001.pid(pid 9001 and port (to correspond)
cluster-enabled yes(Start cluster mode)
cluster-config-file nodes9001.conf(9001 and port (to correspond)
cluster-node-timeout 15000
appendonly yes
- The key point of cluster setup configuration is to cancel the notes of these three configurations in the following figure:
4. Copy five new Redis instances
- We have completed one node. In fact, the next step is to complete another five nodes mechanically. In fact, we can do this: copy the 9001 instance to another five folders, and the only thing to modify is redis All port related information in conf is enough. In fact, there are only four locations. Start the operation, see the figure:
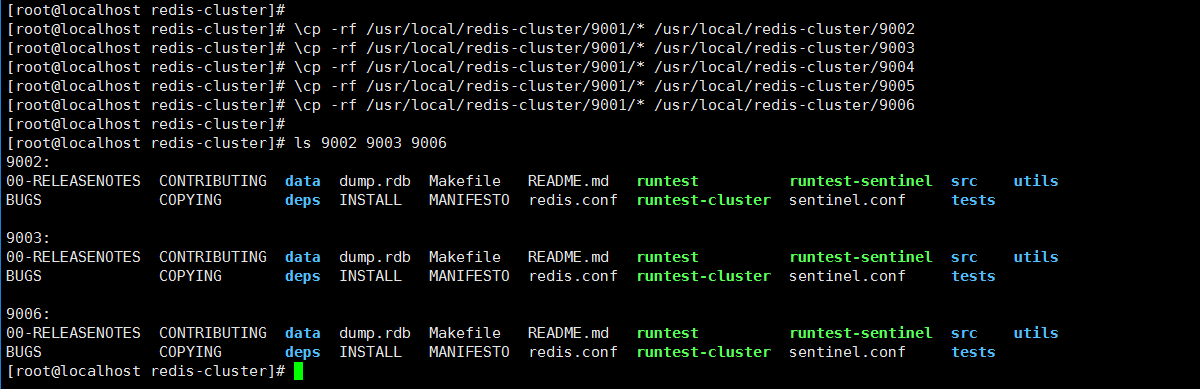
\cp -rf /usr/local/redis-cluster/9001/* /usr/local/redis-cluster/9002
\cp -rf /usr/local/redis-cluster/9001/* /usr/local/redis-cluster/9003
\cp -rf /usr/local/redis-cluster/9001/* /usr/local/redis-cluster/9004
\cp -rf /usr/local/redis-cluster/9001/* /usr/local/redis-cluster/9005
\cp -rf /usr/local/redis-cluster/9001/* /usr/local/redis-cluster/9006
- \The cp -rf command does not use an alias to copy, because cp is actually an alias cp -i, and there will be interactive confirmation during operation, which is annoying.
5. Modify the redis. Of 9002-9006 Conf file
- In fact, it's very simple. You will find that there are only four points that need to be modified through search. Let's replace them globally and enter the corresponding node folder to replace them. The command is very simple. See the figure:
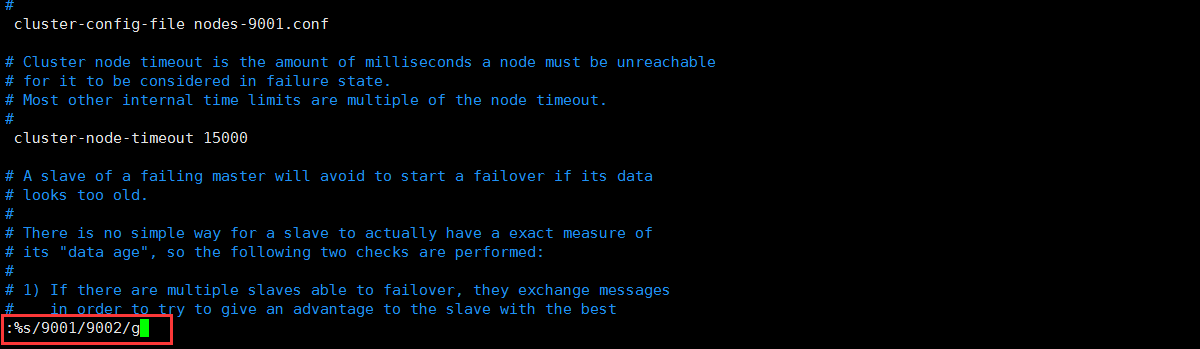
vim redis.conf
:%s/9001/9002g
- After entering the vehicle, you will be prompted that several places have been replaced successfully. If you are not sure, you can check manually:
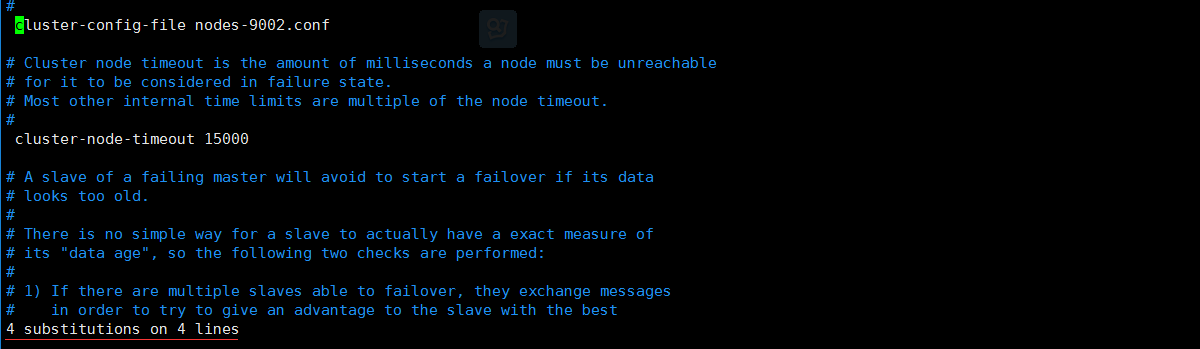
- In fact, we have replaced the following four lines:
port 9002
dir /usr/local/redis-cluster/9002/data/
cluster-config-file nodes-9002.conf
pidfile /var/run/redis_9002.pid
- Here, we have finished the most basic environment, and the next step is to start it.
Actually, we've almost built it
1. Start the six nodes of 9001-9006
- Stop talking nonsense and look at the picture directly:
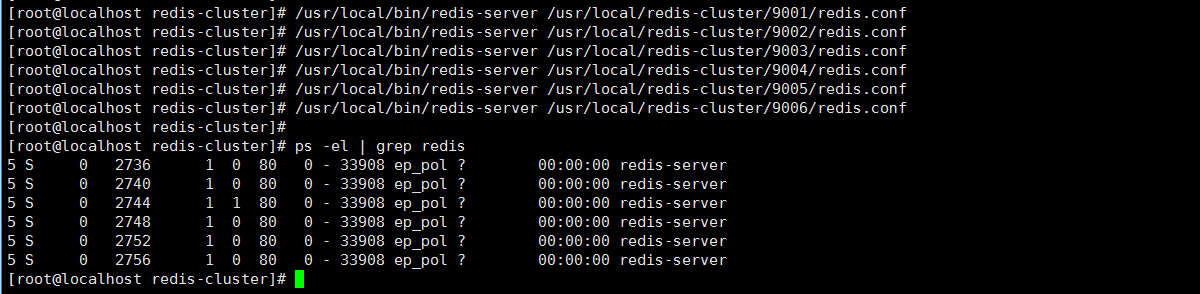
//Welcome to learn and communicate in Java. Sample: 665845932 communicate and blow water together~
/usr/local/bin/redis-server /usr/local/redis-cluster/9001/redis.conf
/usr/local/bin/redis-server /usr/local/redis-cluster/9002/redis.conf
/usr/local/bin/redis-server /usr/local/redis-cluster/9003/redis.conf
/usr/local/bin/redis-server /usr/local/redis-cluster/9004/redis.conf
/usr/local/bin/redis-server /usr/local/redis-cluster/9005/redis.conf
/usr/local/bin/redis-server /usr/local/redis-cluster/9006/redis.conf
- You can check whether the startup is successful: ps -el | grep redis
It can be seen that all six nodes have been started successfully.
2. Randomly find a node to test
//Welcome to learn and communicate in Java. Sample: 665845932 communicate and blow water together~
/usr/local/redis-cluster/bin/redis-cli -h 192.168.119.131 -p 9001

set name mafly

- The connection succeeded, but it seems to report an error???
- (error) CLUSTERDOWN Hash slot not served. What the hell is this?
- This is because although we have configured and started the Redis cluster service, they are not in a cluster for the time being, can not find each other directly, and there is no storage location, which is the so-called slot.
3. Install the software required by the cluster
- Since the Redis cluster needs to use ruby commands, we need to install ruby and related interfaces.
//Welcome to learn and communicate in Java. Sample: 665845932 communicate and blow water together~
yum install ruby
yum install rubygems
gem install redis

This is the real way to create a cluster
- Don't talk nonsense, just hit the command:
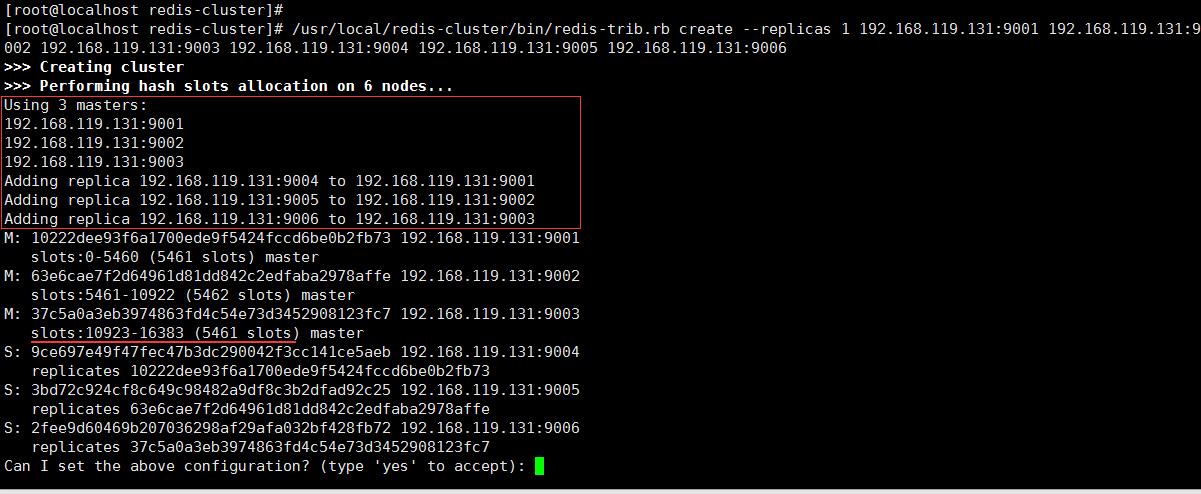
/usr/local/redis-cluster/bin/redis-trib.rb create --replicas 1 192.168.119.131:9001 192.168.119.131:9002 192.168.119.131:9003 192.168.119.131:9004 192.168.119.131:9005 192.168.119.131:9006
-
Briefly explain this command: call the ruby command to create a cluster, – replicas 1 means that the master-slave replication ratio is 1:1, that is, one master node corresponds to one slave node; Then, by default, we are assigned the services of each master node and corresponding slave node, as well as the size of solts. Because there are only 16383 solts in the Redis cluster, they will be evenly distributed to us by default. Of course, you can specify, and the subsequent increase or decrease nodes can also be reassigned.
-
M: 10222dee93f6a1700ede9f5424fccd6be0b2fb73 master node Id
-
S: 9ce697e49f47fec47b3dc290042f3cc141ce5aeb 192.168.119.131:9004 replicas 10222dee93f6a1700ede9f5424fccd6be0b2fb73 corresponding master node Id under slave node
-
At present, 9001-9003 is the master node and 9004-9006 is the slave node. I want to confirm whether you agree to this configuration. After entering yes, cluster creation will start.
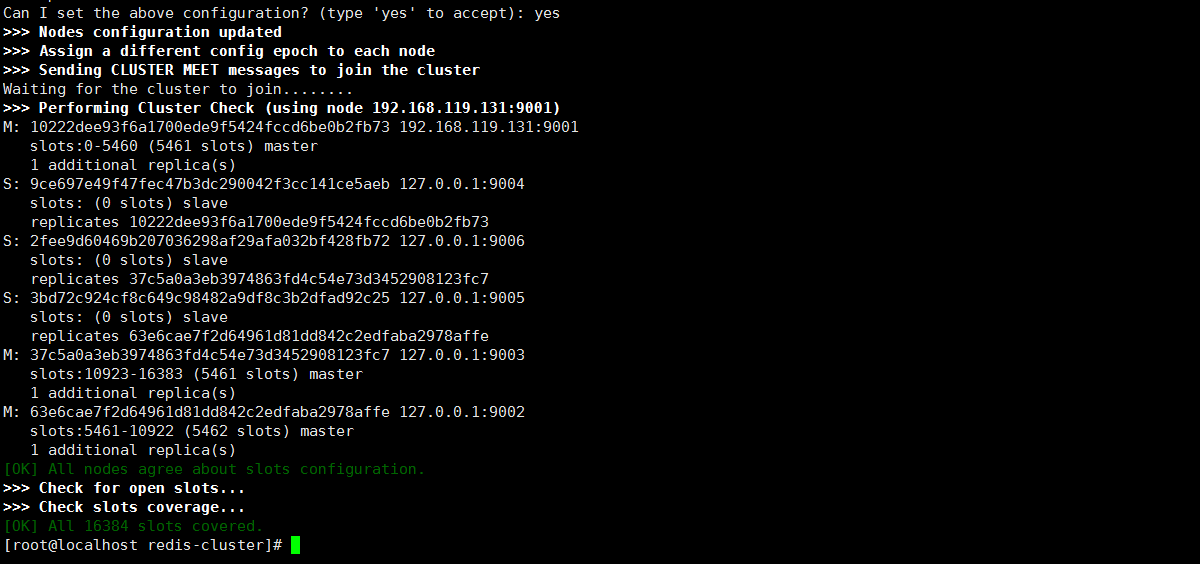
- The above figure indicates that the cluster has been built successfully!!!
- Verify:
- It is still connected through the client command. Check the status and node information through the cluster command.
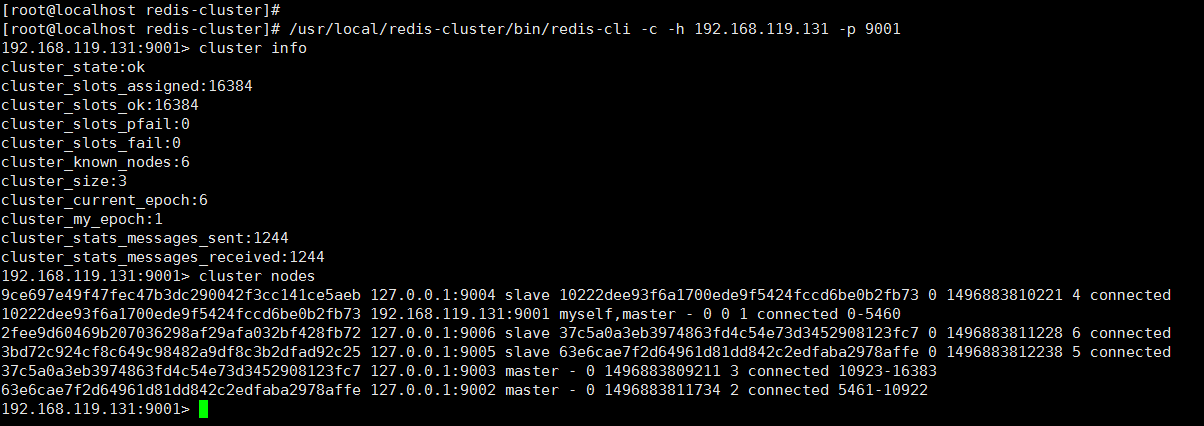
/usr/local/redis-cluster/bin/redis-cli -c -h 192.168.119.131 -p 9001
cluster info
cluster nodes
-
Through the command, you can see the cluster information, node status, master-slave information, connection number, slot information, etc. in detail. Seeing this, we have successfully built and deployed the Redis cluster!
-
Set a mafly:
You will find that when we set name mafly, the message Redirected to slot appears and is automatically connected to node 9002. This is also a data allocation feature of the cluster, which will not be described in detail here.

To sum up
-
This article on Redis cluster deployment and construction is really step by step. As long as you install my steps, you can ensure that you can successfully build a Redis cluster to play. It can also be said that in addition to the cumbersome steps, there is almost no technical content, and it is estimated that those who can read it will feel tired (seriously, writing this article is really tiring).
-
The next step may be dynamic capacity expansion, increasing and reducing nodes, reallocating slot size, etc. of course, the most important thing is how to combine with our program and how to better play the due effect of Redis cache cluster. These are the most important.
-
The typhoon tonight is not very severe. It seems that I haven't slept and woke up in a day for a long time