JSP
JSP (full name JavaServer Pages) is a dynamic web page technical standard led and created by Sun Microsystems.
-
JSP deployed on the Web server can respond to the request sent by the client, dynamically generate Web pages of HTML, XML or other format documents according to the request content, and then return them to the requester.
-
JSP technology takes Java language as the script language to provide services for users' HTTP requests, and can deal with complex business requirements together with other Java programs on the server.
-
JSP embeds Java code and specific change content into the static page to realize the dynamic generation of part of the content with the static page as the template.
-
JSP introduces an XML tag called "JSP action" to call built-in functions. Alternatively, you can create JSP tag libraries and then use them like standard HTML or XML tags. Tag library can enhance functions and server performance, and is not limited by cross platform problems.
-
JSP files are converted into more primitive Servlet code by their compiler at run time. JSP compiler can compile JSP files into servlets written in Java code, and then compile them into binary machine code that can be executed quickly by java compiler, or directly into binary code.
-
The main function of jsp is to replace the Servlet program to return the data of html page, because it is very complicated for the Servlet program to return the data of html page. Development and maintenance costs are extremely high.
jsp page is essentially a Servlet program.
When we visit the jsp page for the first time, we can see in the project directory of the file that the Tomcat server will help us translate the jsp page into a java source file. And compile it into class bytecode program!
When you open the java source file, it is not difficult to find the contents:
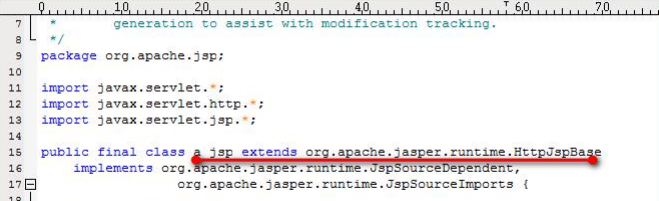
Trace the original code and find the HttpJspBase class. It directly inherits the HttpServlet class.
In other words, the java class translated by jsp indirectly inherits the HttpServlet class, that is, a Servlet program.
Four domain objects of JSP
Scope of domain object:
It is used to save data, obtain data and share data among different resources.
Method of domain object:
-
setAttribute(name,object) ; Method of saving data
-
getAttribute(name) get data
romveAttribute(name) clear data
Scope of four domain objects:
-
Page domain: in the same jsp page, data sharing is effective
-
Request field: data sharing is valid in the same request
-
Session domain: data sharing is effective in the same session
-
Application domain: in the same web application, data sharing is effective
Book City Project
Phase I form verification
The user name must be 12 characters long and 12 digits long
* Get the content in the user name input box* Create regular expressions* use test Method test* Prompt user for results
Verification password: it must be composed of letters, numbers and underscores, and the length is 5 to 12 digits
- Get the content in the password input box
- Create regular expressions
- Test with test method
- Prompt user for results
Verification confirmation password: the same as the password
- Get the content in the confirmation password input box
- Compare with the content in the password input box
Mailbox verification: xxxxx@xxx.com
- Get the contents in the mailbox input box
- Create regular expressions
- Test with test method
- Prompt user for results
Verification Code: now you only need to verify the user
- Get the content in the verification code input box
- Verification code cannot be empty
- Prompt user for results
Note: assuming that the illegal user name is entered for the first time, the page will prompt an error. When we enter a legal user name again, we will submit. When the network speed is slow, the error displayed on the page will still exist! Therefore, the error message should be reset after verification!
<script>
   $(document).ready(function () {
      // Bind a click event to the verify button
      $("#sub_btn").click(function () {
         // Authentication user name: it must be composed of letters, numbers and underscores, and the length is 5 to 12 digits
         var $btnOnj = $("#username").val()
         var patt = /^\w{5,12}$/
         if ( ! patt.test($btnOnj)) {
            $("span.errorMsg").text("Illegal user name");
            return false;
         }
         // Verification password: it must be composed of letters, numbers and underscores, and the length is 5 to 12 digits
         var $pwOnj = $("#password").val()
         var pwpatt = /^\w{5,12}$/
         if (!pwpatt.test($pwOnj)) {
            $("span.errorMsg").text("Illegal password");
            return false;
         }
         // Verification confirmation password: the same as the password
         var $repwdObj = $("#repwd").val()
         if ($pwOnj != $repwdObj) {
            $("span.errorMsg").text("The two passwords are inconsistent");
            return false;
         }
         // Mailbox verification: xxxxx@xxx.com
         var $emailObj = $("#email").val()
         var emailpatt = /^[A-Za-zd0-9]+([-_.][A-Za-zd]+)*@([A-Za-zd]+[-.])+[A-Za-zd]{2,5}$/;
         if (! emailpatt.test($emailObj)) {
            $("span.errorMsg").text("Illegal mailbox");
            return false;
         }
         // Verification Code: now you only need to verify the user
         var $code = $("#code").val()
         // Remove the space entered in the verification code!
         $code = $code.trim();
         if ($code == null || $code == "") {
            $("span.errorMsg").text("Verification code cannot be empty");
            return false;
         }
      })
      $("span.errorMsg").text(""); // Reset error message
   })
</script>
Note: the input content of the verification code needs to remove spaces. You can use regular expressions to verify it, or you can use the tool method trim() method provided in JQuery!
Phase II user registration and login
Three tier architecture of Java EE
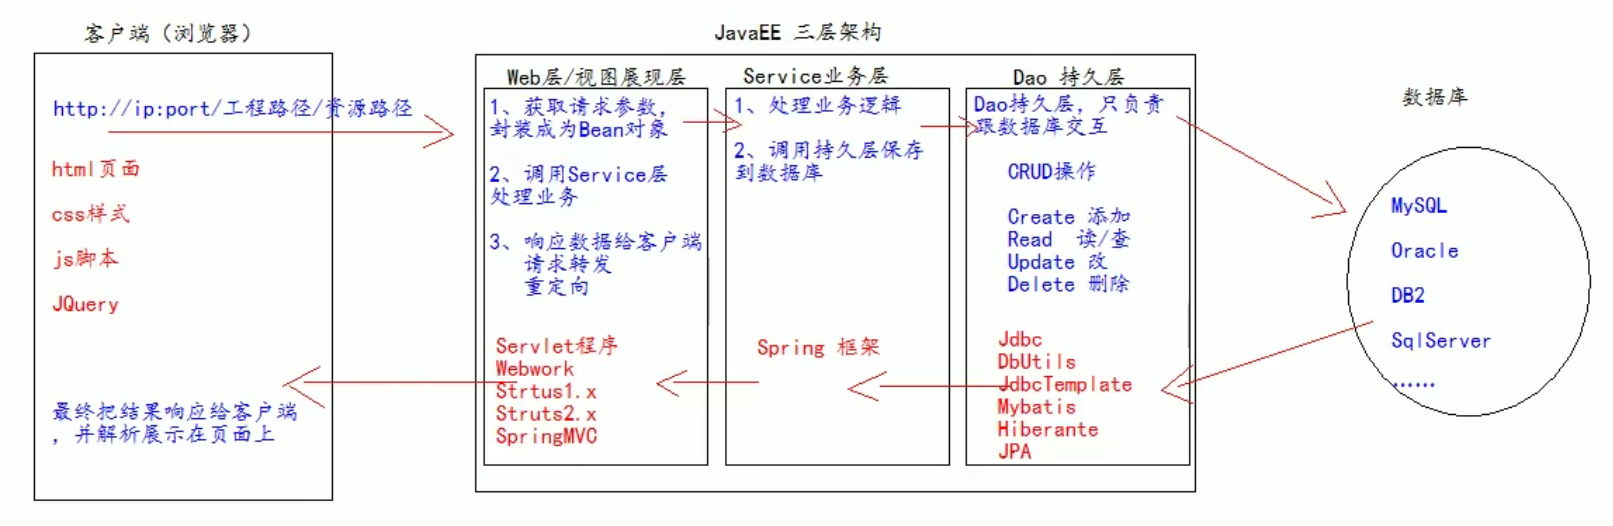
The purpose of layering is to decouple. Decoupling is to reduce the coupling degree of code and facilitate the maintenance and upgrading in the later stage of the project!
Environmental project construction
Web layer com atguigu. web/servlet/controller
service layer com atguigu. service interface package
com.atguigu.service.impl Service interface implementation class
dao persistence layer com atguigu. dao interface package
com.atguigu.dao.impl Dao interface implementation class
Entity bean object com atguigu. POJO / entity / domain / bean JavaBean class
Test package com atguigu. test/junit
Tools com atguigu. utils
Code flow
1. Create database tables and tables
Create a table corresponding to the data required for the registration page:

From the above figure, the corresponding user table (t_user) in the database should have three fields: user name, user password and user email!
CREATE DATABASE book
USE book;
CREATE TABLE t_user(
`id` INT AUTO_INCREMENT,
`username` VARCHAR(20) NOT NULL,
`password` VARCHAR(32) NOT NULL,
`email` VARCHAR(200) NOT NULL,
PRIMARY KEY `id`(`id`),
UNIQUE KEY `username`(`username`)
);
INSERT INTO t_user(`username`,`password`,`email`)
VALUE('admin','admin','admin@atayin.com');
2. Write the JavaBean class corresponding to the database table
After creating the database table, we need to write a User class corresponding to the database table under the package storing the JavaBean class:
public class User {
    private Integer id;
    private String username;
    private String password;
    private String email;

    public User() {
    }

    public User(Integer id, String username, String password, String email) {
        this.id = id;
        this.username = username;
        this.password = password;
        this.email = email;
    }

    public Integer getId() {
        return id;
    }

    public void setId(Integer id) {
        this.id = id;
    }

    public String getUsername() {
        return username;
    }

    public void setUsername(String username) {
        this.username = username;
    }

    public String getPassword() {
        return password;
    }

    public void setPassword(String password) {
        this.password = password;
    }

    public String getEmail() {
        return email;
    }

    public void setEmail(String email) {
        this.email = email;
    }

    @Override
    public String toString() {
        return "User{" +
                "id=" + id +
                ", username='" + username + '\'' +
                ", password='" + password + '\'' +
                ", email='" + email + '\'' +
                '}';
    }
}
3. Write Dao persistence layer
Generally speaking, before writing Dao persistence layer, the project manager will build the project tool classes required by the persistence layer in advance, but at this time, the project is completed by us alone, so we need to write tool classes (JdbcUtils)!
Write the JdbcUtils tool class: connect to the database
public class JdbcUtils {

    private static DruidDataSource dataSource;

    static {
        try {
            Properties properties = new Properties();
            // Read JDBC Properties property configuration file
            InputStream inputStream = JdbcUtils.class.getClassLoader().getResourceAsStream("jdbc.properties");
            // Load data from stream
            properties.load(inputStream);
            // Create database connection pool
            dataSource = (DruidDataSource) DruidDataSourceFactory.createDataSource(properties);
        } catch (Exception e) {
            e.printStackTrace();
        }

    }
    /**
     * Gets the connection in the database connection pool
     * @return If null is returned, it indicates that the connection acquisition failed < br / > a value means that the connection is successful
     */
    public static Connection getConnection(){

        Connection conn = null;

        try {
            conn = dataSource.getConnection();
        } catch (Exception e) {
            e.printStackTrace();
        }
        return conn;
    }
    /**
     * Close the connection and put it back into the database connection pool
     * @param conn
     */
    public static void close(Connection conn){
        if (conn != null) {
            try {
                conn.close();
            } catch (SQLException e) {
                e.printStackTrace();
            }
        }
    }
}
The jar packages required for database connection pool and Java database operation are as follows:
<dependencies>
    <dependency>
        <groupId>junit</groupId>
        <artifactId>junit</artifactId>
        <version>4.11</version>
        <scope>test</scope>
    </dependency>
    <!-- https://mvnrepository.com/artifact/mysql/mysql-connector-java -->
    <dependency>
        <groupId>mysql</groupId>
        <artifactId>mysql-connector-java</artifactId>
        <version>8.0.27</version>
    </dependency>
    <!-- https://mvnrepository.com/artifact/com.alibaba/druid -->
    <dependency>
        <groupId>com.alibaba</groupId>
        <artifactId>druid</artifactId>
        <version>1.2.8</version>
    </dependency>
</dependencies>
Write a configuration file to create a database connection pool:
username=root
password=12345
url = jdbc:mysql://localhost:3306/book?useUnicode=true&characterEncoding=utf8&useSSL=true
driver=com.mysql.cj.jdbc.Driver
initialSize=5
maxActive=10
We can create a test class of JdbcUtils under the test package to test whether JdbcUtils can obtain the connection:
import com.atayin.utils.JdbcUtils;
import org.junit.Test;

/**
 * Created by Ayin
 * Date 2021/11/10 18:12
 * Description: Test the JdbcUtils utility class
 */
public class JdbcUtilsTest {
    @Test
    public void testJdbcUtils() {
        System.out.println(JdbcUtils.getConnection());
    }
}
Note: we have configured in the configuration file that the maximum number of connections in the database connection pool is 10, that is, even if we obtain 100 connections, we will only return 10 connections, so we need to close the connection in time after use!
Write BaseDao:
The following code examples can obtain the data in the database, that is, the corresponding parameter values in the sql statement:
<!-- https://mvnrepository.com/artifact/commons-dbutils/commons-dbutils -->
<dependency>
    <groupId>commons-dbutils</groupId>
    <artifactId>commons-dbutils</artifactId>
    <version>1.7</version>
</dependency>
public abstract class BaseDao {
    QueryRunner queryRunner = new QueryRunner();

    /**
     * update() Execute insert, update and delete statements in sql statements
     * @param sql
     * @param args
     * @return If - 1 is returned, the execution fails; Returns the number of other rows that represent the impact
     */
    public int update(String sql, Object...args) {
        Connection connection = JdbcUtils.getConnection();
        try {
            return queryRunner.update(connection, sql, args);
        } catch (SQLException throwables) {
            throwables.printStackTrace();
        } finally {
            JdbcUtils.close(connection);
        }
        return -1;
    }

    /**
     * The query returns the sql statement of a JavaBean
     * @param type  Object type returned
     * @param sql     Executed sql statement
     * @param args   sql Corresponding parameter value
     * @param <T>    Generic type of return type
     * @return
     */
    public <T> T queryForOne(Class<T> type, String sql, Object...args ) {
        Connection connection = JdbcUtils.getConnection();
        try {
            return queryRunner.query(connection, sql, new BeanHandler<T>(type), args);
        } catch (SQLException throwables) {
            throwables.printStackTrace();
        } finally {
            JdbcUtils.close(connection);
        }
        return null;
    }
    /**
     * Query returns sql statements of multiple JavaBean s
     * @param type  Object type returned
     * @param sql     Executed sql statement
     * @param args   sql Corresponding parameter value
     * @param <T>    Generic type of return type
     * @return
     */
    public <T> List<T> queryForList(Class<T> type, String sql, Object...args ) {
        Connection connection = JdbcUtils.getConnection();
        try {
            return queryRunner.query(connection, sql, new BeanListHandler<T>(type), args);
        } catch (SQLException throwables) {
            throwables.printStackTrace();
        } finally {
            JdbcUtils.close(connection);
        }
        return null;
    }

    /**
     * Execute the sql statement that returns one row
     * @param sql       Executed sql statement
     * @param args     sql Corresponding parameter value
     * @return
     */
    public Object queryForSingleValue(String sql, Object...args) {
        Connection connection = JdbcUtils.getConnection();
        try {
            return queryRunner.query(connection, sql, new ScalarHandler<>(), args);
        } catch (SQLException throwables) {
            throwables.printStackTrace();
        } finally {
            JdbcUtils.close(connection);
        }
        return null;
    }

}
Write UserDao:
public interface UserDao {
    /**
     * Query information according to user name
     * @param username user name
     * @return If null is returned, there is no such user
     */
    public User queryUserByUsername(String username);

    /**
     * Query information according to user name and password
     * @param username user name
     * @param password password
     * @return If null is returned, the user name or password is wrong
     */
    public User queryUserByUsernameAndPassword(String username, String password);

    /**
     *Insert a new user and return the number of rows affected
     * @param user new user
     * @return If - 1 is returned, adding a new user fails
     */
    public int saveUser(User user);

}
Write UserDaoImpl:
UserDaoImpl needs to implement the UserDao interface and inherit the BaseDao class!
public class UserDaoImpl extends BaseDao implements UserDao {
    @Override
    public User queryUserByUsername(String username) {
        String sql = "SELECT `id`,`username`,`password`,`email` FROM `t_user` WHERE `username` = ?";
        return queryForOne(User.class, sql, username);
    }

    @Override
    public User queryUserByUsernameAndPassword(String username, String password) {
        String sql = "SELECT `id`,`username`,`password`,`email` FROM `t_user` WHERE `username` = ? AND `password` = ?";
        return queryForOne(User.class, sql, username, password);
    }

    @Override
    public int saveUser(User user) {
        String sql = "INSERT INTO `t_user`(`username`,`password`,`email`) VALUES(?, ?, ?)";
        return update(sql, user.getUsername(), user.getPassword(), user.getEmail());
    }
}
After completing the above steps, we can test the UserDaoImpl class. IDEA can quickly create a test method class by pressing Ctrl+Shift+T!
public class UserDaoImplTest {

    @Test
    public void queryUserByUsername() {
        UserDao userDao = new UserDaoImpl();
        System.out.println(userDao.queryUserByUsername("admin"));
    }

    @Test
    public void queryUserByUsernameAndPassword() {
    }

    @Test
    public void saveUser() {
        UserDao userDao = new UserDaoImpl();
        int i = userDao.saveUser(new User(null, "testsave", "123456", "testsave@atayin.com"));
        System.out.println(i);
    }
}
4. Write Service layer
After completing the preparation of Dao persistence layer, you should enter the preparation of Service layer. According to the user registration and login interface of book city project, we can analyze that these two pages need to realize the following three businesses:
- User registration (registUser)
- User login (loginUser)
- User name authentication (existUsername)
Write UserService interface:
public interface UserService {
    /**
     * Registered user
     * @param user
     */
    public void registUser(User user);

    /**
     * log on user
     * @param user
     * @return If null is returned, the user name or password is wrong
     */
    public User loginUser(User user);

    /**
     * Determine whether the user name is available
     * @param username
     * @return
     */
    public boolean existUsername(String username);
}
Write UserServiceImpl implementation class:
public class UserServiceImpl implements UserService {
    UserDao userDao = new UserDaoImpl();
    @Override
    public void registUser(User user) {
        userDao.saveUser(user);
    }

    @Override
    public User loginUser(User user) {
        return userDao.queryUserByUsernameAndPassword(user.getUsername(), user.getPassword());
    }

    @Override
    public boolean existUsername(String username) {
        if (userDao.queryUserByUsername(username) == null) {
            return false;
        }
        return true;
    }
}
5. Write web layer
User registration
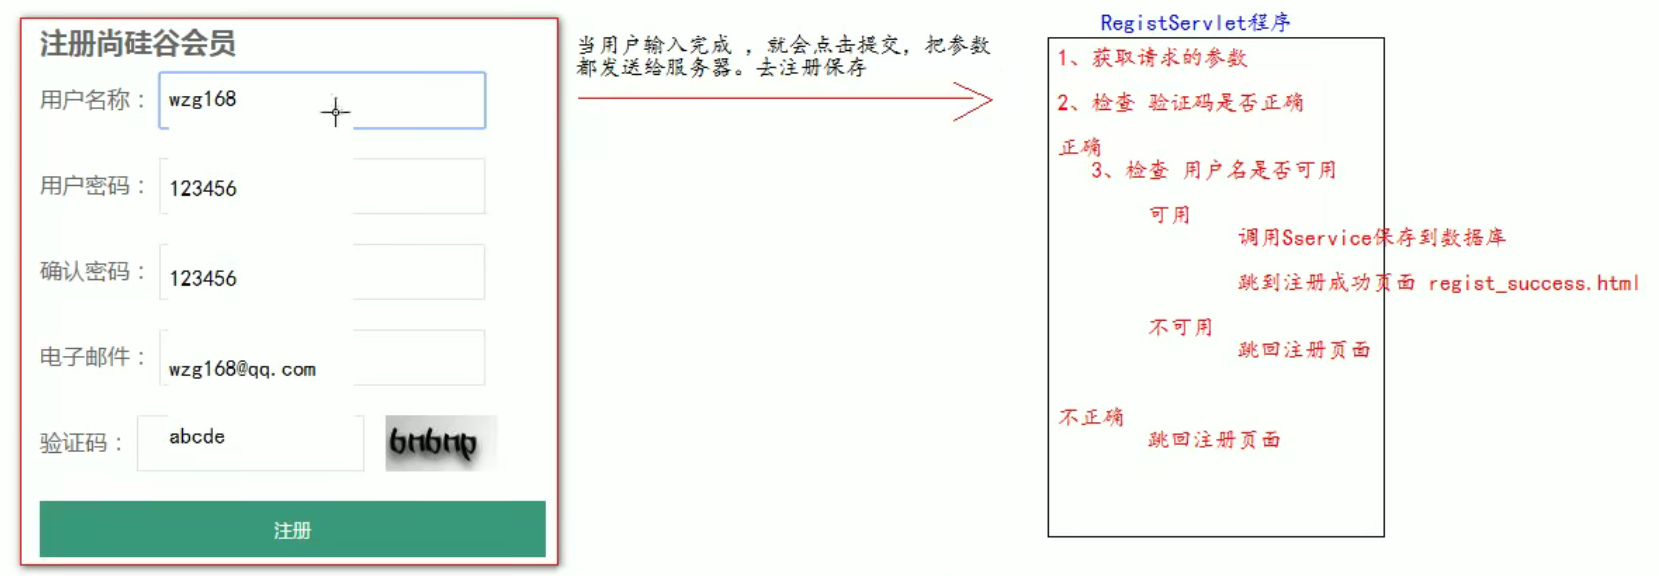
The above is the process of user registration. We need to follow the above process and use servlet to realize the function of user registration!
Of course, before using servlet s, you need to import the required jar packages:
<!-- https://mvnrepository.com/artifact/javax.servlet/javax.servlet-api -->
<dependency>
  <groupId>javax.servlet</groupId>
  <artifactId>javax.servlet-api</artifactId>
  <version>4.0.1</version>
  <scope>provided</scope>
</dependency>
Modify register and register_ Successes interface:
Write a base tag to always fix the result of relative path jump:
<base href="http://localhost:8080/ruibook/">
When the base tag is written, it will affect the page. All relative paths in the page need to be modified. We can view the affected tag in the browser console and modify it!
Note: the path when starting the tomcat server should be consistent with the path set by the base tag!
Modify the submission address and method of the form:
<form action="regist" method="post">
It should be noted that the path filled in the action attribute is on the web The path registered in XML!
Write the RegistServlet class under the web package:
After creating the RegistServlet, you need to XML to register:
<servlet>
  <servlet-name>RegistServlet</servlet-name>
  <servlet-class>com.atayin.web.RegistServlet</servlet-class>
</servlet>
<servlet-mapping>
  <servlet-name>RegistServlet</servlet-name>
  <url-pattern>/regist</url-pattern>
</servlet-mapping>
After the form is submitted, it will enter the / register path and start to execute the methods in the RegistServlet class:
public class RegistServlet extends HttpServlet {
    UserService userService = new UserServiceImpl();
    @Override
    protected void doGet(HttpServletRequest req, HttpServletResponse resp) throws ServletException, IOException {
        // 1. Get the requested parameters
        String username = req.getParameter("username");
        String password = req.getParameter("password");
        String email = req.getParameter("email");
        String code = req.getParameter("code");
        // 2. Check whether the verification code is correct. Since the server is not used to generate the verification code, the verification code is written to death
        if ("abcde".equalsIgnoreCase(code)) {
            // The verification code is correct
            // 3. Check whether the user name is available
            if (userService.existUsername(username)) {
                // Not available
                System.out.println("User name already exists!");
                req.getRequestDispatcher("/pages/user/regist.html").forward(req, resp);
            } else {
                // available
                System.out.println("User registered!");
                userService.registUser(new User(null, username, password, email));
                req.getRequestDispatcher("/pages/user/regist_success.html").forward(req, resp);
            }

        } else {
            // Verification code error, jump to the registration interface
            System.out.println("Verification code error!");
            req.getRequestDispatcher("/pages/user/regist.html").forward(req, resp);
        }
    }

    @Override
    protected void doPost(HttpServletRequest req, HttpServletResponse resp) throws ServletException, IOException {
        doGet(req, resp);
    }
}
In the above code example, it should be noted that the web layer cannot directly call the Dao layer, so you need to instantiate UserService at the beginning!
- Through req The getparameter() method obtains the parameters submitted by the form doGet() / doPost()
- Through req The getrequestdispatcher () method forwards the request and jumps to the page
User login
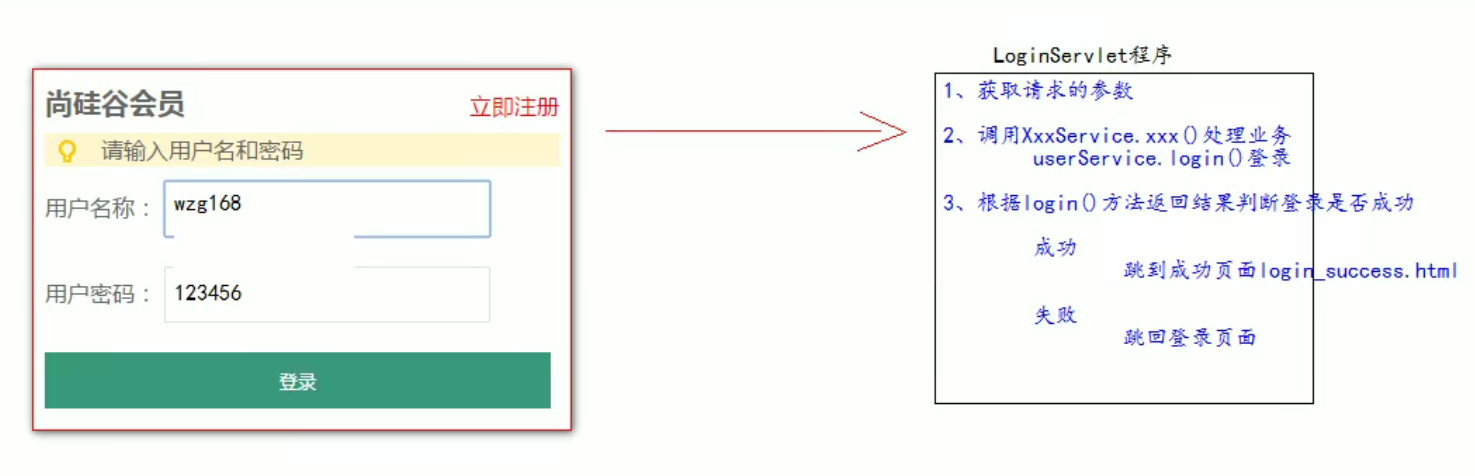
The above is the process of user login!
Registration path:
<servlet>
    <servlet-name>LoginServlet</servlet-name>
    <servlet-class>com.atayin.web.LoginServlet</servlet-class>
</servlet>
<servlet-mapping>
    <servlet-name>LoginServlet</servlet-name>
    <url-pattern>/login</url-pattern>
</servlet-mapping>
Write the LoginServlet class under the web package:
public class LoginServlet extends HttpServlet {
    UserService userService = new UserServiceImpl();
    @Override
    protected void doGet(HttpServletRequest req, HttpServletResponse resp) throws ServletException, IOException {
        String username = req.getParameter("username");
        String password = req.getParameter("password");
        User loginUser = userService.loginUser(new User(null, username, password, null));
        if (loginUser == null) {
            System.out.println("Wrong user name or password");
            req.getRequestDispatcher("/pages/user/login.html").forward(req, resp);
        } else {
            req.getRequestDispatcher("/pages/user/login_success.html").forward(req, resp);
        }

    }

    @Override
    protected void doPost(HttpServletRequest req, HttpServletResponse resp) throws ServletException, IOException {
        doGet(req, resp);
    }
}
Page jsp dynamic
Modify jsp page:
1. Add the page instruction on the top line of the html page.
2. Modify the file suffix to: jsp
3. In IDEA, click the modified JSP file and use the shortcut key: Ctrl+Shift+R to search and replace html is jsp
Dynamically modify the ip address in the base tag:
<%
String basePath = request.getScheme()
+ "://"
+ request.getServerName()
+ ":"
+ request.getServerPort()
+ request.getContextPath()
+ "/";
%>
<%=basePath%>
<!--write base Label, always fix the result of relative path jump-->
<base href="<%=basePath%>">
<link type="text/css" rel="stylesheet" href="static/css/style.css" >
<script type="text/javascript" src="static/script/jquery-1.7.2.js"></script>
The repeated code fields in many jsp pages are extracted and encapsulated in a jsp file. The above code example is the repeated content in each page. jsp pages that need the repeated code field can be called directly with static inclusion!
The following is a duplicate of other page Codes:
Footer of each page:
<div id="bottom">
<span>
Shang Silicon Valley Bookstore.Copyright ©2015
</span>
</div>
Menu after successful login:
<div>
<span>welcome<span class="um_span">President Han</span>Visit Shang Silicon Valley Bookstore</span>
<a href="../order/order.jsp">My order</a>
<a href="../../index.jsp">cancellation</a>
<a href="../../index.jsp">return</a>
</div>
Menu of manager module:
<div>
    <a href="book_manager.jsp">Library management</a>
    <a href="order_manager.jsp">Order management</a>
    <a href="../../index.jsp">Return to the mall</a>
</div>
Login, registration error prompt and form echo
When a user logs in or registers, the following errors may occur:
- When logging in, the user name or password is entered incorrectly
- Duplicate user name when registering
- Verification code error during registration
When the user performs business operations, the above errors occur. The page needs to prompt the errors and display them on the page! At the same time, the information entered by the user in the page should not be cleared, but remain in the page, so the form needs to perform echo operation.
In the Servlet program dealing with login service, through req The setAttribute () method stores user information and error reporting information in the request field, and uses static inclusion calls in the page:
public class LoginServlet extends HttpServlet {
    UserService userService = new UserServiceImpl();
    @Override
    protected void doGet(HttpServletRequest req, HttpServletResponse resp) throws ServletException, IOException {
        String username = req.getParameter("username");
        String password = req.getParameter("password");
        User loginUser = userService.loginUser(new User(null, username, password, null));
        if (loginUser == null) {
            // Save the error information and the echoed form item information into the Request field
            req.setAttribute("msg","User or password error!");
            req.setAttribute("username", username);

            req.getRequestDispatcher("/pages/user/login.jsp").forward(req, resp);
        } else {
            req.getRequestDispatcher("/pages/user/login_success.jsp").forward(req, resp);
        }

    }
}
jsp contains the data stored in the request field using static calls:
<div class="msg_cont">
   <b></b>
   <span class="errorMsg">
      <%=request.getAttribute("meg") == null ? "" : request.getAttribute("msg")%>
   </span>
</div>
Similarly, the user name can be echoed in a similar way:
<label>User name:</label>
<input class="itxt" type="text" placeholder="enter one user name"
      autocomplete="off" tabindex="1" name="username"
      value="<%=request.getAttribute("username") == null ? "" : request.getAttribute("username")%>" />
The same applies to the Servlet program that handles the registration business and the corresponding jsp page:
public class RegistServlet extends HttpServlet {
    UserService userService = new UserServiceImpl();
    @Override
    protected void doGet(HttpServletRequest req, HttpServletResponse resp) throws ServletException, IOException {
        // 1. Get the requested parameters
        String username = req.getParameter("username");
        String password = req.getParameter("password");
        String email = req.getParameter("email");
        String code = req.getParameter("code");
        // 2. Check whether the verification code is correct. Since the verification code is not generated by the server, the verification code is written to death
        if ("abcde".equalsIgnoreCase(code)) {
            // The verification code is correct
            // 3. Check whether the user name is available
            if (userService.existUsername(username)) {
                // Not available
                System.out.println("User name already exists!");
                // Save the echo information to the Request field
                req.setAttribute("msg", "User name already exists!!");
                req.setAttribute("password", password);
                req.setAttribute("username", username);
                req.setAttribute("email", email);
                req.getRequestDispatcher("/pages/user/regist.jsp").forward(req, resp);
            } else {
                // available
                System.out.println("User name is available!");

                userService.registUser(new User(null, username, password, email));
                req.getRequestDispatcher("/pages/user/regist_success.jsp").forward(req, resp);
            }

        } else {
            // Verification code error, jump to the registration interface
            System.out.println("Verification code error!");
            // Save the echo information to the Request field
            req.setAttribute("msg", "Verification code error!!");
            req.setAttribute("username", username);
            req.setAttribute("password", password);
            req.setAttribute("email", email);
            req.getRequestDispatcher("/pages/user/regist.jsp").forward(req, resp);
        }
    }
}
Page echo mailbox:
<input class="itxt" type="text" placeholder="Please enter email address"
      value="<%=request.getAttribute("email") == null ? "" : request.getAttribute("email")%>"
      autocomplete="off" tabindex="1" name="email" id="email" />
Page echo user and password:
<label>User name:</label>
<input class="itxt" type="text" placeholder="enter one user name"
      value="<%=request.getAttribute("username") == null ? "" : request.getAttribute("username")%>"
      autocomplete="off" tabindex="1" name="username" id="username" />
<br />
<br />
<label>User password:</label>
<input class="itxt" type="password" placeholder="Please input a password"
      value="<%=request.getAttribute("password") == null ? "" : request.getAttribute("password")%>"
      autocomplete="off" tabindex="1" name="password" id="password" />
<br />
The page displays an error message:
<div class="tit">
   <h1>Registered member</h1>
   <span class="errorMsg">
      <%=request.getAttribute("msg") == null ? "" : request.getAttribute("msg")%>
   </span>
</div>
Code optimization
Merge login Servlet classes and register Servlet classes
In the actual project development, a module generally uses only one Servlet program.
For example, user registration (RegistServlet) and user login (LoginServlet) are user class businesses, so they need to be merged. How to merge them, you need to use the hidden domain in the page!
<input type="hidden" name="action" value="regist">
<input type="hidden" name="action" value="login" />
The above codes appear on the user registration page and user login page respectively. Generally speaking, this hidden field is invisible in the page and hidden in the next line after the form label.
Write UserServlet class:
@Override
protected void doGet(HttpServletRequest req, HttpServletResponse resp) throws ServletException, IOException {
    String action = req.getParameter("action");
    // Processing registration requirements
    if ("regist".equals(action)) {
        regist(req, resp);
        // Handle login requirements
    } else if ("login".equals(action)) {
        login(req, resp);
    }
}
web. Register UserServlet class in XML:
<servlet>
  <servlet-name>UserServlet</servlet-name>
  <servlet-class>com.atayin.web.UserServlet</servlet-class>
</servlet>
<servlet-mapping>
  <servlet-name>UserServlet</servlet-name>
  <url-pattern>/userServlet</url-pattern>
</servlet-mapping>
Assuming that the previous RegistServlet class and LoginServelet class are directly copied and pasted into the doGet method at this time, the code will appear very bloated, so you can create the register method and login method and write them in the UserServlet class!
Optimize a large amount of else if code through reflection
However, assuming that the business will gradually increase in the future, for example, the user business needs to carry out a series of complex operations such as user name modification, user password modification and user logout, which means that the business needs to be processed. At the same time, the else if module needs to be added to the doGet method. Is there a method that does not need to be judged when processing the business, Automatically find the corresponding method to execute?
Of course the answer is yes!
Java can obtain the corresponding method object and execute it through the reflection mechanism!
Create a test class to get the method object with the same name as the string through reflection:
public class UserServletTest {
    public static void main(String[] args) {
        String action = "login";
        try {
            Method method = UserServletTest.class.getDeclaredMethod(action);
//            System.out.println(method);
            method.invoke(new UserServletTest());
        } catch (Exception e) {
            e.printStackTrace();
        }
    }
    @Test
    public void login() {
        System.out.println("login Method called!");
    }
    @Test
    public void regist() {
        System.out.println("regist Method called!");
    }
}
After running the above test classes, you can find that the login method is called, so the scheme of obtaining method objects through reflection is feasible. Apply the same logic to the doGet/dePost method in the UserServlet class:
@Override
protected void doGet(HttpServletRequest req, HttpServletResponse resp) throws ServletException, IOException {
    String action = req.getParameter("action");
    // Processing registration requirements
    try {
        Method method = this.getClass().getDeclaredMethod(action, HttpServletRequest.class, HttpServletRequest.class);
        method.invoke(this, req, resp);
    } catch (Exception e) {
        e.printStackTrace();
    }
}
Extract BaseServlet program
Suppose there are many Servlet programs to deal with business at this time, such as UserServlet program to deal with user business and BookServlet program to deal with book business. Both of them need to obtain the action parameter value, obtain the business method corresponding to the action parameter value through reflection, and finally call the business method through reflection.
These operations have certain repeatability. You can extract them and put them in the BaseServlet program for unified processing. UserServlet program and BookServlet program only need to inherit the BaseServlet program!
[the external chain image transfer fails, and the source station may have an anti-theft chain mechanism. It is recommended to save the image and upload it directly (img-z2qy1vex-1644134704853) (C: / users / 12709 / appdata / roaming / typora user images / image-20211118160041964. PNG)]
public abstract class BaseServlet extends HttpServlet {
    @Override
    protected void doPost(HttpServletRequest req, HttpServletResponse resp) throws ServletException, IOException {
        String action = req.getParameter("action");
        // Processing registration requirements
        try {
            Method method = this.getClass().getDeclaredMethod(action, HttpServletRequest.class, HttpServletResponse.class);
            method.invoke(this, req, resp);
        } catch (Exception e) {
            e.printStackTrace();
        }
    }
}
Tips: abstract classes are implemented through the abstract keyword. When the abstract keyword is used to modify a method, the method is an abstract method, which means a constraint. This method only has a method name, and no code can be written inside. The methods of abstract classes will be implemented by subclasses that inherit the class, unless the subclass is also an abstract class, Then the implementation of this method will be lost to the subclass of the subclass.
Note: UserServlet needs to inherit BaseServlet class instead of the original HttpServlet class!
Encapsulation and extraction of data use of BeanUtils
In this case, the number of parameters that can be obtained through the client req class is relatively small, so the number of parameters that can be obtained through the client req class is relatively small. In this case, the number of parameters that can be obtained through the client req class is relatively small, so it will be found that the number of parameters that can be obtained through the client req class is relatively large!
BeanUtils tool class, which can inject all requested parameters into JavaBeans at one time. It is often used to inject the values in the Map into JavaBeans, or copy the object attribute values.
BeanUtils is not a Jdk class, but a third-party tool class, so you need to import the corresponding jar package: commons-beanautils-1.8.0 jar,commons-logging-1.1.1.jar!
<!-- https://mvnrepository.com/artifact/commons-logging/commons-logging -->
<dependency>
  <groupId>commons-logging</groupId>
  <artifactId>commons-logging</artifactId>
  <version>1.2</version>
</dependency>
<!-- https://mvnrepository.com/artifact/commons-beanutils/commons-beanutils -->
<dependency>
  <groupId>commons-beanutils</groupId>
  <artifactId>commons-beanutils</artifactId>
  <version>1.9.4</version>
</dependency>
Encapsulate with BeanUtils tool class:
User user = new User();
try {
    System.out.println("Before injection" + user);
    // Inject the requested parameters into user
    BeanUtils.populate(user, req.getParameterMap());
    System.out.println("After injection" + user);
} catch (Exception e) {
    e.printStackTrace();
}
When you put this code in the Servlet program, you can find that when the program executes the business method, req The getparametermap () method will store the obtained parameters in the map set in the form of key value pairs, and the BeanUtils tool class can inject the key value pair parameters in the map set into the User!
However, almost every Servlet program needs to request parameters, so it is very cumbersome to write such a piece of code in each program. In order to make the code more concise, you can encapsulate the above code into a tool class and call it directly in the Servlet program!
public class WebUtils {
    public static void copyParamToBean(HttpServletRequest req, Object bean) {
        try {
            System.out.println("Before injection" + bean);
            // Inject the requested parameters into user
            BeanUtils.populate(bean, req.getParameterMap());
            System.out.println("After injection" + bean);
        } catch (Exception e) {
            e.printStackTrace();
        }
    }
}
// UserServlet
User user = new User();
WebUtils.copyParamToBean(req, user);
By calling the WebUtils tool class, you can also achieve the effect of injecting parameters into the User.
Further analysis of the working principle of the BeanUtils class is to analyze the key values in the map set and call the corresponding set method. For example, if there is such a key value pair (username, "ayin") in the map set, BeanUtils will call the setUsername method corresponding to username and set username to "ayin"!
At this stage, the code seems to be very perfect, but there are still many details that can be further optimized!
In the WebUtils tool class, the parameter of the business method request is HttpServletRequest. If it is changed to Map, the req. method is invoked when calling the business method in UserServlet. Getparametermap(), the business can still be executed!
What's the difference between the two?
In simple terms, in the tool class, the parameters called are called HttpServletRequest in the web layer of the JavaEE three tier architecture, but this means that the Dao layer and the Service layer can not be invoked, but if the parameters are set to Map, they can be used in the three tier architecture. Moreover, using HttpServletRequest as a parameter will also make the coupling degree of the web layer high!
Even at this stage, the code can still continue to be optimized, such as merging two lines of code of UserServlet into one line!
// UserServlet
User user = (User)WebUtils.copyParamToBean(req, new User());
However, this also means that the WebUtils tool class needs the return value of an Object, and the transformation will have certain risks in some cases, so the tool class can use generics to save the transformation!
public class WebUtils {
    public static <T> T copyParamToBean(Map value, T bean) {
        try {
            System.out.println("Before injection" + bean);
            // Inject the requested parameters into user
            BeanUtils.populate(bean, value);

            System.out.println("After injection" + bean);
        } catch (Exception e) {
            e.printStackTrace();
        }
        return bean;
    }
}
Using EL expression to realize form echo
In the implementation of form echo function, it is feasible to use jsp tag, but there is also a more convenient and simpler method, namely EL expression:
${requestScope.msg}
The above expression can obtain the data stored in the request field. If it does not exist, an empty string will be returned by default!
${empty requestScope.msg ? "Please enter your user name and password" : requestScope.msg}
You can also use the empty keyword to define the content returned if the data does not exist!