pinia introduction and setup syntax
1. Basic characteristics of Pinia
pinia is also a Vue state management tool, which has many similarities with vuex. In essence, he was developed by the core members of vuex team, and put forward some improvements on vuex. Compared with vuex, pinia removes the distinction between synchronous function Mutations and asynchronous function Actions in vuex. Synchronous and asynchronous methods can be used directly in Actions (the distinction between synchronous and asynchronous methods will also be removed in vuex's development plan). Secondly, compared with vuex, pinia has better support for typescript. With friendly devTools support, pinia has only 1kb, which simplifies the writing of many methods. Because vuex is relatively perfect, pinia is more suitable for small projects and vuex is more suitable for large projects.
2. Basic configuration and use
//Create a pinia project with Vue cli (choose to create vue3 project here)
vue create pinia
//Install pinia in the project
npm install pinia@next
Import pinia into the project
import { createApp } from 'vue'
import App from './App.vue'
import { createPinia } from 'pinia'
//It should be noted that createPinia from pinia structure is a function, which needs to be called and executed before mounting
createApp(App).use(createPinia()).mount('#app')
Configure the special file for status management, create a store file in the root directory, and create a new index JS file
import {defineStore} from 'pinia';
export  const userTestStore = defineStore({//Note that defineStore returns a callback method
    id:'test',//test is the only flag for this state management. You can also use defineStore(id, {}); Form of
    state(){
     return {
         name:'hello pinia',
         age:20
     }
    },
    getters:{
        testGetters(){
            return this.name+'...';//You can directly use this to get the contents without using the state intermediate object
        }
    },
    actions:()=>{
        addAge:function(){
                setInterval(()=>{
                this.age++;
            },1000)
        }
    }
})
Reference state management variables in components
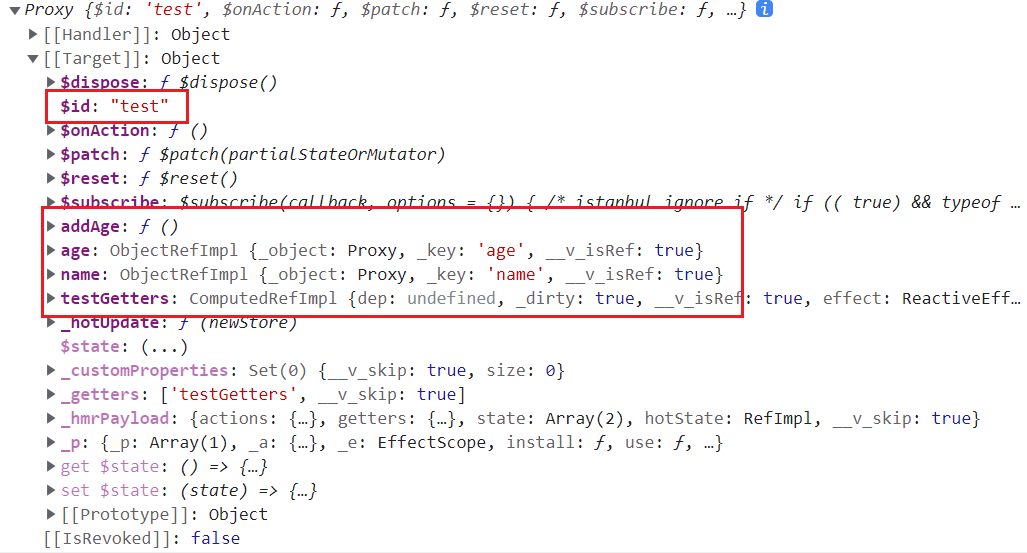
As can be seen from the above figure, the method of obtaining parameters is simplified.
3.pinia pass in call
The following is an example of calling the method with parameters in the store:
//Define the addAge function in the state management tool
actions:{
      addAge(gap){
           this.age+=gap;
      }
 }


//Import the corresponding status management tool into the component
import { userTestStore } from "./store";
const store = userTestStore();
const { addAge } = store;//Deconstruct the addAge method in the store instance
The methods used in components are as follows:
<div>output age:{{ store.age }}</div>
<button @click="addAge(10)">click for add age</button>
It should be noted that there is a sentence on the official website:
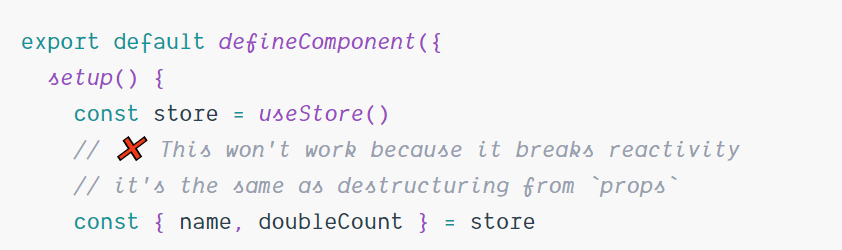
The age directly modified and deconstructed is not of ref type. The following error cases are given:
  <div>error:{{ age }}</div>
  <button @click="test">change error age</button>


let { age } = store;
function test() {
  console.log(" error add age");
  age++;
}
To solve the problem, use storeToRefs in pinia to perform strong rotation:
import { storeToRefs } from "pinia";
let { age } = storeToRefs(userTestStore());
function test() {
  age.value++;//Be careful to add here value is converted to ref type
}
//In this way, effective modification can be realized
4.setup syntax
Next, let's talk about the basic usage of setup syntax sugar in vue3. Syntax sugar is mainly to simplify the writing method of code. As long as you know how to use it, the compiler will automatically convert it into the writing method used by most basic developers for compilation. The following examples are given:
<template>
  <div>{{ name1 }}</div>
  <div @click="test">
    <div>nickname:{{ user.username }}</div>
    <div>age:{{ user.age }}</div>
    <div>{{ data }}</div>
  </div>
</template>


<script setup>
import { ref, reactive } from "vue";
const name1 = "hello world";
let data = ref("default"); //ref usage
const user = reactive({ //reactive usage
  username: "name",
  age: 18,
});
function test() {
  user.name += "...";
  data.value = "new data";//Be careful not to forget the characteristics of ref operation data
}
</script>
On the whole, there is no need to export through export. After setup is mounted, it will automatically export for you.
(2) For the import and export of components, you can directly use import to import the corresponding components. The following examples are given:
<!--components Create a new directory msg.vue assembly-->
<template>
  <div>
    {{ msg }}
  </div>
</template>
<script setup>
  let msg = "hello!"
</script>


<!--App.vue Used in components msg assembly-->
<template>
  <msg />
</template>
<script setup>
import msg from "@/components/msg.vue";
</script>
(3) Custom properties
import { defineProps} from "vue";
let props = defineProps({
  text: String
});
However, we found that the official did not provide the corresponding default value setting method. Through consulting, we found that the default value setting can be realized by using the macro command withDefaults, which is used as follows:
<script setup lang="ts">
//Defineprops and withdefaults are both macro commands and do not need to be imported manually
const props = withDefaults(
  defineProps<{
    text: string;
  }>(),
  {
    text: "default Data",
  }
);
</script>
It is important to note that Vue cli should not be used to create projects here. After repeatedly whipping the corpse, I found that the project created by vue create "project name" used in Vue cli does not support the declaration of lang=ts, and a series of errors such as two loader s not loaded will be reported. On the contrary, the project will not run. The solution is to install the project through vite scaffold:
//Install the initialized vue3 project
yarn create @vitejs/app my-vue-app --template vue
//Load dependency
yarn
The final effect is to use the default value and supplement some new uses of typescript:
const props = withDefaults(
  defineProps<{
    text?:string;//Indicates that text is an optional parameter. At this time, that is, the following default will become invalid
  }>(),
  {
    text: "default Data",
  }
);


//Using interfaces to declare types
interface testType {
  name: string;
  age: number;
}
const props = withDefaults(
  defineProps<{
    text: testType;
  }>(),
  {
    text: {
      name: "flying_dark_feather",
      age: 20,
    },
  }
);
//However, when in use, the actual data needs to be transmitted in the form of parameters, otherwise it will be recognized as a string and an error will be reported
(3) The setup child component triggers functions in the parent component
Write the corresponding function body of the sub component:
<template>
  <div @click="test">This is info assembly</div>
</template>


<script setup>
//The triggered component needs to be declared with defineEmits and return a function (event,...args). The first parameter of the function is the event name and the other parameters are
//Parameters passed to the first event function
const emits = defineEmits(["handleClick", "handleChange"]);
function test() {
  emits("handleClick", "Parameters from subcomponents");
}
</script>
The parent component accepts the corresponding function body:
<template>
  <info @handleClick="test" />
</template>


<script setup>
import info from "./components/info.vue";
function test(res) {
  console.log("Click event triggered,Parameters passed by subcomponents:", res);
}
</script>
<info @handleClick="test" />
```javascript
//There are two ways to obtain component information
//vue2
 mounted: function () {
    console.log("output data", this.$refs.testRef);
    //testRef is equivalent to a name, and each ref corresponds to an instantiated dom object
  },
//vue3 setup acquisition (this refers to acquisition rather than export)
<script setup>
import info from "./components/info.vue";
import { onMounted, ref } from "vue";
const testRef = ref(null);//This is mainly to prevent undefined error reporting
onMounted(() => {
    //Directly get the testRef attribute in the node, that is, the instance of the custom component
  console.log("Output data:", testRef.value);
});
console.log("testRef",testRef.value);//Real ref variable
</script>
Seeing the above two acquisition methods, I was really confused and finally found the answer:
If the ref attribute is added to a normal element, then this$ refs. Name points to the DOM element
If the ref attribute is added to the component, this$ refs. Name points to the component instance
By printing two testrefs, it is found that the two representations are not actually the same thing
Give an explanation: the reason why testRef is added is mainly due to the detection before operation. I feel that this explanation is not very professional
By using setup to define components, the variables and functions defined in them cannot be obtained in the parent component. Solution: use defineEmit to define the export:
defineExpose({//defineExpose is also a macro definition and does not need to be imported
  count,
  handle,
});
Supplementary note: it is not recommended to directly use ref to modify data, which is not very friendly in performance.
(5) useSlots tracks the slot contents defined in the parent component (import required)
<!--Parent component-->
<template>
  <info>
    <template #Header > < div > this is the header data < / div > < / template >
    <!--perhaps v-slot:header-->
    <template #Footer > < div > this is the footer data < / div > < / template >
  </info>
</template>


<!--Subcomponents-->
<template>
  <div>This is info assembly</div>
  <slot name="header" />
  <slot name="footer" />
</template>
<script setup lang="ts">
import { onMounted, useSlots } from "@vue/runtime-core";
const slots = useSlots();//Call the useSlots function to get the slots filled in the parent component
onMounted(() => {
  console.log("Output slot contents:", slots);
});
</script>
(6) useAttrs gets the properties defined in the parent component
<!--Parent component-->
<info attr="test"></info>
<!--Subcomponents-->
<script setup lang="ts">
import { onMounted, useAttrs, useSlots } from "@vue/runtime-core";
const getAttr = useAttrs();
onMounted(() => {
  console.log("output attr:", getAttr);//Gets the properties of the parent component
});
</script>
Of course, it is not very useful to obtain the properties of the parent component, because a component generally knows the contents of the parent component and the child components.
<template>
  <div class="test-div" @click="clickFun">This is info assembly</div>
</template>
<script setup lang="ts">
import { ref } from "vue";
let setColor = ref("pink");
function clickFun() {
  setColor.value = "red";
}
</script>
<style>
.test-div {
  color: v-bind(setColor);
}
</style>
reference
(1)Vue3.2. Detailed explanation of new features
(2)Vue3.2 detailed explanation of new features and its video tutorial
Color.value = "red";
}
### reference

[(1)Vue3.2 Detailed explanation of new features](https://blog.csdn.net/qq_41800366/article/details/120091329?utm_source=app&app_version=4.17.2&code=app_1562916241&uLinkId=usr1mkqgl919blen)

[(2)Vue3.2 Detailed explanation of new features and its video tutorial](https://blog.csdn.net/qq_41800366/article/details/120091329?utm_source=app&app_version=4.17.2&code=app_1562916241&uLinkId=usr1mkqgl919blen)