Oar regular season: remote sensing image land segmentation - 8th place scheme in November
1. Introduction to the competition
1.1 game page portal: Regular season: remote sensing image block segmentation
1.2 introduction to competition questions
This competition is adapted from the preliminary competition of 2020 CCF BDCI remote sensing image block segmentation. Remote sensing image parcel segmentation aims to analyze the pixel level content of remote sensing image and extract and classify the categories of interest in remote sensing image. It has high practical value in urban and rural planning, flood control and disaster relief and other fields, and has also attracted extensive attention in industry. The existing data processing methods of remote sensing image block segmentation are limited to specific scenes and specific data sources, and the accuracy can not meet the requirements. Therefore, in practical application, it still relies heavily on manual processing, which needs to consume a lot of human, material and financial resources. The purpose of this competition is to measure the effect of remote sensing image block segmentation model on multiple categories (such as buildings, roads, woodlands, etc.), fully mine heterogeneous remote sensing image data from multiple sources and scenes by using artificial intelligence technology, create efficient and practical algorithms, and improve the analysis and extraction ability of remote sensing images. The purpose of this competition is to analyze the pixel level content of remote sensing images, extract and classify the categories of interest in remote sensing images, so as to measure the effect of remote sensing image parcel segmentation model on multiple categories (such as buildings, roads, woodlands, etc.).
1.3 data description
This competition provides desensitized remote sensing image data of multiple regions, and each contestant can build their own plot segmentation model based on these data.
Training data set
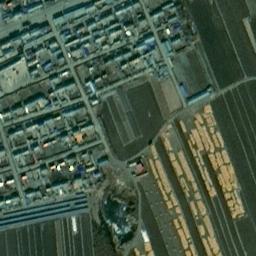
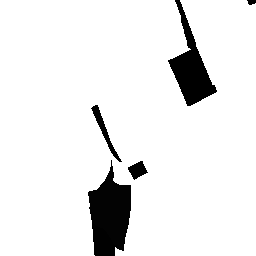
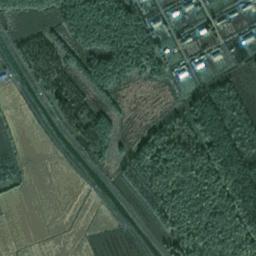
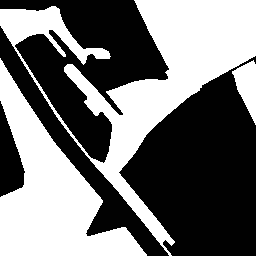
The sample picture and its annotation are shown in the following figure:
Training dataset file name: train_and_label.zip
It contains two sub files: training data set (original picture) file and training data set (labeled picture) file. The details are as follows:
Training dataset (original picture) file name: img_train
It contains 66653 JPG pictures with a resolution of 2m/pixel and a size of 256 * 256. The name of each picture is like t000123 jpg.
Training data set (labeled picture) file name: lab_train
It contains 66653 PNG pictures with a resolution of 2m/pixel and a size of 256 * 256. The name of each picture is like t000123 png.
Note: all PNG images include 4 categories, with pixel values of 0, 1, 2 and 3 respectively. In addition, the pixel value 255 is an unmarked area, indicating that the category of the corresponding area is uncertain, and this part of the area will not be considered in the evaluation.
Test data set
Test dataset file name: img_test.zip, as follows:
It contains 4609 JPG pictures with a resolution of 2m/pixel and a size of 256 * 256. The file name is 123 jpg.
2. Introduction of ideas
Note that this version is mainly to learn to use PaddleSeg and be familiar with AiStudio platform, so there is no special modification to the model or analysis according to the characteristics of the data set.
In order to get started quickly, I found the official information from the discussion area baseline based on PaddleSeg.
First, follow the tutorial to prepare the environment and data.
Environmental installation
!git clone https://gitee.com/paddlepaddle/PaddleSeg.git

# Install required dependencies
!pip install -r PaddleSeg/requirements.txt
Decompress data set
The data is stored in the data path. Every time you close the notebook, it will be deleted, so you need to decompress it again every time.
# Modify "data80164" according to your pathname
!unzip -q data/data80164/train_and_label.zip
!unzip -q data/data80164/img_test.zip
data processing
The training set data is divided into train and val, and the file name is written into txt. The subsequent data reading configuration is read from txt file. It can be written once and reused later, which is also convenient to compare and observe whether the model changes have been improved.
import os
import numpy as np

datas = []
image_base = 'img_train'   # Training set primitive path
annos_base = 'lab_train'   # Training set label path

# Read original drawing file name
ids_ = [v.split('.')[0] for v in os.listdir(image_base)]

# Write the image set and label path of the training set into the data
for id_ in ids_:
    img_pt0 = os.path.join(image_base, '{}.jpg'.format(id_))
    img_pt1 = os.path.join(annos_base, '{}.png'.format(id_))
    datas.append((img_pt0.replace('/home/aistudio', ''), img_pt1.replace('/home/aistudio', '')))
    if os.path.exists(img_pt0) and os.path.exists(img_pt1):
        pass
    else:
        raise "path invalid!"

# Print the length of data and specific storage examples
print('total:', len(datas))
print(datas[0][0])
print(datas[0][1])
print(datas[10][:])
import numpy as np

# Four types of labels are of little use here. The competition evaluation is based on 0, 1, 2 and 3 categories
labels = ['Architecture', 'Cultivated land', 'woodland',  'other']

# Write labels to label file
with open('labels.txt', 'w') as f:
    for v in labels:
        f.write(v+'\n')

# Randomly disrupt data
np.random.seed(5)
np.random.shuffle(datas)

# For the division of verification set and training set, 0.05 means that 5% is training set and 95% is training set
split_num = int(0.05*len(datas))

# Divide training set and verification set
train_data = datas[:-split_num]
valid_data = datas[-split_num:]

# Write training set list
with open('train_list.txt', 'w') as f:
    for img, lbl in train_data:
        f.write(img + ' ' + lbl + '\n')

# Write validation set list
with open('valid_list.txt', 'w') as f:
    for img, lbl in valid_data:
        f.write(img + ' ' + lbl + '\n')

# Print training set and test set size
print('train:', len(train_data))
print('valid:', len(valid_data))
model training
There are two configuration files that need to be modified by yourself.
For quick experiment, I replaced the backbone of deep labv3 + with mobilenetv2, and also used the pre training model. Considering that the image size used this time is 256 * 256 pixels, the hole convolution rate of ASPP is adjusted to reduce the hole rate from [12,24,36] to {1,3,6], and the new structure is named DSPP.
In order to make full use of GPU video memory and maximize the batch size, 240 is basically the limit, and the number of training iterations is increased.
deeplabv3p_mobilenetv2_g.yml
_base_: '../_base_/cityscapes.yml'

batch_size: 240
iters: 60000

model:
  type: DeepLabV3P_DSPP
  backbone:
    type: MobileNetV2
    channel_ratio: 1.0
    min_channel: 16
    pretrained: https://bj.bcebos.com/paddleseg/dygraph/mobilenetv2.tar.gz
    # output_stride: 16
    # multi_grid: [1, 1, 2]
  num_classes: 4
  backbone_indices: [0, 3]
  dspp_ratios: [1, 3, 6]
  # mid_channels: 256
  dspp_out_channels: 256
  align_corners: False
  pretrained: null

pred_dataset:
  num_classes: 4
  transforms:
    - type: Normalize
The second configuration file is the benchmark file, which mainly modifies the txt path and the number of figure categories.
Simply try the effects of different transforms, and the effect of removing color and contrast is better. At the same time, I found a point I didn't notice in November. The default value of random scaling and cutting is too large. The image itself is only 256256 and scaled to 1080512. No wonder the previous training is so slow. If the batchsize is a little larger, it will explode the display memory. After modifying to 256 * 256, the batch size is expanded ten times, and the effect is improved obviously.
batch_size: 2
iters: 80000

train_dataset:
  type: Dataset
  dataset_root: /home/aistudio
  train_path: /home/aistudio/train_list.txt
  num_classes: 4
  transforms:
    - type: ResizeStepScaling
      min_scale_factor: 0.5
      max_scale_factor: 2.0
      scale_step_size: 0.25
    - type: RandomPaddingCrop
      crop_size: [256, 256]
    - type: RandomHorizontalFlip
    # - type: RandomDistort
    #   brightness_range: 0.4
    #   contrast_range: 0.4
    #   saturation_range: 0.4
    - type: Normalize
  mode: train

val_dataset:
  type: Dataset
  dataset_root: /home/aistudio
  val_path: /home/aistudio/valid_list.txt
  num_classes: 4
  transforms:
    - type: Normalize
  mode: val


optimizer:
  type: sgd
  momentum: 0.9
  weight_decay: 4.0e-5

lr_scheduler:
  type: PolynomialDecay
  learning_rate: 0.01
  end_lr: 0
  power: 0.9

loss:
  types:
    - type: CrossEntropyLoss
  coef: [1]
Then you can start training.
!python PaddleSeg/train.py \
        --config PaddleSeg/configs/deeplabv3p/deeplabv3p_mobilenetv2.yml \
        --use_vdl \
        --do_eval \
        --save_interval 1000 \
        --save_dir output \
        --num_workers 4 \
        --learning_rate 0.1
Use the saved best after model training_ Model. In order to facilitate the submission of results, the prediction file is slightly modified and the output method meeting the submission requirements is added.
# Copyright (c) 2020 PaddlePaddle Authors. All Rights Reserved.
#
# Licensed under the Apache License, Version 2.0 (the "License");
# you may not use this file except in compliance with the License.
# You may obtain a copy of the License at
#
#    http://www.apache.org/licenses/LICENSE-2.0
#
# Unless required by applicable law or agreed to in writing, software
# distributed under the License is distributed on an "AS IS" BASIS,
# WITHOUT WARRANTIES OR CONDITIONS OF ANY KIND, either express or implied.
# See the License for the specific language governing permissions and
# limitations under the License.

import os
import math

import cv2
import numpy as np
import paddle
from paddle.fluid.layers.tensor import save

from paddleseg import utils
from paddleseg.core import infer
from paddleseg.utils import logger, progbar


def mkdir(path):
    sub_dir = os.path.dirname(path)
    if not os.path.exists(sub_dir):
        os.makedirs(sub_dir)


def partition_list(arr, m):
    """split the list 'arr' into m pieces"""
    n = int(math.ceil(len(arr) / float(m)))
    return [arr[i:i + n] for i in range(0, len(arr), n)]


def predict(model,
            model_path,
            transforms,
            image_list,
            image_dir=None,
            save_dir='output',
            aug_pred=False,
            scales=1.0,
            flip_horizontal=True,
            flip_vertical=False,
            is_slide=False,
            stride=None,
            crop_size=None):
    """
    predict and visualize the image_list.

    Args:
        model (nn.Layer): Used to predict for input image.
        model_path (str): The path of pretrained model.
        transforms (transform.Compose): Preprocess for input image.
        image_list (list): A list of image path to be predicted.
        image_dir (str, optional): The root directory of the images predicted. Default: None.
        save_dir (str, optional): The directory to save the visualized results. Default: 'output'.
        aug_pred (bool, optional): Whether to use mulit-scales and flip augment for predition. Default: False.
        scales (list|float, optional): Scales for augment. It is valid when `aug_pred` is True. Default: 1.0.
        flip_horizontal (bool, optional): Whether to use flip horizontally augment. It is valid when `aug_pred` is True. Default: True.
        flip_vertical (bool, optional): Whether to use flip vertically augment. It is valid when `aug_pred` is True. Default: False.
        is_slide (bool, optional): Whether to predict by sliding window. Default: False.
        stride (tuple|list, optional): The stride of sliding window, the first is width and the second is height.
            It should be provided when `is_slide` is True.
        crop_size (tuple|list, optional):  The crop size of sliding window, the first is width and the second is height.
            It should be provided when `is_slide` is True.

    """
    utils.utils.load_entire_model(model, model_path)
    model.eval()
    nranks = paddle.distributed.get_world_size()
    local_rank = paddle.distributed.get_rank()
    if nranks > 1:
        img_lists = partition_list(image_list, nranks)
    else:
        img_lists = [image_list]

    added_saved_dir = os.path.join(save_dir, 'added_prediction')
    pred_saved_dir = os.path.join(save_dir, 'pseudo_color_prediction')
    org_saved_dir = os.path.join(save_dir, 'result')

    logger.info("Start to predict...")
    progbar_pred = progbar.Progbar(target=len(img_lists[0]), verbose=1)
    with paddle.no_grad():
        for i, im_path in enumerate(img_lists[local_rank]):
            im = cv2.imread(im_path)
            ori_shape = im.shape[:2]
            im, _ = transforms(im)
            im = im[np.newaxis, ...]
            im = paddle.to_tensor(im)

            if aug_pred:
                pred = infer.aug_inference(
                    model,
                    im,
                    ori_shape=ori_shape,
                    transforms=transforms.transforms,
                    scales=scales,
                    flip_horizontal=flip_horizontal,
                    flip_vertical=flip_vertical,
                    is_slide=is_slide,
                    stride=stride,
                    crop_size=crop_size)
            else:
                pred = infer.inference(
                    model,
                    im,
                    ori_shape=ori_shape,
                    transforms=transforms.transforms,
                    is_slide=is_slide,
                    stride=stride,
                    crop_size=crop_size)
            pred = paddle.squeeze(pred)
            pred = pred.numpy().astype('uint8')

            # get the saved name
            if image_dir is not None:
                im_file = im_path.replace(image_dir, '')
            else:
                im_file = os.path.basename(im_path)
            if im_file[0] == '/' or im_file[0] == '\\':
                im_file = im_file[1:]

            # save added image
            added_image = utils.visualize.visualize(im_path, pred, weight=0.6)
            added_image_path = os.path.join(added_saved_dir, im_file)
            mkdir(added_image_path)
            cv2.imwrite(added_image_path, added_image)

            # save pseudo color prediction
            pred_mask = utils.visualize.get_pseudo_color_map(pred)
            pred_saved_path = os.path.join(
                pred_saved_dir,
                os.path.splitext(im_file)[0] + ".png")
            mkdir(pred_saved_path)
            pred_mask.save(pred_saved_path)

            # Output for submission is added here
            org_saved_path = os.path.join(
                org_saved_dir,
                os.path.splitext(im_file)[0] + ".png"
            )
            mkdir(org_saved_path)
            cv2.imwrite(org_saved_path, pred)

            # pred_im = utils.visualize(im_path, pred, weight=0.0)
            # pred_saved_path = os.path.join(pred_saved_dir, im_file)
            # mkdir(pred_saved_path)
            # cv2.imwrite(pred_saved_path, pred_im)

            progbar_pred.update(i + 1)
!python PaddleSeg/predict.py \
        --config PaddleSeg/configs/deeplabv3p/deeplabv3p_mobilenetv2.yml \
        --model_path output/best_model/model.pdparams \
        --image_path data/img_testA \
        --aug_pred
3. Experience sharing
In December, I continued to be familiar with the code, mainly looking at the image input preprocessing. The whole code runs down two points.
- Finding the appropriate combination of preprocessing can significantly improve the classification accuracy.
- Use large batch size as much as possible and make full use of video memory to improve efficiency and classification accuracy at the same time.
For those who first contact PaddleSeg, according to the official example, they can easily get through the process.
A simple summary of the process is:
-
download PaddleSeg
-
Configure the environment (this step seems to be skipped)
-
Decompress data and build train and val list txt file
-
Modify the number of corresponding paths and figure categories in the model configuration file
-
Training and forecasting
-
Submit results
The configuration of the model in PaddleSeg is the yml file used. People who haven't used it still need to take time to get familiar with it. The models are modular design. It is convenient to replace different modules through configuration files. You can also write new modules yourself. In general, it is easy to make simple changes. I tried to modify the multi-scale module ASPP, which can be easily embedded into the existing model.