Elasticsearch
Version: 7.16.2
Official website: https://www.elastic.co/cn/elasticsearch/
file: https://www.elastic.co/guide/index.html
1 Introduction
1.1 what is Elasticsearch
Elasticsearch is a distributed search and analysis engine located at the core of Elastic Stack. Logstash and Beats help you collect, aggregate, enrich, and store your data in elastic search. Kibana enables you to interactively explore, visualize, and share insight into data, and manage and monitor the stack. Elastic search is where magic occurs to index, search, and analyze.
Elasticsearch provides near real-time search and analysis for all types of data. Whether you have structured or unstructured text, numeric data, or geospatial data, elasticsearch can efficiently store and index it in a way that supports fast search. You can go beyond simple data retrieval and aggregating information to discover trends and patterns in data. As your data and queries grow, elasticsearch's distributed nature enables your deployment to grow seamlessly.
Although not all problems are search problems, Elasticsearch provides speed and flexibility to process data in various use cases:
- Add a search box to an application or web site
- Store and analyze logs, metrics, and security event data
- Use machine learning to automatically model the behavior of data in real time
- Automate business workflows using Elasticsearch as a storage engine
- Use Elasticsearch as a geographic information system (GIS) to manage, integrate and analyze spatial information
- Elasticsearch is used as a bioinformatics research tool to store and process genetic data
We are constantly surprised by the novel ways people use search. However, whether your use case is similar to one of them or you are using Elasticsearch to solve new problems, you process data, documents, and indexes the same way in Elasticsearch.
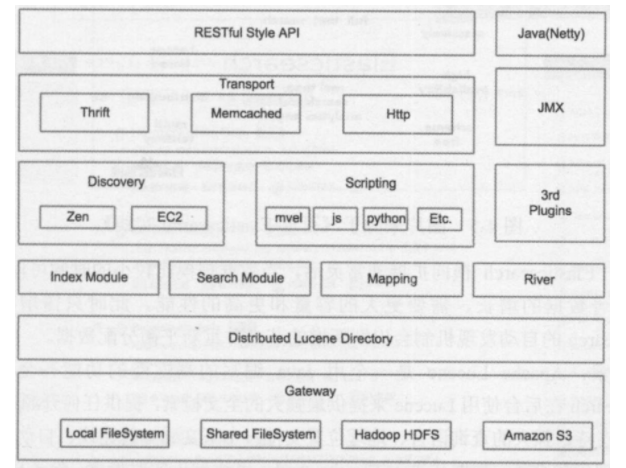
Basic architecture
1.2 several important concepts of elasticsearch
Elasticsearch has several core concepts. Understanding these concepts from the beginning will be of great help to the whole learning process.
1.2.1 near real time (NRT)
Elasticsearch is a near real-time search platform. This means that there is a slight delay (usually 1 second) from indexing a document until the document can be searched.
1.2.2 cluster
A cluster is organized by one or more nodes. They jointly hold your entire data and provide indexing and search functions together. A cluster is identified by a unique name, which is "elastic search" by default. This name is important because a node can only join a cluster by specifying the name of the cluster. It's a good habit to explicitly set this name in a production environment, but it's also good to use default values for test / development.
1.2.3 node
A node is a server in your cluster. As a part of the cluster, it stores your data and participates in the indexing and search functions of the cluster. Similar to the cluster, a node is also identified by a name. By default, this name is the name of a random Marvel comic character, which will be given to the node at startup. This name is very important for management, because in this management process, you will determine which servers in the network correspond to which nodes in the Elasticsearch cluster.
A node can join a specified cluster by configuring the cluster name. By default, each node is scheduled to join a cluster called "elastic search", which means that if you start several nodes in your network and assume that they can find each other, they will automatically form and join a cluster called "elastic search".
In a cluster, you can have as many nodes as you want. Moreover, if there is no elasticsearch node running in your network, start a node at this time, and a cluster called "elasticsearch" will be created and joined by default.
1.2.4 index
An index is a collection of documents with somewhat similar characteristics. For example, you can have an index of customer data, another index of product catalog, and an index of order data. An index is identified by a name (which must be all lowercase letters), and we should use this name when we want to index, search, update and delete the documents corresponding to the index. Index is similar to the concept of Database in relational Database. In a cluster, you can define as many indexes as you want.
1.2.5 type - removed after version 7.0
In an index, you can define one or more types. A type is a logical classification / partition of your index, and its semantics is entirely up to you. Typically, a type is defined for a document that has a common set of fields. For example, let's say you run a blog platform and store all your data in an index. In this index, you can define one type for user data, another type for blog data, and of course, another type for comment data. Type is similar to the concept of Table in relational database.
1.2.6 document
A document is a basic information unit that can be indexed. For example, you can have a document of a customer, a document of a product, and, of course, a document of an order. Documents are represented in JSON (Javascript Object Notation) format, which is a ubiquitous Internet data interaction format.
In an index/type, you can store as many documents as you want. Note that although a document physically exists in an index, the document must be indexed / given the type of an index. Document is similar to the concept of Record in relational database. In fact, in addition to user-defined data, a document also includes_ index,_ Type and_ id field.
1.2.7 mapping - removed after version 7.0
Mapping is a very important content in ES. It is similar to the schema of table in traditional relational data. It is used to define the structure of type data in an index. In ES, we can manually create type (equivalent to table) and mapping (related to schema), or use the default creation method. In the default configuration, ES can automatically create types and their mapping based on the inserted data. Mapping mainly includes field name, field data type and field index type.
1.2.8 shards & replicas
An index can store a large amount of data beyond the hardware limit of a single node. For example, an index with 1 billion documents occupies 1TB of disk space, but no node has such a large disk space; Or a single node handles the search request and the response is too slow.
To solve this problem, elastic search provides the ability to divide the index into multiple copies, which are called Shards. When you create an index, you can specify the number of slices you want. Each partition itself is also a fully functional and independent "index", which can be placed on any node in the cluster.
There are two main reasons why fragmentation is important:
- Allows you to split / expand your content horizontally
- Allows you to perform distributed, parallel operations over shards (potentially on multiple nodes), thereby improving performance / throughput
How a fragment is distributed and how its documents aggregate back to search requests are completely managed by Elasticsearch. These are transparent to you as a user.
In a network / cloud environment, failure can occur at any time. A partition / node is offline somehow or disappears for any reason. In this case, having a failover mechanism is very useful and highly recommended. For this purpose, elastic search allows you to create one or more copies of shards, which are called copy shards, or directly copy. Replication is important for two reasons:
- High availability is provided in case of fragmentation / node failure. For this reason, it is important to note that the replica shard is never placed on the same node as the original/primary shard.
- Expand your search volume / throughput because search can run in parallel on all replications
In short, each index can be divided into multiple slices. An index can also be copied 0 times (meaning no copy) or more. Once replicated, each index has a primary shard (the original shard as the replication source) and a replication shard (a copy of the primary shard). The number of shards and copies can be specified when the index is created. After the index is created, you can dynamically change the number of copies at any time, but you can't change the number of slices.
By default, each index in Elasticsearch is partitioned into 5 primary partitions and 1 replication, which means that if there are at least two nodes in your cluster, your index will have 5 primary partitions and another 5 replication partitions (1 full copy). In this way, each index will have a total of 10 partitions. Multiple slices of an index can be stored on one host or multiple hosts in the cluster, depending on the number of cluster machines. The specific location of master partition and replica partition is determined by the internal strategy of ES.
The above part is transferred from Elasticsearch basic tutorial , and supplemented it.
1.3 configuration file
Elasticsearch has three configuration files:
- elasticsearch.yml is used to configure Elasticsearch
- jvm.options is used to configure Elasticsearch JVM settings
- log4j2.properties is used to configure Elasticsearch logging
1.3.1 elasticsearch.yml profile
Document content:
# ======================== Elasticsearch Configuration =========================
#
# NOTE: Elasticsearch comes with reasonable defaults for most settings.
#       Before you set out to tweak and tune the configuration, make sure you
#       understand what are you trying to accomplish and the consequences.
#
# The primary way of configuring a node is via this file. This template lists
# the most important settings you may want to configure for a production cluster.
#
# Please consult the documentation for further information on configuration options:
# https://www.elastic.co/guide/en/elasticsearch/reference/index.html
#
# ---------------------------------- Cluster -----------------------------------
#
# Use a descriptive name for your cluster:
#
#cluster.name: my-application
#
# ------------------------------------ Node ------------------------------------
#
# Use a descriptive name for the node:
#
#node.name: node-1
#
# Add custom attributes to the node:
#
#node.attr.rack: r1
#
# ----------------------------------- Paths ------------------------------------
#
# Path to directory where to store the data (separate multiple locations by comma):
#
#path.data: /path/to/data
#
# Path to log files:
#
#path.logs: /path/to/logs
#
# ----------------------------------- Memory -----------------------------------
#
# Lock the memory on startup:
#
#bootstrap.memory_lock: true
#
# Make sure that the heap size is set to about half the memory available
# on the system and that the owner of the process is allowed to use this
# limit.
#
# Elasticsearch performs poorly when the system is swapping the memory.
#
# ---------------------------------- Network -----------------------------------
#
# By default Elasticsearch is only accessible on localhost. Set a different
# address here to expose this node on the network:
#
#network.host: 192.168.0.1
#
# By default Elasticsearch listens for HTTP traffic on the first free port it
# finds starting at 9200. Set a specific HTTP port here:
#
#http.port: 9200
#
# For more information, consult the network module documentation.
#
# --------------------------------- Discovery ----------------------------------
#
# Pass an initial list of hosts to perform discovery when this node is started:
# The default list of hosts is ["127.0.0.1", "[::1]"]
#
#discovery.seed_hosts: ["host1", "host2"]
#
# Bootstrap the cluster using an initial set of master-eligible nodes:
#
#cluster.initial_master_nodes: ["node-1", "node-2"]
#
# For more information, consult the discovery and cluster formation module documentation.
#
# ---------------------------------- Various -----------------------------------
#
# Require explicit names when deleting indices:
#
#action.destructive_requires_name: true
#
# ---------------------------------- Security ----------------------------------
#
#                                 *** WARNING ***
#
# Elasticsearch security features are not enabled by default.
# These features are free, but require configuration changes to enable them.
# This means that users don't have to provide credentials and can get full access
# to the cluster. Network connections are also not encrypted.
#
# To protect your data, we strongly encourage you to enable the Elasticsearch security features.
# Refer to the following documentation for instructions.
#
# https://www.elastic.co/guide/en/elasticsearch/reference/7.16/configuring-stack-security.html
(1)cluster.name: elasticsearch
Configure the cluster name of elasticsearch. The default is elasticsearch. Elasticsearch will automatically find clusters under the same network segment and hosts named elasticsearch. If there are multiple clusters under the same network segment, you can use this attribute to distinguish different clusters. Recommended changes when building the environment.
(2)node.name: "Franz Kafka"
Node name. By default, randomly specify a name in the name list, which is in the config folder of the jar package of elasticsearch Txt file, there are many interesting names added by the author, most of which are the character names in Marvel animation. In the generation environment, it is recommended to change to easily specify the machine corresponding to the node in the cluster
(3)node.master: true
Specify whether the node is eligible to be elected as a node. The default is true. elasticsearch defaults to the first started machine in the cluster as the master. If the machine hangs, the master will be re elected.
(4)node.data: true
Specifies whether the node stores index data. The default value is true. If the node is configured with node Master: false and node Data: false, the node will play the role of load balancing
(5)index.number_of_shards: 5
Set the default number of index slices, which is 5 by default. After my test, index fragmentation has a great impact on the query performance of ES. In the application environment, we should choose the appropriate fragment size.
(6)index.number_of_replicas:
Set the default number of index copies, which is 1 copy by default. One copy here refers to index number_ of_ A full copy of shards; The default is 5 slices and 1 copy; That is, the total number of segments is 10.
(7)path.conf: /path/to/conf
Set the storage path of the configuration file. The default is the config folder under the es root directory.
(8)path.data:/path/to/data1,/path/to/data2
Set the storage path of index data. The default is the data folder under the es root directory. You can set multiple storage paths separated by commas.
(9)path.work:/path/to/work
Set the storage path of temporary files. The default is the work folder under the es root directory.
(10)path.logs: /path/to/logs
Set the storage path of the log file. The default is the logs folder under the es root directory
(11)path.plugins: /path/to/plugins
Set the storage path of plug-ins. The default is the plugins folder under the es root directory
(12)bootstrap.mlockall: true
Set to true to lock the memory. Because the efficiency of es will be reduced when the jvm starts to swap, to ensure that it does not swap, ES can be_ MIN_ MEM and ES_MAX_MEM sets the two environment variables to the same value, and ensures that the machine has enough memory allocated to es. At the same time, the elasticsearch process should be allowed to lock the memory. Under linux, you can use the ulimit -l unlimited command.
(13)network.bind_host: 192.168.0.1
Set the bound ip address, which can be ipv4 or ipv6. The default is 0.0.0.0.
(14)network.publish_host: 192.168.0.1
Set the ip address of other nodes interacting with this node. If it is not set, it will be judged automatically. The value must be a real ip address.
(15)network.host: 192.168.0.1
This parameter is used to set bind at the same time_ Host and publish_host the above two parameters.
(16)transport.tcp.port: 9300
Set the tcp port for interaction between nodes. The default is 9300.
(17)transport.tcp.compress: true
Set whether to compress the data during tcp transmission. The default is false and not compressed.
(18)http.port: 9200
Set the http port of external service. The default value is 9200.
(19)http.max_content_length: 100mb
Set the maximum content capacity. The default is 100mb
(20)http.enabled: false
Whether to use http protocol to provide external services. The default value is true. On.
(21)gateway.type: local
The gateway type is local by default, that is, the local file system. It can be set to the local file system, distributed file system, HDFS of hadoop, s3 server of amazon and other file systems.
(22)gateway.recover_after_nodes: 1
Set data recovery when N nodes in the cluster are started. The default value is 1.
(23)gateway.recover_after_time: 5m
Set the timeout for initializing the data recovery process. The default is 5 minutes.
(24)gateway.expected_nodes: 2
Set the number of nodes in the cluster to 2 by default. Once the N nodes are started, data recovery will be carried out immediately.
(25)cluster.routing.allocation.node_initial_primaries_recoveries: 4
When initializing data recovery, the number of concurrent recovery threads is 4 by default.
(26)cluster.routing.allocation.node_concurrent_recoveries: 2
The number of concurrent recovery threads when adding or deleting nodes or load balancing. The default is 4.
(27)indices.recovery.max_size_per_sec: 0
Set the limited bandwidth for data recovery, such as 100mb. The default is 0, that is, unlimited.
(28)indices.recovery.concurrent_streams: 5
Set this parameter to limit the maximum number of concurrent streams opened simultaneously when recovering data from other partitions. The default is 5.
(29)discovery.zen.minimum_master_nodes: 1
Set this parameter to ensure that nodes in the cluster can know other N nodes with master qualification. The default value is 1. For large clusters, you can set a larger value (2-4)
(30)discovery.zen.ping.timeout: 3s
Set the timeout time of ping connection when automatically discovering other nodes in the cluster, which is 3 seconds by default. For poor network environment, you can use a high value to prevent errors during automatic discovery.
(31)discovery.zen.ping.multicast.enabled: false
Set whether to turn on the multicast discovery node. The default is true.
(32)discovery.zen.ping.unicast.hosts: ["host1", "host2:port", "host3 [portX-portY] "]
Set the initial list of master nodes in the cluster, which can be used to automatically discover new nodes joining the cluster.
1.3.2 jvm.options profile
1.3.3 log4j2.properties configuration file
2 installation and use
2.1 preparation before installation
Operating system requirements: https://www.elastic.co/cn/support/matrix
JVM requirements: https://www.elastic.co/cn/support/matrix#matrix_jvm
2.2 install version 7.16
Windows:
Download page https://www.elastic.co/cn/downloads/elasticsearch
MacOS:
curl -L -O https://artifacts.elastic.co/downloads/elasticsearch/elasticsearch-7.16.2-darwin-x86_64.tar.gz
tar -xzvf elasticsearch-7.16.2-darwin-x86_64.tar.gz
cd elasticsearch-7.16.2
./bin/elasticsearch
Linux:
curl -L -O https://artifacts.elastic.co/downloads/elasticsearch/elasticsearch-7.16.2-linux-x86_64.tar.gz
tar -xzvf elasticsearch-7.16.2-linux-x86_64.tar.gz
cd elasticsearch-7.16.2
./bin/elasticsearch
verification
root@asdas # curl http://127.0.0.1:9200
{
  "name" : "DESKTOP-QCCNVAA",
  "cluster_name" : "elasticsearch",
  "cluster_uuid" : "jvvb9b1DS2OoxGIjrgd8bw",
  "version" : {
    "number" : "7.16.3",
    "build_flavor" : "default",
    "build_type" : "zip",
    "build_hash" : "4e6e4eab2297e949ec994e688dad46290d018022",
    "build_date" : "2022-01-06T23:43:02.825887787Z",
    "build_snapshot" : false,
    "lucene_version" : "8.10.1",
    "minimum_wire_compatibility_version" : "6.8.0",
    "minimum_index_compatibility_version" : "6.0.0-beta1"
  },
  "tagline" : "You Know, for Search"
}
2.3 installation of kibana7 Version 16
mac:
curl -L -O https://artifacts.elastic.co/downloads/kibana/kibana-7.16.2-darwin-x86_64.tar.gz
tar xzvf kibana-7.16.2-darwin-x86_64.tar.gz
cd kibana-7.16.2-darwin-x86_64/
./bin/kibana
Windows:
https://www.elastic.co/cn/downloads/kibana
visit:
2.4 installing ElasticHD
https://github.com/qax-os/ElasticHD/releases
3 entry level use
3.1 simple addition, deletion, modification and query
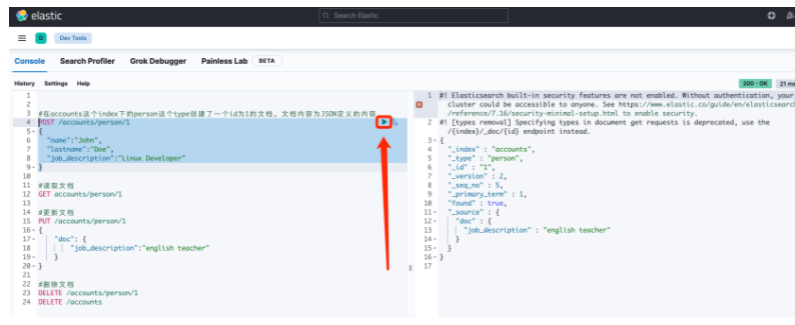
#The person type under the accounts index creates a document with id 1. The document content is the content defined by JSON.
POST /accounts/person/1
{
  "name":"John",
  "lastname":"Doe",
  "job_description":"Linux Developer"
}

#Read document
GET accounts/person/1

#Update document
PUT /accounts/person/1
{
    "doc": {
        "job_description":"english teacher"
    }
}

#remove document
DELETE /accounts/person/1
DELETE /accounts
3.2 advanced query
#Advanced actions for searching
#Add data
POST /people/student/3
{
  "no":3,
  "name":"Tom",
  "lastname":"Doe",
  "job_description":"Linux Developer"
}

#
#Advanced operations
#

#Query all
GET /people/student/_search
{
  "query": { "match_all": {} }
}

#Number of queries
GET /people/student/_search
{
 	"query": { "match_all": {} },
	"size": 1
}

#Result set sorting
GET /people/student/_search
{
      "query": {"match_all": {}},
      "sort": [
        {
          "no": {
            "order": "desc"
          }
        }
      ],
      "size": 2,
      "from": 1
}

#Field query
GET /people/student/_search
{
      "query": { "match_all": {} },
      "_source": ["name", "lastname"]
}

#Keyword needs to be added after querying version 7.0 keyword
GET /people/student/_search
{
  "query": {
    "term": {
      "name.keyword": {
        "value": "Tom"
      }
    }
  }
}

#Range query
GET /people/student/_search
{
  "query": {
    "range": {
      "no": {
        "gte": 2,
        "lte": 3
      }
    }
  }
}

#Prefix query prefix needs to be lowercase (case insensitive)
GET /people/student/_search
{
  "query": {
    "prefix": {
      "name": {
        "value": "t"
      }
    }
  }
}

#Wildcard queries are in lowercase (case insensitive)
GET /people/student/_search
{
  "query": {
    "wildcard": {
      "name": {
        "value": "*o*"
      }
    }
  }
}

#Multi ID query
GET  /people/student/_search
{
  "query": {
    "ids": {
      "values": ["1","3"]
    }
  }
}

#Fuzzy query
GET /people/student/_search
{
  "query": {
    "fuzzy": {
      "name":{
        "value": "aom"
      }
    }
  }
}

#Full text query
# Return all 5 pieces of data
GET /people/student/_search
{
  "query": {
    "match": {
      "name": "son"
    }
  }
}
reference resources: https://www.cnblogs.com/lonely-wolf/p/14975414.html