Preface
This article takes you to understand what JWT is, as well as the introduction of JWT definition and first pass concept, and gives you a simple Demo to learn how to integrate SpringBoot with SpringBoot 2.
Before introducing, here we will discuss how to learn a new technology, which I personally summarize as RSA.
- R: Read to read official documents.
- S:search, or first pass technical articles or github to search for the first pass information.
- A: ask can consult Tech Daniel or discuss with his colleagues and classmates.
RSA is just a personal learning point of view about code. It's just an immature suggestion for readers.
JWT introduction
The official website is introduced as follows:
What is JSON Web Token?
JSON Web Token (JWT) is an open standard (RFC 7519) that defines a compact and self-contained way for securely transmitting information between parties as a JSON object. This information can be verified and trusted because it is digitally signed. JWTs can be signed using a secret (with the HMAC algorithm) or a public/private key pair using RSA or ECDSA.
Although JWTs can be encrypted to also provide secrecy between parties, we will focus on signed tokens. Signed tokens can verify the integrity of the claims contained within it, while encrypted tokens hide those claims from other parties. When tokens are signed using public/private key pairs, the signature also certifies that only the party holding the private key is the one that signed it.
Chinese translation:
JSON Web Token (JWT) is an open standard (RFC 7519), which defines a compact, self-contained way to safely transfer information as JSON objects between parties. This information can be verified and trusted because it is a digital signature. JWTS can sign using secret (using HMAC algorithm) or public/private key pairs using RSA or ECDSA.
Although JWTS can be encrypted, it also provides security between parties. We will focus on signature tokens. Signed tokens verify the integrity of the declarations contained therein, while encrypted tokens hide these declarations in case of other parties. When a token is signed with a public/private key pair, the signature also proves that only the party holding the private key is the Party of the signature.
Introduction of JWT Prior Concepts
Before using JWT, you need to know three things:
- Head information
- Load information
- Signature information
Head information
Header information consists of two parts
- The type of token, JWT
- Signature algorithms used, such as HMACSHA256 or RSA.
The header information JSON code is as follows:
{
  "alg": "HS256",
  "typ": "JWT"
}
Then, the JSON is encoded as Base64Url, forming the first part of JWT.
Load information
It contains claims, declarations that can store entities (usually users) and other data, and declarations include three types
- Registered declaration
- Public statement
- Private statement
Registered declaration
These are a set of predefined declarations, not mandatory, but are recommended to provide a useful set of interoperable declarations. Some of them are: iss (issuer), exp (due date), sub (theme), aud (audience) etc.
Public statement
See IANA JSON Web Token Registry https://www.iana.org/assignments/jwt/jwt.xhtml for a public declaration
Private statement
Some data formats are customized according to your business needs.
The example payload can be:
{

"sub": "1234567890",

"name": "John Doe",

"admin": true

}
Signature information
This part needs the header encrypted by Base64 and the payload encrypted by base64. It uses a string composed of connections, and then combines salt secret s with the encrypted method declared in the header to encrypt. Then it forms the third part of JWT.
For example, if you want to use the HMAC SHA256 algorithm, the signature will be created in the following way:
HMACSHA256(base64UrlEncode(header) + "." +base64UrlEncode(payload),secret)
Introduction to JWT Simple and Practical Demonstration
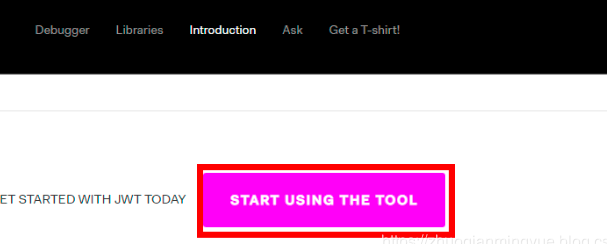
First go to JWT official website to explore, visit. https://jwt.io Enter the JWT website. Next we start to learn how to use JWT by clicking on LEARN MORE ABOUT JWT in the figure above to show the following image: then click START USING THE TOOL.
 [picture]
 [picture]
Select the JWT usage tutorial for the corresponding language as shown in the figure below. Here we introduce the version labeled maven:com.auth0 java-jwt.
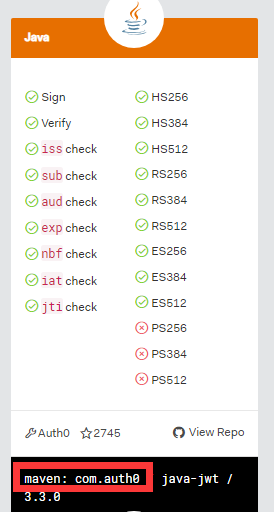
Check out the JWT GitHub sample tutorial and source code. https://github.com/auth0/java-jwt

In the README.md file, there are introductions and sample programs.

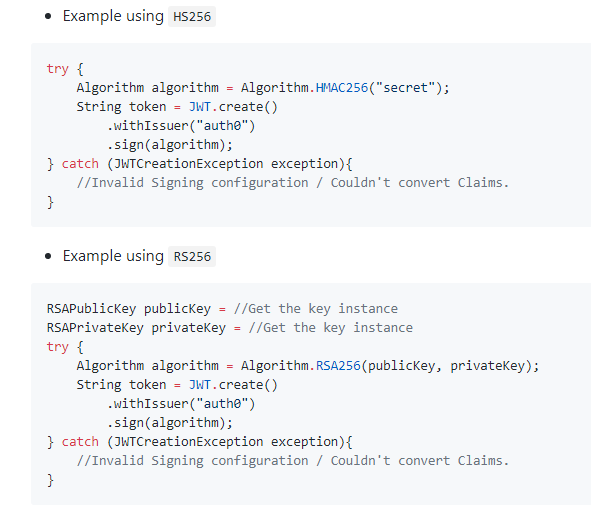
The example on GitHub is relatively simple, so let me take you to a relatively detailed Demo.
The first step is to introduce JWT dependencies to pom.xml in SpringBook applications
<dependency>
    <groupId>com.auth0</groupId>
    <artifactId>java-jwt</artifactId>
    <version>3.4.1</version>
</dependency>
We demonstrate how to use JWT in three ways
- createToken() Creates token without custom information
- createTokenWithClaim() Creates token with custom information
-
verifyToken() validates our token information and parses the contents in token
Generate JWT token without custom information
Step 1: Build header information
Map<String, Object> map = new HashMap<String, Object>();
map.put("alg", "HS256");
map.put("typ", "JWT");
Step 2: Construct key information
Algorithm algorithm = Algorithm.HMAC256("secret");Step 3: We generate jwt token by defining registration and custom declaration and combining header and key information
String token = JWT.create()
   .withHeader(map)// Setting Header information
   .withIssuer("SERVICE")//Setting load signatures is who generates, for example, servers
   .withSubject("this is test token")//Setting the theme of load signature
   // .withNotBefore(new Date()) / / set the load definition before any time, and the jwt is not available.
   .withAudience("APP")//Audiences who set payload signatures can also understand who accepts signatures
   .withIssuedAt(nowDate) //Set the time when the payload generates the signature
   .withExpiresAt(expireDate)//Setting the expiration time of load signature
   .sign(algorithm);//Signature
The detailed code is as follows:
```java
@Test
public void createToken() {
    String secret = "secret";// token key
    Algorithm algorithm = Algorithm.HMAC256("secret");

    // Head information
    Map<String, Object> map = new HashMap<String, Object>();
    map.put("alg", "HS256");
    map.put("typ", "JWT");

    Date nowDate = new Date();
    Date expireDate = getAfterDate(nowDate, 0, 0, 0, 2, 0, 0);// 2 small expired

    String token = JWT.create()
        .withHeader(map)// Setting Header information
        .withIssuer("SERVICE")//Setting load signatures is who generates, for example, servers
        .withSubject("this is test token")//Setting the theme of load signature
        // .withNotBefore(new Date()) / / set the load definition before any time, and the jwt is not available.
        .withAudience("APP")//Audiences who set payload signatures can also understand who accepts signatures
        .withIssuedAt(nowDate) //Set the time when the payload generates the signature
        .withExpiresAt(expireDate)//Setting the expiration time of load signature
        .sign(algorithm);//Signature
    Assert.assertTrue(token.length() > 0);
}
```
Generate JWT token with custom information
Custom information is added through the withClaim method. The specific operations are as follows:
Java JWT. create (). withHeader (map). withClaim ("loginName", "zhuoqianmingyue"). withClaim ("user Name", "Zhang San"). withClaim("deptName", "Technology Department")
The detailed code for generating JWT token with custom information is as follows:
    @Test
    public String createTokenWithChineseClaim() {

        Date nowDate = new Date();
        Date expireDate = getAfterDate(nowDate, 0, 0, 0, 2, 0, 0);// 2 small expired

        Map<String, Object> map = new HashMap<String, Object>();
        map.put("alg", "HS256");
        map.put("typ", "JWT");

        Algorithm algorithm = Algorithm.HMAC256("secret");
        String token = JWT.create().withHeader(map)
                /* Payload Setting Load */
                .withClaim("loginName", "zhuoqianmingyue").withClaim("userName", "Zhang San").withClaim("deptName", "Technology Department")
                .withIssuer("SERVICE")// Who generates signatures, such as servers
                .withSubject("this is test token")// Subject of signature
                // .withNotBefore(new Date()) / / before the definition is defined, the jwt is unavailable.
                .withAudience("APP")// Audiences of signatures can also understand who accepts signatures.
                .withIssuedAt(nowDate) // Time to generate signatures
                .withExpiresAt(expireDate)// Time of expiration of signature
                /* Signature */
                .sign(algorithm);

        Assert.assertTrue(token.length() > 0);
        return token;
Verify JWT Token
Step 1: Construct key information
Algorithm algorithm = Algorithm.HMAC256("secret");Step 2: Generate JWTVerifier (JWT Verification Class) from key information and signature publisher information
java JWTVerifier verifier = JWT.require(algorithm) .withIssuer("SERVICE") .build(); Algorithm algorithm = Algorithm.HMAC256("secret");
JWTVerifier can also be obtained without adding. withIssuer("SERVICE").
Step 3: Get the information in token by verify of JWTVerifier.
java DecodedJWT jwt = verifier.verify(token);
As shown in the following code, we can get the theme, audience and custom declaration information of the token signature we generated earlier.
String subject = jwt.getSubject();
List<String> audience = jwt.getAudience();
Map<String, Claim> claims = jwt.getClaims();
for (Entry<String, Claim> entry : claims.entrySet()) {
   String key = entry.getKey();
   Claim claim = entry.getValue();
   System.out.println("key:"+key+" value:"+claim.asString());
}
Verify the details of JWT Token as follows:
```java
@Test
public void verifyToken() throws UnsupportedEncodingException {
String token = createTokenWithChineseClaim2();
    Algorithm algorithm = Algorithm.HMAC256("secret");
    JWTVerifier verifier = JWT.require(algorithm).withIssuer("SERVICE").build(); // Reusable verifier instance
    DecodedJWT jwt = verifier.verify(token);

    String subject = jwt.getSubject();
    List<String> audience = jwt.getAudience();
    Map<String, Claim> claims = jwt.getClaims();
    for (Entry<String, Claim> entry : claims.entrySet()) {
        String key = entry.getKey();
        Claim claim = entry.getValue();
        log.info("key:" + key + " value:" + claim.asString());
    }
    Claim claim = claims.get("loginName");

    log.info(claim.asString());
    log.info(subject);
    log.info(audience.get(0));

}
public String createTokenWithChineseClaim2() throws UnsupportedEncodingException {

    Date nowDate = new Date();
    Date expireDate = getAfterDate(nowDate, 0, 0, 0, 2, 0, 0);// 2 small expired

    Map<String, Object> map = new HashMap<String, Object>();
    map.put("alg", "HS256");
    map.put("typ", "JWT");

    User user = new User();
    user.setUserNaem("Zhang San");
    user.setDeptName("Technology Department");
    Gson gson = new Gson();
    String userJson = gson.toJson(user);

    String userJsonBase64 = BaseEncoding.base64().encode(userJson.getBytes());

    Algorithm algorithm = Algorithm.HMAC256("secret");
    String token = JWT.create().withHeader(map)

            .withClaim("loginName", "zhuoqianmingyue").withClaim("user", userJsonBase64).withIssuer("SERVICE")// Who Generates Signatures
            .withSubject("this is test token")// Subject of signature
            // WithNotBefore (new Date ()// the jwt is unavailable
            .withAudience("APP")// Audiences of signatures can also understand who accepts signatures.
            .withIssuedAt(nowDate) // Time to generate signatures
            .withExpiresAt(expireDate)// Time of expiration of signature
            .sign(algorithm);//Signature

    return token;
}
```
Summary
JWT is a tool for generating Token. If we don't use JWT, we can also generate Token according to our own encryption rules. It's just that the JWT specification defines a standard for generating Token. The core function of JWT is to generate and parse Token. In the next part of the integration JWT of Spring Boot 2, we will introduce the actual operation of JWT through a case of login through an interface.
Code example
See the src/test/java JWTDemo.java file under spring-boot-2.x-jwt in my GitHub repository spring bootexamples for specific code examples.
GitHub: https://github.com/zhuoqianmingyue/springbootexamples
Reference
https://jwt.io/introduction/
https://github.com/auth0/java-jwt