One: Source of demand:
First, let's look at the source of the entire need: how do you ensure the health and stability of your app when it's migrated to Kubernetes?In fact, it is very simple and can be enhanced in two ways:
1. First, improve the observability of the application;
2, the second is to improve the resilience of the application.
Observability can be enhanced in three ways:
1. First of all, the health status of the application can be observed in real time.
2, the second is to obtain the resource usage of the application;
3. The third is to get a real-time log of the application to diagnose and analyze the problem.
When a problem occurs, the first thing to do is to reduce the scope of impact, debug and diagnose the problem.Finally, when problems arise, it is ideal that a complete recovery can be achieved through a self-healing mechanism integrated with K8s.
Two detection methods are introduced: livenessProbe and ReadnessProbe.
-
Liveness Probe: [Activity Detection] is a user-defined rule to determine if the container is healthy.This is also known as the survival pointer. If the Liveness pointer determines that the container is unhealthy, it kills the pod by kubelet and determines whether to restart the container by the restart policy.If the Liveness pointer is not configured by default, it is assumed by default that the probe default return was successful.
- ReadnessProbe: [Agile Detection] Used to determine if this container is started and completed, that is, if the pod's state (expected value) is ready.If one of the results of the probe is unsuccessful, it will then be removed from the Endpoint on the pod, that is, the previous pod will be removed from the access layer (set the pod to unavailable state) and will not be suspended on the corresponding endpoint again until the next judgement is successful.
What is Endpoint?
Endpoint is a resource object in the k8s cluster that is stored in etcd to record the access addresses of all pod s corresponding to a service.
2. Scenarios for the use of Liveness and Readness detection mechanisms:
The Liveness Pointer scenario is for applications that can be pulled up again, while the Readines Pointer is for applications that cannot be served immediately after startup.
3. The similarities and differences between Liveness and Readness detection mechanisms:
The same point is to check the health of a pod based on an application or file within the probe pod, but the difference is that liveness restarts the pod if the probe fails, whereas readliness sets the pod unavailable after three consecutive probe failures and does not restart the pod.
4. The Liveness and Readines pointers support three different detection methods:
- 1, the first is httpGet.It is judged by sending an http Get request, and when the return code is a status code between 200 and 399, identifies that the application is healthy;
- 2. The second detection method is Exec.It determines whether the current service is normal by executing a command in a container and identifies that the container is healthy when the command line returns 0.
- 3. The third detection method is tcpSocket.It does TCP health checks by detecting the IP and Port of the container, and if the TCP link can be established properly, then identifying the current container is healthy.
The first detection method is very similar to the third, and the first and second detection methods are generally used.
3. Examples of application of detection mechanism:
1,LivenessProbe:
Method 1: Use the exec detection method to check if a specified file in the pod exists, if it exists, it is considered healthy, otherwise the pod will be restarted according to the restart policy set.
Configuration file for ###pod:
[root@sqm-master yaml]# vim livenss.yaml
kind: Pod
apiVersion: v1
metadata:
  name: liveness
  labels:
    name: liveness
spec:
  restartPolicy: OnFailure    ##Define a restart policy that only restarts when a pod object has an error
  containers:
  - name: liveness
    image: busybox
    args:
    - /bin/sh
    - -c
    - touch /tmp/test; sleep 30; rm -rf /tmp/test; sleep 300  #Create a file and delete it after 30 seconds
    livenessProbe:      #Perform activity detection
      exec:
        command:
        - cat              #There is a test file in the probe/tmp directory, if it represents health, and if it does not, a restart pod policy is executed.
        - /tmp/test
      initialDelaySeconds: 10        #How long after the container has been running (in s)
      periodSeconds: 5     #Detect frequency (units s) every 5 seconds.
Other optional fields in the detection mechanism:
- initialDelaySeconds: The number of seconds to wait for the first probe to execute after the container starts.
- periodSeconds: The frequency at which the probe is performed.Default is 10 seconds, minimum 1 second.
- timeoutSeconds: Probe timeout.Default 1 second, minimum 1 second.
- SuccThreshold: The minimum number of successive probes that are considered successful after a probe fails.The default is 1.For liveness, it must be 1.The minimum value is 1.
- failureThreshold: The minimum number of consecutive failures after a successful probe is identified as failures.The default is 3.The minimum value is 1.
//Run the pod for testing:
[root@sqm-master yaml]# kubectl  apply -f  livenss.yaml
pod/liveness created
//Monitor the status of the pod:
Probing starts 10 seconds after the container starts and occurs every 5s.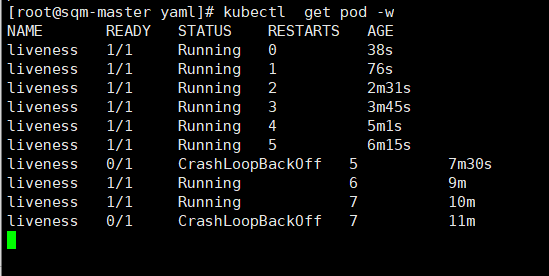
We can see that pod has been restarting, and we can see RESTARTS from the image above
Seven times since the command was executed when the pod was started:
/bin/sh -c "touch /tmp/test; sleep 30; rm -rf /tmp/test; sleep 300"
The cat/tmp/test command returns a successful return code within the first 30 seconds of the container's life.However, after 30 seconds, cat/tmp/test will return the failed return code, triggering the restart policy of the pod.
//Let's take a look at pod's Events information:
[root@sqm-master ~]# kubectl  describe  pod liveness

As you can see from the above events, the probe failed and the container will be restarted because the file was not found in the specified directory.
Method 2: Run a web service using httpGet probing to detect whether a specified file exists in the root directory of a web page, which is equivalent to "curl-I container ip address: /healthy".(The directory / here specifies the home directory of the web service in the container.)
//pod yaml file:
[root@sqm-master yaml]# vim http-livenss.yaml
apiVersion: v1
kind: Pod
metadata:
  name: web
  labels:
    name: mynginx
spec:
  restartPolicy: OnFailure      #Define pod restart policy
  containers:
  - name: nginx
    image: nginx
    ports:
    - containerPort: 80
    livenessProbe:       #Define the detection mechanism
      httpGet:               #Probe as httpGet
        scheme: HTTP    #Specify Agreement
        path: /healthy       #The file under the specified path, if it does not exist, fails to detect
        port: 80
      initialDelaySeconds: 10       #How long after the container has been running (in s)
      periodSeconds: 5       #Detection frequency (units s), detected every 5 seconds
---
apiVersion: v1       #Associate a service object
kind: Service
metadata:
  name: web-svc
spec:
  selector:
    name: mynginx
  ports:
  - protocol: TCP
    port: 80
    targetPort: 80
The httpGet detection method has the following optional control fields:
- Host: The host name of the connection, the IP to which the pod is connected by default.You may want to set "Host" in the http header instead of using IP.
- scheme: schema used for connection, default HTTP.
- Path: The path of the HTTP server accessed.
- httpHeaders: Header for custom requests.HTTP runs a duplicate header.
- Port: The port name or port number of the container being accessed.Port number must be between 1 and 65525.
//Run the pod:
[root@sqm-master yaml]# kubectl  apply -f  http-livenss.yaml
pod/web created
service/web-svc created
##View how the pod was running 10 seconds ago:
The container was alive for the first 10 seconds and returned a status code of 200.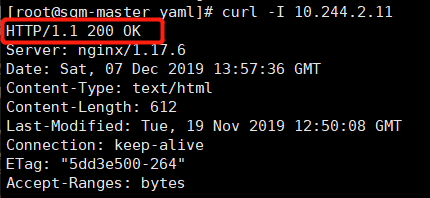
Look at the pod again after 10 seconds when the detection mechanism starts exploring:
//Viewed pod events:
[root@sqm-master yaml]# kubectl describe  pod web

You can see that the status code returned is 404, indicating that the specified file was not found in the root directory of the web page, indicating that the probe failed and restarted four times, and that the status is completed, indicating that the pod is problematic.
2) Next we proceed with the detection to make it a success:
Modify the pod configuration file:
[root@sqm-master yaml]# vim http-livenss.yaml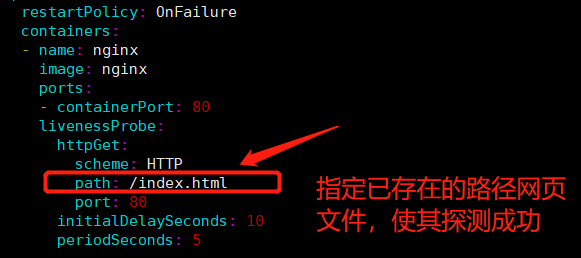
//Rerun pod:
[root@sqm-master yaml]# kubectl  delete -f  http-livenss.yaml
pod "web" deleted
service "web-svc" deleted
[root@sqm-master yaml]# kubectl apply -f  http-livenss.yaml
pod/web created
service/web-svc created
//Finally, we look at the status of the pod and the Events information:
[root@sqm-master yaml]# kubectl  get pod -o wide
NAME   READY   STATUS    RESTARTS   AGE   IP            NODE     NOMINATED NODE   READINESS GATES
web    1/1     Running   0          5s    10.244.1.11   node01   <none>           <none>
[root@sqm-master yaml]# kubectl  describe  pod web
Events:
  Type    Reason     Age   From               Message
  ----    ------     ----  ----               -------
  Normal  Scheduled  71s   default-scheduler  Successfully assigned default/web to node01
  Normal  Pulling    71s   kubelet, node01    Pulling image "nginx"
  Normal  Pulled     70s   kubelet, node01    Successfully pulled image "nginx"
  Normal  Created    70s   kubelet, node01    Created container nginx
  Normal  Started    70s   kubelet, node01    Started container nginx
It works when you see the state of the pod.
##Test Access Page Header Information:
[root@sqm-master yaml]# curl -I 10.244.1.11
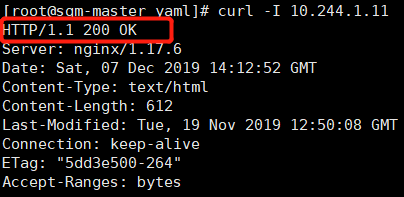
The status code returned is 200, indicating that the pod is in good health.
ReadnessProbe probe:
Method 1: Use exec to detect whether a file exists, the same as iveness.
The configuration file for //pod is as follows:
[root@sqm-master yaml]# vim readiness.yaml
kind: Pod
apiVersion: v1
metadata:
  name: readiness
  labels:
    name: readiness
spec:
  restartPolicy: OnFailure
  containers:
  - name: readiness
    image: busybox
    args:
    - /bin/sh
    - -c
    - touch /tmp/test; sleep 30; rm -rf /tmp/test; sleep 300;
    readinessProbe:   #Define readiness detection method
      exec:
        command:
        - cat
        - /tmp/test
      initialDelaySeconds: 10
      periodSeconds: 5
//Run the pod: [root@sqm-master yaml]# kubectl apply -f readiness.yaml pod/readiness created
//Detect the status of the pod:
//View pod's Events:
[root@sqm-master yaml]# kubectl  describe  pod readiness

You can see that the file cannot be found, indicating a probe failure, but instead of restarting the pod, the readiness mechanism, unlike the liveness mechanism, sets the container to an unavailable state after three successive probe failures.
Method 2: httpGet mode.
[root@sqm-master yaml]# vim http-readiness.yaml
apiVersion: v1
kind: Pod
metadata:
  name: web2
  labels:
    name: web2
spec:
  containers:
  - name: web2
    image: nginx
    ports:
    - containerPort: 81
    readinessProbe:
      httpGet:
        scheme: HTTP    #Specify Agreement
        path: /healthy    #Specify the path, if it does not exist, then it needs to be created or the probe fails
        port: 81
      initialDelaySeconds: 10
      periodSeconds: 5
---
apiVersion: v1
kind: Service
metadata:
  name: web-svc
spec:
  selector:
    name: web2
  ports:
  - protocol: TCP
    port: 81
    targetPort: 81
//Run pod: [root@sqm-master yaml]# kubectl apply -f http-readiness.yaml pod/web2 created service/web-svc created
//View the status of the pod:
[root@sqm-master yaml]# kubectl  get pod -o wide
NAME        READY   STATUS      RESTARTS   AGE     IP            NODE     NOMINATED NODE   READINESS GATES
readiness   0/1     Completed   0          37m     10.244.2.12   node02   <none>           <none>
web         1/1     Running     0          50m     10.244.1.11   node01   <none>           <none>
web2        0/1     Running     0          2m31s   10.244.1.14   node01   <none>           <none>

Looking at the Events information for a pod, you can tell by probing that the pod is unhealthy and that the http access failed.
Instead of restarting, it simply sets the pod to an unavailable state.
Application of health detection in rolling update process:
First we look at the fields used by the update using the explain tool:
[root@sqm-master ~]# kubectl explain deploy.spec.strategy.rollingUpdate
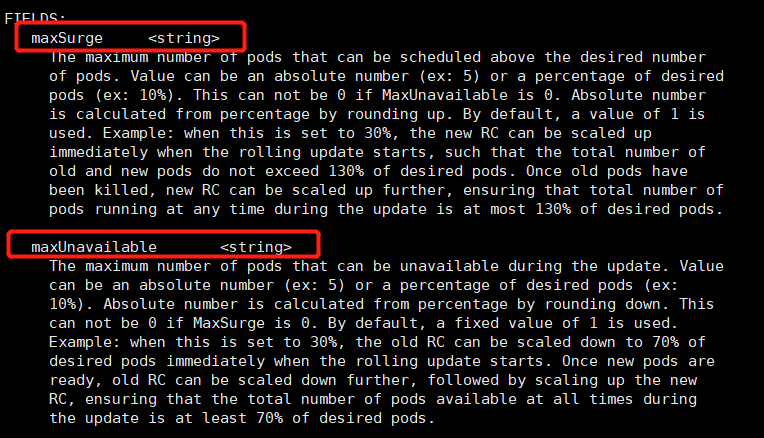
You can see that two parameters are available during the rolling update process:
- maxSurge: This parameter controls the total number of copies exceeding the maximum number of pods expected during rolling updates.It can be either a percentage or a specific value, defaulting to 1.If the value is set to 3, three pods will be added directly during the update process (and of course, the detection mechanism will be verified to be updated successfully).The larger the value is, the faster the upgrade will be, but it will consume more system resources.
- maxUnavailable: This parameter controls the number of pods that are not available during rolling updates. Note that the reduction in the number of original pods does not calculate the range of maxSurge values.If the value is 3, three pods will be unavailable during the upgrade process if the probe fails.The larger the value is, the faster the upgrade will be, but it will consume more system resources.
Scenarios for maxSurge and maxUnavailable:
1. If you want to upgrade as quickly as possible while maintaining system availability and stability, you can set maxUnavailable to 0 and assign a larger value to maxSurge.
2. If system resources are tight and pod load is low, you can set maxSurge to 0 and give maxUnavailable a larger value to speed up the upgrade.It is important to note that if maxSurge is 0maxUnavailable is DESIRED, the entire service may become unavailable, at which point RollingUpdate will degenerate to downtime Publishing
1) First we create a deployment resource object:
[root@sqm-master ~]# vim app.v1.yaml
apiVersion: extensions/v1beta1
kind: Deployment
metadata:
  name: my-web
spec:
  replicas: 10              #Define 10 copies
  template:
    metadata:
      labels:
        name: my-web
    spec:
       containers:
        - name: my-web
          image: nginx
          args:
          - /bin/sh
          - -c
          - touch /usr/share/nginx/html/test.html; sleep 300000; #Create a file to keep the pod healthy while probing
          ports:
          - containerPort: 80
          readinessProbe:       #Using readiness mechanism
            exec:
              command:
              - cat
              - /usr/share/nginx/html/test.html
            initialDelaySeconds: 10
            periodSeconds: 10
//After running the pod, look at the number of pods (10): [root@sqm-master yaml]# kubectl get pod -o wide NAME READY STATUS RESTARTS AGE IP NODE NOMINATED NODE READINESS GATES my-web-7bbd55db99-2g6tp 1/1 Running 0 2m11s 10.244.2.44 node02 <none> <none> my-web-7bbd55db99-2jdbz 1/1 Running 0 118s 10.244.2.45 node02 <none> <none> my-web-7bbd55db99-5mhcv 1/1 Running 0 2m53s 10.244.1.40 node01 <none> <none> my-web-7bbd55db99-77b4v 1/1 Running 0 2m 10.244.1.44 node01 <none> <none> my-web-7bbd55db99-h888n 1/1 Running 0 2m53s 10.244.2.41 node02 <none> <none> my-web-7bbd55db99-j5tgz 1/1 Running 0 2m38s 10.244.2.42 node02 <none> <none> my-web-7bbd55db99-kjgm2 1/1 Running 0 2m25s 10.244.1.42 node01 <none> <none> my-web-7bbd55db99-kkmh2 1/1 Running 0 2m38s 10.244.1.41 node01 <none> <none> my-web-7bbd55db99-lr896 1/1 Running 0 2m13s 10.244.1.43 node01 <none> <none> my-web-7bbd55db99-rpd8v 1/1 Running 0 2m23s 10.244.2.43 node02 <none>
Probing was successful and all 10 copies were running.
2) First update:
Update the nginx mirror version and set the rolling update policy:
[root@sqm-master yaml]# vim app.v1.yaml
apiVersion: extensions/v1beta1
kind: Deployment
metadata:
  name: my-web
spec:
  strategy:       #Set the rolling update policy by setting the rolling Update subproperty under this field
    rollingUpdate:
      maxSurge: 3                 #Specifies that up to three additional pod s can be created during the rolling update process
      maxUnavailable: 3     #- Specifies that up to 3 pod s are allowed to be unavailable during rolling updates
  replicas: 10
  template:
    metadata:
      labels:
        name: my-web
    spec:
       containers:
        - name: my-web
          image: 172.16.1.30:5000/nginx:v2.0    #The updated mirror is a mirror nginx:v2.0 in the private repository
          args:
          - /bin/sh
          - -c
          - touch /usr/share/nginx/html/test.html; sleep 300000;
          ports:
          - containerPort: 80
          readinessProbe:
            exec:
              command:
              - cat
              - /usr/share/nginx/html/test.html
            initialDelaySeconds: 10
            periodSeconds: 10
//After executing the yaml file, look at the number of pod s:
[root@sqm-master yaml]# kubectl  get pod -o wide
NAME                      READY   STATUS      RESTARTS   AGE     IP            NODE     NOMINATED NODE   READINESS GATES
my-web-7db8b88b94-468zv   1/1     Running     0          3m38s   10.244.2.57   node02   <none>           <none>
my-web-7db8b88b94-bvszs   1/1     Running     0          3m24s   10.244.1.60   node01   <none>           <none>
my-web-7db8b88b94-c4xvv   1/1     Running     0          3m38s   10.244.2.55   node02   <none>           <none>
my-web-7db8b88b94-d5fvc   1/1     Running     0          3m38s   10.244.1.58   node01   <none>           <none>
my-web-7db8b88b94-lw6nh   1/1     Running     0          3m21s   10.244.2.59   node02   <none>           <none>
my-web-7db8b88b94-m9gbh   1/1     Running     0          3m38s   10.244.1.57   node01   <none>           <none>
my-web-7db8b88b94-q5dqc   1/1     Running     0          3m38s   10.244.1.59   node01   <none>           <none>
my-web-7db8b88b94-tsbmm   1/1     Running     0          3m38s   10.244.2.56   node02   <none>           <none>
my-web-7db8b88b94-v5q2s   1/1     Running     0          3m21s   10.244.1.61   node01   <none>           <none>
my-web-7db8b88b94-wlgwb   1/1     Running     0          3m25s   10.244.2.58   node02   <none>           <none>
//View pod version information:
[root@sqm-master yaml]# kubectl  get deployments. -o wide
NAME     READY   UP-TO-DATE   AVAILABLE   AGE   CONTAINERS   IMAGES                        SELECTOR
my-web   10/10   10           10          49m   my-web       172.16.1.30:5000/nginx:v2.0   name=my-web
Detection was successful and all 10 pod versions were updated successfully.
3) Second update:
Update the mirror version to version 3.0 and set a rolling update policy.(detection failed)
The configuration file for pod is as follows:
[root@sqm-master yaml]# vim app.v1.yaml
apiVersion: extensions/v1beta1
kind: Deployment
metadata:
  name: my-web
spec:
  strategy:
    rollingUpdate:
      maxSurge: 3                  #Define the update strategy and keep the number at 3
      maxUnavailable: 3
  replicas: 10                       #The number of pod s is still 10
  template:
    metadata:
      labels:
        name: my-web
    spec:
       containers:
        - name: my-web
          image: 172.16.1.30:5000/nginx:v3.0   #Test mirror version updated to 3.0
          args:
          - /bin/sh
          - -c
          - sleep 300000;        #Do not create the specified file to fail its probing
          ports:
          - containerPort: 80
          readinessProbe:
            exec:
              command:
              - cat
              - /usr/share/nginx/html/test.html
            initialDelaySeconds: 10
            periodSeconds: 5
//Rerun the pod profile: [root@sqm-master yaml]# kubectl apply -f app.v1.yaml deployment.extensions/my-web configured
//See how many pod s have been updated:
[root@sqm-master yaml]# kubectl  get pod  -o wide
NAME                      READY   STATUS      RESTARTS   AGE    IP            NODE     NOMINATED NODE   READINESS GATES
my-web-7db8b88b94-468zv   1/1     Running     0          12m    10.244.2.57   node02   <none>           <none>
my-web-7db8b88b94-c4xvv   1/1     Running     0          12m    10.244.2.55   node02   <none>           <none>
my-web-7db8b88b94-d5fvc   1/1     Running     0          12m    10.244.1.58   node01   <none>           <none>
my-web-7db8b88b94-m9gbh   1/1     Running     0          12m    10.244.1.57   node01   <none>           <none>
my-web-7db8b88b94-q5dqc   1/1     Running     0          12m    10.244.1.59   node01   <none>           <none>
my-web-7db8b88b94-tsbmm   1/1     Running     0          12m    10.244.2.56   node02   <none>           <none>
my-web-7db8b88b94-wlgwb   1/1     Running     0          12m    10.244.2.58   node02   <none>           <none>
my-web-849cc47979-2g59w   0/1     Running     0          3m9s   10.244.1.63   node01   <none>           <none>
my-web-849cc47979-2lkb6   0/1     Running     0          3m9s   10.244.1.64   node01   <none>           <none>
my-web-849cc47979-762vb   0/1     Running     0          3m9s   10.244.1.62   node01   <none>           <none>
my-web-849cc47979-dv7x8   0/1     Running     0          3m9s   10.244.2.61   node02   <none>           <none>
my-web-849cc47979-j6nwz   0/1     Running     0          3m9s   10.244.2.60   node02   <none>           <none>
my-web-849cc47979-v5h7h   0/1     Running     0          3m9s   10.244.2.62   node02   <none>           <none>
We can see that the current total number of pods is 13 (including maxSurge plus an additional number) because detection fails, three pods (including additional pods) are set to be unavailable, but there are still seven pods available (because maxUnavailable is set to three), but note that the versions of the seven pods have not been updated successfully or are the previous version.
//View pod's updated version information:
[root@sqm-master yaml]# kubectl  get deployments. -o wide
NAME     READY   UP-TO-DATE   AVAILABLE   AGE   CONTAINERS   IMAGES                        SELECTOR
my-web   7/10    6            7           58m   my-web       172.16.1.30:5000/nginx:v3.0   name=my-web
Explanation of parameters:
READY: Indicates the desired value of the user
UP-TO-DATE: Indicates an updated
AVAILABLE: Indicates available
We can see that the number of mirrored versions that have been updated is 6 (including an additional 3 pods), but it is unavailable, but make sure that the number of pods available is 7, but the version has not been updated.
Summary:
Describes what the detection mechanism does during rolling updates?
If you need to update a pod in an application in your company, if there is no detection mechanism, whether the pod is ready for updating or not, it will update all the pods in the application. This will have serious consequences, although after updating, you will find that the status of the pod is normal in order to meet the expectations of the Controller ManagerValue, the READY value is still 1/1, but the pod is already a regenerated pod, indicating that all data within the pod will be lost.
If a probing mechanism is added, it will detect whether the files or other applications you specified exist in the container. If the conditions you specified are met, the probing will succeed, and your pod will be updated. If the probing fails, the pod will be set to be unavailable. Although the failed container is unavailable, at least there are other previous versions of the pod available in this module.Keep the company's service running properly.So how important is the detection mechanism?
_________