Blog address
Address of my personal blog 👉👉 Click to enter
Open source project address
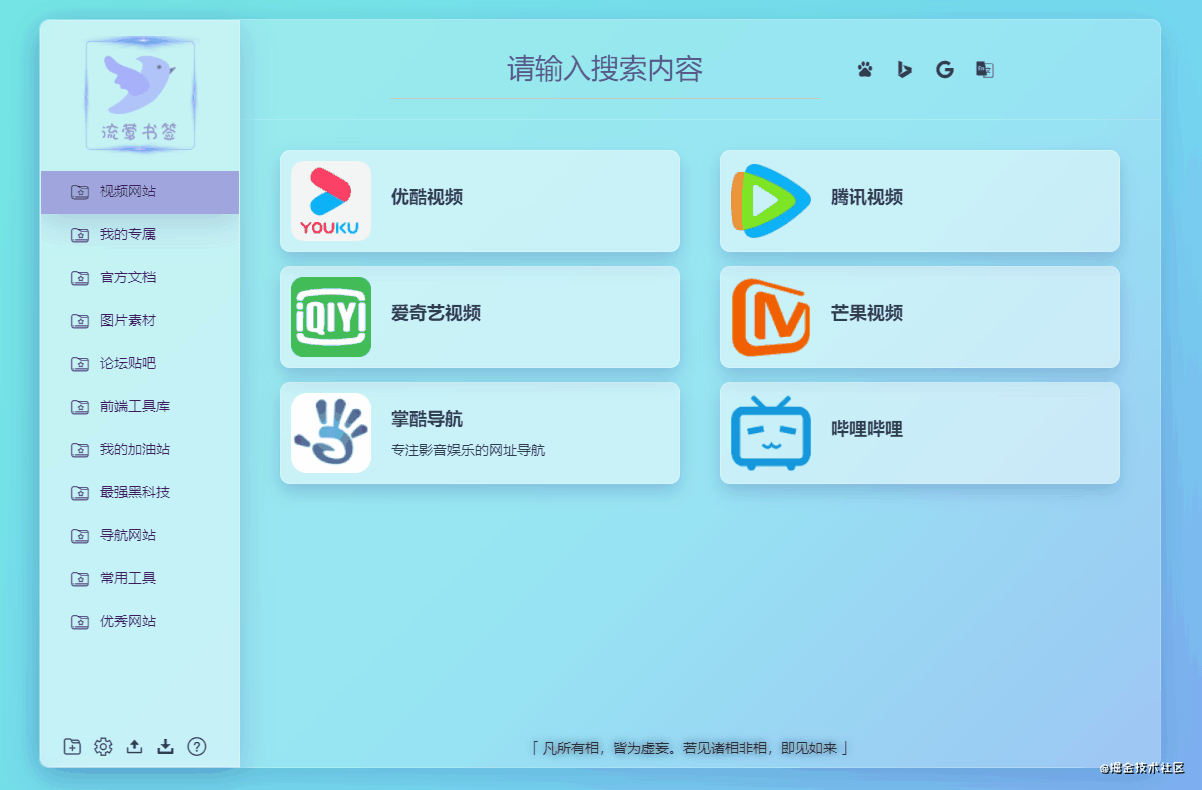
This is my project of an open source collection website
Project address 👉👉 Click to enter , it can be directly set as the browser home page or desktop shortcut for use. I am using it and maintain it for a long time.
Completely open source, you can research and secondary development at will. Of course, you are welcome to order a Star ⭐⭐⭐
👉👉Source code link (gitee) 👉👉Source code link (github)
How to build a rich text editor for your blog?
- Technology stack: vue2 x
- Rich text editor: Vue quill editor
- UI framework: elementUI
Because blog is a website for learning records, it is bound to use a text editor. I chose Vue quill editor, a rich text editor. Here is how to use this editor!
Use of rich text editor Vue quill editor
1. First install Vue quill editor and its dependencies
npm i vue-quill-editor --save
npm i quill --save
2. Because I use the whole editor as a component here, it can be used internally
import "quill/dist/quill.core.css";
import "quill/dist/quill.snow.css";
import "quill/dist/quill.bubble.css";
//Calling the rich text editor
import { quillEditor } from "vue-quill-editor";
3. Mount components
// Mount text editor component
components: {
  quillEditor
},
4. Used in template
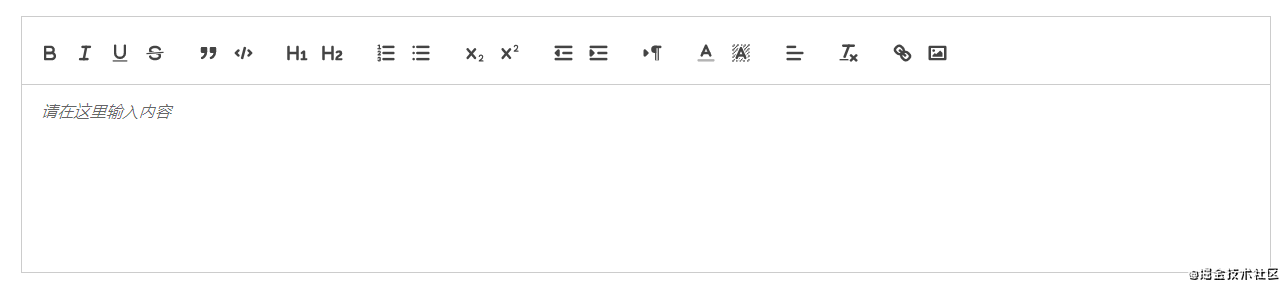
<quill-editor ref="myQuillEditor" @change="" v-model="" :options="editorOption">
</quill-editor>
5. Configure the function of rich text editor
data() {
  return {
    editorOption: {
      placeholder: "Please enter the content here",
      modules: {
        toolbar: {
          container: [
            ["bold", "italic", "underline", "strike"], //Bold, italic, underline, strikeout
            ["blockquote", "code-block"], //Reference, code block
            [{ header: 1 }, { header: 2 }], // Title, the form of key value pair; 1. 2 indicates font size
            [{ list: "ordered" }, { list: "bullet" }], //list
            [{ script: "sub" }, { script: "super" }], // Superscript and subscript
            [{ indent: "-1" }, { indent: "+1" }], // indent
            [{ direction: "rtl" }], // Text direction
            // [{size: ["small", false, "large", "tiger"]}], / / font size
            // [{header: [1, 2, 3, 4, 5, 6, false]}], / / level titles
            [{ color: [] }, { background: [] }], // Font color
            // [{font: []}], / / font
            [{ align: [] }], //Alignment
            ["clean"], //Clear font style
            ["link", "image"] //Upload pictures, upload videos "link" link "video
          ],
        }
      }
    }
  };
},
6. Also add styles in style
.quill-editor {
  width: 1000px;
  margin: 0 auto;
  height: 150px;
}
.editor {
  line-height: normal !important;
  height: 800px;
}
.ql-snow .ql-tooltip[data-mode='link']::before {
  content: 'Please enter the link address:';
}
.ql-snow .ql-tooltip.ql-editing a.ql-action::after {
  border-right: 0px;
  content: 'preservation';
  padding-right: 0px;
}
.ql-snow .ql-tooltip[data-mode='video']::before {
  content: 'Please enter the video address:';
}
.ql-snow .ql-picker.ql-size .ql-picker-label::before,
.ql-snow .ql-picker.ql-size .ql-picker-item::before {
  content: '14px';
}
.ql-snow .ql-picker.ql-size .ql-picker-label[data-value='small']::before,
.ql-snow .ql-picker.ql-size .ql-picker-item[data-value='small']::before {
  content: '10px';
}
.ql-snow .ql-picker.ql-size .ql-picker-label[data-value='large']::before,
.ql-snow .ql-picker.ql-size .ql-picker-item[data-value='large']::before {
  content: '18px';
}
.ql-snow .ql-picker.ql-size .ql-picker-label[data-value='huge']::before,
.ql-snow .ql-picker.ql-size .ql-picker-item[data-value='huge']::before {
  content: '32px';
}
.ql-snow .ql-picker.ql-header .ql-picker-label::before,
.ql-snow .ql-picker.ql-header .ql-picker-item::before {
  content: 'text';
}
.ql-snow .ql-picker.ql-header .ql-picker-label[data-value='1']::before,
.ql-snow .ql-picker.ql-header .ql-picker-item[data-value='1']::before {
  content: 'Title 1';
}
.ql-snow .ql-picker.ql-header .ql-picker-label[data-value='2']::before,
.ql-snow .ql-picker.ql-header .ql-picker-item[data-value='2']::before {
  content: 'Title 2';
}
.ql-snow .ql-picker.ql-header .ql-picker-label[data-value='3']::before,
.ql-snow .ql-picker.ql-header .ql-picker-item[data-value='3']::before {
  content: 'Title 3';
}
.ql-snow .ql-picker.ql-header .ql-picker-label[data-value='4']::before,
.ql-snow .ql-picker.ql-header .ql-picker-item[data-value='4']::before {
  content: 'Title 4';
}
.ql-snow .ql-picker.ql-header .ql-picker-label[data-value='5']::before,
.ql-snow .ql-picker.ql-header .ql-picker-item[data-value='5']::before {
  content: 'Title 5';
}
.ql-snow .ql-picker.ql-header .ql-picker-label[data-value='6']::before,
.ql-snow .ql-picker.ql-header .ql-picker-item[data-value='6']::before {
  content: 'Title 6';
}
7. Just like the general input box, use v-model to bind the text content. I submit the content here using the change event. Of course, you can also use any event type you want
It's done here. Let's see the results!
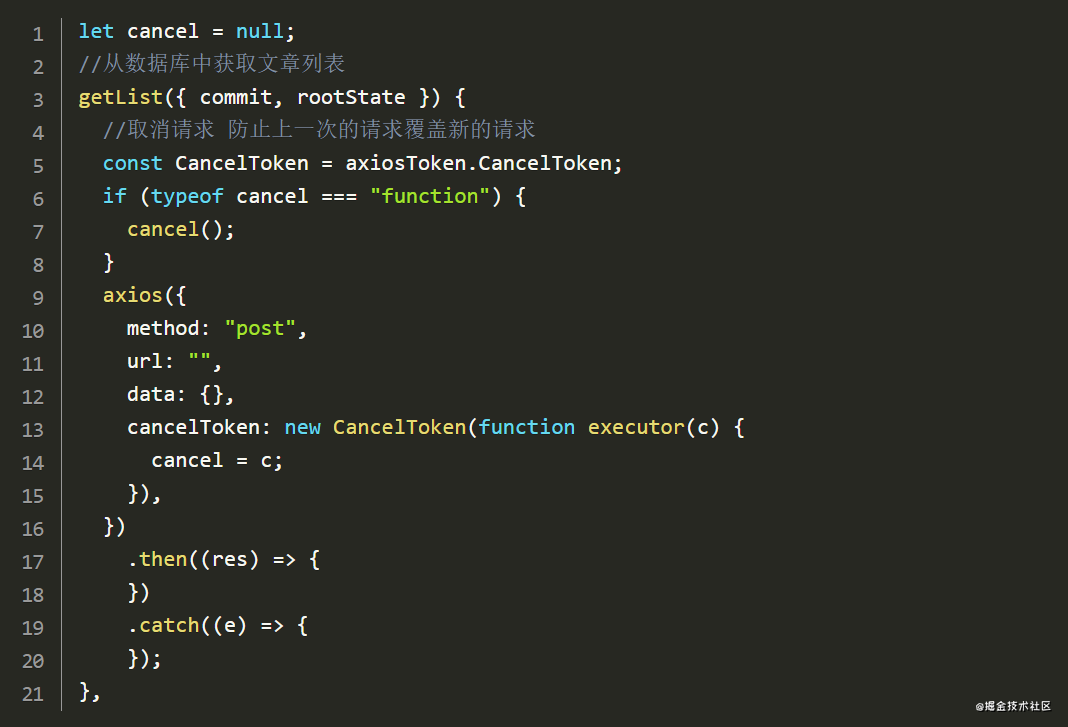
Vue quill editor echo and code block highlighting
Since we pasted a lot of code when writing articles, we must echo it to the page when viewing, and we can only see it with code highlighting. Otherwise, black and white words are a headache. Finally, we have to use plug-ins to realize it
I Vue quill editor echo
We need to add div to the page to be echoed, and then use v-html to render the data. In particular, we need to add the QL editor class name, otherwise it will not take effect
<div class="ql-editort" v-html=""></div>
II Code block highlighting
1. First install prismjs and its dependencies
//Install prismjs
npm i prismjs
//Install the compiler plug-in for prismjs
npm i babel-plugin-prismjs -D
2. Find Babel under the project config. js
In module Add the following configuration to the plugins in exports. If there are no plugins, you can add them manually
plugins: [
  [
    "prismjs",
    {
      languages: ["javascript", "css", "markup"],
      plugins: ["line-numbers"], //Configure the display line number plug-in
      theme: "okaidia", //Subject name
      css: true,
    },
  ],
],
3. Introduce modules into components
//Introducing code beautification plug-ins
import Prism from "prismjs";
4. It is difficult to deal with here that the code structure generated through the text editor is only the pre tag, and this code highlighting plug-in only works on the nested code tag of the pre tag. Some class names must be written on the code tag, so we need to do a global replacement before saving into the database The class name line numbers displays the line number language XXX. Select the programming language. Here we select js: language js
//Because the code block generated by the rich text editor only has a pre tag and no code tag, and the echo of the front end needs a code tag, it needs to be processed
let newContent = blogEditerContent.replace(
  /<pre class="ql-syntax" spellcheck="false">/g,
  '<pre class="ql-syntax line-numbers language-js" spellcheck="false"><code class="language-js">'
);
newContent = newContent.replace(/<\/pre>/g, "</code></pre>");
5. Some articles on the Internet say that prism is added to mounted highlightAll(); But my personal test is not very easy to use, so I used another method, custom plug-ins
//Introducing code beautification plug-ins
import Prism from "prismjs";
let Highlight = {};
// Custom plug-ins
Highlight.install = function(Vue) {
  // Custom directive v-highlight
  Vue.directive("highlight", {
    // The VNode of the instruction component and its sub VNode are updated after all updates.
    componentUpdated: function() {
      //Code beautification
      Prism.highlightAll();
    },
  });
};
export default Highlight;
6. In main JS
//Introducing code block highlighting plug-ins
import Highlight from "./assets/js/Highlight";
Vue.use(Highlight);
7. Then add the command v-highlight to the div in the first step
<div class="ql-editor" v-html="" v-highlight></div>
It's done here. Let's see the effect
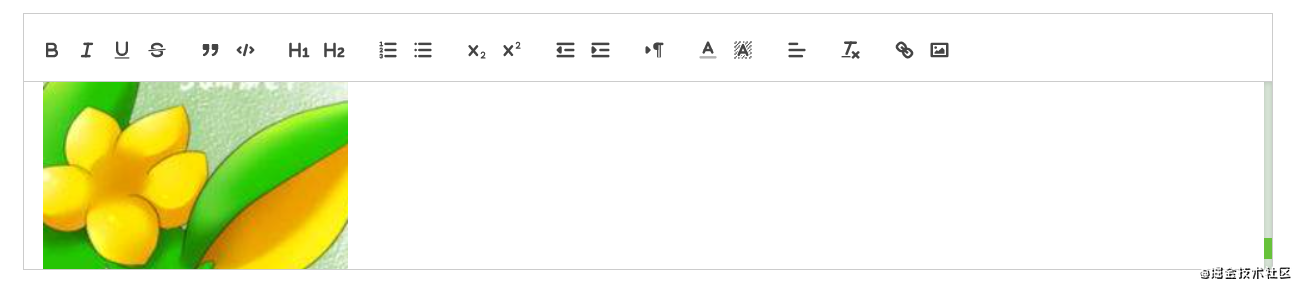
Vue quill editor combined with elementUI to upload pictures
It is inevitable to upload pictures when writing articles, but the editor is stored in base64 encoding by default. This disadvantage is that when the pictures are large, the parameters are too long when submitting to the background, which may lead to submission failure, and if the amount of data increases, it will cause great pressure on the database. Therefore, we combine the picture upload component of elementUI, Upload the picture to our own picture space and save the return URL to the database
1. Add the upload component action in the template, and fill in the interface address of our upload server
<!-- elementUI Upload picture component -->
<el-upload class="avatar-uploader"
  :action="serverUrl"
  :show-file-list="false"
  :on-success="handleAvatarSuccess"
  :on-error="handleAvatarError"
  :before-upload="beforeAvatarUpload">
</el-upload>
2. Add rewrite upload image method in toolbar
data() {
  return {
    editorOption: {
      modules: {
        toolbar: {
          //Rewrite picture upload event
          handlers: {
            'image': function (value) {
              if (value) {
                // Trigger the input box to select a picture file
                document.querySelector('.avatar-uploader input').click()
              } else {
                this.quill.format('image', false);
              }
            }
          }
        }
      }
    }
  };
},
3. Verify and insert in the upload success hook function of the upload component
//Image upload successful hook function
handleAvatarSuccess(res) {
  // res is the data returned by the picture server
  // Get rich text component instance
  let quill = this.$refs.myQuillEditor.quill
  // If the upload is successful
  if (res.sinaPath !== null) {
    // Gets the position of the cursor
    let length = quill.selection.savedRange.index;
    // Insert picture res.info is the picture address returned by the server
    quill.insertEmbed(length, 'image', res.sinaPath)
    // Adjust cursor to last
    quill.setSelection(length + 1)
  } else {
    this.$message.error('Picture insertion failed')
  }
},
4. In order to improve the interactive experience, the loading component is added during the image upload process
//Wrap quill editor with El row
<el-row v-loading="quillUpdateImg">
  <quill-editor ref="myQuillEditor" @change="submitBlogEditerContent" v-model="blogEditerContent" :options="editorOption">
  </quill-editor>
</el-row>
5. Add loading in the hook function before image upload. After the image upload result is returned (whether successful or failed), remove loading
//Hook function before image upload
beforeAvatarUpload(file) {
  // Show loading animation
  this.quillUpdateImg = true
},
//Picture upload failed hook function
handleAvatarError() {
  // The loading animation disappears
  this.quillUpdateImg = false
  this.$message.error('Picture insertion failed')
}
//Image upload successful hook function
handleAvatarSuccess(res) {
  // The loading animation disappears
  this.quillUpdateImg = false
},
That's it. Upload a picture and try it
Finally, thank you for your patience. Now that you are here, please order 👍 Let's go
Link integration
🔊 Project preview address (GitHub Pages): 👉👉 https://alanhzw.github.io
🔊 Project preview alternate address (own server): 👉👉 http://warbler.duwanyu.com
🔊 Source address (gitee): 👉👉 https://gitee.com/hzw_0174/warbler-homepage
🔊 Source code address (github): 👉👉 https://github.com/alanhzw/WarblerHomepage
🔊 My blog: 👉👉 https://www.duwanyu.com