From May 18 to 20, we held Google's annual conference in the form of full online I/O Developer Conference , including 112 conferences, 151 codelabs, 79 developer gatherings, 29 seminars, and many exciting releases. Although this year's conference did not release a new version of Google I/O application, we still updated the code base to show some of the latest features and trends in Android development.
The use experience of applications on large-size screens (tablets, foldable devices, and even Chrome OS and desktop PCs) is one of our concerns: in the past year, large-size screen devices have become more and more popular and user utilization has increased to 250 million active devices. Therefore, it is particularly important for applications to make full use of additional screen space. This article will show some of the techniques we use to make Google I/O applications better displayed on large screens.
Responsive navigation
On a wide screen device such as a tablet or a horizontal screen mobile phone, users usually hold both sides of the device, so it is easier for the user's thumb to touch the area near the side. At the same time, due to the additional horizontal space, it is more natural for the navigation elements to move from the bottom to the side. In order to achieve this ergonomic change, we are using Material Components New in Navigation rail.
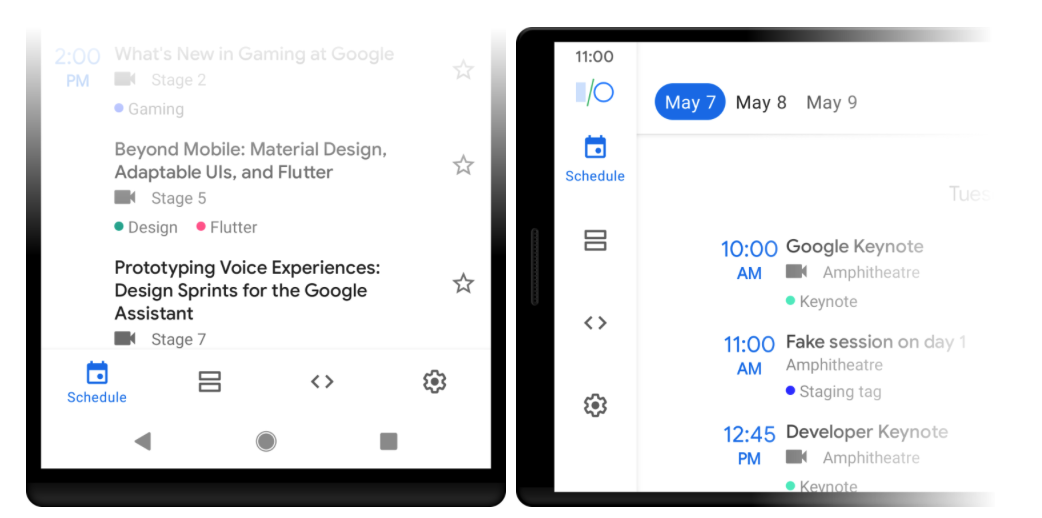
△ left: bottom navigation in vertical screen mode. Right: navigation rail in horizontal screen mode.
The Google I/O application uses two different layouts in the main Activity, including our ergonomic navigation. The layout under res/layout directory contains BottomNavigationView, while the layout under res/layout-w720dp directory contains NavigationRailView. During the running of the program, we can call the operator (?.) safely through Kotlin To determine which view to present to the user according to the current device configuration.
private lateinit var binding: ActivityMainBinding

override fun onCreate(savedInstanceState: Bundle?) {
  super.onCreate(savedInstanceState)
  binding = ActivityMainBinding.inflate(layoutInflater)

  // Depending on the configuration, there may be one of the following two navigation views.
  binding.bottomNavigation?.apply {
    configureNavMenu(menu)
    setupWithNavController(navController)
    setOnItemReselectedListener { } // Avoid navigating to the same destination interface.
  }
  binding.navigationRail?.apply {
    configureNavMenu(menu)
    setupWithNavController(navController)
    setOnItemReselectedListener { } // Avoid navigating to the same destination interface.
  }
  ...
}
Tip: even if you don't need all the features of data binding, you can still use it View binding To generate binding classes for your layout, so you can avoid calling findViewById.
Single pane or double pane
In the schedule function, we use the list detail mode to show the level of information. On the wide screen device, the display area is divided into the meeting list on the left and the selected meeting details on the right. A special challenge brought by this layout is that the same device may have different best display modes under different configurations. For example, the vertical screen of tablet computer is different from the horizontal screen. Because Google I/O applications use Jetpack Navigation How does the challenge of switching between different interfaces affect the navigation map and how do we record the content on the current screen?
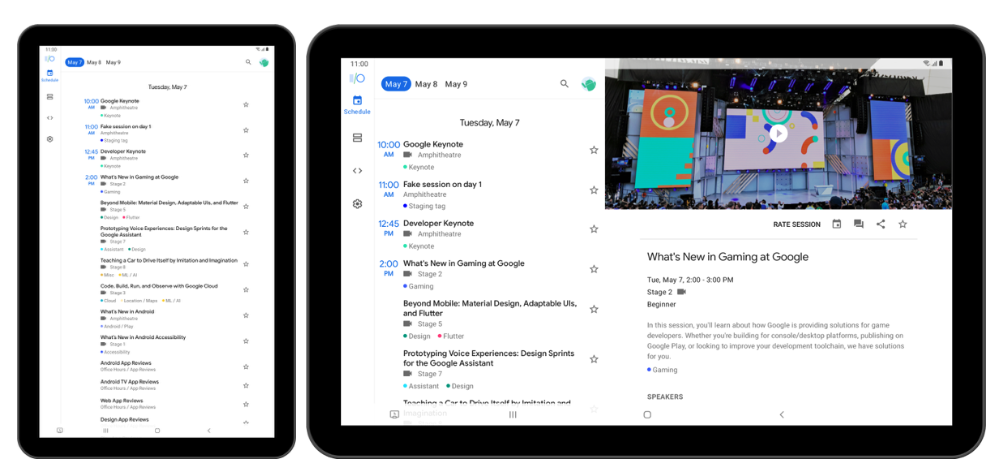
△ left: vertical screen mode of tablet (single pane). Right: horizontal screen mode of tablet (double pane).
We used SlidingPaneLayout , it provides an intuitive solution to the above problems. The double pane will always exist, but depending on the size of the screen, the second pane may not be visible. SlidingPaneLayout displays both only if there is still enough space under the given pane width. We assigned 400dp and 600dp widths to the meeting list and details panes, respectively. After some experiments, we found that even on a flat panel with a large screen, displaying the contents of two panes in the vertical screen mode at the same time will make the display of information too dense, so these two width values can ensure that the contents of all panes can be displayed at the same time only in the horizontal screen mode.
As for the navigation map, the destination page of the schedule is now a double pane Fragment, and the destinations that can be displayed in each pane have been migrated to the new navigation map. We can use NavController in a pane to manage various target pages contained in the pane, such as meeting details and lecturer details. However, we cannot navigate directly from the meeting list to the meeting details, because they are now placed in different panes, that is, in different navigation charts.
Our alternative is to let the meeting list and the double pane Fragment share the same ViewModel, which contains a Kotlin data flow. Whenever a user selects a meeting from the list, we will send an event to the data flow, and then the double pane Fragment can collect this event and forward it to NavController:
val detailPaneNavController =
  (childFragmentManager.findFragmentById(R.id.detail_pane) as NavHostFragment)
  .navController
scheduleTwoPaneViewModel.selectSessionEvents.collect { sessionId ->
  detailPaneNavController.navigate(
    ScheduleDetailNavGraphDirections.toSessionDetail(sessionId)
  )
  // On a narrow screen device, if the meeting details pane is not at the top, slide it in and block it above the list.
  // If both panes are already visible, there is no execution effect.
  binding.slidingPaneLayout.open()
}
As in the code above, call slidingPaneLayout.. Open (), on narrow screen devices, sliding into the display details pane has become a visible part of the navigation process. We must also slide out the details pane to "return" to the meeting list in other ways. Since the target pages in the double pane Fragment are no longer part of the application leading chart, we cannot automatically navigate backward in the pane by pressing the back button on the device, that is, we need to realize this function.
All the above situations can be handled in OnBackPressedCallback. This callback will be registered when the onViewCreated() method of the double pane Fragment is executed (you can learn more about adding here) Custom navigation Content of the. This callback listens to the movement of the sliding pane and pays attention to the changes of the navigation destination page of each pane, so it can evaluate how to deal with it the next time the return key is pressed.
class ScheduleBackPressCallback(
  private val slidingPaneLayout: SlidingPaneLayout,
  private val listPaneNavController: NavController,
  private val detailPaneNavController: NavController
) : OnBackPressedCallback(false),
  SlidingPaneLayout.PanelSlideListener,
  NavController.OnDestinationChangedListener {

  init {
    // Monitor the movement of the sliding pane.
    slidingPaneLayout.addPanelSlideListener(this)
    // Listen for changes in the navigation destination page in both panes.
    listPaneNavController.addOnDestinationChangedListener(this)
    detailPaneNavController.addOnDestinationChangedListener(this)
  }

  override fun handleOnBackPressed() {
    // Pressing return has three possible effects. We check them in order:
    // 1. Currently in the details pane, return the meeting details from the instructor details.
    val listDestination = listPaneNavController.currentDestination?.id
    val detailDestination = detailPaneNavController.currentDestination?.id
    var done = false
    if (detailDestination == R.id.navigation_speaker_detail) {
      done = detailPaneNavController.popBackStack()
    }
    // 2. Currently on a narrow screen device, if the details page is at the top, try sliding it out.
    if (!done) {
      done = slidingPaneLayout.closePane()
    }
    // 3. Currently in the List pane, return to the meeting list from the search results.
    if (!done && listDestination == R.id.navigation_schedule_search) {
      listPaneNavController.popBackStack()
    }

    syncEnabledState()
  }

  // For other necessary overrides, just call syncEnabledState().

  private fun syncEnabledState() {
    val listDestination = listPaneNavController.currentDestination?.id
    val detailDestination = detailPaneNavController.currentDestination?.id
    isEnabled = listDestination == R.id.navigation_schedule_search ||
      detailDestination == R.id.navigation_speaker_detail ||
      (slidingPaneLayout.isSlideable && slidingPaneLayout.isOpen)
  }
}
SlidingPaneLayout has also recently been optimized and updated for foldable devices. For more information about using SlidingPaneLayout, see: Create a two pane layout.
Limitations of resource qualifiers
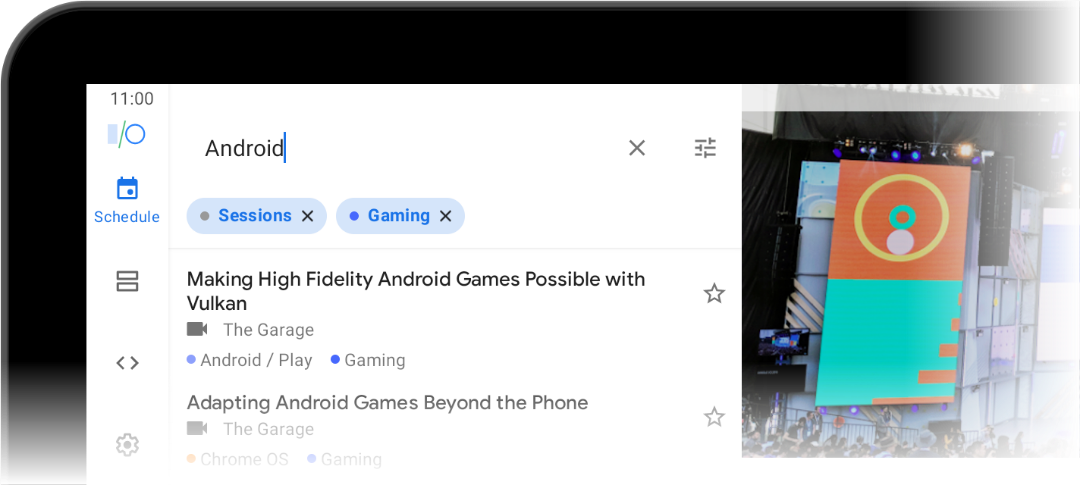
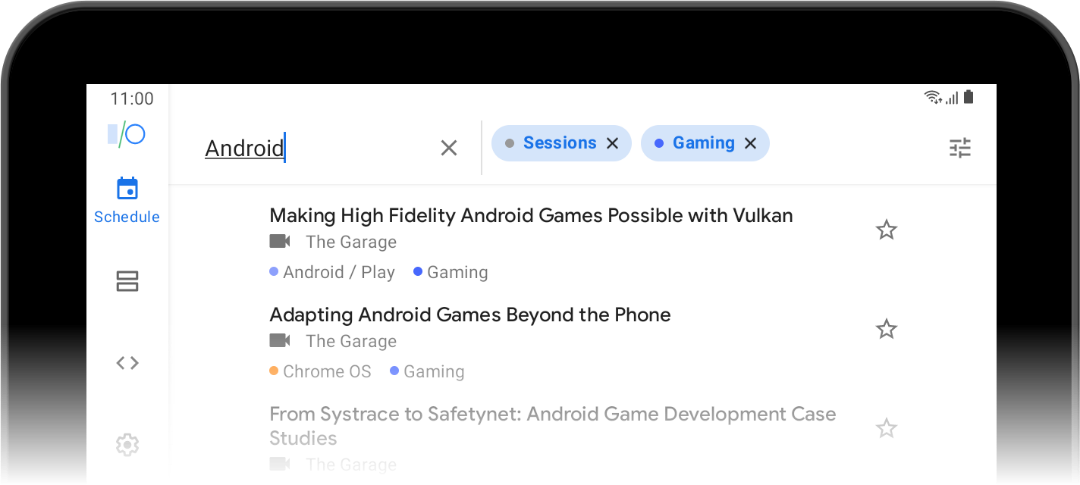
The search application bar also displays different contents under different screen contents. When searching, you can select different tags to filter the search results to be displayed. We will also display the currently effective filter tags in one of the following two positions: under the search text box in narrow mode and behind the search text box in wide mode. It may be counterintuitive that when the tablet is horizontal, it belongs to narrow size mode, while when it is vertical, it belongs to wide size mode.
△ search application bar when flat screen is horizontal (narrow mode)
△ search application bar in flat vertical screen (wide mode)
Previously, we realized this function by using the < include > tag in the application bar of the view hierarchy of the search Fragment and providing two different versions of layout, one of which is limited to the specification of layout-w720dp. Now this method doesn't work, because in that case, the layout or other resource files with these qualifiers will be parsed according to the full screen width, but in fact, we only care about the width of that particular pane.
To implement this feature, see search layout Part of the application bar code. Notice the two ViewStub elements (lines 27 and 28).
<com.google.android.material.appbar.AppBarLayout
  android:id="@+id/appbar"
  android:layout_width="match_parent"
  android:layout_height="wrap_content"
  ... >

  <androidx.appcompat.widget.Toolbar
    android:layout_width="match_parent"
    android:layout_height="?actionBarSize">

    <!-- Toolbar I won't support it layout_weight,So we introduce an intermediate layout LinearLayout. -->
    <LinearLayout
      android:layout_width="match_parent"
      android:layout_height="match_parent"
      android:orientation="horizontal"
      android:showDividers="middle"
      ... >

      <SearchView
        android:id="@+id/searchView"
        android:layout_width="0dp"
        android:layout_height="match_parent"
        android:layout_weight="2"
        ... />

      <!-- Filter labels in wide size ViewStub. -->
      <ViewStub
        android:id="@+id/active_filters_wide_stub"
        android:layout_width="0dp"
        android:layout_height="wrap_content"
        android:layout_weight="3"
        android:layout="@layout/search_active_filters_wide"
        ... />
    </LinearLayout>
  </androidx.appcompat.widget.Toolbar>

  <!-- Filter labels in narrow sizes ViewStub. -->
  <ViewStub
    android:id="@+id/active_filters_narrow_stub"
    android:layout_width="match_parent"
    android:layout_height="wrap_content"
    android:layout="@layout/search_active_filters_narrow"
    ... />
</com.google.android.material.appbar.AppBarLayout>
Two ViewStub They point to different layouts, but they all contain only one RecyclerView (although the properties are slightly different). These stubs do not occupy visual space at runtime until the content is inflated. The rest is to select the pile to inflate when we know how wide the pane is. So we just need to use doOnNextLayout Extend the function and wait for the first layout of AppBarLayout in onViewCreated().
binding.appbar.doOnNextLayout { appbar ->
  if (appbar.width >= WIDE_TOOLBAR_THRESHOLD) {
    binding.activeFiltersWideStub.viewStub?.apply {
      setOnInflateListener { _, inflated ->
        SearchActiveFiltersWideBinding.bind(inflated).apply {
          viewModel = searchViewModel
          lifecycleOwner = viewLifecycleOwner
        }
      }
      inflate()
    }
  } else {
    binding.activeFiltersNarrowStub.viewStub?.apply {
      setOnInflateListener { _, inflated ->
        SearchActiveFiltersNarrowBinding.bind(inflated).apply {
          viewModel = searchViewModel
          lifecycleOwner = viewLifecycleOwner
        }
      }
      inflate()
    }
  }
}
Conversion space
Android has always been able to create layouts that are available on a variety of screen sizes, all by match_parent size values, resource qualifiers, and libraries such as ConstraintLayout. However, this does not always provide the best experience for users in a specific screen size. When UI elements are stretched excessively, far apart or too dense, it is often difficult to convey information, and touch elements become difficult to identify, which affects the usability of the application.
For functions like "Settings", our short list items will be stretched severely on the wide screen. Since these list items themselves are unlikely to have a new layout, we can limit the width of the list through ConstraintLayout.
<androidx.constraintlayout.widget.ConstraintLayout
  android:layout_width="match_parent"
  android:layout_height="match_parent">
  <androidx.core.widget.NestedScrollView
    android:id="@+id/scroll_view"
    android:layout_width="0dp"
    android:layout_height="match_parent"
    app:layout_constraintLeft_toLeftOf="parent"
    app:layout_constraintRight_toRightOf="parent"
    app:layout_constraintWidth_percent="@dimen/content_max_width_percent">

    <!-- Set item-->

  </androidx.core.widget.NestedScrollView>
</androidx.constraintlayout.widget.ConstraintLayout>
On line 10, @ dimension / content_ max_ width_ Percent is a size value of floating-point number type. It may have different values according to different screen widths. These values gradually decrease from 1.0 of the small screen to 0.6 of the wide screen, so when the screen becomes wider, the UI elements will not feel torn due to excessive stretching.
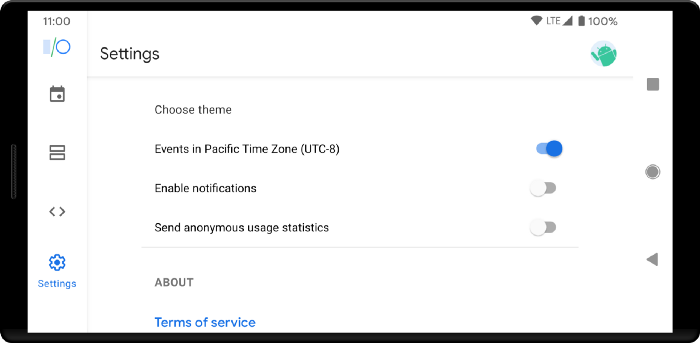
△ setting interface on wide screen equipment
Please read this about supporting different screen sizes guide , get the reference information of common dimension dividing points.
Conversion content
The Codelabs function has a similar structure to the setup function. But we want to make full use of the extra screen space, rather than limiting the width of the display. On a narrow screen device, you will see a list of items that expand or collapse when clicked. On the wide size screen, these list items will be converted into grid by grid cards, and the detailed contents are directly displayed on the cards.

△ left figure: Codelabs is displayed on the narrow screen. Right: Codelabs is displayed on the wide screen.
These independent grid cards are defined under res/layout-w840dp Alternate layout , data binding deals with how the information is bound to the view and how the card responds to clicks. Therefore, in addition to the differences under different styles, there is no need to implement too much content. On the other hand, there is no alternate layout for the whole Fragment, so let's see what skills are used to implement the required styles and interactions under different configurations.
Everything is focused on this RecyclerView element:
<androidx.recyclerview.widget.RecyclerView
  android:id="@+id/codelabs_list"
  android:clipToPadding="false"
  android:orientation="vertical"
  android:paddingHorizontal="@dimen/codelabs_list_item_spacing"
  android:paddingVertical="8dp"
  app:itemSpacing="@{@dimen/codelabs_list_item_spacing}"
  app:layoutManager="@string/codelabs_recyclerview_layoutmanager"
  app:spanCount="2"
  ......Other layout properties/>
Two resource files are provided here, each with different values on the size dividing point we selected for the alternative layout:
resource file | Infinite qualifier Version (default) | -w840dp |
|---|---|---|
@string/codelabs_recyclerview_layoutmanager | LinearLayoutManager | StaggeredGridLayoutManager |
@dimen/codelabs_list_item_spacing | 0dp | 8dp |
We configure the layout manager by setting the value of app:layoutManager to the string resource just now in the XML file, and then setting android:orientation and app:spanCount at the same time. Note that the orientation attribute is the same for both layout managers, but the span count is only applicable to StaggeredGridLayoutManager. If the filled layout manager is LinearLayoutManager, it will simply ignore the set transverse span value.
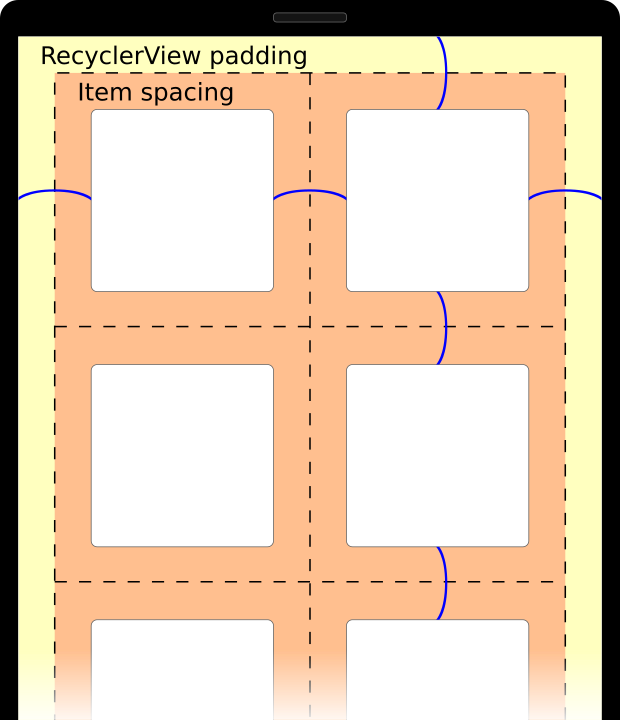
The dimension resource for android:paddingHorizontal is also used for another attribute app:itemSpacing. It is not a standard attribute of RecyclerView, so where does it come from? This is actually caused by Binding Adapter The Binding Adapter is a method to provide custom logic to the data binding library. When the application runs, the data binding will call the following functions and pass the value parsed from the resource file as a parameter.
@BindingAdapter("itemSpacing")
fun itemSpacing(recyclerView: RecyclerView, dimen: Float) {
  val space = dimen.toInt()
  if (space > 0) {
    recyclerView.addItemDecoration(SpaceDecoration(space, space, space, space))
  }
}
SpaceDecoration It is a simple implementation of ItemDecoration, which reserves a certain space around each element, which also explains why we always get the same element interval on 840dp or wider screen (we need to give a positive value for @ dimension / codelabs_list_item_spacing). Setting the inner margin of the RecyclerView itself to the same value will keep the distance between the element and the RecyclerView boundary the same size as the gap between the elements, forming a unified white space around the elements. In order for elements to scroll all the way to the edge of RecyclerView, you need to set android:clipToPadding="false".
The more diverse the screens, the better
Android has always been a diverse hardware ecosystem. As more tablets and foldable devices become popular among users, make sure to test your application in these different sizes and screen proportions so that some users won't feel left out. Android Studio also provides Foldable simulator and Free window mode To simplify these testing processes, so you can use them to check your application's response to the above scenarios.
We hope these changes in Google I/O applications will inspire you to build beautiful and high-quality applications that fully adapt to devices of all shapes and sizes. Welcome from Github Download the code and give it a try.
Welcome click here Submit feedback to us, or share your favorite content and found problems. Your feedback is very important to us. Thank you for your support!