Note: the bugs in this article are all encountered during the installation process. After finding out the reasons, the command is optimized. Therefore, if you type according to the command, you should not encounter the following bugs
It's not easy for new bloggers to sort out. If your problem is solved, please give a praise~~~~~~
I Installing anaconda
Command:
//If you want to install other versions, change anaconda3-2021.05-linux-x86 in each sentence_ 64.sh


//Get installation package
wget https://repo.continuum.io/archive/Anaconda3-2021.05-Linux-x86_64.sh

//Modify the sh file permission. If the permission is too small, the conda command may not be found after installation
sudo chmod 777 Anaconda3-2021.05-Linux-x86_64.sh

//Install anaconda base command
bash Anaconda3-5.0.1-Linux-x86_64.sh

//Add environment variable
echo 'export PATH="~/anaconda3/bin:$PATH"' >> ~/.bashrc

//Order bashrc entry into force
source .bashrc

//Keep updated
conda upgrade --all
Code explanation:
1. Get anaconda installation package
The wget command can download the file corresponding to the following web address to the current directory. The sh file here is the installation package of anaconda. If you want to download other versions, you can change the web address
2. Installing anaconda
The bash instruction is used to execute sh files
3. Add environment variable
Environment variable information exists bashrc is in this file (under the root directory). Adding environment variables is actually adding a sentence to this file: PATH="~/anaconda3/bin:$PATH". In addition to the above echo and export commands, you can also add them manually
Execute source Bashrc make it effective
Check for successful installation:
Enter conda on the command line. If conda command not found appears, the installation has not been successful.
Regarding the bug: conda command not found, the author found two reasons:
1. Environment variables are not set properly:
Configure environment variables: directly import the path of anaconda's bin into ~ / bashrc. (this is the general path. If you are not sure, you'd better check it.)
echo 'export PATH="~/anaconda3/bin:$PATH"'>>~/.bashrc
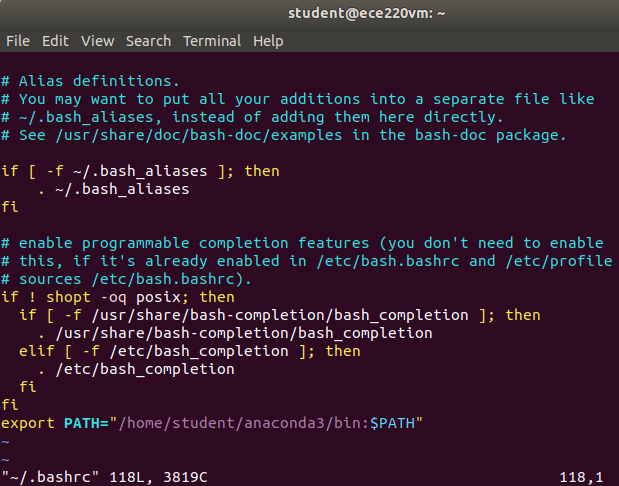
If you're not sure if it's imported, check the directory in the root directory bashrc file, type the command
vi ~/.bashrc
Then draw it to the bottom of the file, if there is one on the last line
export PATH="/home / so and so / anaconda3/bin:$PATH
The description is imported, as shown in the following figure:
But it can't be #export PATH="/h.....", which is commented out

Then don't forget the source bashrc!!!
Then don't forget the source bashrc!!!
Then don't forget the source bashrc!!!
2. Permissions of installation package sh files:
(1) if your environment variables are good, but you still conda command not found, it is likely that your installation package, that is, the permissions of sh files, need to be reinstalled at this time
You can use ls -al to confirm Anaconda_xxxxxx.sh file permission. If it is not readable or writable, please look down
(2) delete the things installed now (important)
#There are two related documents, both deleted
sudo rm -r anaconda3
sudo rm -r .conda
(3) modify the permissions of the sh file and use the chmod 777 command
sudo chmod 777 Anaconda3-2021.05-Linux-x86_64.sh
#Replace it with your own sh file name. My name is this
(4) perform the installation steps again
II Install pytorch in anaconda's virtual environment
(note that cuda has been installed in advance, but cuda toolkit is used for version matching.)
Command:
# To create a virtual environment, select python=3.8, env_name took whatever he wanted
# Template: conda create -n [env_name] python=[3.8]
# Here is an example

conda create -n xtreme python=3.8

#Activate anaconda environment
source activate

# Enter the virtual environment (must be installed after entering the virtual environment)
conda activate xtreme


# Change pip mirror source
pip config set global.index-url https://mirrors.bfsu.edu.cn/pypi/web/simple

# Install pytorch (install using pip, because you can install pytorch of the specified cuda version)
# For example, 1.9.0+cu111 refers to torch 1 9.0 + cuda11. one
pip install torch==1.9.0+cu111 torchvision==0.10.0+cu111 -f https://download.pytorch.org/whl/torch_stable.html


# If you want to use other versions of cuda, you can directly conda install the corresponding cuda toolkit
# Of course, the pytorch version should also be consistent with the cuda version, such as 1.7.0+cu102
conda install cudatoolkit=10.2


# Then run the program in the virtual environment, not outside the virtual environment. Each project can build a new virtual environment

# Exit virtual environment
conda deactivate
Code explanation:
We choose to configure cuda and pytorch in anaconda's virtual environment, which has two advantages
1) it's convenient to toss around. The last time it was installed in the host, it polluted the environment, and finally the whole server crashed qwq
2) anaconda will help you install all kinds of dependencies, which is very convenient
First, use the conda create command to install the virtual environment xtreme
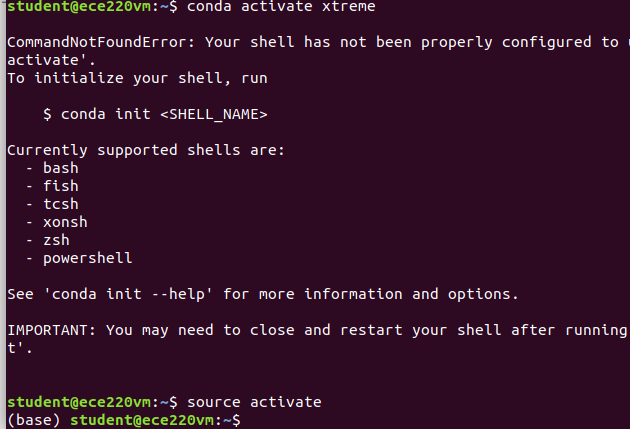
Then use source activate to activate it. After activation, the (base) will appear in front of the command line
After that, the notes of the command are clear and will not be repeated here
Installation bug:
CommandNotFoundError: Your shell has not been properly configured to use 'conda activate'.
Solution:
#Activate anaconda environment
source activate

The (base) appears in the front, which indicates that the activation is OK