4.4. Create logical volumes using lvcreate
Volume group is the core of LVM architecture, which is similar to disk partition in non LVM system. Logical volume is the final object we use. The command used to create logical volume in volume group is lvcreate. In fact, LVM has two modes: non Thin mode and Thin mode. In non Thin mode, the basic command format is as follows:
lvcreate -L Capacity size -n Logical volume name volume group name
In Thin mode, the basic format of the command is as follows:
lvcreate --thin -L Capacity size -n Logical volume name volume group name
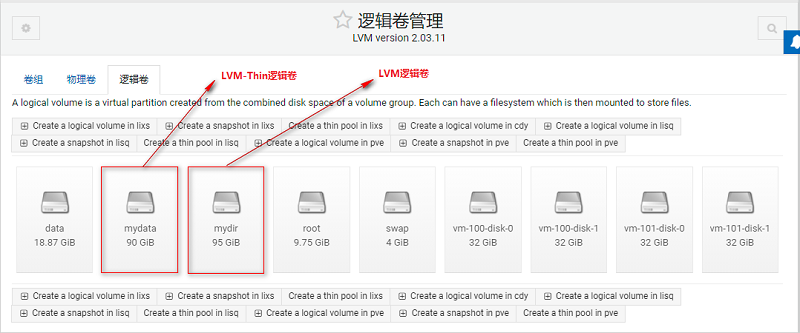
As shown in Figure 1, we want to create a Thin mode logical volume in the lisq volume group and mount it on the LVM Thin storage point. Before creating a logical volume, we must know the space size of the lisq volume group. You can see that the space size of the lisq volume group is 90GB through the command "vgs".
root@pve:~# vgs
  VG   #PV #LV #SN Attr   VSize    VFree
  cdy    2   0   0 wz--n- <106.86g <106.86g
  lisq   2   0   0 wz--n-   93.12g   93.12g
  lixs   1   0   0 wz--n- <100.00g <100.00g
  pve    1   7   0 wz--n-  <39.50g   <4.88g
Before creating a logical volume, we should plan the name and space size of the logical volume. As shown in Figure 1, we need to create an LVM thin logical volume with the name of "mydata" and the capacity of 90GB from the lisq volume group, an LVM logical volume with the name of "mydir" and the capacity of 95GB from the lixs volume group, and no logical volume is created in the cdy volume group.
root@pve:~# lvcreate --thin -L 90G -n mydata lisq           # Create LVM thin mode logical volumes
  Thin pool volume with chunk size 64.00 KiB can address at most 15.81 TiB of data.
  Logical volume "mydata" created.
root@pve:~# lvcreate -L 95G -n mydir lixs                   # Create LVM mode logical volumes
  Logical volume "mydir" created.
After the logical volume is created, we can view the details of the logical volume through the "lvs" command and the "lvdisplay" command.
root@pve:~# lvs
  LV            VG   Attr       LSize  Pool Origin Data%  Meta%  Move Log Cpy%Sync Convert
  mydata        lisq twi-a-tz-- 90.00g             0.00   10.42  # LVM thin mode logical volume space size
  mydir         lixs -wi-a----- 95.00g                           # LVM mode logical volume space size
  data          pve  twi-aotz-- 18.87g             0.00   1.58
  root          pve  -wi-ao----  9.75g
  swap          pve  -wi-ao----  4.00g
  vm-100-disk-0 pve  Vwi-a-tz-- 32.00g data        0.00
  vm-100-disk-1 pve  Vwi-a-tz-- 32.00g data        0.00
  vm-101-disk-0 pve  Vwi-a-tz-- 32.00g data        0.00
  vm-101-disk-1 pve  Vwi-a-tz-- 32.00g data        0.00
root@pve:~# lvdisplay
  --- Logical volume ---
  LV Path                /dev/lixs/mydir                   # LVM logical volume mydir file path
  LV Name                mydir                             # LVM logical volume name: mydir
  VG Name                lixs                              # Volume group name: lixs
  LV UUID                bIaKsE-7ezS-rrTS-epe0-yvqB-AzZl-7J4nCM
  LV Write Access        read/write
  LV Creation host, time pve, 2021-09-30 23:14:01 +0800
  LV Status              available
  # open                 0
  LV Size                95.00 GiB                         # LVM logical volume mydir space size
  Current LE             24320
  Segments               1
  Allocation             inherit
  Read ahead sectors     auto
  - currently set to     256
  Block device           253:13

  --- Logical volume ---
  LV Name                mydata                           # LVM thin logical volume mydata file path
  VG Name                lisq                             # Volume group name: lixs
  LV UUID                wHEz7Q-U7bF-Dota-JXm3-vwor-cPoa-XZRnjL
  LV Write Access        read/write
  LV Creation host, time pve, 2021-09-30 23:13:09 +0800
  LV Pool metadata       mydata_tmeta             # Metadata pool, which is used to store data for managing and retrieving virtual machines
  LV Pool data           mydata_tdata             # Data pool for storing virtual machine disks
  LV Status              available
  # open                 0
  LV Size                90.00 GiB                # LVM thin logical volume mydata space size
  Allocated pool data    0.00%
  Allocated metadata     10.42%
  Current LE             23040
  Segments               1
  Allocation             inherit
  Read ahead sectors     auto
  - currently set to     256
  Block device           253:12
Note that the mydir logical volume is in LVM mode and is a file device with the device name "/ dev/lixs/mydir". The mydata logical volume is in LVM thin mode and is an LV Pool. Once a virtual machine disk is created in mydata, the "/ dev/lisq/mydata" will be automatically deleted and replaced by the virtual machine disk logical volume. For details, please refer to the chapter on "data logical volume".
root@pve:~# ls /dev/lixs
mydir
root@pve:~# ls /dev/lisq
mydata
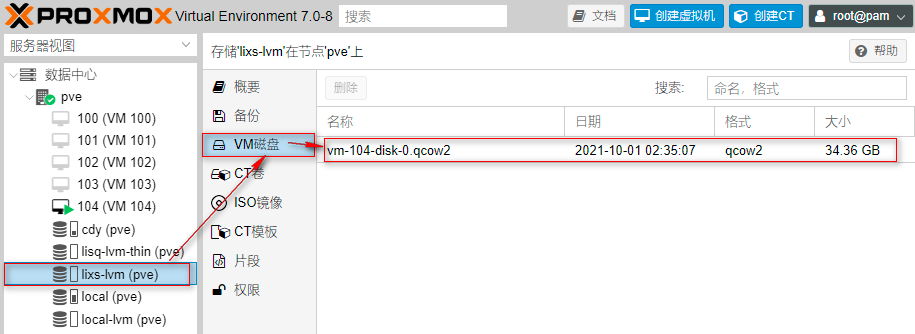
On the third-party WEB UI monitoring interface, we can see the LVM thin mydata logical volume and LVM mydir logical volume we created, as shown in Figure 47.
We can also view more detailed logical volume information through the "lsblk -f" command line CLI:
root@pve:~# lsblk -f
NAME                         FSTYPE      FSVER    LABEL UUID                                   FSAVAIL FSUSE% MOUNTPOINT
sda
├─sda1
├─sda2                       vfat        FAT32          F92A-97E4
└─sda3                       LVM2_member LVM2 001       Ny0mtE-hiIR-IVRB-33aA-dKZe-uKyL-gtbWkM
  ├─pve-swap                 swap        1              d971d023-1e21-4db4-b083-35581f2fc965                  [SWAP]
  ├─pve-root                 ext4        1.0            9cbd71dd-b8a4-473e-a503-48c8c0c0928b      3.2G    61% /
  ├─pve-data_tmeta
  │ └─pve-data-tpool
  │   ├─pve-data
  │   ├─pve-vm--100--disk--0
  │   ├─pve-vm--100--disk--1
  │   ├─pve-vm--101--disk--0
  │   └─pve-vm--101--disk--1
  └─pve-data_tdata
    └─pve-data-tpool
      ├─pve-data
      ├─pve-vm--100--disk--0
      ├─pve-vm--100--disk--1
      ├─pve-vm--101--disk--0
      └─pve-vm--101--disk--1
sdb
├─sdb1                       LVM2_member LVM2 001       G4QEvl-FLjA-HLOy-47ue-pWRx-yZN0-b6NFaL
│ ├─lisq-mydata_tmeta              # Metadata pool for LVM thin logical volume mydata
│ │ └─lisq-mydata
│ └─lisq-mydata_tdata              # Data pool of LVM thin logical volume mydata
│   └─lisq-mydata
└─sdb2                       LVM2_member LVM2 001       9mWUj0-lteJ-LDGj-V1cd-CHi4-jix4-vt0yGl
sdc
├─sdc1                       LVM2_member LVM2 001       N74Wl8-azXA-LxvN-eB5t-D33X-oosh-u30LSw
│ └─lisq-mydata_tdata      # Data pool of LVM thin logical volume mydata
│   └─lisq-mydata
└─sdc2                       LVM2_member LVM2 001       F3dAkc-a2vJ-s6dI-22KU-WBIh-qIVB-oc6Q37
sdd                          LVM2_member LVM2 001       31G4SJ-B2J6-uSLL-1t20-VSTM-iIz3-dh0UNH
└─lixs-mydir              # LVM logical volume mydir
sr0                          iso9660              PVE   2021-07-05-19-15-41-00
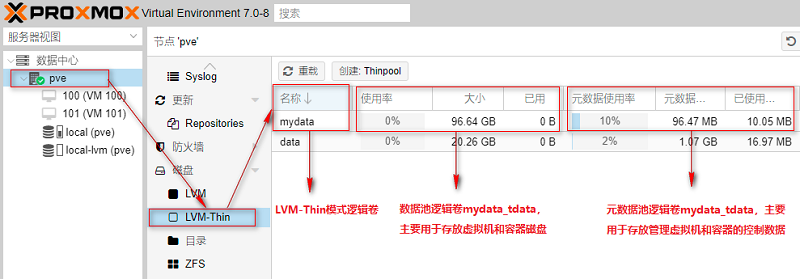
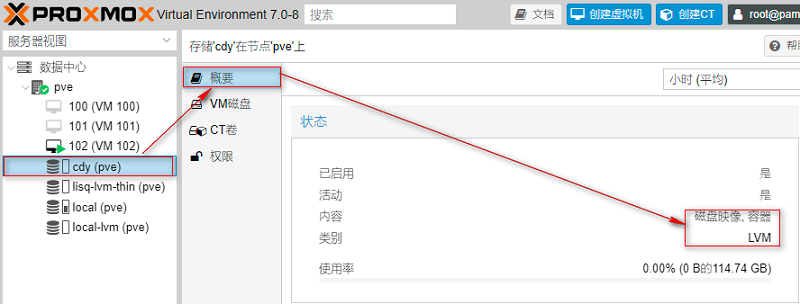
Through the above explanation, we should now know that the mydata logical volume is actually the same as the default data logical volume. It is an LVM thin mode logical volume and a thin pool. Let's take a look at the thin pool in the Proxmox VE 7.0 interface, as shown in Figure 48.
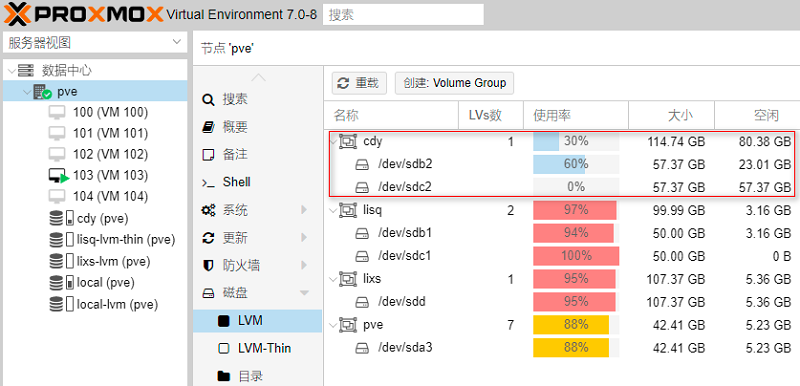
Next, let's go to the Proxmox VE 7.0 interface to see the usage of volume groups. Through the usage of this volume group, we will explain the meaning of this interface, as shown in Figure 49.
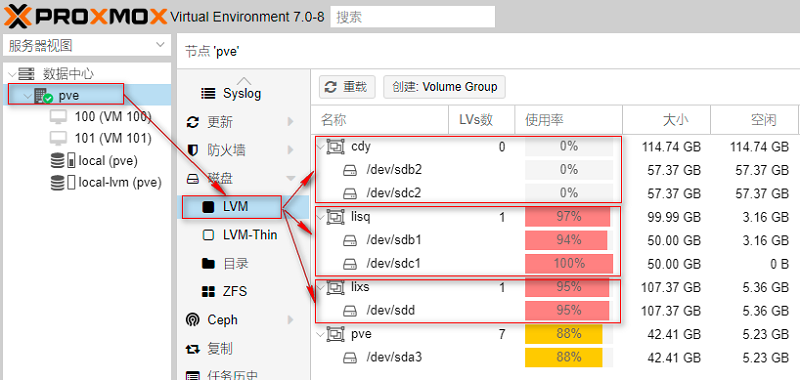
As can be seen from figure 49, the current utilization rate of cdy volume group is 0%, that is, so far, we have not created logical volumes (similar to disk partitions) on the volume group. The current utilization rate of the lisq volume group is 97%, that is, so far, we have created the LVM thin mode logical volume mydata on the lisq volume group. The size of the mydata space is 90GB, accounting for 97% of the total lisq logical volume space. The current utilization rate of the lixs volume group is 95%, that is, so far, we have created the LVM mode logical volume mydir on the lixs volume group. The size of the mydir space is 95GB, accounting for 95% of the whole lixs logical volume space.
4.5. Create file system using mkfs (format logical volume)
After the logical volume is created, we can use the logical volume like a normal disk partition, but we must format the logical volume before using the logical volume.
The so-called format logical volume actually means creating a file system on the logical volume. We use ext4 file system to format the logical volume. The formatting operations are as follows:
root@pve:~# mkfs -t ext4 /dev/lixs/mydir         # mydir logical volume creates ext4 file system
mke2fs 1.46.2 (28-Feb-2021)
Creating filesystem with 24903680 4k blocks and 6225920 inodes
Filesystem UUID: 1f5c23fe-eaf2-43b4-a274-43e9e12fc1ce
Superblock backups stored on blocks:
	32768, 98304, 163840, 229376, 294912, 819200, 884736, 1605632, 2654208,
	4096000, 7962624, 11239424, 20480000, 23887872

Allocating group tables: done
Writing inode tables: done
Creating journal (131072 blocks): done
Writing superblocks and filesystem accounting information: done
Note that I only formatted the mydir logical volume in LVM mode here, because the mydir logical volume needs to be mounted to the "directory" storage point, while mydata needs to be mounted to the "LVM thin" storage point, and the cdy volume group needs to be mounted to the "LVM" storage point. These two do not need to be formatted, mainly because Proxmox VE 7.0 will automatically process when mounted to the "LVM thin" and "LVM" storage points. That is, LVM mode logical volumes mounted to a "directory" storage point need to be formatted and a file system created.
root@pve:~# lsblk -f
NAME                         FSTYPE      FSVER    LABEL UUID                                   FSAVAIL FSUSE% MOUNTPOINT
sda
├─sda1
├─sda2                       vfat        FAT32          F92A-97E4
└─sda3                       LVM2_member LVM2 001       Ny0mtE-hiIR-IVRB-33aA-dKZe-uKyL-gtbWkM
  ├─pve-swap                 swap        1              d971d023-1e21-4db4-b083-35581f2fc965                  [SWAP]
  ├─pve-root                 ext4        1.0            9cbd71dd-b8a4-473e-a503-48c8c0c0928b      3.2G    61% /
  ├─pve-data_tmeta
  │ └─pve-data-tpool
  │   ├─pve-data
  │   ├─pve-vm--100--disk--0
  │   ├─pve-vm--100--disk--1
  │   ├─pve-vm--101--disk--0
  │   └─pve-vm--101--disk--1
  └─pve-data_tdata
    └─pve-data-tpool
      ├─pve-data
      ├─pve-vm--100--disk--0
      ├─pve-vm--100--disk--1
      ├─pve-vm--101--disk--0
      └─pve-vm--101--disk--1
sdb
├─sdb1                       LVM2_member LVM2 001       G4QEvl-FLjA-HLOy-47ue-pWRx-yZN0-b6NFaL
│ ├─lisq-mydata_tmeta
│ │ └─lisq-mydata
│ └─lisq-mydata_tdata
│   └─lisq-mydata
└─sdb2                       LVM2_member LVM2 001       9mWUj0-lteJ-LDGj-V1cd-CHi4-jix4-vt0yGl
sdc
├─sdc1                       LVM2_member LVM2 001       N74Wl8-azXA-LxvN-eB5t-D33X-oosh-u30LSw
│ └─lisq-mydata_tdata
│   └─lisq-mydata
└─sdc2                       LVM2_member LVM2 001       F3dAkc-a2vJ-s6dI-22KU-WBIh-qIVB-oc6Q37
sdd                          LVM2_member LVM2 001       31G4SJ-B2J6-uSLL-1t20-VSTM-iIz3-dh0UNH
└─lixs-mydir                 ext4        1.0            1f5c23fe-eaf2-43b4-a274-43e9e12fc1ce     # File system created
sr0                          iso9660              PVE   2021-07-05-19-15-41-00
4.6. Mount storage point
In the Proxmox VE 7.0 interface, up to 12 types of storage can be mounted. The mydata logical volume in LVM thin mode is suitable for mounting to the "LVM thin" storage point, the mydir logical volume in LVM mode is suitable for mounting to the "LVM" storage point, and the cdy volume group is suitable for mounting to the "directory" storage point, as shown in Figure 50.

In Proxmox VE 7.0, there are two modes for logical volumes: LVM thin (Thin) mode and LVM (non Thin) mode. The format of local LVM built in Proxmox VE 7.0 is LVM thin.
LVM thin mode logical volumes have advantages and disadvantages in use:
1) Benefits: when creating virtual machines and containers, it has the snapshot function, and LVM thin can exceed the disk space;
2) Disadvantages: only virtual machine and container files can be stored, and other types of files cannot be stored;
LVM mode logical volumes have advantages and disadvantages in use:
1) Benefits: it can store multiple file types including virtual machines and containers (Proxmox VE limits that LVM can only store virtual machines and container files);
2) Disadvantages: virtual machines and containers have no snapshot function, and LVM storage cannot exceed disk space;
4.6.1. Mount mydata logical volume to LVM thin storage point
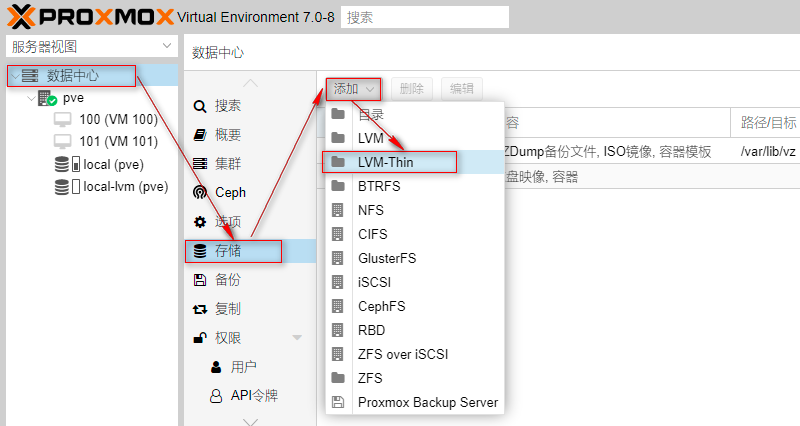
Step 1: select LVM thin mount point
Mount the mydata logical volume in LVM thin mode to the LVM thin storage point for storing virtual machine disks and container disks. First, we select the LVM thin mount point, as shown in Figure 51.
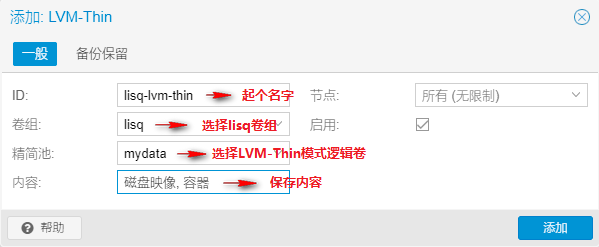
Step 2: Mount LVM thin mode logical volumes
In the pop-up LVM thin interface, fill in the name of LVM thin storage pool, select volume group and thin pool, as shown in Figure 52.
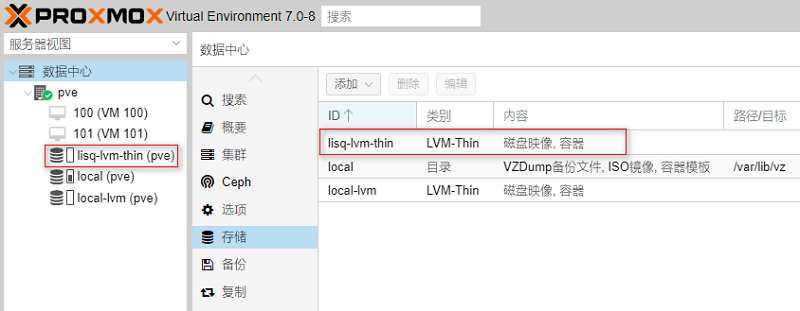
After the LVM thin storage pool is successfully added, the "lisq LVM thin" storage ID will appear in the navigation tree on the left of Proxmox VE 7.0. At the same time, the lisq LVM thin storage pool is also mounted in the window, as shown in figures 53 and 54.

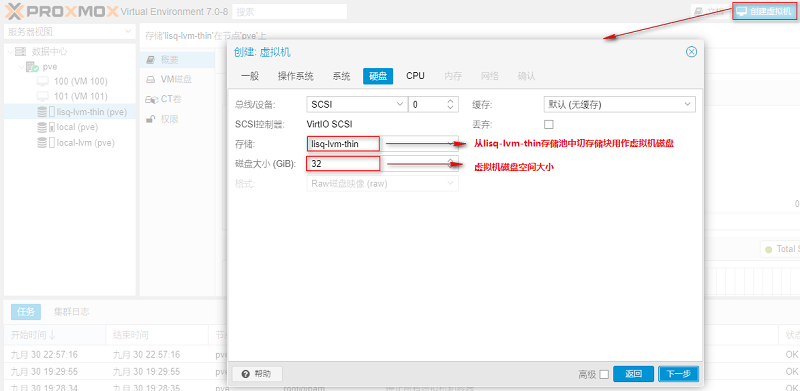
Step 3: create a virtual machine to detect usage
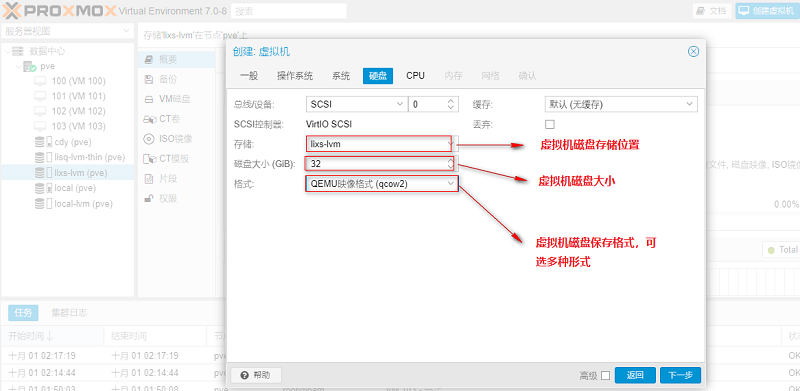
In the interface of creating virtual machine, select "lisq LVM thin" for the storage pool, and cut storage blocks from the storage pool "lisq LVM thin" to be used as virtual machine disks. Virtual machine disks can be set according to the actual situation, as shown in Figure 55.
The virtual machine is created successfully, the virtual machine disk is stored in the lisq LVM thin storage pool, and the virtual machine can be started normally, as shown in Figure 56.
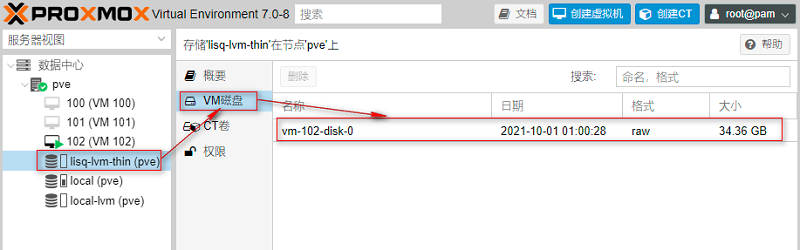
4.6.2.cdy volume group is mounted to LVM storage point
Step 1: select LVM mount point
Mount the cdy volume group volume to the LVM storage point to store the virtual machine disk and container disk. First, we select the LVM mount point, as shown in Figure 57.
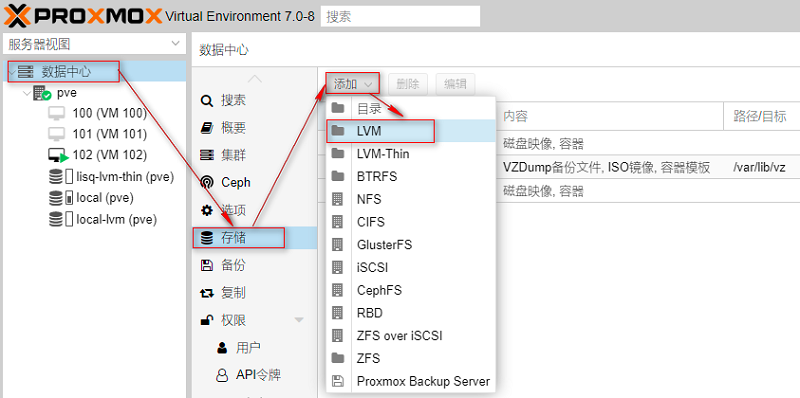
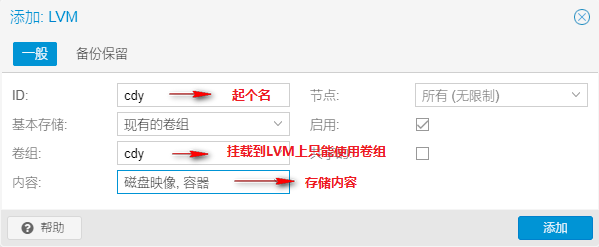
Step 2: mount the volume group
LVM storage points can only mount volume groups. In the pop-up LVM interface, fill in the name of LVM storage pool, select volume group and thin pool, as shown in Figure 58.
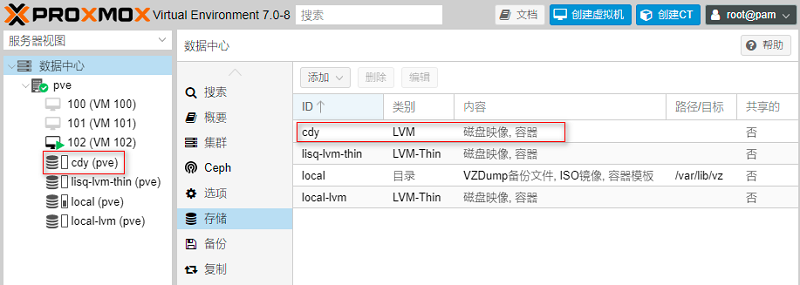
After the LVM storage pool is successfully added, the "cdy" storage ID will appear in the left navigation tree of Proxmox VE 7.0. At the same time, the cdy storage pool will also be mounted in the window, as shown in figures 59 and 60.
Step 3: create a virtual machine to detect usage
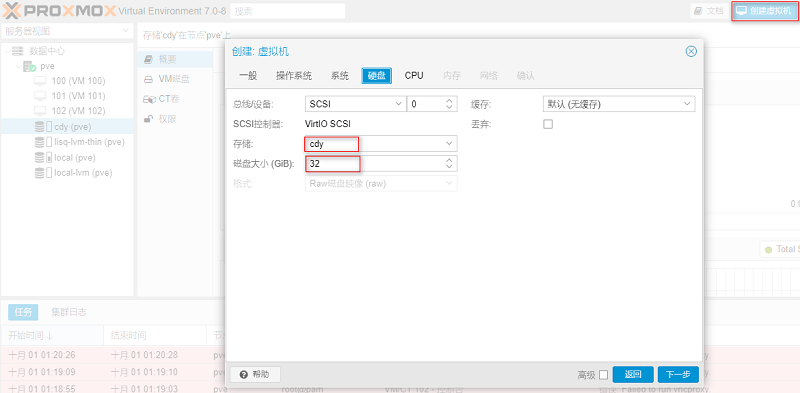
In the interface of creating virtual machine, select "cdy" for the storage pool, and cut storage blocks from the storage pool "cdy" to be used as virtual machine disks. Virtual machine disks can be set according to the actual situation, as shown in Figure 61.
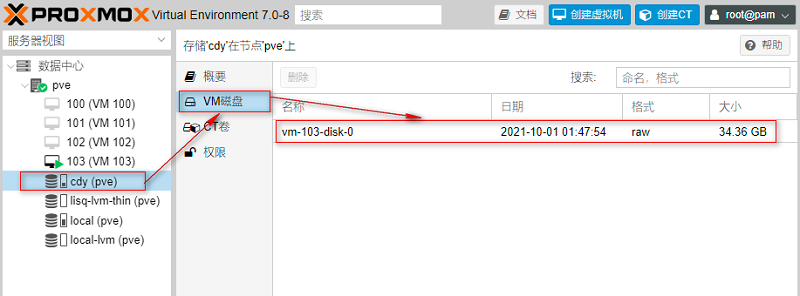
After the virtual machine is successfully created, let's take another look at the utilization of cdy volume groups in the Proxmox VE 7.0 interface, as shown in Figure 63.
4.6.3. Mount mydir logical volume to directory storage point
Step 1: create a mount point in the background of Proxmox VE
root@pve:~# mkdir /var/mydir # Create mount point / var/mydir
Step 2: modify the / etc/fstab file to achieve permanent mounting
root@pve:~# vim /etc/fstab
# <file system> <mount point> <type> <options> <dump> <pass>
/dev/pve/root / ext4 errors=remount-ro 0 1
/dev/pve/swap none swap sw 0 0
proc /proc proc defaults 0 0
/dev/lixs/mydir /var/mydir ext4 defaults 0  0       # Add this sentence at the end to permanently mount

root@pve:~# df -hT | grep -v tmpfs            # Check whether the mount is successful. Sometimes it needs to be restarted
Filesystem             Type      Size  Used Avail Use% Mounted on
/dev/mapper/pve-root   ext4      9.5G  5.9G  3.2G  65% /
/dev/mapper/lixs-mydir ext4       93G   24K   89G   1% /var/mydir   # Mount succeeded
/dev/fuse              fuse      128M   20K  128M   1% /etc/pve
Step 3: select the directory mount point on the Proxmox VE interface
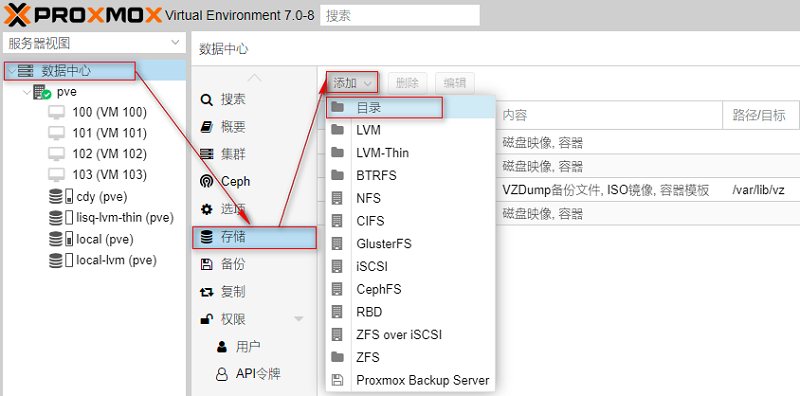
Mount the LVM mode logical volume to the "directory" storage point, which is used to store virtual machine disks and container disks, as well as documents in other formats. First, we select the "directory" mount point, as shown in Figure 64.
Step 4: Mount LVM mode logical volumes
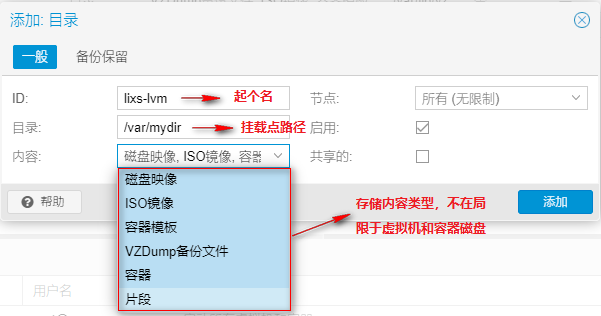
The "directory" storage point is suitable for mounting logical volumes in LVM mode. In the pop-up LVM interface, fill in the "directory" storage pool name, directory path and storage content, as shown in Figure 65.
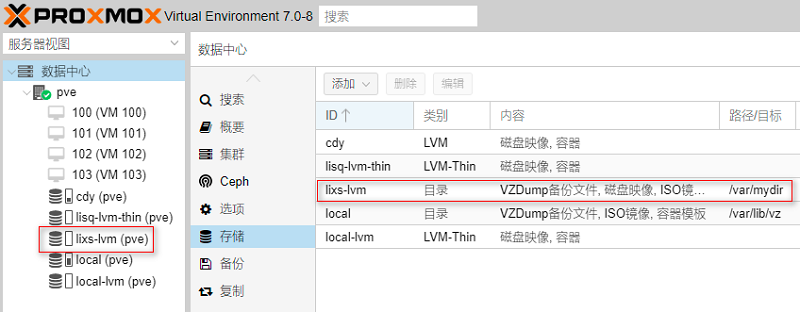
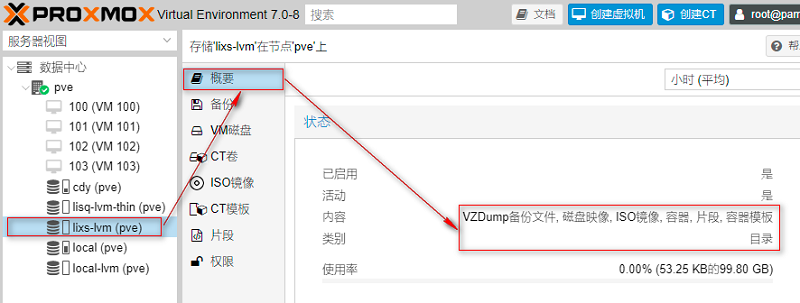
After the "directory" storage pool is successfully added, the "lixs LVM" storage ID will appear in the left navigation tree of Proxmox VE 7.0. At the same time, the lixs LVM storage pool is also mounted in a window, as shown in figures 66 and 67.
Step 5: create a virtual machine to detect usage
In the interface of creating virtual machine, select "lixs LVM" for the storage pool, and cut storage blocks from the storage pool "lixs LVM" to be used as virtual machine disks. Virtual machine disks can be set according to the actual situation, as shown in Figure 68.
The virtual machine is created successfully, the virtual machine disk is stored in the lixs storage pool, and the virtual machine can be started normally, as shown in Figure 69.