Writing wrapper interfaces based on another set of classes is a common API Design For example, your job may be to maintain a large legacy code base. Compared with refactoring all the code, you are more willing to audit a new and concise API to hide all the underlying legacy code; Or you may have written a C++API and later need to provide a C interface to specific customers; Or your API uses a third-party dependency library. You want customers to use this library directly, but you don't want to expose this library directly to customers.
The potential side effect of creating wrapper APIs is performance impact, mainly due to the additional level 1 indirection and the overhead of storing wrapper hierarchy state. But in the cases mentioned above, doing so can create higher quality and more targeted APIs, which is worth it. Next, we will summarize the proxy mode, adapter mode and appearance mode in order of the increasing degree of difference between the wrapper layer and the original interface.
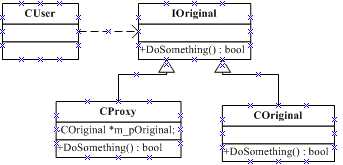
1. Agent mode
1.1 class diagram

Add the virtual interface shared by the agent's original API based on the above. This is to better save the synchronization of the two APIs. The premise is that you can modify the original API.
1.2 code implementation
#pragma once

#include <iostream>
using namespace std;

class IOriginal
{
public:
    IOriginal()
    {
        cout << "IOriginal Sturuct" << endl;
    }

    virtual ~IOriginal()
    {
        cout << "IOriginal Destruct" << endl;
    }

    virtual void DoSomething() = 0;
};

class COriginal : public IOriginal
{
public:
    COriginal()
    {
        cout << "COriginal Sturuct" << endl;
    }

    ~COriginal()
    {
        cout << "COriginal Destruct" << endl;
    }

    void DoSomething()
    {
        cout << "COriginal DOSomething" << endl;
    }
}

class CProxy : public IOriginal
{
public:
    CProxy()
    {
        m_pOriginal = new COriginal();
        cout << "CProxy Sturuct" << endl;
    }

    ~CProxy()
    {
        if (m_pOriginal != NULL)
        {
            delete COriginal;
            m_pOriginal = NULL;
        }
        cout << "CProxy Destruct" << endl;
    }

    void DoSomething()
    {
        m_pOriginal->DoSomething();
        cout << "CProxy DOSomething" << endl;
    }

private:
    COriginal *m_pOriginal;
}
2. Adapter mode
The adapter design pattern converts the interface of a class into a compatible but different interface. Similar to the proxy pattern, the adapter design pattern is also a single component wrapper, but the interface between the adapter class and Yuan Shilei can be different.
2.1 class diagram

2.2 code implementation
#pragma once

#include <iostream>
using namespace std;

class COriginal
{
public:
    COriginal()
    {
        cout << "COriginal Sturuct" << endl;
    }

    ~COriginal()
    {
        cout << "COriginal Destruct" << endl;
    }

    void DoSomethingA()
    {
        cout << "COriginal DOSomethingA" << endl;
    }
}

class CAdapter
{
public:
    CProxy()
    {
        m_pOriginal = new COriginal();
        cout << "CProxy Sturuct" << endl;
    }

    ~CProxy()
    {
        if (m_pOriginal != NULL)
        {
            delete COriginal;
            m_pOriginal = NULL;
        }
        cout << "CProxy Destruct" << endl;
    }

    void fun()
    {
        //"......"
        m_pOriginal->DoSomethingA();
        cout << "CProxy DOSomething" << endl;
    }

private:
    COriginal *m_pOriginal;
}
View Code
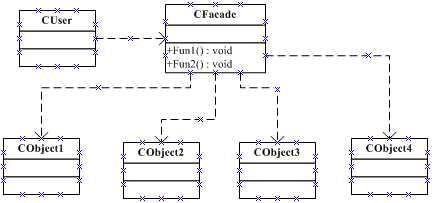
3. Appearance mode
Facade patterns can provide a simplified interface for a set of classes. It actually defines a higher-level interface to make the bottom subsystem easier to use.
3.1 class diagram
Publisher: full stack programmer, stack length, please indicate the source for Reprint: https://javaforall.cn/120142.html Original link: https://javaforall.cn