Puppet deployment application
Skill goal
- Familiar with the working principle of Puppet
- Master the configuration method of Puppet deployment application
Case 1 Analysis
Case overview
As a system administrator, maintaining the normal operation of the server is the most basic responsibility. When managing several to dozens of servers, most administrators like to write their own gadgets to maintain. However, with the increase of the number of servers, the number of tasks also increases gradually. At this time, a concise and powerful framework is needed to complete the system management task.
To achieve this goal, a number of tools are introduced. These tools are "programmable". The system administrator only needs to write a few lines of "code" for these tools, and it will automatically complete all work. Puppet is one of these operation and maintenance automation tools. In some large Internet enterprises, puppet operation and maintenance automation tool manages hundreds or even thousands of servers. It can carry out unified operation for multiple servers, such as deploying unified software and unified on-line maintenance, and can quickly complete on-line deployment, reduce manpower and reduce the risk of manual misoperation.
Case pre knowledge points
1. Working principle of puppet
The purpose of puppet is to let the administrator focus only on the objectives to be managed and ignore the details of implementation. Puppet can be used either on a single machine or in C/S structure. In the case of large-scale use of puppet, C/S structure is usually used. In this structure, the Puppet Client only runs Puppet Client, and the puppet server only runs Puppet Master.
The workflow of Puppet management tool is shown in the figure below.
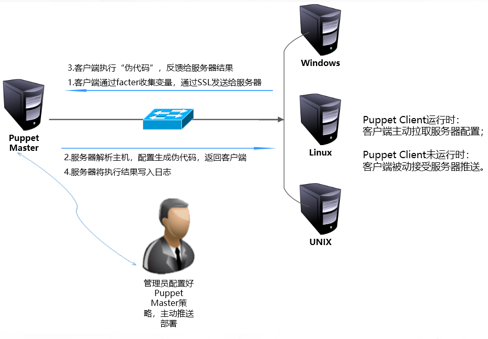
(1) The client puppet calls the factor tool (factor is a tool for collecting, detecting and analyzing client configuration information through SSL encryption). Factor detects some variables of the host, such as host name, memory size, IP address, etc. Puppet sends this information to the server through SSL connection.
(2) The Puppet Master on the server side analyzes and detects the host name of the client through the factor tool, then finds the corresponding node configuration in the main configuration file manifest of the project, and parses this part of the content. The information sent by factor can be processed as variables. Only the code involved in node is parsed, and other codes not involved are not parsed. Parsing is divided into several stages. First, check the syntax. If the syntax is correct, continue parsing. The result of parsing generates an intermediate "pseudo code", and then sends the pseudo code to the client.
(3) The client receives the "pseudo code" and executes it. The client sends the execution result to the server.
(4) The server writes the execution result of the client to the log
2. Precautions in puppet work
During the work of Puppet, the following two points deserve attention.
(1) In order to ensure security, the Client and the Master are based on SSL and certificate. Only the Client authenticated by the Master certificate can communicate with the Master.
(2) Puppet will keep the system in a state that people expect and maintain it all the time. For example, detect a file and ensure that it always exists, and ensure that the SSH service is always enabled. If the file is deleted or the SSH service is closed, the file will be re created or the SSH service will be started the next time puppet executes (30 minutes by default).
Case environment
1. Experimental environment of this case
| host name | IP address | to configure | Main software |
|---|---|---|---|
| master | 192.168.10.101 | 2C/2G | Puppet-server |
| client1 | 192.168.10.102 | 2C/2G | Puppet |
| client2 | 192.168.10.103 | 2C/2G | Puppet |
2. Case requirements
Batch modify the client SSH service port with Puppet
3. Case realization ideas
(1) Environmental preparation;
(2) Install Puppet Master and Puppet Client;
(3) Configure test nodes;
(4) The client actively pulls and the server actively pushes.
Case 1 implementation
Puppet installation and deployment
1. Modify the server host name
In the small-scale Puppet environment, it is generally to modify the / etc/hosts file to realize the service communication through the host name. However, thousands of servers need to build their own DNS server to realize the service communication through the host name. This experiment is realized by modifying the / etc/hosts file.
192.168.10.101 Host operation
hostnamectl set-hostname master
su

192.168.10.102 Host operation
hostnamectl set-hostname client1
su

192.168.10.103 Host operation
hostnamectl set-hostname client2
su
2. Turn off the firewall kernel security mechanism and all host operations
systemctl stop firewalld
systemctl disable firewalld
setenforce 0
sed -i "s/^SELINUX=.*/SELINUX=disabled/g" /etc/selinux/config
3. Install and start the time synchronization server and all host operations
yum -y install chrony
systemctl start chronyd
systemctl enable chronyd
chronyc sources -v
4. Add hosts resolution and all host operations
cat >> /etc/hosts << EOF
192.168.10.101 master
192.168.10.102 client1
192.168.10.103 client2
EOF
Puppet installation and deployment
1. Install puppet server and master host operation
From the official website https://yum.puppetlabs.com/el/7/products/x86_64/ Download puppetlabs-release-7-12 noarch. RPM package and upload it to the master server.
#Unzip the source package
rpm -ivh puppetlabs-release-7-12.noarch.rpm

#Install and start puppet server
yum install -y puppet-server
systemctl start puppetmaster
systemctl enable puppetmaster
2. Install Puppet and operate two client hosts
#Upload the puppetlabs source to the client host and install the puppetlabs source
rpm -ivh puppetlabs-release-7-12.noarch.rpm

#Install puppet
yum install -y puppet
3. Modify the configuration files of the two clients
vim /etc/puppet/puppet.conf
#Add the "server = master" configuration field under the [main] heading in the file to set the domain name of puppet server
server = master     #master host name. If there is a DNS server, you can write the domain name
4. Apply for registration on two clients
#client1 host registration
puppet agent --server=master --no-daemonize --verbose

#client2 host registration
puppet agent --server=master --no-daemonize --verbose

#Wait a moment, and then you can press Ctrl+C to end
5. View the clients applying for registration on the master side
puppet cert --list
"client1" (SHA256) 1D:D4:FE:81:C7:C3:98:1C:53:28:86:49:6E:1C:FF:13:7F:61:D3:0C:DC:2F:94:51:49:18:8E:EB:C8:24:1A:1C
"client2" (SHA256) 02:3D:64:24:56:42:F4:CE:46:B5:96:91:06:CF:E9:E9:FB:1D:CD:BC:CB:CF:CA:CD:55:27:A1:7F:17:9E:72:29
6. Register all unregistered clients on the master side
puppet cert sign --all
Notice: Signed certificate request for client1
Notice: Removing file Puppet::SSL::CertificateRequest client1 at '/var/lib/puppet/ssl/ca/requests/client1.pem'
Notice: Signed certificate request for client2
Notice: Removing file Puppet::SSL::CertificateRequest client2 at '/var/lib/puppet/ssl/ca/requests/client2.pem'

#If you want to allow a single client to register, you can use the following command
puppet cert sign Client host name or domain name

#After successful registration, you can view the registered clients through the directory
ll /var/lib/puppet/ssl/ca/signed/
Total consumption 12
-rw-r--r--. 1 puppet puppet 1931 5 March 31-17:20 client1.pem
-rw-r--r--. 1 puppet puppet 1931 5 March 31-17:20 client2.pem
-rw-r--r--. 1 puppet puppet 1927 5 March 31-15:53 master.pem
Configuration instance
In order to protect the ssh port of Linux, modify the client ssh port in batch, change the default port 22 to 9922, and restart. Create an ssh module on the Master side. The module directory is ssh. There are three subdirectories under the module Directory: manifests, templates and files.
-
The manifest must contain an init pp file, which is the initial (entry) file of the module. When importing a module, it will start from init pp start execution. You can write all the code to init pp can also be divided into multiple pp files. Init contains other files. ssh must be used to define the class name in order to realize the call.
-
The files directory is the file distribution directory of the module. Puppet provides a file distribution mechanism, similar to the rsync module.
-
The templates directory contains erb model files, which are related to the template attribute of the file resource (rarely used).
Configure the test node and operate on the master side
The Master needs to use the following configuration files:
-
Node information: in / etc / puppet / manifest / nodes/
-
Module information: in / etc/puppet/modules/
(1) Create the required directory on the Master
cd /etc/puppet/
mkdir -p modules/ssh/{manifests,templates,files}
mkdir manifests/nodes
mkdir modules/ssh/files/ssh
chown -R puppet modules/       #Modify permissions
ll modules/ssh    #Check the structure in / etc/puppet/modules/ssh directory
 Total consumption 0
drwxr-xr-x. 3 puppet root 17 5 March 31-17:31 files
drwxr-xr-x. 2 puppet root  6 5 March 31-17:31 manifests
drwxr-xr-x. 2 puppet root  6 5 March 31-17:31 templates
(2) Create the module configuration file install pp
vim /etc/puppet/modules/ssh/manifests/install.pp
#Enter the following information (make sure the client installs SSH service first)
class ssh::install{
    package{ "openssh":
        ensure => present,
    }
}
(3) Create module configuration file config pp
vim /etc/puppet/modules/ssh/manifests/config.pp
#Enter the following information to configure the files to be synchronized
class ssh::config{
    # Configure the files that the client needs to synchronize
    file { "/etc/ssh/sshd_config":
        # Make sure the client file exists
        ensure => present,
        # User to which the file belongs
        owner =>"root",
        # Group to which the file belongs
        group =>"root",
        # File properties
        mode =>"0600",
        # Synchronize files from the server
        source =>"puppet://$puppetserver/modules/ssh/ssh/sshd_config",
        # Call install PP make sure ssh is installed
        require => Class["ssh::install"],
        # If config Notify service when PP changes pp
        notify => Class["ssh::service"],
    }
}
(4) Create module configuration file service pp
vim /etc/puppet/modules/ssh/manifests/service.pp
class ssh::service {
    service {"sshd":
        ensure=>running,       #Confirm ssh operation
        hasstatus=>true,       #puppet this service supports the status command, which is similar to service sshd status
        hasrestart=>true,      #Puppet this service supports the restart command, which is similar to service sshd restart
        enable=>true,          #Whether the service is started
        require=>Class["ssh::config"]      #Confirm config PP call
    }
}
(5) Create module master configuration file init pp
vim /etc/puppet/modules/ssh/manifests/init.pp
class ssh{
    include ssh::install,ssh::config,ssh::service     #Load the above configuration file
}

#At this time, there are four files in the / etc / puppet / modules / SSH / manifest directory
ll /etc/puppet/modules/ssh/manifests/
Total consumption 16
-rw-r--r--. 1 root root 628 5 March 31-17:46 config.pp
-rw-r--r--. 1 root root  63 5 March 31-17:47 init.pp
-rw-r--r--. 1 root root  79 5 March 31-17:45 install.pp
-rw-r--r--. 1 root root 186 5 March 31-17:46 service.pp
(6) Establish server-side ssh unified maintenance file
Copy server side / etc / SSH / sshd_ Default path from config file to module.
cp /etc/ssh/sshd_config /etc/puppet/modules/ssh/files/ssh/
chown -R puppet /etc/puppet/modules/ssh/files/ssh/
(7) Create test node profile
Create a test node configuration file and load SSH.
vim /etc/puppet/manifests/nodes/ssh.pp
node 'client1'{       #Note that node is followed by the host name or domain name of the client
    include ssh
}
node 'client2'{
    include ssh
}
(8) Load the test node into the Puppet, that is, modify the site pp
vim /etc/puppet/manifests/site.pp
import "nodes/ssh.pp"
(9) Modify the sshd maintained by the server_ Config configuration file
vim /etc/puppet/modules/ssh/files/ssh/sshd_config
Port 9922	#Uncomment and change to 9922
(10) Restart the puppet master service
systemctl restart puppetmaster


tree /etc/puppet
/etc/puppet
├── auth.conf
├── environments
│   └── example_env
│       ├── manifests
│       ├── modules
│       └── README.environment
├── fileserver.conf
├── manifests
│   ├── nodes
│   │   └── ssh.pp
│   └── site.pp
├── modules
│   └── ssh
│       ├── files
│       │   └── ssh
│       │       └── sshd_config
│       ├── manifests
│       │   ├── config.pp
│       │   ├── init.pp
│       │   ├── install.pp
│       │   └── service.pp
│       └── templates
└── puppet.conf

12 directories, 11 files
Client active pull
On one of the client1 clients, perform the following operations to actively pull the configuration from the server.
puppet agent -t

netstat -tunlp | grep ssh   #Check the TCP/UDP port number and filter out the ssh port number
tcp        0      0 0.0.0.0:9922            0.0.0.0:*               LISTEN      19797/sshd
tcp6       0      0 :::9922                 :::*                    LISTEN      19797/sshd

#The ssh port number turned out to be 9922
Active push of server
In large-scale deployment, it is impossible to use pull action on each client, but it is more reasonable to use server push mode at this time. Make changes on client client2.
(1) Modify the puppet configuration file and add the following in the last line.
vim /etc/puppet/puppet.conf
#Add on the last line of the file
listen = true    #Listen port 8139
(2) Modify the authentication configuration file auth Conf defines some authentication information and access rights, and the last line is added as follows.
 vim /etc/puppet/auth.conf
#Add the following to the last line
allow *	     #Allow any server push
(3) Start the Puppet Agent client.
systemctl start puppetagent
(4) Modify / etc / SSH / sshd of client client2_ Config file, restore Port 9922 to its initial state, and then restart the sshd service.
vim //etc/ssh/sshd_config
#Port 22

systemctl restart sshd

netstat -tunlp | grep ssh
tcp        0      0 0.0.0.0:22              0.0.0.0:*               LISTEN      18913/sshd
tcp6       0      0 :::22                   :::*                    LISTEN      18913/sshd
(5) Push the configuration to the client2 node, and operate the master host
puppet kick client2
If the "error: host client 2 fails: connection rejected - connection (2)" appears, go to the client to check the status of the following puppetagent
 Client view status
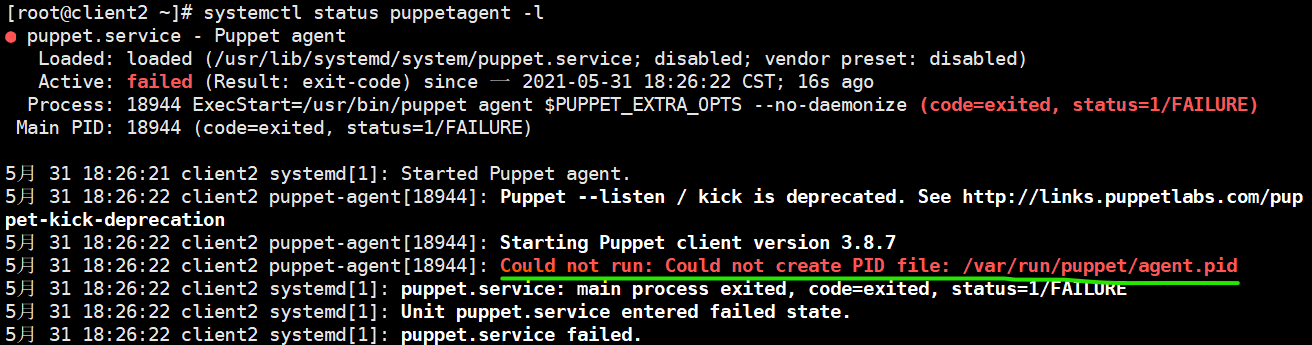 Directly put / var / run / puppet / agent PID file deletion
cd /var/run/puppet/
rm -rf agent.pid

#Then restart the puppetagent
systemctl restart puppetagent
systemctl status puppetagent
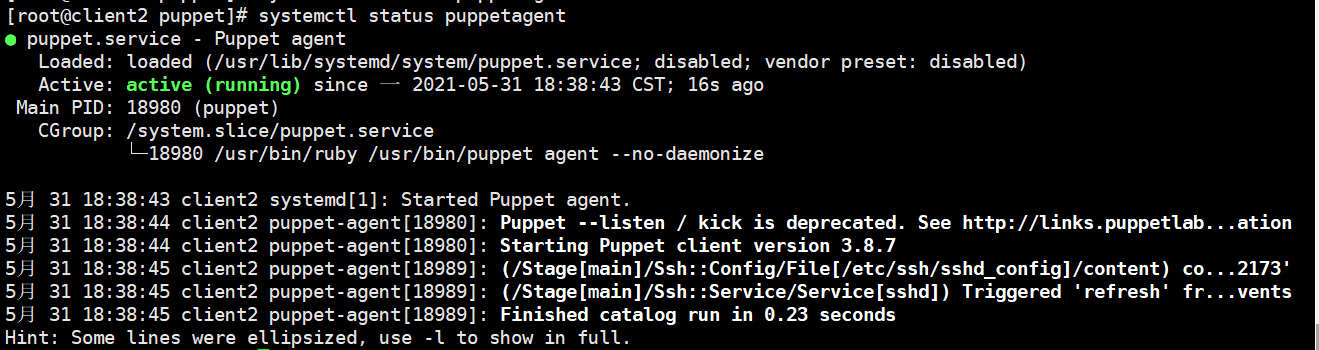 Then go to the master host to push again, and there will be no errors

(6) Check results, client2 host operation
At this time, you can see that the SSH port has been changed to 9922 on the client2 host.
cat /etc/ssh/sshd_config | grep Port
#Port 9922
#GatewayPorts no

netstat -tunlp | grep sshd
tcp        0      0 0.0.0.0:9922            0.0.0.0:*               LISTEN      19158/sshd
tcp6       0      0 :::9922                 :::*                    LISTEN      19158/sshd
Extension: puppet kick -p 10 -host client #-p means that a batch of 10 clients are pushed -- to whom is the host pushed