Article catalogue
NodeJS environment configuration
Nodejs download address: http://nodejs.cn/download/

MAC configuration
Just download from the official website and install it directly
Installation mode 2:
# View node version
brew search node

# Install node
brew install node

# Check whether the installation is successful
node -v
npm -v
node version management:
npm install -g n

# View all versions of node
n ls

# Switch between different versions from the installed node
n

# Install node 12 version
n 12
Linux configuration
sudo apt-get install nodejs
The node version management tool n can also be used for version switching
Windows configuration
-
Download the installation package
-
All defaults - next - Finish to complete the installation (you can change the installation path. I usually install it to disk D)
-
CMD opens the command line and enters node -v and npm -v to view the version numbers of node and npm
-
Configure the global module installation path and cache path, and create two folders node under the installation directory of nodejs_ Global and node_cache
-
CMD opens the command line and executes the following contents (the specific path is filled in according to your own)
npm config set perfix "D:Program Files
odejs
ode_global"
npm config set cache  "D:Program Files
odejs
ode_cache"
-
System environment variable new NODE_PATH, the path is the node added above_ New node under global folder_ Modules folder
D:Program Files
odejs
ode_global
ode_modules
-
Edit the user variable path and add a node_global path
D:Program Files
odejs
ode_global
Windows configuration environment reference address: https://www.cnblogs.com/hshdexy/p/13605176.html
Development environment initialization
Basic environment
-
Find a location to create a new folder, for example: test
-
Create a JS file, such as test js
-
Enter the test folder, run the command line in this directory, and execute the following command
npm init
# Then just press enter all the way, that is, fill in a project description and so on, and then a package will be generated JSON configuration file
-
To use the puppeter in the project, run the following command to install it (refer to GitHub)
npm i puppeteer
# or "yarn add puppeteer"
Tip: when installing puppeter, it will download the latest version of Chromium (MAC 170MB, Linux 282mb, windows 280MB) that can be used with puppeter
Here, I developed it on the Mac and directly used it, because I need to display the running process of the program on the browser. Later, when I deploy it to the Linux server, I will no longer use the browser (the browser type can be customized), and then I can install puppeter core. The installation steps are as follows
npm i puppeteer-core
# or "yarn add puppeteer-core"
Tip: starting from version 1.7.0, the puppeter core software package has been officially released. This is a puppeter version. By default, no browser will be downloaded. The puppeter core is designed as a lightweight version of puppeter to launch an existing browser installation or to connect to a remote browser. Make sure that the version of puppeter core you install is compatible with the browser you intend to connect to. (translated from Github)
-
Official screenshot example
const puppeteer = require('puppeteer'); (async () => { const browser = await puppeteer.launch(); const page = await browser.newPage(); await page.goto('https://example.com'); await page.screenshot({ path: 'example.png' }); await browser.close(); })(); -
Edit test JS, and then run the following command on the command line to execute the script
node test.js
GitHub address: https://github.com/puppeteer/puppeteer
Baidu OCR docking
Note: because my own program needs to be identified with verification code, I used Baidu OCR
Download character recognition node js SDK: https://ai.baidu.com/sdk#ocr
-
Unzip the SDK into a separate folder, such as AIP node SDK version, and copy it to the test folder
-
Enter the AIP node sdk version folder and run the following command to install the sdk dependency Library
npm install
-
Treat directories as module dependencies
-
Enter the test folder to install the dependency
npm install baidu-aip-sdk
-
You can use the sample interface of Baidu ordinary character recognition
var fs = require('fs');

var image = fs.readFileSync("assets/example.jpg").toString("base64");

// Call general character recognition, and the picture parameter is local picture
client.generalBasic(image).then(function(result) {
    console.log(JSON.stringify(result));
}).catch(function(err) {
    // If a network error occurs
    console.log(err);
});

// If there are optional parameters
var options = {};
options["language_type"] = "CHN_ENG";
options["detect_direction"] = "true";
options["detect_language"] = "true";
options["probability"] = "true";

// Call general character recognition with parameters, and the picture parameters are local pictures
client.generalBasic(image, options).then(function(result) {
    console.log(JSON.stringify(result));
}).catch(function(err) {
    // If a network error occurs
    console.log(err);
});;

var url = "https//www.x.com/sample.jpg";

// Call general character recognition, and the picture parameter is remote url picture
client.generalBasicUrl(url).then(function(result) {
    console.log(JSON.stringify(result));
}).catch(function(err) {
    // If a network error occurs
    console.log(err);
});

// If there are optional parameters
var options = {};
options["language_type"] = "CHN_ENG";
options["detect_direction"] = "true";
options["detect_language"] = "true";
options["probability"] = "true";

// Call general character recognition with parameters, and the picture parameters are remote url pictures
client.generalBasicUrl(url, options).then(function(result) {
    console.log(JSON.stringify(result));
}).catch(function(err) {
    // If a network error occurs
    console.log(err);
});;
My example code
const puppeteer = require('puppeteer');

// Website user name and login password
const userName = "xxxxxxxxxx";
const passWord = "xxxxxxxxxx";
// Website home page and position list address
const gotoUrl = "xxxxxxxxxxxx";
const listUrl = "xxxxxxxxxxxx";
// Verification code picture path
const verCodeImgPath = "verCodeImg.png";
// Verification Code
let code;
// Quote Baidu OCR
let AipOcrClient = require('baidu-aip-sdk').ocr;

// Set Baidu OCR APPID/AK/SK
let APP_ID = "xxxxx";
let API_KEY = "xxxxxxxxx";
let SECRET_KEY = "xxxxxxxxx";

// Create a new object. It is recommended to save only one object and call the service interface
let client = new AipOcrClient(APP_ID, API_KEY, SECRET_KEY);
// Local picture upload
let fs = require('fs');

// Refresh function
async function refresh() {
  const browser = await puppeteer.launch({
    // Headless mode. The script running process is displayed without opening the browser. It can be opened during debugging
    headless: true,
    // Set browser window size
    defaultViewport: {
      width: 1000,
      height: 2000,
    }
  });
  const page = await browser.newPage();
  try {
    // Enter the login page and wait until there is no network connection
    await page.goto(gotoUrl, {
      waitUntil: "networkidle2",
    });
  } catch(e) {
    console.log("Login page cannot be accessed!");
    // Close the browser and return to no longer run down. This refresh failed
    await browser.close();
    return;
  }

  // Fill in user name
  try {
    // Find label element for user name
    let accountElements = await page.$x('//input[@id="UserName"]', {
      waitForTimeout: 3000
    });
    // Fill in user name
    await accountElements[0].type(userName)
  } catch (e) {
    console.log("User name input failed!");
    await browser.close();
    return;
  }
  await page.waitForTimeout(2000);
  // Fill in the password
  try {
    // Find label element for password
    let pwdElements = await page.$x('//input[@id="UserPass"]', {
      waitForTimeout: 3000
    });
    // Fill in the password
    await pwdElements[0].type(passWord)
  } catch (e) {
    console.log("Password input failed!");
    await browser.close();
    return;
  }

  // Select user type
  await page.click('#RadioC');
  // Submit Form
  await page.click('#Denglu');
  // Wait 5 seconds to load the page
  await page.waitForTimeout(5000);

  // Jump to position list page
  try {
    // Wait until there is no network connection
    await page.goto(listUrl, {
      waitUntil: "networkidle2"
    });
  } catch (e) {
    console.log("Position list page cannot be accessed!");
    await browser.close();
    return;
  }

  //Click Select all
  try {
    await page.click("#CheckAll");
  } catch (e) {
    console.log("Failed to select all!");
    await browser.close();
    return;
  }

  // Verification code label element found
  const verCodeImg = await page.$('body > div:nth-child(5) > table > tbody > tr > td:nth-child(3) > form > table:nth-child(5) > tbody > tr > td:nth-child(2) > img');
  // Determine whether the verification code label exists
  if (verCodeImg) {
    // Get the verification code and store it locally
    try {
      await verCodeImg.screenshot({
        path: verCodeImgPath
      });
      var image = fs.readFileSync(verCodeImgPath).toString("base64");
    } catch (e) {
      console.log("Verification code interception error!");
      await browser.close();
      return;
    }
    // Baidu OCR
    // Call general character recognition, and the picture parameter is local picture
    client.generalBasic(image).then(async function(result) {
      code = result.words_result[0].words;
      // Wait for identification results
      await page.waitForTimeout(3000);
    }).catch(async function(err) {
      // If a network error occurs
      console.log(err);
      console.log("Baidu OCR Network error occurred on the interface!");
      await browser.close();
      return;
    });
    // Fill in the verification code
    try {
      // Until the verification code input box label element
      let codeInput = await page.$("#Tel");
      // Wait 2 seconds
      await page.waitForTimeout(2000);
      // Enter verification code
      await codeInput.type(code);
      // Wait 2 seconds
      await page.waitForTimeout(2000);
    } catch (e) {
      console.log("Verification code input error!");
      await browser.close();
      return;
    }
  }

  //Click refresh position
  try {
    // Click the refresh position button
    await page.click("#btn_tigao");
    // Wait for 3 seconds. There is a response time during the actual test, so there must be a waiting time
    await page.waitForTimeout(3000);
    console.log("Refresh succeeded!");
  } catch (e) {
    console.log("Refresh failed!");
    await browser.close();
    return;
  }
  await browser.close();
}
// Run the refresh function once
refresh();
// Set a refresh every 2 minutes
setInterval(() => {
  refresh();
}, 120 * 1000);
Docker deployment
To be added
Little knowledge
-
What if you don't use an xpath selector to select tags?
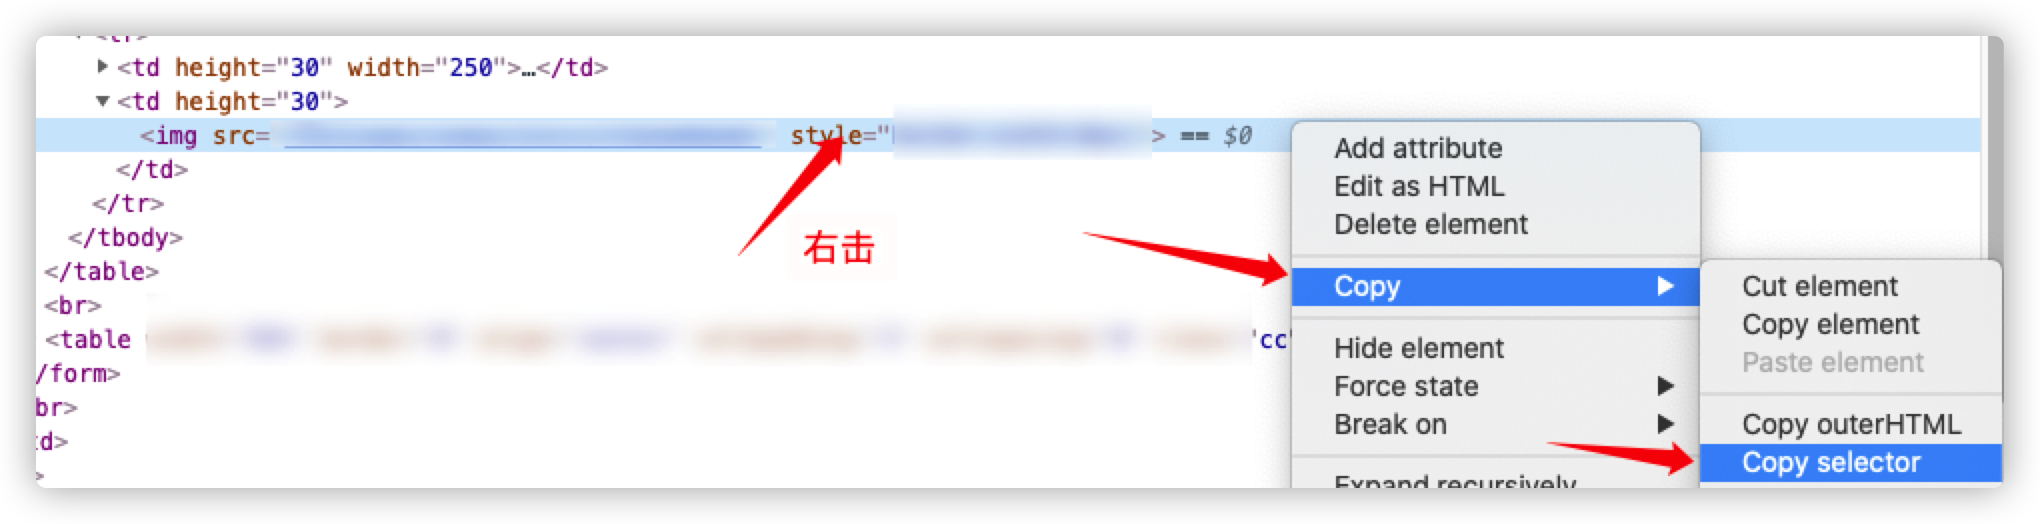
Directly navigate to the tab - right click - copy - copy selector and paste to page$ X ('') can be in single quotation marks. It's very simple!
-
Take a screenshot of a tag, get the tag element first, and then use element Just screenshot
Puppeter syntax
To be added
function
explain
waitForTimeout
Wait for n milliseconds before executing, similar to the previous waitFor
page.screenshot
Screenshot of page
element.screenshot
You can also get a screenshot of the tag element
Error summary
- Raspberry pie (Ubuntu) running error:
-
Error: Failed to launch the browser process puppeteer
-
resolvent:
sudo apt-get install chromium-browser
- Raspberry pie (Ubuntu) runs using puppeter core:
-
The puppeter core needs to be installed
-
Reference puppeter core in js file
const puppeteer = require('puppeteer-core');
- In the async decorated function, await should be added to each operation
My blog
The blog will be updated in time. Please leave a message if you have any questions!