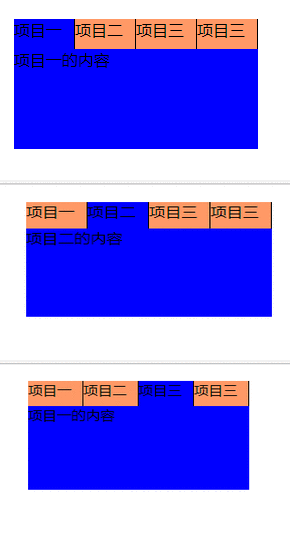
To tell the truth, this little trick is expected to be common now. I didn't pay much attention when I started. Until a project was used this afternoon, it reminded me that I developed it according to my own ideas, without referencing others, and felt quite accomplished. Ha-ha.
The idea is simply to set the contents under the li list as absolutely positioned and position them below the li list
Here's an example:
HTML:
<ul>
        <li>Item One
            <div id="" class="">
                <p>Contents of Item 1</p>
            </div>
        </li>
        <li>Item 2
            <div id="" class="">
                <p>Contents of Item 2</p>
            </div>
        </li>
        <li>Item 3
            <div id="" class="">
                <p>Contents of Item 1</p>
            </div>
        </li>
        <li>Item 3
            <div id="" class="">
                <p>Contents of Item 1</p>
            </div>
        </li>
    </ul>
CSS:
     *{margin:0;padding:0; }
     ul{
        width:244px;
        position:relative;   /*Set relative positioning so that child elements are positioned relative to it*/
        margin:20px auto;
    }
    ul li{
        list-style:none;
        height:30px;
        width:60px;
        float:left;     /*Floating in horizontal row*/
        border-right:1px solid #000;
        background-color:#ff9966;
    }
    li div{
        display:none;   /*Start as hidden*/
        width:244px;
        height:100px;
        position:absolute;   /*Absolute positioning*/
        left:0;
        top:30px;         /*Locate below the li list*/
        background-color:blue;
    }
    li:hover{
        background-color:blue;
    }
    li:hover>div{         /*When crossing the li list, the div below this list appears*/
        display:block;

    }
Demonstration:

The second or even third-level menus are all about making the div in the li tag smaller and positioning it relative to the li tag.