Contents of this article:
1.3 Deployment Environment Description
1.4 Deployment of DHCP services
1.6 Provides boot loader and related configuration files for pxe
1.7 Get Linux Kernel Files from Installation Mirror
1.8 Set up boot menu and provide system installation file
1.10 Unattended Batch Installation Operating System through pxe+kickstart
1.1 PXE Description
The so-called PXE is the abbreviation of Preboot Execution Environment, literally meaning the execution environment before booting.
To achieve PXE, there must be two links:
(1) One is that the client's network card must support the PXE client function, and choose to start from the network card when booting, so that the system can enter the PXE client program with the network card;
(2) One is that the PXE server must provide at least DHCP and TFTP services!
And among them:
· DHCP service must be able to provide network parameters of the client, and also inform the client where TFTP is located.
· TFTP provides the client's boot loader and kernel file download path.
Also add NFS / FTP / HTTP (choose the same) and other installation files (installation mirror decompression files), is a relatively complete PXE server. TFTP and DHCP services are generally provided by the same server, and most of the time also provide NFS/FTP/HTTP services, so PXE servers generally provide three-in-one services.
1.2 PXE process
Here's the picture: It's from the internet. It's not easy to understand, but the details are well described.
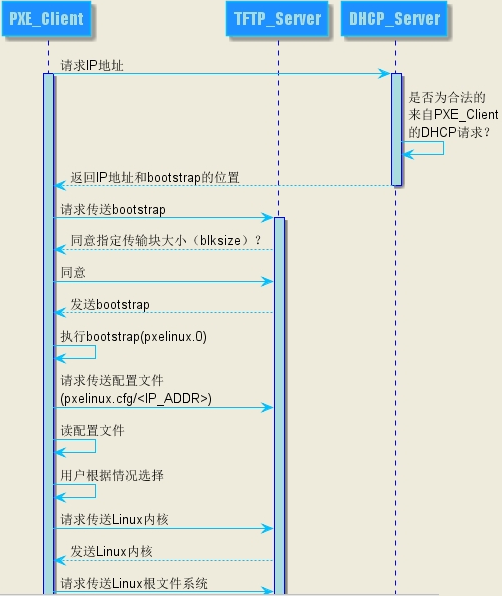
Client sends IP address request message to DHCP on PXE Server. DHCP detects whether Client is legitimate (mainly the MAC address of Client's network card). If it is legitimate, it returns Client's IP address. At the same time, the location information of Boot loader file pxelinux.0 in pxe environment is transmitted to Client.
(2) Client requests pxelinux.0 from TFTP on PXE Server. After TFTP receives the message, it sends pxelinux.0 size information to Client to test whether Client is satisfied. When TFTP receives the agreed size information from Client, it sends pxelinux.0 to Client formally.
Client executes the received pxelinux.0 file.
(4) Client requests the pxelinux.cfg file from TFTP (in fact, it is a directory, which is placed in the boot menu, that is, grub's configuration file). TFTP sends the configuration file back to Client, and Client performs subsequent operations according to the configuration file.
Client sends Linux kernel request information to TFTP, TFTP receives the message and sends the kernel file to Client.
Client sends root file request information to TFTP, TFTP receives the message and returns to the Linux root file system.
(7).Client loads the Linux kernel (the startup parameters have been set in the configuration file in 4).
Client is installed by downloading system installation files from nfs/ftp/http. If the kickstart path is specified in the configuration file in 4, the system will be installed automatically based on this file.
1.3 Deployment Environment Description
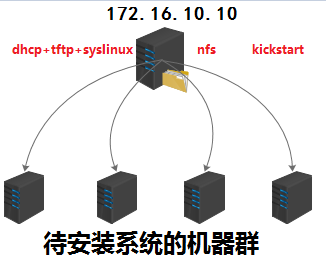
As shown below, 172.16.10.10 is a PXE server providing dhcp+tftp+nfs services. The other hosts in the network segment are the host groups of the system to be installed.
1.4 Deployment of DHCP services
First, install the dhcp server program.
yum -y install dhcp
DHCP mainly provides client network parameters and TFTP location, as well as boot loader file name. At the same time, we only inform TFTP about its location in the intranet, so we can edit / etc/dhcp/dhcpd.conf and add two parameters in the subnet block. The name of the boot loader file downloaded for the PXE client on PXE is pxelinux.0.
vim /etc/dhcp/dhcpd.conf
ddns-update-style none;
default-lease-time 259200;
max-lease-time 518400;
option routers 172.16.10.10;
option domain-name-servers 172.16.10.10;
subnet 172.16.10.0 netmask 255.255.255.0 {
        range 172.16.10.11 172.16.10.100;
        option subnet-mask 255.255.255.0;
        next-server 172.16.10.10;            # It's the location of TFTP.
        filename "pxelinux.0";               # Tell the boot loader file name to download from the TFTP root directory
}
Restart dhcp
systemctl start dhcpd
1.5 Deployment of TFTP
As can be seen from the flow chart, the boot loader file pxelinux.0 and the kernel-related configuration files (under the directory pxelinux.cfg) are mainly provided by TFTP!
The installation of TFTP is very simple. You can use yum directly. But tell the client where the root directory of TFTP is so that the client can find the relevant files. Also note that TFTP is managed by xinetd, a super daemon, so after TFTP is set up, xinetd will be started.
yum install tftp-server
yum -y install xinetd
The default root directory of the TFTP service is / var/lib/tftpboot /. To write fewer letters, the root directory of TFTP is changed to / tftpboot /. Modify the configuration file of tftp, mainly the root directory of TFTP.
vim /etc/xinetd.d/tftp

service tftp
{
        socket_type             = dgram
        protocol                = udp
        wait                    = yes
        user                    = root
        server                  = /usr/sbin/in.tftpd
        server_args             = -s /tftpboot    # Here's the point! Modify the chroot root directory of tftp
        disable                 = no
        per_source              = 11
        cps                     = 100 2
        flags                   = IPv4
}
Create the root directory of tftp.
mkdir /tftpboot
Start TFTP and observe:
systemctl start tftp

netstat -tulnp | grep xinetd
udp        0      0 0.0.0.0:69              0.0.0.0:*                           28465/xinetd
Next files must be placed in the / tftpboot / directory.
1.6 Provides bootloader and related configuration files for pxe
If you want to boot with PXE, you need to use the syslinux package provided by CentOS to copy two files from it to the root directory of tftp / tftpboot. The whole process is as follows:
yum -y install syslinux
cp -a /usr/share/syslinux/{menu.c32,vesamenu.c32,pxelinux.0}  /tftpboot/
mkdir /tftpboot/pxelinux.cfg
ls -l /tftpboot/
-rw-r--r-- 1 root root  61796 Oct 16  2014 menu.c32      # Provide graphical menu function
-rw-r--r-- 1 root root  26759 Oct 16  2014 pxelinux.0    # boot loader file
drwxr-xr-x 2 root root   4096 Feb 24 20:02 pxelinux.cfg  # The boot menu is set here.
-rw-r--r-- 1 root root 163728 Oct 16  2014 vesamenu.c32  # It also provides graphical menu functions, but the interface is different from menu.c32
pxelinux.cfg is a directory that can place default boot options or provide different boot options for different client hosts. In general, you can create a file named default in the pxelinux. CFG directory to provide default options.
If there is no menu.c32 or vesamenu.c32, the menu will be displayed line by line in plain text mode. If you use menu.c32 or vesamenu.c32, a similar anti-whitening effect will appear. At this time, you can use the upper and lower keys to select the option, instead of looking at the screen to enter a number key to select the boot option. Tests show that vesamenu.c32 is better than menu.c32.
After this part is set up, it is the kernel-related settings.
1.7 Get Linux Kernel Files from Installation Mirror
To install a Linux system, you must provide the Linux kernel file and initrd file, for example, the 64-bit version of entOS 7.2.
It is planned to place the kernel-related files in the / tftpboot / CentOS 7.2 / directory. Since you want to get the kernel-related files from the installation image, you have to mount the image first.
mount /dev/cdrom /test
mkdir /tftpboot/CentOS7.2
cp /test/isolinux/{vmlinuz,initrd.img} /tftpboot/CentOS7.2
cp /test/isolinux/isolinux.cfg /tftpboot/pxelinux.cfg/default
In fact, only two files, vmlinuz and initrd.img, are needed. However, the file isolinux.cfg is copied here. This file provides boot options, which can be used as a template to modify boot options and menus. This is easier and more convenient to modify.
1.8 Set up boot menu and provide system installation file
The following is the default content provided in isolinux.cfg provided in the syslinux package in CentOS 7.2.
[root@xuexi ~]# cat /tftpboot/pxelinux.cfg/default
default vesamenu.c32   # This is a must, or use menu.c32
timeout 600            # Overtime waiting time, no operation within 60 seconds will automatically select the default menu to load

display boot.msg       # This is a document that provides some explanations for the options

# Clear the screen when exiting the menu, instead of leaving the menu displayed.
# For vesamenu, this means the graphical background is still displayed without
# the menu itself for as long as the screen remains in graphics mode.
menu clear
menu background splash.png   # Background picture
menu title CentOS 7          # Headline
menu vshift 8
menu rows 18
menu margin 8
#menu hidden
menu helpmsgrow 15
menu tabmsgrow 13

# Border Area
menu color border * #00000000 #00000000 none

# Selected item
menu color sel 0 #ffffffff #00000000 none

# Title bar
menu color title 0 #ff7ba3d0 #00000000 none

# Press [Tab] message
menu color tabmsg 0 #ff3a6496 #00000000 none

# Unselected menu item
menu color unsel 0 #84b8ffff #00000000 none

# Selected hotkey
menu color hotsel 0 #84b8ffff #00000000 none

# Unselected hotkey
menu color hotkey 0 #ffffffff #00000000 none

# Help text
menu color help 0 #ffffffff #00000000 none

# A scrollbar of some type? Not sure.
menu color scrollbar 0 #ffffffff #ff355594 none

# Timeout msg
menu color timeout 0 #ffffffff #00000000 none
menu color timeout_msg 0 #ffffffff #00000000 none

# Command prompt text
menu color cmdmark 0 #84b8ffff #00000000 none
menu color cmdline 0 #ffffffff #00000000 none

# Do not display the actual menu unless the user presses a key. All that is displayed is a timeout message.

menu tabmsg Press Tab for full configuration options on menu items.

menu separator # insert an empty line
menu separator # insert an empty line

label linux
  menu label ^Install CentOS 7   # Menu Text
  kernel vmlinuz        # Kernel file path, note that the relative path is from tftp Root Path/tftpboot Start, so change it to"./CentOS7.2/vmlinuz"
  append initrd=initrd.img inst.stage2=hd:LABEL=CentOS\x207\x20x86_64 quiet
                        # Kernel startup options, including initrd Similarly, the path should be changed to"./CentOS7.2/initrd.img"
                        # stage2 The search path of the file, the search file is generally".treeinfo",If you can't find the file, look for it. LiveOS/squashfs.img
                        # In general pxe environment, this path directly points to the path of the system installation file. See the example below.

label check
  menu label Test this ^media & install CentOS 7
  menu default          # menu default means that the icon stays on this label by default at the start of the boot.
  kernel vmlinuz
  append initrd=initrd.img inst.stage2=hd:LABEL=CentOS\x207\x20x86_64 rd.live.check quiet

menu separator # insert an empty line

# utilities submenu          # Setting Method of Submenu Items
menu begin ^Troubleshooting
  menu title Troubleshooting

label vesa
  menu indent count 5
  menu label Install CentOS 7 in ^basic graphics mode
  text help
        Try this option out if you're having trouble installing
        CentOS 7.
  endtext
  kernel vmlinuz
  append initrd=initrd.img inst.stage2=hd:LABEL=CentOS\x207\x20x86_64 xdriver=vesa nomodeset quiet

label rescue
  menu indent count 5
  menu label ^Rescue a CentOS system
  text help
        If the system will not boot, this lets you access files
        and edit config files to try to get it booting again.
  endtext
  kernel vmlinuz
  append initrd=initrd.img inst.stage2=hd:LABEL=CentOS\x207\x20x86_64 rescue quiet

label memtest
  menu label Run a ^memory test
  text help
        If your system is having issues, a problem with your
        system's memory may be the cause. Use this utility to
        see if the memory is working correctly.
  endtext
  kernel memtest

menu separator # insert an empty line

label local
  menu label Boot from ^local drive
  localboot 0xffff

menu separator # insert an empty line
menu separator # insert an empty line

label returntomain
  menu label Return to ^main menu
  menu exit

menu end
So modify it slightly to make it suitable for pxe's menu configuration file.
default vesamenu.c32
timeout 600

display boot.msg

menu clear
menu background splash.png
menu title CentOS 7 menu
menu vshift 8
menu rows 18
menu margin 8
#menu hidden
menu helpmsgrow 15
menu tabmsgrow 13

menu color border * #00000000 #00000000 none
menu color sel 0 #ffffffff #00000000 none
menu color title 0 #ff7ba3d0 #00000000 none
menu color tabmsg 0 #ff3a6496 #00000000 none
menu color unsel 0 #84b8ffff #00000000 none
menu color hotsel 0 #84b8ffff #00000000 none
menu color hotkey 0 #ffffffff #00000000 none
menu color help 0 #ffffffff #00000000 none
menu color scrollbar 0 #ffffffff #ff355594 none
menu color timeout 0 #ffffffff #00000000 none
menu color timeout_msg 0 #ffffffff #00000000 none
menu color cmdmark 0 #84b8ffff #00000000 none
menu color cmdline 0 #ffffffff #00000000 none

label linux
  menu label ^Install CentOS 7.2 through pxe
  menu default
  kernel "./CentOS7.2/vmlinuz"
  append initrd="./CentOS7.2/initrd.img" inst.stage2=ftp://172.16.10.10 quiet net.ifnames=0 biosdevname=0
The two kernel startup parameters "net.ifnames=0 biosdevname=0" are designed to give the network card name ethN, rather than the default random name such as eno16777728.
Note that the path of stage 2 in the example is placed under the FTP path (vsftpd root directory / var/ftp /), so first extract the system installation file from the mirror file and put it under / var/ftp /. Of course, in addition to ftp, nfs/http is also supported. However, there are bug s in support of NFS in CentOS 7.2 when pxe+kickstart, so it is not recommended to use nfs. When using nfs, please switch back to FTP or http.
yum -y install vsftpd
cp -a /test/* /var/ftp/
systemctl start vsftpd
1.9 Start-up Test
Open a new virtual machine, enter bios interface settings to boot from the network card. The DHCP server will be searched first, the bootloader file will be searched after the DHCP is found, the Startup menu settings file will be searched, and then the Startup menu will be entered to wait for the selection of items to be started. As follows:

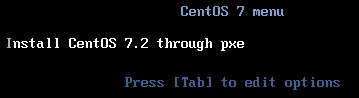
Because only one startup item is set, there is only one item in the menu. Start it, and a series of files will be loaded until the installation operation interface appears.
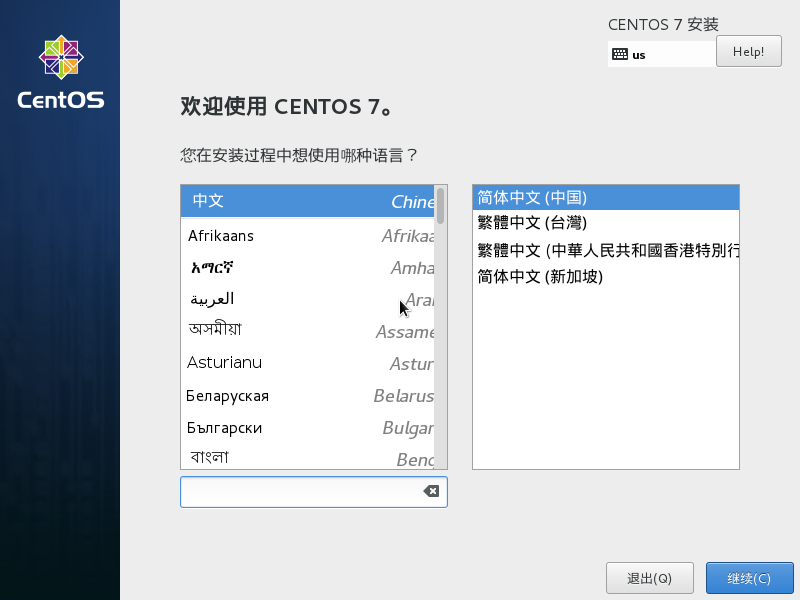
Then you can directly operate the installation system. But after all, this is manual operation, which can not achieve batch system installation, so to provide an automatic response file, each manual operation step is answered by the items given in the automatic response file, so that the automatic installation of the operating system can be realized, and the batch system installation can also be realized.
1.10 Unattended Batch Installation Operating System through pxe+kickstart
The so-called unattended response is the automatic response. When the human-computer interaction is needed to provide some options in the installation process (such as how to partition), the automatic response file can automatically provide answers according to the corresponding items. However, unattended is not entirely unattended. At least setting bios to boot from the network card must be set artificially, and setting up not to boot from the network card after installing the system also needs to be set artificially. In addition, other basic can achieve unattended installation.
To configure an unattended system installation environment, you need to provide the various answers needed in the installation process. These answers are set in the kickstart configuration file. Usually, after the normal installation of the Linux system, there is an anaconda-ks.cfg in the root user's home directory. See the options in this file. kickstart file details.
The following is the content of the modified file, which will be used as kickstart response file. The file is provided by FTP service, so the kickstart file is saved in the pub directory of ftp.
[root@xuexi ~]# cp -a ~/anaconda-ks.cfg /var/ftp/pub/ks.cfg
[root@xuexi ~]# chmod +r /var/ftp/pub/ks.cfg     # Keep ks.cfg globally readable
[root@xuexi ~]# cat anaconda-ks.cfg
#version=DEVEL
# System authorization information
auth --enableshadow --passalgo=sha512
# Install OS instead of upgrade
install
# Use network installation
url --url="ftp://172.16.10.10"
#url --url="http://192.168.100.53/cblr/links/CentOS7.2-x86_64"
#nfs --server=172.16.10.10 --dir=/install
# Use text mode install
text
# Firewall configuration
firewall --disabled
firstboot --disable
ignoredisk --only-use=sda
# Keyboard layouts
# old format: keyboard us
# new format:
keyboard --vckeymap=us --xlayouts='us'
# System language
lang en_US.UTF-8

# Network information
network  --onboot=yes --bootproto=dhcp --device=eth0 --noipv6
network  --hostname=node1.xuexi.com
# Reboot after installation
reboot
# Root password
rootpw --iscrypted $6$KIPkwGVYqtjHln80$quxmkE5MKKA2LyzLOAc/s3FWH/jX76sObq6hqwOsEBoeMc/wIrzGG4xm72lkXwLeOfRLS/sl5vdajY9j34D4J.
# SELinux configuration
selinux --disabled
# Do not configure the X Window System
skipx
# System timezone
timezone Asia/Shanghai
# System bootloader configuration
bootloader --append="quiet crashkernel=auto" --location=mbr --boot-drive=sda
# Clear the Master Boot Record
zerombr
# Partition clearing information
clearpart --all --initlabel
# Disk partitioning information
part /boot --asprimary --fstype="xfs" --size=250
part swap --fstype="swap" --size=2000
part / --asprimary --fstype="xfs" --grow --size=5000

# If you want LVM partitions, consider the following partitions
# part /boot --fstype ext4 --size=100
# part swap --fstype=swap --size=2048
# part pv26 --size=100 --grow
# volgroup VG00 --pesize=32768 pv26
# logvol / --fstype ext4 --name=LVroot --vgname=VG00 --size=29984
# logvol /data --fstype ext4 --name=LVdata --vgname=VG00 --size=100 --grow

%post
rm -f /etc/yum.repos.d/*
cat >>/etc/yum.repos.d/base.repo<<eof
[base]
name=sohu
baseurl=http://mirrors.sohu.com/centos/7/os/x86_64/
gpgcheck=0
enable=1
[epel]
name=epel
baseurl=http://mirrors.aliyun.com/epel/7Server/x86_64/
enable=1
gpgcheck=0
eof
sed -i "s/rhgb //" /boot/grub2/grub.cfg
sed -i "s/ONBOOT.*$/ONBOOT=yes/" /etc/sysconfig/network-scripts/ifcfg-eth0
sed -i "/UUID/d" /etc/sysconfig/network-scripts/ifcfg-eth0
echo "DNS1=114.114.114.114" >> /etc/sysconfig/network-scripts/ifcfg-eth0
echo "UseDNS no" >> /etc/ssh/sshd_config
sed -i "s/^SELINUX=.*$/SELINUX=disabled/" /etc/sysconfig/selinux
systemctl disable firewalld
%end

%packages
@base
@core
@development
@platform-devel
kexec-tools
lftp
tree
lrzsz

%end

%addon com_redhat_kdump --enable --reserve-mb='auto'

%end
After setting, modify the / tftpboot/pxelinux.cfg/default file, and add a kickstart file search path to the kernel startup parameter.
vim /tftpboot/pxelinux.cfg/default
label linux
  menu label ^Install CentOS 7.2 through pxe
  menu default
  kernel "./CentOS7.2/vmlinuz"
  append initrd="./CentOS7.2/initrd.img" inst.stage2=ftp://172.16.10.10 ks=ftp://172.16.10.10/pub/ks.cfg quiet net.ifnames=0 biosdevname=0


# If you use NFS to provide installation files and kickstart files, then ks parameters must use nfs4 protocol, even if nfs4 is used, it is still unable to achieve unattended, which is a bug.
  append initrd="./CentOS7.2/initrd.img" inst.stage2=nfs:172.16.10.10:/install ks=nfs4:172.16.10.10:/install/ks.cfg quiet net.ifnames=0 biosdevname=0
Note that nfs4 is used in the comment line instead of nfs, otherwise an error will be reported when installing the system, as follows. I don't know why I need to specify nfs4 explicitly in CentOS 7.2. It's a bug. In the bug submission area of redhat, users have submitted relevant questions.

But even with nfs4 protocol, kickstart file can be read, but it can not take effect, that is, automatic response can not be achieved, and manual operation is still needed.
Therefore, it is recommended to use ftp or http instead of NFS for the time being. But this bug is only for CentOS 7, and there is no problem with CentOS 6.
Back to the point, now you have / tftpboot/pxelinux.cfg/default and / var/ftp/pub/ks.cfg, so you can install Linux unattended.
Back to the outline of the series: http://www.cnblogs.com/f-ck-need-u/p/7048359.html