pygame is a product of the past century. Although it is not suitable for the most 3D games, I can use pygame to draw simple 3D graphics, just like a stereo on white paper.
Main Contents: Visual proximity, 3D space, drawing a spatial graphic
1. Visual proximity
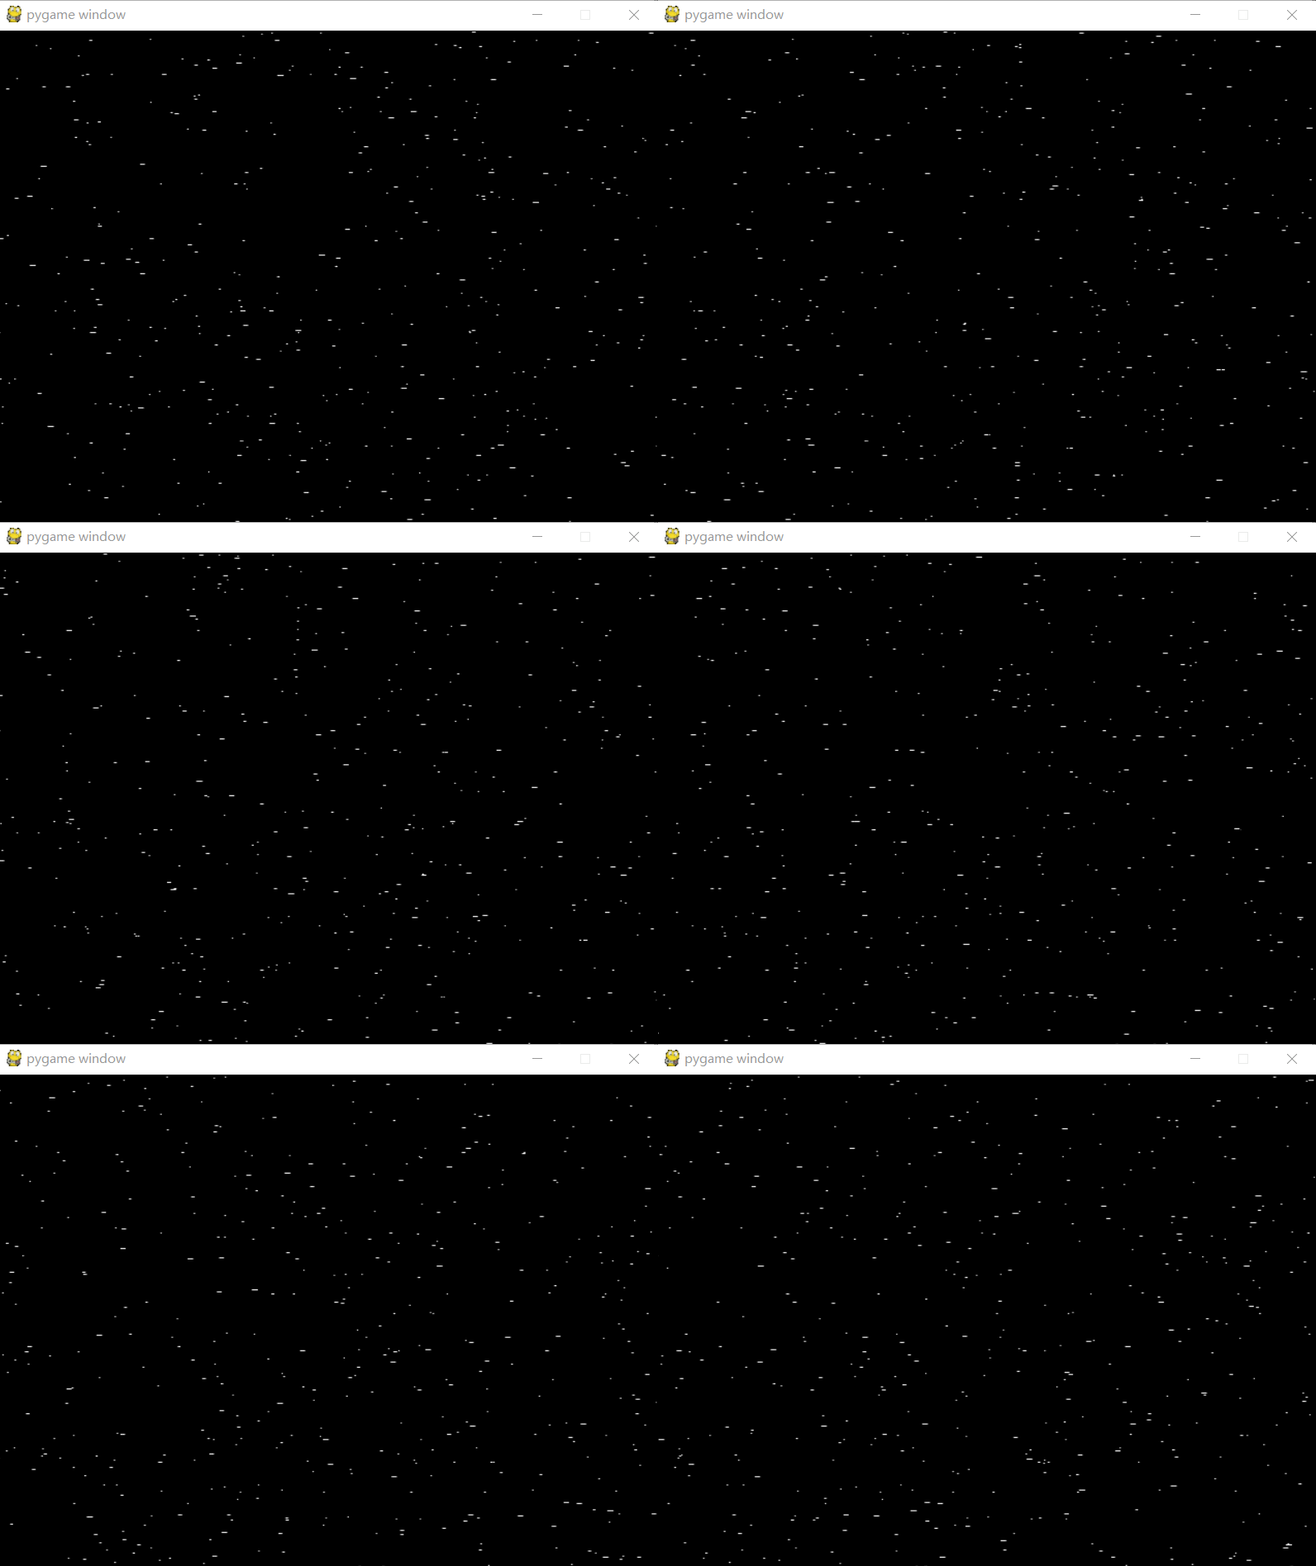
_People's vision always follows a principle: near big, far small.Imagine if one day you lie on the grass and do nothing, look up at the stars, and the sky suddenly flies through the shower. The meteors near us look very long and bright, and the ones far away look like dark spots. We can use pygame to simulate this:
step1: Define the Star class
To describe a shooting star, coordinates and speeds are required.In defining a list to store the point set:
class Star(object):
	def __init__(self, x, y, speed):
		self.x = x
		self.y = y
		self.speed = speed

stars = []
step2: generate random points
_We need to generate shooters regularly
x = float(randint(0, 639))
y = float(randint(0, 479))
speed = float(randint(10, 300))
stars.append(Star(x, y, speed))

while True:
	y = float(randint(0, 479))
	speed = float(randint(10, 300))
	stars.append(Star(640., y, speed))
step3: draw short lines
_Because the tail of a nearby meteor appears to be longer, we can draw a short line to represent the shooting star based on its speed.You can use pygaame's time library function Clock to measure time and draw short lines of different lengths at different locations according to time and speed:
while True:
	for star in stars:
		new_x = star.x - star.speed*time_passed_seconds
		pygame.draw.aaline(screen, white, (new_x, star.y), (star.x+1, star.y))
		star.x = new_x
step4: view the effect
import pygame
from pygame.locals import *
from random import randint

class Star(object):
	def __init__(self, x, y, speed):
		self.x = x
		self.y = y
		self.speed = speed

def run():
	pygame.init()
	screen = pygame.display.set_mode((640, 480), 0, 32)

	stars = []
	for k in range(200):
		x = float(randint(0, 639))
		y = float(randint(0, 479))
		speed = float(randint(10, 300))
		stars.append(Star(x, y, speed))

	clock = pygame.time.Clock()
	white = (255, 255, 255)

	while True:
		for event in pygame.event.get():
			if event.type == QUIT:
				pygame.quit()
				return
			elif event.type == KEYDOWN:
				return

		y = float(randint(0, 479))
		speed = float(randint(10, 300))
		stars.append(Star(640., y, speed))

		time_passed = clock.tick(60)
		time_passed_seconds = time_passed / 1000

		screen.fill((0, 0, 0))

		for star in stars:
			new_x = star.x - star.speed*time_passed_seconds
			pygame.draw.aaline(screen, white, (new_x, star.y), (star.x+1, star.y))
			star.x = new_x

		def on_screen(star):
			return star.x > 0

		stars = list(filter(on_screen, stars))

		pygame.display.update()

if __name__ == "__main__":
	run()
_Here we need to pay attention to a detail, we define an on_screen function, if a point on the screen returns a value of True, use the filter function to filter out functions that are not on the screen, and keep the points on the screen (points that are not on the screen consume resources).
def on_screen(star):
			return star.x > 0

		stars = list(filter(on_screen, stars))
_We keep generating short, variable-length, moving lines that look like shooting stars
2. 3D Space
_Firstly, we define our coordinate system with porridge z facing us and the x-axis facing right, just like the x-axis of the pygame window, the y-axis facing up is opposite to the Y-axis of the pygame window.
Projection: Parallel projection
The easiest way to project_is to discard z-coordinates
def parallel_project(vector3):
	return(vector3.x, vector3.y)
_This method is simple, but the result is not ideal, basically no perspective effect can be seen.
Projection: Stereographic projection
_This projection is more realistic in that it uses perspective to reduce distant objects.Game is widely used.
def perspective_project(vector3, d):
    x, y, z = vector3
    return (x*d/z, -y*d/z)
_Because of the size, our result is divided by a z, taking into account the distance d (the distance from the observer to the screen), as shown below.
_Analogue: It can be imagined that when you look through a hole, when the eye is away from the hole (the distance increases), the field of vision (fov) decreases, and the content you see naturally decreases. When the eye is close to the hole, the distance of sight decreases, the field of vision increases, and the content you see increases.
_Analogue: z can be regarded as the distance between the observer and the observed object, and the distance from the camera to the object. As the distance z increases, the object that you see decreases, which conforms to the principle of perspective.

Line of Sight: Calculate Line of Sight
from math import tan
def calculate_viewing_distance(fov, screen_width):
	d = (screen_width/2.0) / tan(fov/2.0)
	return d
3. Draw a spatial graphic
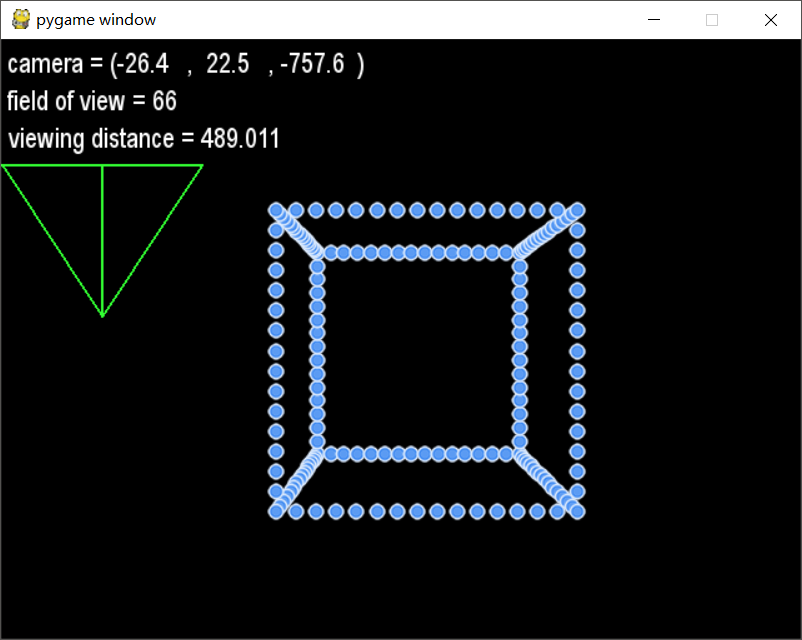
_Based on what we have learned above and combined with the basic mathematics, we can draw a 3D graphic with the following key codes:
 # Draw Points
        for point in points:
            x, y, z = point - camera_position
            x = x * viewing_distance / z
            y = -y * viewing_distance / z
            x += center_x
            y += center_y
            screen.blit(ball, (x-ball_center_x, y-ball_center_y))
_Here, we first define the camera_position of a camera, which represents the observer's position, and the initial value is (0, 0, -700), because to divide by the distance z, we first set Z larger (because if Z is very small, if it is close to 0, (x, y) is close to (,), then we add (x, y) plus center_y, center_y. The purpose is to draw the graphics in the center of the screen, and finally to draw the ball in the opposite position according to the size of the ball.
_The complete code is as follows:
import pygame
from pygame.locals import *
from gameobjects.vector3 import Vector3

from math import *
from random import randint

SCREEN_SIZE = (640, 480)
CUBE_SIZE = 300

def caculate_viewing_distance(fov, screen_width):
    d = (screen_width/2.0) / tan(fov/2.0)
    return d

def run():
    pygame.init()
    screen = pygame.display.set_mode(SCREEN_SIZE, 0, 32)

    my_font = pygame.font.SysFont("arial", 23)

    ball = pygame.image.load("ball.png")

    # 3D points
    points = []

    fov = 90.0 # Field of view
    viewing_distance = caculate_viewing_distance(radians(fov), SCREEN_SIZE[0])

    # Points on the edge of a cube, 16 points per edge
    for x in range(0, CUBE_SIZE+1, 20):
        edge_x = (x == 0 or x == CUBE_SIZE)

        for y in range(0, CUBE_SIZE+1, 20):
            edge_y = (y ==0 or y == CUBE_SIZE)

            for z in range(0, CUBE_SIZE+1, 20):
                edge_z = (z == 0 or z == CUBE_SIZE)

                # Coordinate properties of cube edges with vertices (0, 0, 0)
                if sum((edge_x, edge_y, edge_z)) >= 2:

                    # Move to centered (0, 0, 0)
                    point_x = float(x) - CUBE_SIZE/2
                    point_y = float(y) - CUBE_SIZE/2
                    point_z = float(z) - CUBE_SIZE/2

                    point = Vector3(point_x, point_y, point_z)
                    points.append(point)

    # Sort from large to small in point_z
    def point_z(point):
        return point.z
    points.sort(key=point_z, reverse=True)

    center_x, center_y = SCREEN_SIZE
    center_x /= 2
    center_y /= 2

    ball_w, ball_h = ball.get_size()
    ball_center_x = ball_w / 2
    ball_center_y = ball_h / 2

    camera_position = Vector3(0.0, 0.0, -700.0)
    camara_speed = Vector3(300.0, 300.0, 300.0)

    clock = pygame.time.Clock()

    while True:

        for event in pygame.event.get():
            if event.type == QUIT:
                return

        screen.fill((0, 0, 0))

        pressed_keys = pygame.key.get_pressed()

        time_passed = clock.tick()
        time_pass_seconds = time_passed / 1000.0

        direction = Vector3()
        if pressed_keys[K_LEFT]:
            direction.x = -1.0
        elif pressed_keys[K_RIGHT]:
            direction.x = +1.0

        if pressed_keys[K_UP]:
            direction.y = +1.0
        elif pressed_keys[K_DOWN]:
            direction.y = -1.0

        if pressed_keys[K_q]:
            direction.z = +1.0
        elif pressed_keys[K_a]:
            direction.z = -1.0

        # fov sizes range from 0-179
        if pressed_keys[K_w]:
            fov = min(179.0, fov+0.2)
            w = SCREEN_SIZE[0]
            viewing_distance = caculate_viewing_distance(radians(fov), w)
        elif pressed_keys[K_s]:
            fov = max(1.0, fov-0.2)
            w = SCREEN_SIZE[0]
            viewing_distance = caculate_viewing_distance(radians(fov), w)

        camera_position += direction * camara_speed *  time_pass_seconds

        # Draw Points
        for point in points:

            x, y, z = point - camera_position
            x = x * viewing_distance / z
            y = -y * viewing_distance / z
            x += center_x
            y += center_y
            screen.blit(ball, (x-ball_center_x, y-ball_center_y))

        # Draw Table
        diagram_width = SCREEN_SIZE[0] / 4
        col = (50, 255, 50)
        diagram_points = []
        diagram_points.append((diagram_width/2, 100+viewing_distance/4))
        diagram_points.append( (0, 100) )
        diagram_points.append( (diagram_width, 100) )
        diagram_points.append( (diagram_width/2, 100+viewing_distance/4) )
        diagram_points.append( (diagram_width/2, 100) )
        pygame.draw.lines(screen, col, False, diagram_points, 2)

        # Draw Text
        white = (255, 255, 255)
        cam_text = my_font.render("camera = "+str(camera_position), True, white)
        screen.blit(cam_text, (5, 5))
        fov_text = my_font.render("field of view = %i"%int(fov), True, white)
        screen.blit(fov_text, (5, 35))
        txt = "viewing distance = %.3f"%viewing_distance
        d_text = my_font.render(txt, True, white)
        screen.blit(d_text, (5, 65))

        pygame.display.update()

if __name__ == "__main__":
    run()
Here's our final result:
6th Pgame Learning Notes Complete cheers!
Reference Blog: Write games with Python and Pygame - from getting started to mastering
Icon reference: Iconfont