Quick Start for PyQt5 (8) PyQt5 database operations
1. SQLite database
1. Introduction to SQLite
SQLite is a lightweight database that implements a self-contained, server-free, zero-configuration, transactional SQL database engine, mainly used as a database for mobile applications and small desktop applications.
Official website:
https://www.sqlite.org
2. Common SQLite operations
Create a database file and enter SQLite command line mode after creation.
sqlite3 DatabaseName.db
View existing database files and execute in SQLLite command line mode:
.databases
Open an existing database file and create it if it does not exist.
sqlite3 DatabaseName.db
View help information and execute in SQLLite command line mode:
.help
Create a table to execute in SQLLite command line mode:
create table person(id integer primary key, name text);
Insert data into table:
insert into person(id, name) values(1, "zhangsan");
Query operation:
select * from person;
Query table structure:
.schema person
3. SQLite Management Tools
SQLite has several open source and excellent DBMS s (database management systems) that provide an interface to manipulate the SQLite database.
SQLiteStudio is a very professional SQLite database management software, compact, powerful, Chinese-language support, installation-free.
SQLiteStudio Download:
https://sqlitestudio.pl/index.rvt?act=download
2. Connecting to a database
1. Database Driver Type
In PyQt, the QSqlDatabase class is used to connect to databases and can use database drivers to interact with different databases. A QSqlDatabase instance represents a database connection.The following types of database drivers are available:
QDB2 IBM DB2 Driver
QMYSQL MySQL Driver
QOCI Oracle Call Interface Driver
QODBC ODBC driver (including MS SQL Server)
QPSQL PostgreSQL Driver
QSQLITE SQLite3 Driver
QSQLITE2 SQLite2 Driver
2. Common methods of QSqlDatabase
Common QSqlDatabase methods are as follows:
addDataBase: Set the database driver type to connect to the database
setDatabaseName: Sets the name of the database to which you are connecting
setHostName: Sets the host name where the database is located
setUserName: Specifies the user name of the connection
setPassword: Sets the password for the connection object
commit: commits the transaction and returns True if the execution is successful.
Rollback: rollback database transaction
Close: close the database connection
3. Instances of database connection
import sys
from PyQt5.QtSql import QSqlDatabase
from PyQt5.QtCore import *

if __name__ == "__main__":
    app = QCoreApplication(sys.argv)
    db = QSqlDatabase.addDatabase("QSQLITE")
    db.setDatabaseName("/home/user/test.db")
    if db.open():
        print("open DB success.")
    sys.exit(app.exec_())
3. Executing SQL Statements
QSqlQuery has the ability to execute and manipulate SQL statements, execute DDL and DML type SQL queries, and QSqlQuery.exec_() is used to execute SQL operations.
import sys
from PyQt5.QtSql import QSqlDatabase, QSqlQuery
from PyQt5.QtCore import *

def createDB():
    db = QSqlDatabase.addDatabase("QSQLITE")
    db.setDatabaseName("/home/user/test.db")
    if db.open():
        query = QSqlQuery()
        query.exec_("create table person(id int primary key, name varchar(20), address varchar(30))")
        query.exec_("insert into person values(1, 'Bauer', 'beijing')")
        query.exec_("insert into person values(2, 'Jack', 'shanghai')")
        query.exec_("insert into person values(3, 'Alex', 'chengdu')")

        db.close()

if __name__ == "__main__":
    app = QCoreApplication(sys.argv)
    createDB()
    sys.exit(app.exec_())
After executing the SQL statement, if there are no other database operations, you need to use db.close to close the database connection, because the database connection resources are limited, the database connection that is no longer used must be closed, or the database connection resources will eventually be exhausted, causing the program to connect to the database normally.
If you need to read and display data from the database in PyQt's window, you need to open the database when the window is initialized and close the database connection when the window is closed.
import sys
from PyQt5.QtSql import QSqlDatabase, QSqlQuery
from PyQt5.QtCore import *
from PyQt5.QtWidgets import *

class MainWindow(QWidget):
    def __init__(self, parent=None):
        super(MainWindow, self).__init__(parent)
        self.db = QSqlDatabase.addDatabase("QSQLITE")
        self.db.setDatabaseName("/home/user/test.db")
        self.db.open()

    def closeEvent(self, event):
        self.db.close()

if __name__ == "__main__":
    app = QApplication(sys.argv)
    window = MainWindow()
    window.show()
    sys.exit(app.exec_())
4. Database Model View
QSqlTableModel in Qt is an advanced interface that provides a readable and writable data model for reading and saving data in a single table and for displaying tables in a database in a QTableView.After connecting to the database, use seTable to set the table to query, setFilter function to set filter conditions, and select function to query.You can use the setEditerStrategy function to set editing policies, which are as follows:
QSqlTableModel.OnFieldChange: All changes are updated to the database in real time
QSqlTableModel.OnRowChange: Updates the current row when the user selects a different row
QSqlTableModel.OnManuallSubmit: Manual submission, not automatic submission
import sys
from PyQt5.QtSql import QSqlDatabase, QSqlQuery, QSqlTableModel
from PyQt5.QtCore import *
from PyQt5.QtWidgets import *

class MainWindow(QWidget):
    def __init__(self, parent=None):
        super(MainWindow, self).__init__(parent)
        self.db = QSqlDatabase.addDatabase("QSQLITE")
        self.db.setDatabaseName("/home/user/test.db")
        self.db.open()
        self.model = QSqlTableModel()
        self.initializedModel()

        self.tableView = QTableView()
        self.tableView.setModel(self.model)

        self.layout = QVBoxLayout()
        addButton = QPushButton("add")
        deleteButton = QPushButton("delete")
        hLayout = QHBoxLayout()
        hLayout.addWidget(addButton)
        hLayout.addWidget(deleteButton)
        self.layout.addWidget(self.tableView)
        self.layout.addLayout(hLayout)
        self.setLayout(self.layout)
        self.resize(600, 400)

        addButton.clicked.connect(self.onAddRow)
        deleteButton.clicked.connect(self.onDeleteRow)

    def initializedModel(self):
        self.model.setTable("person")
        self.model.setEditStrategy(QSqlTableModel.OnFieldChange)
        self.model.select()
        self.model.setHeaderData(0, Qt.Horizontal, "ID")
        self.model.setHeaderData(1, Qt.Horizontal, "Name")
        self.model.setHeaderData(2, Qt.Horizontal, "Address")

    def onAddRow(self):
        self.model.insertRows(self.model.rowCount(), 1)
        self.model.submit()

    def onDeleteRow(self):
        self.model.removeRow(self.tableView.currentIndex().row())
        self.model.submit()
        self.model.select()

    def closeEvent(self, event):
        self.db.close()

if __name__ == "__main__":
    app = QApplication(sys.argv)
    window = MainWindow()
    window.show()
    sys.exit(app.exec_())
5. Paging Query
1. Data preparation
Paging uses data as a student table of student information, can be inserted using SQLite command line using SQL statement, or can be created and inserted using Python program.
db = QSqlDatabase.addDatabase("QSQLITE")
db.setDatabaseName("/home/user/test.db")
if not db.open():
    return False
query = QSqlQuery()
query.exec_("create table student(id int primary key, name varchar(20), sex varchar(8), age int);")

query.exec_("insert into student values(1, 'Bauer', 'Man', 25)")
query.exec_("insert into student values(2, 'Alex', 'Man', 24)")
query.exec_("insert into student values(3, 'Mary', 'Female', 23)")
query.exec_("insert into student values(4, 'Jack', 'Man', 25)")
query.exec_("insert into student values(5, 'xiaoming', 'Man', 24)")
query.exec_("insert into student values(6, 'xiaohong', 'Female', 23)")
query.exec_("insert into student values(7, 'xiaowang', 'Man', 25)")
query.exec_("insert into student values(8, 'xiaozhang', 'Man', 25)")
query.exec_("insert into student values(9, 'xiaoli', 'Man', 25)")
query.exec_("insert into student values(10, 'xiaohan', 'Man', 25)")
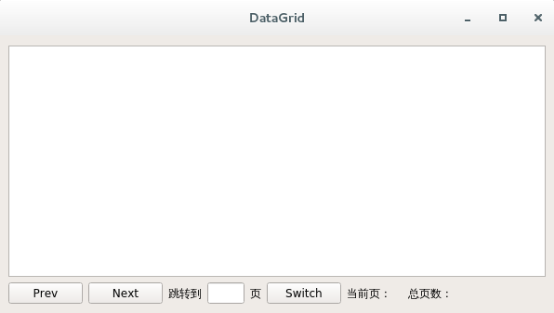
2. Paging window
Paging windows include labels, the previous page, the next page, jump buttons, and so on.
import sys
from PyQt5.QtSql import QSqlDatabase, QSqlQuery, QSqlTableModel, QSqlQueryModel
from PyQt5.QtCore import *
from PyQt5.QtWidgets import *

class DataGrid(QWidget):
    def __init__(self, parent=None):
        super(DataGrid, self).__init__(parent)
        # Database Connection
        self.db = None
        # Layout Manager
        self.layout = QVBoxLayout()
        # Query Model
        self.queryModel = QSqlQueryModel()
        # Table View
        self.tableView = QTableView()
        self.tableView.setModel(self.queryModel)
        #
        self.totalPageLabel = QLabel()
        self.currentPageLabel = QLabel()
        self.switchPageLineEdit = QLineEdit()
        self.prevButton = QPushButton("Prev")
        self.nextButton = QPushButton("Next")
        self.switchPageButton = QPushButton("Switch")
        self.currentPage = 0
        self.totalPage = 0
        self.totalRecordCount = 0
        self.pageRecordCount = 5

    def initUI(self):
        self.tableView.horizontalHeader().setStretchLastSection(True)
        self.tableView.horizontalHeader().setSectionResizeMode(QHeaderView.Stretch)
        self.layout.addWidget(self.tableView)

        hLayout = QHBoxLayout()
        hLayout.addWidget(self.prevButton)
        hLayout.addWidget(self.nextButton)
        hLayout.addWidget(QLabel("Jump To"))
        self.switchPageLineEdit.setFixedWidth(40)
        hLayout.addWidget(self.switchPageLineEdit)
        hLayout.addWidget(QLabel("page"))
        hLayout.addWidget(self.switchPageButton)
        hLayout.addWidget(QLabel("Current page:"))
        hLayout.addWidget(self.currentPageLabel)
        hLayout.addWidget(QLabel("Total pages:"))
        hLayout.addWidget(self.totalPageLabel)
        hLayout.addStretch(1)

        self.layout.addLayout(hLayout)
        self.setLayout(self.layout)

        self.setWindowTitle("DataGrid")
        self.resize(600, 300)

    def closeEvent(self, event):
        self.db.close()

if __name__ == "__main__":
    app = QApplication(sys.argv)
    window = DataGrid()
    window.initUI()
    window.show()
    sys.exit(app.exec_())
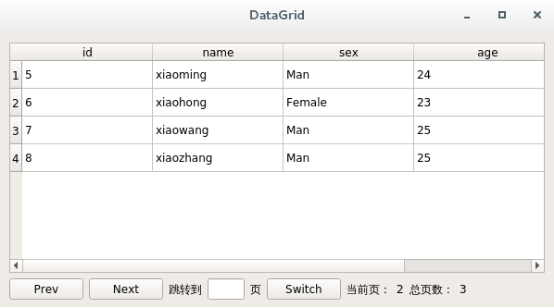
3. Paging Query Implementation
Read the student table of the database to initialize the table data model.
import sys
from PyQt5.QtSql import QSqlDatabase, QSqlQuery, QSqlTableModel, QSqlQueryModel
from PyQt5.QtCore import *
from PyQt5.QtWidgets import *
import re

class DataGrid(QWidget):
    def __init__(self, parent=None):
        super(DataGrid, self).__init__(parent)
        # Declare Database Connections
        self.db = None
        # Layout Manager
        self.layout = QVBoxLayout()
        # Query Model
        self.queryModel = QSqlQueryModel()
        # Table View
        self.tableView = QTableView()
        self.tableView.setModel(self.queryModel)
        #
        self.totalPageLabel = QLabel()
        self.currentPageLabel = QLabel()
        self.switchPageLineEdit = QLineEdit()
        self.prevButton = QPushButton("Prev")
        self.nextButton = QPushButton("Next")
        self.switchPageButton = QPushButton("Switch")
        # Current Page
        self.currentPage = 1
        # PageCount
        self.totalPage = None
        # Total Records
        self.totalRecordCount = None
        # Number of records per page
        self.pageRecordCount = 4

        self.initUI()
        self.initializedModel()
        self.setUpConnect()
        self.updateStatus()

    def initUI(self):
        self.tableView.horizontalHeader().setStretchLastSection(True)
        self.tableView.horizontalHeader().setSectionResizeMode(QHeaderView.Stretch)
        self.layout.addWidget(self.tableView)

        hLayout = QHBoxLayout()
        hLayout.addWidget(self.prevButton)
        hLayout.addWidget(self.nextButton)
        hLayout.addWidget(QLabel("Jump To"))
        self.switchPageLineEdit.setFixedWidth(40)
        hLayout.addWidget(self.switchPageLineEdit)
        hLayout.addWidget(QLabel("page"))
        hLayout.addWidget(self.switchPageButton)
        hLayout.addWidget(QLabel("Current page:"))
        hLayout.addWidget(self.currentPageLabel)
        hLayout.addWidget(QLabel("Total pages:"))
        hLayout.addWidget(self.totalPageLabel)
        hLayout.addStretch(1)

        self.layout.addLayout(hLayout)
        self.setLayout(self.layout)

        self.setWindowTitle("DataGrid")
        self.resize(600, 300)

    def setUpConnect(self):
        self.prevButton.clicked.connect(self.onPrevPage)
        self.nextButton.clicked.connect(self.onNextPage)
        self.switchPageButton.clicked.connect(self.onSwitchPage)

    def initializedModel(self):
        self.db = QSqlDatabase.addDatabase("QSQLITE")
        self.db.setDatabaseName("/home/user/test.db")
        if not self.db.open():
            return False
        self.queryModel.setHeaderData(0, Qt.Horizontal, "ID")
        self.queryModel.setHeaderData(1, Qt.Horizontal, "Name")
        self.queryModel.setHeaderData(2, Qt.Horizontal, "Sex")
        self.queryModel.setHeaderData(3, Qt.Horizontal, "Age")
        # Get all the records of the table
        sql = "SELECT * FROM student"
        self.queryModel.setQuery(sql, self.db)
        self.totalRecordCount = self.queryModel.rowCount()
        if self.totalRecordCount % self.pageRecordCount == 0:
            self.totalPage = self.totalRecordCount / self.pageRecordCount
        else:
            self.totalPage = int(self.totalRecordCount / self.pageRecordCount) + 1
        # Show Page 1
        sql = "SELECT * FROM student limit %d,%d" % (0, self.pageRecordCount)
        self.queryModel.setQuery(sql, self.db)

    def onPrevPage(self):
        self.currentPage -= 1
        limitIndex = (self.currentPage - 1) * self.pageRecordCount
        self.queryRecord(limitIndex)
        self.updateStatus()

    def onNextPage(self):
        self.currentPage += 1
        limitIndex = (self.currentPage - 1) * self.pageRecordCount
        self.queryRecord(limitIndex)
        self.updateStatus()

    def onSwitchPage(self):
        szText = self.switchPageLineEdit.text()
        pattern = re.compile('^[0-9]+$')
        match = pattern.match(szText)
        if not match:
            QMessageBox.information(self, "Tips", "please enter a number.")
            return
        if szText == "":
            QMessageBox.information(self, "Tips", "Please enter a jump page.")
            return
        pageIndex = int(szText)
        if pageIndex > self.totalPage or pageIndex < 1:
            QMessageBox.information(self, "Tips", "No page specified, re-enter.")
            return

        limitIndex = (pageIndex - 1) * self.pageRecordCount
        self.queryRecord(limitIndex)
        self.currentPage = pageIndex
        self.updateStatus()

    # Query records based on paging
    def queryRecord(self, limitIndex):
        sql = "SELECT * FROM student limit %d,%d" % (limitIndex, self.pageRecordCount)
        self.queryModel.setQuery(sql)

    # Update Spatial Status
    def updateStatus(self):
        self.currentPageLabel.setText(str(self.currentPage))
        self.totalPageLabel.setText(str(self.totalPage))
        if self.currentPage <= 1:
            self.prevButton.setEnabled(False)
        else:
            self.prevButton.setEnabled(True)

        if self.currentPage >= self.totalPage:
            self.nextButton.setEnabled(False)
        else:
            self.nextButton.setEnabled(True)

    # Close database connection when interface is closed
    def closeEvent(self, event):
        self.db.close()

if __name__ == "__main__":
    app = QApplication(sys.argv)
    window = DataGrid()
    window.show()
    sys.exit(app.exec_())