PYTHON crawler diary 02 - Data Visualization
Record your learning reptile diary
1. Environmental preparation
linux environment python3 6 + (there are many online tutorials here, so choose one that is more effective Installing Python 3 on Linux))
linux nginx environment (choose your favorite version) https://nginx.org/download/ )
linux gunicorn (pip download)
pycharm local project debugging
Data preparation The data displayed on the page is cat's eye top100, which has been realized in the last blog. If you are interested, you can jump
2. Ideas
1. Prepare crawler data
In the previous step, we have imported all the data into the mysql database. We only need to export the data from the database and display it on the page, so that our simple page visualization can be realized
2. Prepare the front-end formwork
Choosing a useful and appropriate template can greatly reduce the development time. Here is a simple template
3. Modify the template and deploy it through python
Modify it according to your personal preferences, but don't repeat it here. Choose python flash as our web framework
4. Deploy the project to linux in the form of Flash + gunicorn + nginx
Flash can also be accessed when deployed alone, but there are many limitations and shortcomings, which can be well solved with the combination of gunicorn+nginx
5. Reptile test
Take your own page as the object of the crawler, and climb your own '^' to provide the data basis for the backstage implementation of big data anti climbing
3. Start drying
Due to space, the relevant code here only shows the relevant logic and complete code https://github.com/lxw2/Flsak_Spider
-
New flash project
-
Because pychart I use is a free community version, there is no way to directly generate templates, so we need to manually create a flash project

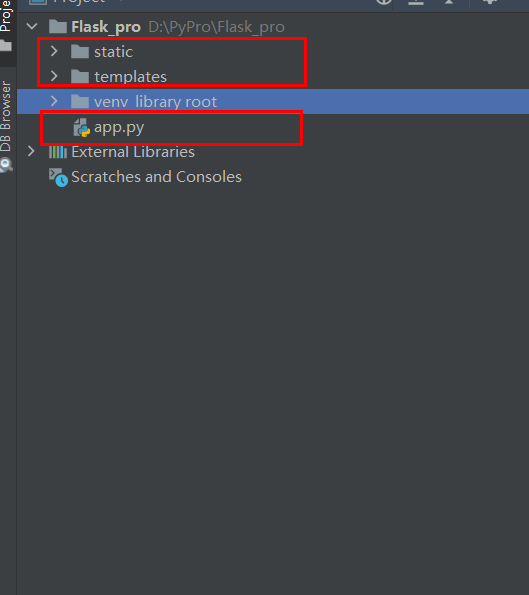
Create two new python packages under the root directory of the project, and they will be generated automatically__ INIT__.py delete, and delete the__ INIT__. New. Py, also deleted py
Such a basic flash structure is built
Static folder is used to store static resource files such as css, JavaScript and image
templates folder, which is used to store HTML files
-
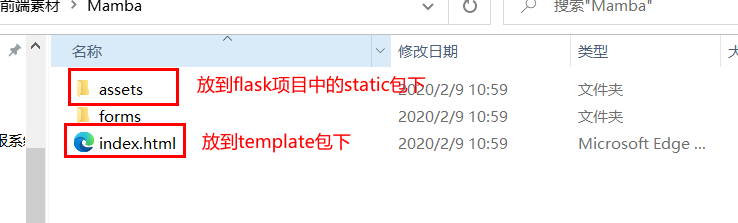
Prepare the front-end template and apply it to the flash project
Front end template - Mamba Zip - Web page production document resources - CSDN Download
-
Modify app py
app.py
from flask import Flask, render_template,request import pymysql app = Flask(__name__) @app.route("/header") def header(): """ homepage :return: Index.html """ return render_template('index.html') @app.route("/maoyantop") def maoyantop(): """ Cat's eye page :return: maoyantop.html """ #Get paging offset parameters offset=request.args.get("offset") if offset == None: offset=0 datalist = [] conn = pymysql.connect( host='xxx.xx.xx.xx', # host port=3306, # Default port, modified according to actual conditions user='root', # user name passwd='123456', # password db='luke_db', # DB name ) cur = conn.cursor() #Query data cur.execute("select * from luke_db.t_movie_top100_maoyan limit "+str(offset)+",10") data = cur.fetchall() for dat in data : datalist.append(dat) # print(dat) cur.close() conn.close() #Transfer data into page call return render_template("maoyantop.html",movies = datalist) if __name__ == '__main__': app.run(debug=True, host='127.0.0.1', port='5000') -
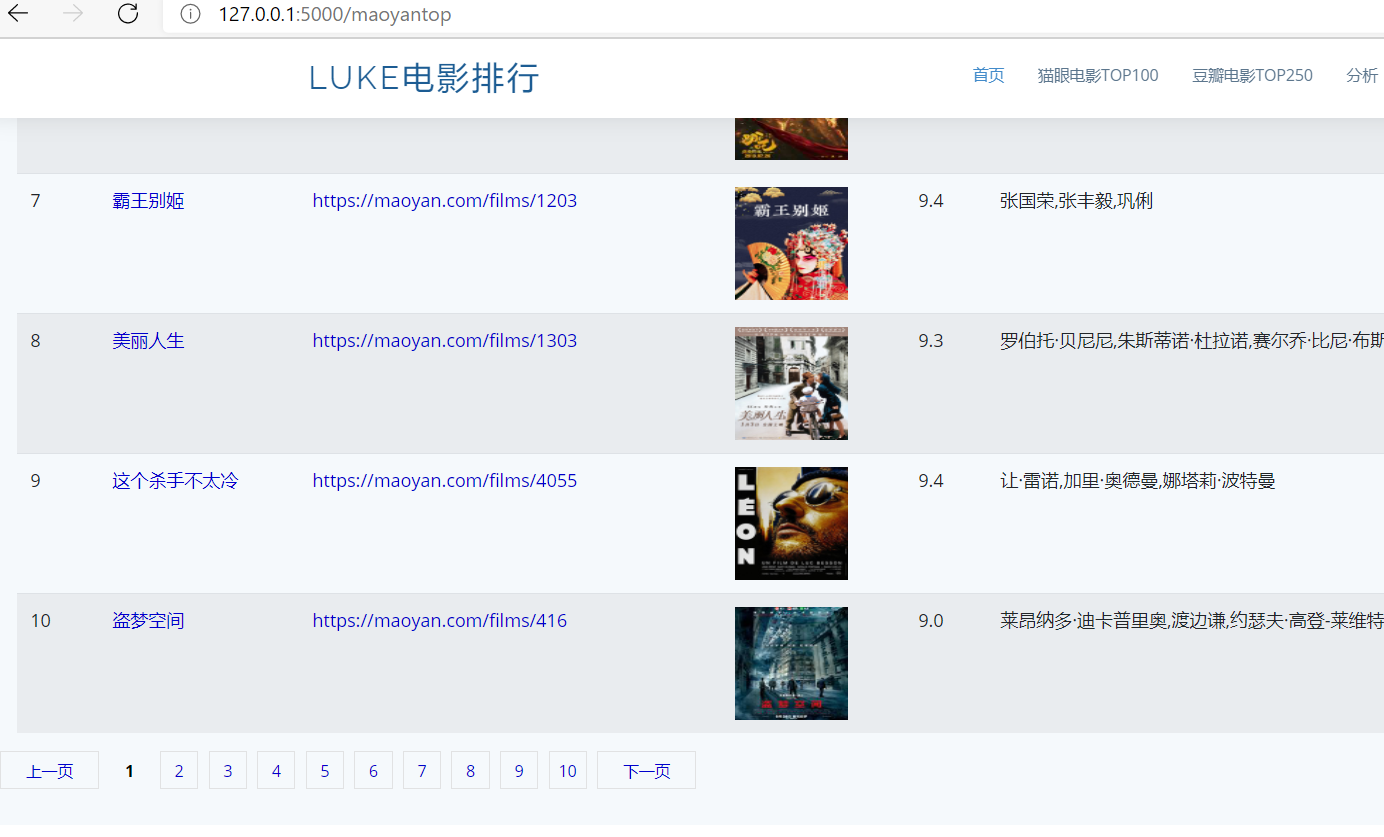
Display and pagination of html data
<section  class="counts section-bg">
      <div class="container" style="max-width: 100%">

          <table class="table table-striped" >
				<!-- List display -->
              <tr>
                  <td nowrap="nowrap">ranking</td>
                  <td nowrap="nowrap">title</td>
                  <td nowrap="nowrap">link</td>
                  <td nowrap="nowrap">picture</td>
                  <td nowrap="nowrap">score</td>
                  <td nowrap="nowrap">to star</td>
                  <td nowrap="nowrap">Release time</td>
              </tr>

              {% for movie in movies %}
              <tr >
                  <td nowrap="nowrap">{{movie[0]+1}}</td>

                  <td nowrap="nowrap">
                    <a href="{{movie[2]}}" target="_blank">
                      {{movie[1]}}
                        </a>
                  </td>
                  <td nowrap="nowrap">
                    <a href="{{movie[2]}}" target="_blank">
                      {{movie[2]}}
                        </a></td>
                  <td nowrap="nowrap">
                    <img  height=100 width=100 class="board-img" src="{{movie[3]}}">
                  </td>
                  <td nowrap="nowrap">{{movie[4]}}</td>
                  <td nowrap="nowrap">{{movie[5]}}</td>
                  <td nowrap="nowrap">{{movie[6]}}</td>
              </tr>

              {% endfor %}

          </table>

        </div>

		<!-- Simple implementation of paging -->
        <div class="page" style="max-width: 100%">
			<ul style="max-width: 100%">
				<li class="prev"><a id="uppage" href="" >previous page</a></li>
				<li><a id="page_1" href="?offset=0">1</a></li>
				<li><a id="page_2" href="?offset=10">2</a></li>
				<li><a id="page_3" href="?offset=20">3</a></li>
				<li><a id="page_4" href="?offset=30">4</a></li>
				<li><a id="page_5" href="?offset=40">5</a></li>
				<li><a id="page_6" href="?offset=50">6</a></li>
				<li><a id="page_7" href="?offset=60">7</a></li>
				<li><a id="page_8" href="?offset=70">8</a></li>
				<li><a id="page_9" href="?offset=80">9</a></li>
				<li><a id="page_10" href="?offset=90">10</a></li>
				<li class="next"><a id="downpage" href="">next page</a></li>
			</ul>
		</div>
    </section>


<!-- Several related to paging js script -->
  <script type="text/javascript">
         var page = location.search.substr(1).split('=')[1]
         if (isNaN(page))
         {
            page=0
         }
         if (parseInt(page)!=0)
         {
            page=parseInt(page)-10
         }
         document.getElementById("uppage").href="?offset="+page+""

   </script>
   <script type="text/javascript">
         var page = location.search.substr(1).split('=')[1]
         if (isNaN(page))
         {
            page=10
         }
		 page=parseInt(page)+10
         document.getElementById("downpage").href="?offset="+page+""

   </script>
   <script>
        var page_num = location.search.substr(1).split('=')[1] /10
        if (isNaN(page_num))
         {
            page_num=1
         }else
         {
            page_num=page_num+1
         }
        var page_id="page_"+page_num
        document.getElementById(page_id).setAttribute('class','active')
   </script>
Relevant codes have been uploaded to github and can be modified according to your own needs
After modification, you can start debugging
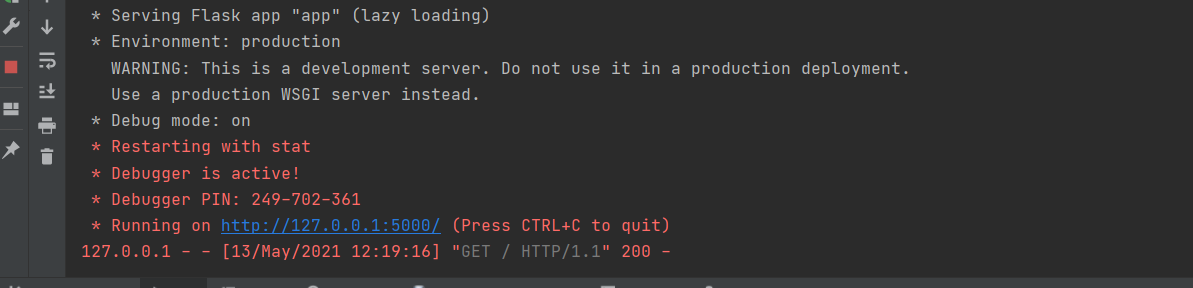
Pay attention to modifying the database path
-
-
Deploy to linux, assisted by gunicorn+nginx
I directly uploaded the whole package to linux

implement
python3 app.py

# Normal output 	 Then you can access
 * Serving Flask app "app" (lazy loading)
 * Environment: production
   WARNING: This is a development server. Do not use it in a production deployment.
   Use a production WSGI server instead.
 * Debug mode: on
 * Running on http://0.0.0.0:5000/ (Press CTRL+C to quit)
 * Restarting with stat
 * Debugger is active!
 * Debugger PIN: 298-358-626

#If an error is reported and a module is missing, execute the corresponding pip install XXX
#Next, install gunicorn
pip install gunicorn

#Then execute in the directory of the project
gunicorn -w 2 -b localhost:5000 app:app
#The successful output can be accessed through the browser
#You can let the program execute in the background
gunicorn -w 2 -b localhost:5000 app:app 1> /dev/null 2>&1 &
After gunicorn is successfully deployed, nginx can be used. As the data source of anti crawling, we need to collect the data of the page requested by others, so we need to collect the log and put it into the file
After installing nginx
Prepare the corresponding nginx conf
The server module is the main modified part. The agent for the local port is added, and then the comment of log collection is opened
Direct the log to the directory specified by us
#user  nobody;
worker_processes  1;

#error_log  logs/error.log;
#error_log  logs/error.log  notice;
#error_log  logs/error.log  info;

#pid        logs/nginx.pid;


events {
    worker_connections  1024;
}


http {
    include       mime.types;
    default_type  application/octet-stream;

#    log_format  main  '$remote_addr - $remote_user [$time_local] "$request" '
 #                     '$status $body_bytes_sent "$http_referer" '
  #                    '"$http_user_agent" "$http_x_forwarded_for"';
     log_format  main  '$remote_addr"#csc#"-"#csc#"$remote_user"#csc#"[$time_local]"#csc#""$request""#csc#"'
                      '$status"#csc#"$body_bytes_sent"#csc#""$http_referer""#csc#"'
                      '"$http_user_agent""#csc#""$http_x_forwarded_for"';

    access_log  logs/user_access.log  main;

    sendfile        on;
    #tcp_nopush     on;

    #keepalive_timeout  0;
    keepalive_timeout  65;

    #gzip  on;

    server {
        listen       80;
        server_name  localhost;

        #charset koi8-r;

        #access_log  logs/host.access.log  main;
        root   html;
        index  index.html index.htm;

        location / {
                proxy_pass http://localhost:5000/;
                proxy_redirect off;
                proxy_set_header Host $http_post;
                proxy_set_header X-Real-IP $remote_addr;
                proxy_set_header X-Forwarded-For $proxy_add_x_forwarded_for;
        }


        error_page   500 502 503 504  /50x.html;
        location = /50x.html {
            root   html;
        }


    }


}
Wuhu ~ can start
/usr/local/nginx/sbin/nginx -c /usr/local/nginx/conf/nginx.conf
This is started in the background
-
After the deployment is successful, let's directly visit the page locally

It can be seen that the corresponding request data has been obtained. Later, the request data will be collected and analyzed in real time, and the popular big data framework will be used to build the anti climbing project
Welcome to exchange~