#Introduction to Python crawler
01. Python virtual environment construction
Domestic sources are recommended here Anaconda For download, installation and use, please refer to the following article:
- ubuntu16.04 installation and use of Anaconda3 (detailed)
- ubuntu16.04 creating python virtual environment using anaconda
- ubuntu view the Python interpreter location used by tensorflow, and the python Association
1, Installation environment
sudo pip3 install virtualenv -i https://pypi.douban.com/simple/
2, Install virtualenvwrapper
sudo pip3 install virtualenvwrapper -i https://pypi.douban.com/simple/
3, Disposition
- sudo vim ~/.bashrc
export WORKON_HOME=/home/ljh/.virtualenvs
export VIRTUALENVWRAPPER_PYTHON=/usr/bin/python3.5
source  /usr/local/bin/virtualenvwrapper.sh
- source ~/.bashrc
4, Create virtual environment
mkvirtualenv testlev
5, Switch virtual environment
workon testlev
6, Shut down the virtual environment
deactivate testlev
7, Delete virtual environment
rmvirtualenv testlev
02. Introduction to reptiles
-
What is a reptile?
Web crawler (also known as web spider, web robot) is a program or script that automatically grabs the information of the world wide web according to certain rules.
-
Several ways to obtain data
- User generated data baidu index
- Data platform purchase data Aggregate data
- Government public data Bureau of statistics data
-
The role of reptiles
- Data analysis
- shopping assistant
- Consulting website
- Search Engines
-
Need knowledge
- Python Basics
- HTML Basics
- Data persistence knowledge
- Scrapy framework knowledge
-
Classification of reptiles
-
Universal crawler
- General web crawler is an important part of search engine capture system (Baidu, Google, Yahoo, etc.). The main purpose is to download the web pages on the Internet to the local to form a mirror backup of Internet content.
-
focused crawler
- Focused crawler is a web crawler program "oriented to specific topic requirements". It is different from general search engine crawler in that:
-
Different
- The focus crawler will process and filter the content when implementing web page capture, and try to ensure that only the web page information related to the demand is captured.
-
-
Robots protocol
The full name is "Robots Exclusion Protocol". The website tells search engines which pages can be crawled and which pages cannot be crawled through Robots protocol,
For example: https://www.jd.com/robots.txt
HTTP and HTTPS 03
-
HTTP protocol
- Hypertext Transfer Protocol: it is a transfer protocol used to transfer hypertext data from the network to the local browser
-
HTTPS protocol
- In short, it is the secure version of HTTP. SSL layer (HTTP+SSL) is added on the basis of HTTP protocol. SSL (Secure Sockets Layer) is mainly used for the secure transmission protocol of the Web. It encrypts the network connection in the transmission layer to ensure the security of data transmission on the Internet.
-
port
- The port number of HTTP is 80 and that of HTTPS is 443
-
SSL
- The security foundation of HTTPS is SSL, so the content that can be transmitted through it is encrypted by SSL
- Establish a safe and effective information transmission channel to ensure the security of data transmission
- Determine the authenticity and effectiveness of the website
- The security foundation of HTTPS is SSL, so the content that can be transmitted through it is encrypted by SSL
-
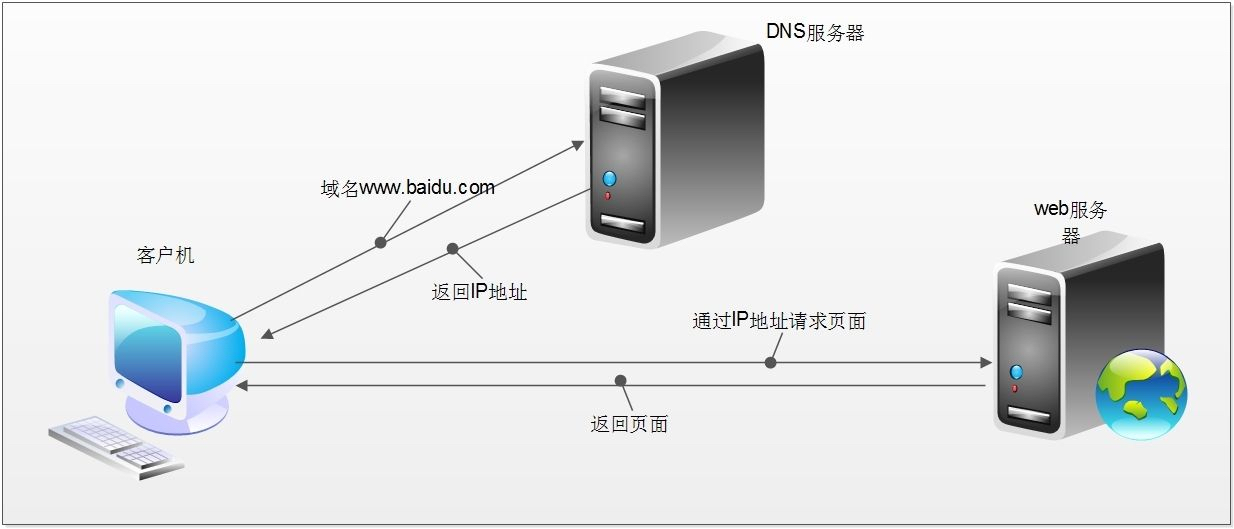
Request and response
-
1. Domain name resolution -- >
2. Initiate three handshakes of TCP -- >
3. Initiate http request after establishing TCP connection -- >
4. The server responds to the http request and the browser gets the html code -- >
5. The browser parses the html code and requests the resources in the html code (such as js, css, pictures, etc.) -- >
6. The browser renders the page to the user
-
-
-
URL
- Uniform resource locator is an identification method used to completely describe the addresses of web pages and other resources on the Internet.
- form https://book.qidian.com/info/1004608738#Catalog
- scheme: Protocol
- host: the IP address or domain name of the server
- Port: the port of the server
- Path: the path to access the resource
- Query string: parameter
- Anchor: anchor
-
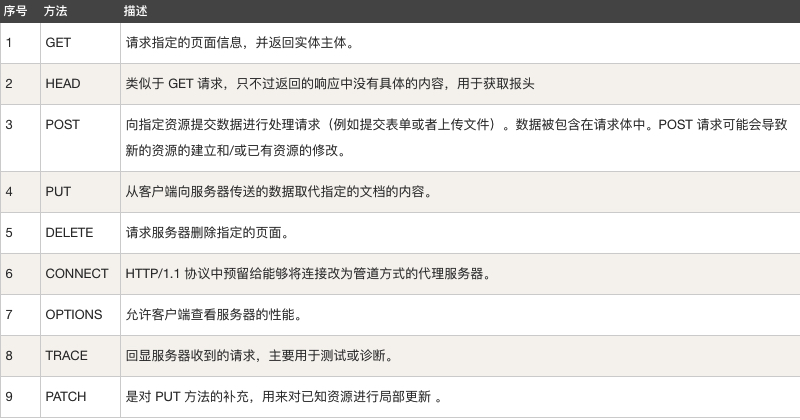
Request method
-
Common request header
-
Accept: Specifies the content type that the client can receive.
-
Accept charset: the character encoding set that the browser can accept.
-
Accept encoding: Specifies the compression encoding type of content returned by the web server that the browser can support.
-
Accept language: the language acceptable to the browser.
-
Accept ranges: you can request one or more sub range fields of a web page entity.
-
Authorization http: authorization certificate of authorization.
-
Cache control: Specifies the caching mechanism followed by requests and responses.
-
Connection: indicates whether a persistent connection is required. (HTTP 1.1 makes persistent connection by default)
-
Cookie http: when a request is sent, all cookie values saved under the domain name of the request will be sent to the web server together.
-
Content length: the length of the requested content.
-
Content type: requested MIME information corresponding to the entity.
-
Date: the date and time when the request was sent.
-
Expect: the specific server behavior of the request.
-
From: Email of the user who made the request.
-
Host: Specifies the domain name and port number of the requested server.
-
If match: valid only if the requested content matches the entity.
-
If modified since: if the part of the request is modified after the specified time, the request is successful. If it is not modified, a 304 code is returned.
-
If none match: if the content has not changed, the return code is 304. The parameter is the Etag previously sent by the server. Compare it with the Etag responded by the server to determine whether it has changed.
-
If range: if the entity is not changed, the server sends the missing part of the client, otherwise the whole entity is sent.
-
If unmodified since: the request succeeds only if the entity has not been modified after the specified time.
-
Max forwards: limit the time when information is transmitted through agents and gateways.
-
Pragma: used to contain implementation specific instructions.
-
Proxy authorization: the authorization certificate to connect to the proxy.
-
Range: only part of the requested entity, specifying the range.
-
Referer: the address of the previous web page, followed by the current request web page, that is, the source.
-
TE: the transmission code that the client is willing to accept and notify the server to accept the tail header information.
-
Upgrade: specify a transport protocol to the server for conversion (if supported).
-
Whether the user agent is a browser.
-
Via: notify the intermediate gateway or proxy server address and communication protocol.
-
Warning: warning information about Message Entities
-
-
Response header
-
Accept ranges: indicates whether the server supports the specified range request and what type of segmentation request.
-
Age: the estimated time from the original server to the formation of the proxy cache (in seconds, non negative).
-
Allow: an effective request behavior for a network resource. If it is not allowed, 405 is returned.
-
Cache control: tell all caching mechanisms whether they can cache and what type.
-
Content encoding Web: the compression encoding type of returned content supported by the server..
-
Content language: the language of the response body.
-
Content length: the length of the response body.
-
Content location: another alternative address for requesting resources.
-
Content-MD5: returns the MD5 check value of the resource.
-
Content range: the byte position of this part in the whole return body.
-
Content type: returns the MIME type of the content.
-
Date: the time when the original server message was sent.
-
ETag: the current value of the entity tag of the request variable.
-
Expires: the date and time when the response expires.
-
Last modified: the last modified time of the requested resource.
-
Location: used to redirect the receiver to the location of the non requesting URL to complete the request or identify a new resource.
-
Pragma: includes implementation specific instructions that can be applied to any receiver in the response chain.
-
Proxy authenticate: it indicates the authentication scheme and the parameters on the URL that can be applied to the proxy.
-
refresh: it is used for redirection or a new resource is created and redirected after 5 seconds (proposed by Netscape and supported by most browsers)
-
Retry after: if the entity is temporarily unavailable, notify the client to try again after the specified time.
-
Serverweb: the name of the server software.
-
Set Cookie: set Http Cookie.
-
Trailer: indicates that the header field exists at the end of the block transmission code.
-
Transfer encoding: file transfer encoding.
-
Vary: tells downstream agents whether to use cached responses or request from the original server.
-
Via: tells the proxy client where the response was sent.
-
Warning: warn the entity of possible problems.
-
Www authenticate: indicates the authorization scheme that the client requesting entity should use.
-
-
Status code
- 200 - Request successful
- 301 - resources (web pages, etc.) are permanently transferred to other URL s
- 302 - resources (web pages, etc.) are temporarily transferred to other URL s
- 401 - unauthorized
- 403 - no access
- 408 - Request timeout
- 404 - the requested resource (web page, etc.) does not exist
- 500 - internal server error
- 503 - server unavailable
#urllib basic usage
04. Get and Post usage of urllib
-
Decode
- The function of Decode is to convert other encoded strings into unicode encoding, such as str.decode('gb2312 '), which means to convert the string str1 encoded by GB2312 into unicode encoding.
-
Encode
- Encode is used to convert unicode encoding into other encoded strings, such as str.encode('gb2312 '), which means to convert unicode encoded string str2 into GB2312 encoding.
-
Get request
- URL encoding
word = {"wd" : "beauty"} # Through urllib The URLEncode () method converts the dictionary key value pair according to the URL code, so that it can be accepted by the web server. result = urllib.parse.urlencode(word) print(result)- decode
result = urllib.parse.unquote(result)
print(result)
- Send request
 response = urllib.request.urlopen(request)
 print(response.read())
-
POST request
-
# The target URL of the POST request (this code is the previous link for our convenience. There is no need to pass the sign parameter, which is encrypted in the new version)
url = "http://fanyi.youdao.com/translate?smartresult=dict&smartresult=rule&smartresult=ugc&sessionFrom=null"
#Building form data
formdata = {
    'i': 'Hello',
    'from': 'AUTO',
    'to': 'AUTO',
    'smartresult': 'dict',
    'client': 'fanyideskweb',
    'doctype': 'json',
    'version': '2.1',
    'keyfrom': 'fanyi.web',
    'action': 'FY_BY_CLICKBUTTION',
    'typoResult': 'false',
}

formdata = urllib.parse.urlencode(formdata)
formdata = formdata.encode('utf-8')

req = request.Request(url, data = formdata, headers = headers)
#Initiate a request to get the response result
response = request.urlopen(req)
#Print the obtained response results
print (response.read().decode('utf-8'))
-
-
Ignore SSL authentication
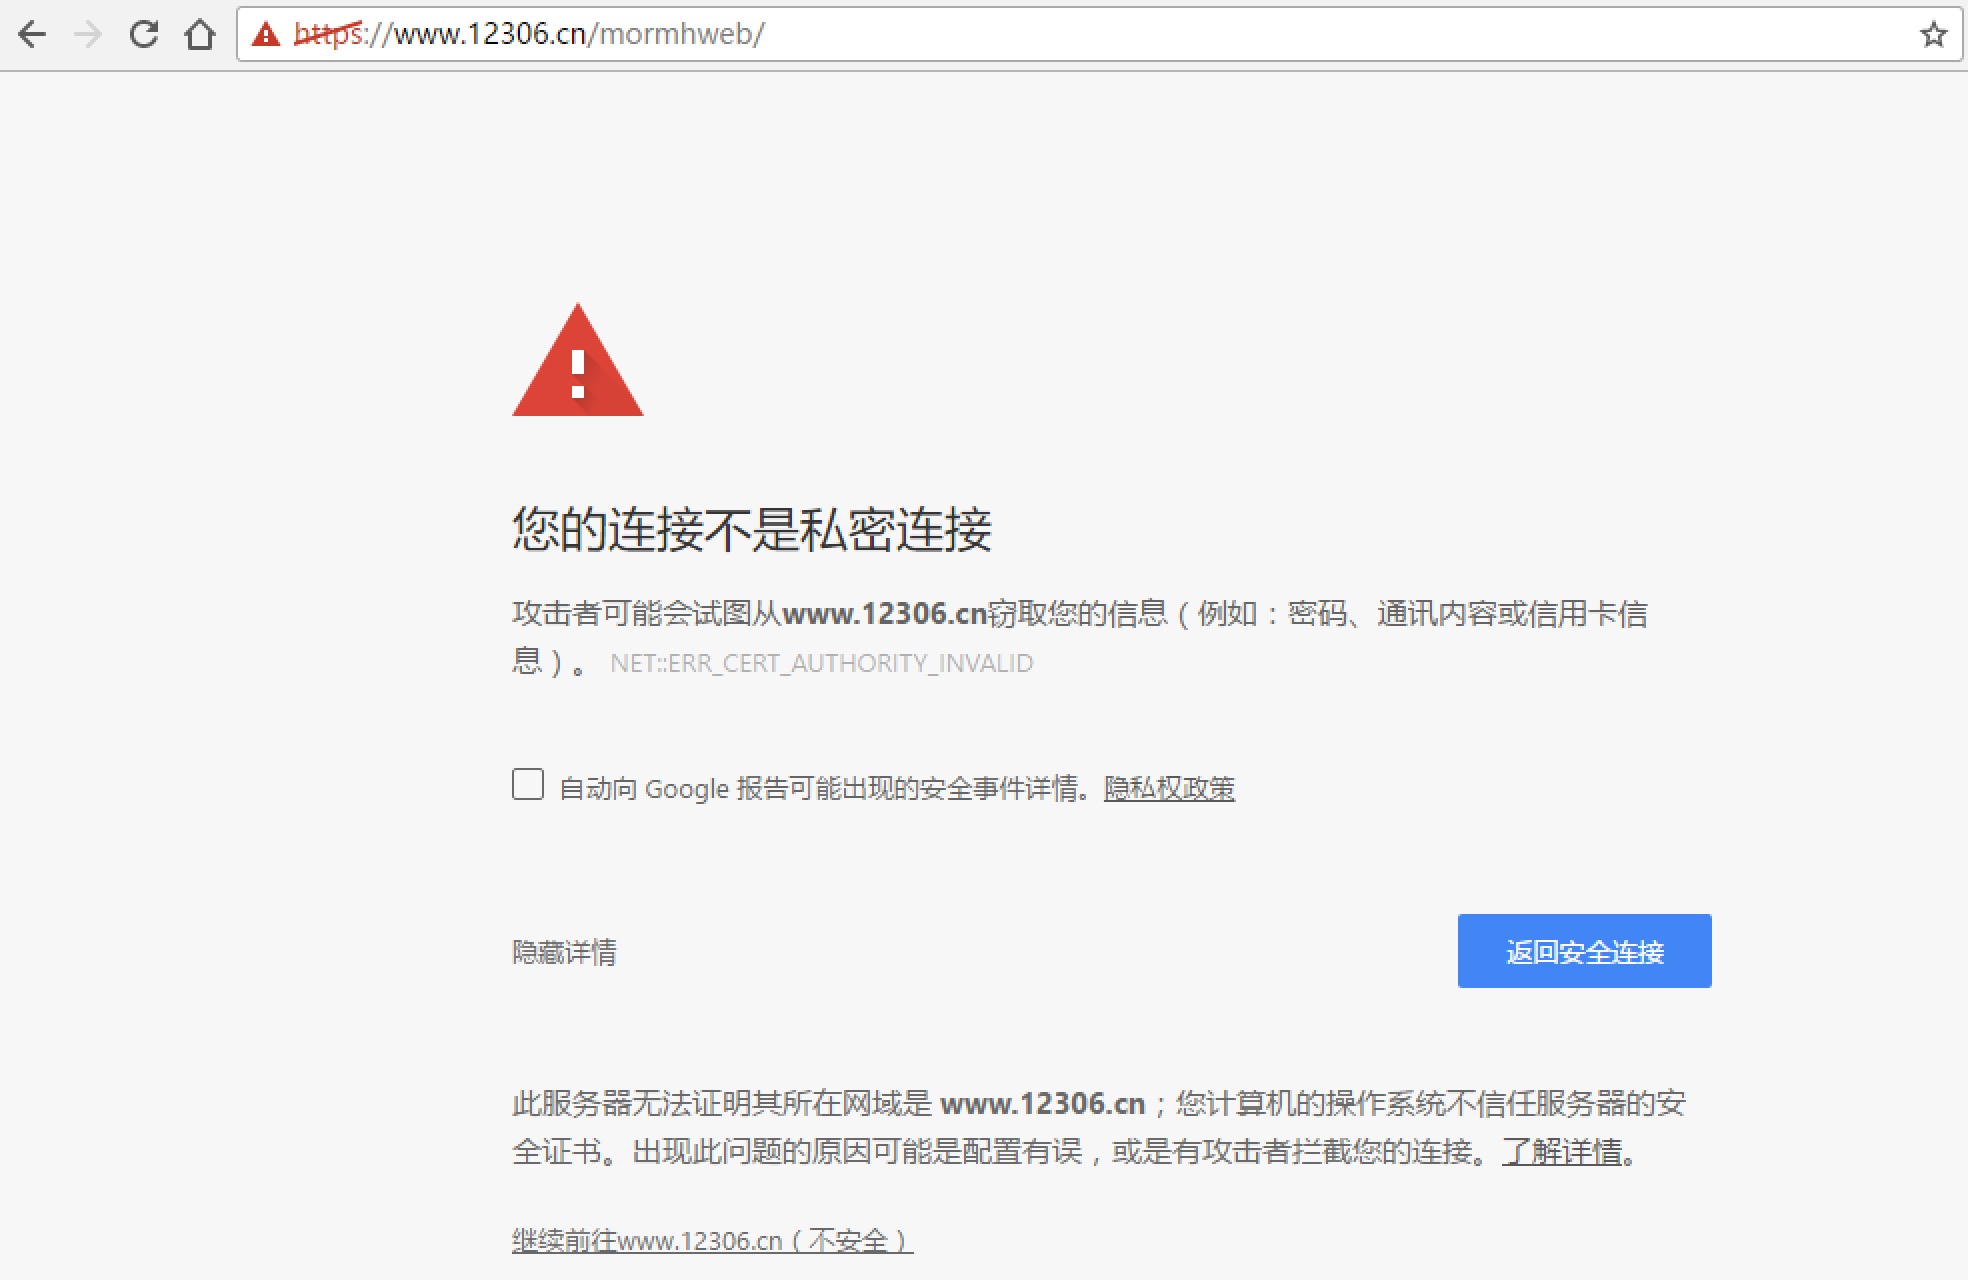
from urllib import request
# 1. Import Python SSL processing module
import ssl
# 2. Indicates that unauthenticated SSL certificate authentication is ignored
context = ssl._create_unverified_context()
# Target url
url = "https://www.12306.cn/mormhweb/"
#Set request header
headers = {"User-Agent": "Mozilla/5.0 (Windows NT 10.0; Win64; x64) AppleWebKit/537.36 (KHTML, like Gecko) Chrome/54.0.2840.99 Safari/537.36"}
#Build request object
request = urllib.request.Request(url, headers = headers)
# 3. Specify adding context parameter in urlopen() method
response = urllib.request.urlopen(request, context = context)
html = response.read().decode()
print (html)
05. Other uses of urlib
-
urlparse() implements URL identification and segmentation
	url = 'https://book.qidian.com/info/1004608738?wd=123&page=20#Catalog'
"""
url: To be resolved url
scheme='': If analytical url No agreement,You can set the default protocol,If url There is a protocol. Setting this parameter is invalid
allow_fragments=True: Ignore anchor,Default to True Indicates not to ignore,by False Indicates ignore
"""
result = parse.urlparse(url=url,scheme='http',allow_fragments=True)
print(result)
print(result.scheme)
-
urlunparse() can realize the construction of URL
-
url_parmas = ('https', 'book.qidian.com', '/info/1004608738', '', 'wd=123&page=20', 'Catalog') #components: is an iteratable object, and the length must be 6 result = parse.urlunparse(url_parmas) print(result) """ https://book.qidian.com/info/1004608738?wd=123&page=20#Catalog """ -
urljoin() passes a basic link, according to which an incomplete link can be spliced into a complete link
base_url = 'https://book.qidian.com/info/1004608738?wd=123&page=20#Catalog'
sub_url = '/info/100861102'
full_url = parse.urljoin(base_url,sub_url)
print(full_url)
-
parse_qs() deserializes the parameters of url encoding format into dictionary type
-
parmas_str = 'page=20&wd=123' parmas = parse.parse_qs(parmas_str) print(parmas) """ {'page': ['20'], 'wd': ['123']} """ -
quote() can convert Chinese into URL encoding format
-
word = 'The Chinese Dream'
url = 'http://www.baidu.com/s?wd='+parse.quote(word)
print(parse.quote(word))
print(url)
"""
%E4%B8%AD%E5%9B%BD%E6%A2%A6
http://www.baidu.com/s?wd=%E4%B8%AD%E5%9B%BD%E6%A2%A6
"""
-
unquote: URL encoding can be decoded
-
url = 'http://www.baidu.com/s?wd=%E4%B8%AD%E5%9B%BD%E6%A2%A6'
print(parse.unquote(url))
"""
http://www.baidu.com/s?wd = Chinese dream
"""
06. Urllib exception error
-
URLError
- The error module from the urllib library inherits from OSError. Exceptions generated by the request module can be handled by capturing this class
- No network connection
- Server connection failed
- The specified server could not be found
- The error module from the urllib library inherits from OSError. Exceptions generated by the request module can be handled by capturing this class
-
HTTPError
-
HTTPError is a subclass of URLError. When we send a request, the server will correspond to a response response object, which contains a digital "response status code".
-
It is specially used to handle H TTP request errors, such as unauthenticated, page does not exist, etc
-
There are three properties:
-
Code: returns the status code of HTTP
-
Reason: error reason returned
-
headers: return request header
from urllib import request,error def check_error(): """ because HTTPError The parent class of is URLError,So our better processing order should be Catch the errors of the subclass first, and then catch the errors of the parent class """ req_url = 'https://www.baiduxxx.com/' try: response = request.urlopen(url=req_url) print(response.status) except error.HTTPError as err: print(err.code,err.reason,err.headers) except error.URLError as err: print('===', err.reason) -
-
07. Urlib proxy settings
- Customize Opener
urlopen, which we have been using before, is a special opener created by the module. Custom opener will have more advanced usage
import urllib.request
# Build an HTTPHandler processor object to support processing HTTP requests
http_handler = urllib.request.HTTPHandler()
# Build an HTTPHandler processor object to support processing HTTPS requests
# http_handler = urllib.request.HTTPSHandler()
# Call urllib request. build_ The opener () method creates an opener object that supports processing HTTP requests
opener = urllib.request.build_opener(http_handler)
# Build Request
request = urllib.request.Request("http://www.baidu.com/")
# Call the open() method of the custom opener object and send the request
response = opener.open(request)
# Get server response content
print (response.read().decode())
-
Proxy settings
-
-
Role of agent:
-
1. Break through their own IP access restrictions and visit some sites that cannot be accessed at ordinary times.
-
2. Visit internal resources of some units or groups: for example, using the free proxy server in the address segment of the education network can be used for various FTP download and upload services open to the education network, as well as various data query and sharing services.
-
3. Improve access speed: usually, the proxy server sets a large hard disk buffer. When external information passes through, it will also be saved in the buffer. When other users access the same information again, the information will be directly taken out of the buffer and transmitted to users to improve access speed.
-
4. Hide real IP: Internet users can also hide their IP in this way to avoid attacks. For crawlers, we use agents to hide their own IP and prevent their own IP from being blocked.
-
-
According to the agreement
-
FTP proxy server * *: it is mainly used to access the FTP server. It generally has the functions of uploading, downloading and caching. The port number is generally 2121**
-
HTTP proxy server * *: it is mainly used to access web pages. It generally has the functions of content filtering and caching. The port numbers are generally 80, 8080, 3128, etc**
-
SSL/TLS proxy: it is mainly used to access encrypted websites, generally SSL or TLS encryption**
-
SOCKS proxy: it is only used to transmit data packets, and does not care about the specific protocol usage. It is fast and has cache function. The port number is generally 1080
-
-
Divided by anonymous content
-
Highly anonymous proxy: it will forward the data packet in the original envelope. It seems to the server that it is really an ordinary user accessing for a short time, and the recorded IP is the IP of the proxy server
-
Ordinary anonymous proxy: it will make some changes on the data packet. The server may find that this is a proxy server, and there is a certain chance to trace the real IP of the client
-
Transparent proxy: not only changes the data packet, but also tells the server the real IP of the client. In addition to using cache technology, this proxy improves the browser speed. It has no other function except to improve security with content filtering.
-
Using proxy IP is the second trick of Crawler / anti crawler, and it is usually the best.
-
-
-
Proxy website
- Western thorn free proxy IP
- Fast agent free agent
from urllib import request,error
#Build a handler that supports agents
proxy = {
    'http':'61.138.33.20:808',
    'https':'120.69.82.110:44693',
}
proxy_handler = request.ProxyHandler(
    proxies=proxy
)
# To build a private agent Handler, you need to add the user name and password of the private agent account
# authproxy = {
#    "http" :"username:password@61.135.217.7:80"
#}
# authproxy_handler=urllib.request.ProxyHandler(
#    proxies=authproxy
#)
#According to proxy_handler instantiates an opener object
opener = request.build_opener(proxy_handler)
url = 'http://www.baidu.com/'
# use https://httpbin.org/get Proxy is used for interface validation
# url = 'https://httpbin.org/get'
try:
    response = opener.open(url,timeout=5)
    print(response.status)
except error.HTTPError as err:
    print(err.reason)
except error.URLError as err:
    print(err.reason)
# 1. If you follow the above code, you can only use opener Send with open() method
 Request to use a custom proxy, and urlopen()The custom proxy is not used.
response = opener.open(request)
# 2. Set the customized opener to the global opener, and then all, no matter
opener.open()still urlopen() A custom proxy will be used whenever a request is sent.
# request.install_opener(opener)
# response = urlopen(request)
08. Role of cookies
-
The role of Cookies
- Cookies is the most direct application, which is to detect whether the user has logged in
Get a with login information Cookie Simulated landing # -*- coding:utf-8 -*- import urllib.request url = 'https://www.douban.com/people/175417123/' #According to the login information just now, build the header information of a logged in user headers = { 'User-Agent':' Mozilla/5.0 (Macintosh; Intel Mac OS X 10.12; rv:59.0) Gecko/20100101 Firefox/59.0', 'Host':'www.renren.com', 'Cookie':'anonymid=jgoj4xlw-3izsk4; depovince=BJ; jebecookies=62d94404-de1f-450a-919b-a2d9f4c8b811|||||; _r01_=1; JSESSIONID=abchsGLNgne0L8_wz2Emw; ick_login=cf54f2dc-8b0b-417a-96b2-32d4051f7236; jebe_key=02cb19ad-2966-4641-8828-217160ca67a0%7Cba6f6d6ec917200a4e17a85dbfe33a4a%7C1525230975024%7C1%7C1525230982574; t=87a502d75601f8e8c0c6e0f79c7c07c14; societyguester=87a502d75601f8e8c0c6e0f79c7c07c14; id=965706174; xnsid=e1264d85; ver=7.0; loginfrom=null; wp_fold=0', } # 2. Construct the Request object through the header information (mainly Cookie information) in the headers request = urllib.request.Request(url, headers=headers) # 3. Direct Douban personal homepage (mainly Cookie information) #, judge that this is a logged in user and return to the corresponding page response = urllib.request.urlopen(request) # 4. Print the response content print (response.read().decode()) -
CookieJar
- An object used to store cookie values and store them in memory to add cookies to outgoing HTTP requests.
import http.cookiejar as cookiejar
from urllib import parse,request
#1. Construct a cookie jar object instance to save cookies
cookie = cookiejar.CookieJar()
# 2. Create a cookie processor object using HTTP cookie processor(),
# The parameter is a CookieJar() object
cookie_handler = request.HTTPCookieProcessor(cookie)
#3. build_opener() to build opener
opener = request.build_opener(cookie_handler)
#4. Add headers accepts a list in which each element is a tuple of header information
#opener will come with header information
opener.addheaders = [
    ('User-Agent','Mozilla/5.0 (Macintosh; Intel Mac OS X 10.12; rv:59.0) Gecko/20100101 Firefox/59.0'),
]
#5. Login account and password are required
data = {
    'source': 'index_nav',
    'form_email': '18518753265',
    'form_password': 'ljh123456',
}
#6. Transcoding via urlencode()
postdata = parse.urlencode(data).encode('utf-8')
#7. Build the Request object, including the user name and password to be sent
request = request.Request("https://www.douban.com/accounts/login", data = postdata)
# 8. Send this request through opener and obtain the Cookie value after login,
opener.open(request)
# 9. opener contains the Cookie value after the user logs in. You can directly access the pages that can be accessed only after logging in
response = opener.open("https://www.douban.com/people/175417123/")
#Here is to test the effect of accessing the modified interface without adding cookie s
#headers = {
#    'User-Agent':'Mozilla/5.0 (Macintosh; Intel Mac OS X 10.12; rv:59.0) Gecko/20100101 #Firefox/59.0',
#}
# request = request.Request('https://www.douban.com/people/175417123/',headers=headers)
# response = request.urlopen(request)
# 10. Print response content
#Print the results to check whether the access is successful
print(response.code)
html = response.read().decode('utf-8')
# print(html)
with open('douban_login.html','w') as f:
    f.write(html)
#Request usage
09. Get and Post usage of requests
-
requests
- requests is a simple and easy-to-use HTTP library implemented in python, which is much simpler to use than urllib.
-
Get request
response = requests.get("http://www.baidu.com/") * response Common methods of: * response.text Returns the decoded string * respones.content Returns in bytes (binary). * response.status_code Response status code * response.request.headers Request header of the request * response.headers Response header * response.encoding = 'utf-8' You can set the encoding type * response.encoding Get current encoding * response.json() Built in JSON Decoder to json Formal return,If the content returned is json Format, otherwise an exception will be thrown if there is an error in parsing -
Add request header
import requests kw = {'wd':'beauty'} headers = { "User-Agent": "Mozilla/5.0 (Windows NT 10.0; Win64; x64) AppleWebKit/537.36 (KHTML, like Gecko) Chrome/54.0.2840.99 Safari/537.36" } # params receives the query parameters of a dictionary or string, # The dictionary type is automatically converted to url encoding, and urlencode() is not required response = requests.get( "http://www.baidu.com/s?", params = kw, headers = headers ) -
be careful
- Use response Text, Requests will automatically decode the response content based on the text encoding of the HTTP response. Most Unicode character sets can be decoded seamlessly, but there will also be garbled Requests. Response is recommended content. deocde()
- Use response Content returns the original binary byte stream of the server response data, which can be used to save binary files such as pictures.
-
Post request
import requests
req_url = "http://fanyi.youdao.com/translate?smartresult=dict&smartresult=rule&smartresult=ugc&sessionFrom=null"
#Analyze form data
formdata = {
    'i': 'Mice love rice',
    'from': 'AUTO',
    'to': 'AUTO',
    'smartresult': 'dict',
    'client': 'fanyideskweb',
    'doctype': 'json',
    'version': '2.1',
    'keyfrom': 'fanyi.web',
    'action': 'FY_BY_CLICKBUTTION',
    'typoResult': 'false',
}
#Add request header
req_header = {
    'User-Agent':'Mozilla/5.0 (X11; Linux x86_64) AppleWebKit/537.36 (KHTML, like Gecko) Chrome/67.0.3396.99 Safari/537.36',
}
response = requests.post(
    req_url,
    data = formdata,
    headers = req_header
)
#print (response.text)
# If it is a json file, it can be displayed directly
print (response.json())
10. Other uses of requests
-
Upload file
url = 'https://httpbin.org/post' files = {'file': open('image.png', 'rb')} response = requests.post(url, files=files) print(response.text) -
Web client authentication
import requests auth=('test', '123456') response = requests.get( 'http://192.168.199.107', auth = auth ) print (response.text) -
Proxy settings
import requests # Select different agents according to the protocol type proxies = { "http": "http://11.44.156.126:4532", "https": "http://11.134.156.126:4532", } ##If the proxy needs to use HTTP Basic Auth, you can use the following format: ''' proxy = { "http": "name:password@11.134.156.126:4532" } ''' response = requests.get( "http://www.baidu.com", proxies = proxies ) print(response.text) -
Cookies
import requests response = requests.get("https://www.douban.com/") # 7\. Return CookieJar object: cookiejar = response.cookies # 8\. Convert CookieJar to Dictionary: cookiedict = requests.utils.dict_from_cookiejar( cookiejar ) print (cookiejar) print (cookiedict) -
Session
import requests # 1\. Create a session object to save the Cookie value ssion = requests.session() # 2\. Processing headers headers = { "User-Agent": "Mozilla/5.0 (Windows NT 10.0; Win64; x64) AppleWebKit/537.36 (KHTML, like Gecko) Chrome/54.0.2840.99 Safari/537.36" } # 3\. Login user name and password required data = { "email":"18518753265", "password":"ljh123456" } # 4\. Send the request with user name and password, obtain the Cookie value after login and save it in session ssion.post( "http://www.renren.com/PLogin.do", data = data ) # 5\. Session contains the Cookie value after the user logs in. You can directly access the pages that can only be accessed after logging in response = ssion.get( "http://www.renren.com/965722397/profile" ) # 6\. Print response content print (response.text) -
Skip SSL authentication
import requests
response = requests.get("https://www.12306.cn/mormhweb/", verify = False)
print (response.text)
#Regular
11. Regular
-
regular
- A regular expression is a set of patterns used to match strings
-
Online website
-
Why learn regularization
- Extract the data we want with regular
-
compile function
- Used to compile regular expressions and generate a Pattern object
- re.I use matching case insensitive (case insensitive)
- re.S make Matches all characters, including line breaks
- re.M multiline matching
- re.L do localization recognition
- Used to compile regular expressions and generate a Pattern object
-
match method:
-
Search from the starting position and match once
import re

pattern = re.compile('\d', re.S)
result = re.match(pattern, '12')
print(result.group())
-
-
search method:
-
Search from anywhere, one match
import re

pattern = re.compile('\d', re.S)
result = re.search(pattern, 'a12')
print(result.group())
-
-
findall method:
-
Match all and return to the list
import re

pattern = re.compile('\d', re.S)
result = re.findall(pattern, 'a12')
print(result)
-
-
split method:
-
Split string and return list
import re

pattern = re.compile('\d', re.S)
result = re.split(pattern, 'a1b2c')
print(result)
-
-
sub method:
-
replace
import re

pattern = re.compile('\d', re.S)
result = re.sub(pattern, 'a', '1234')
print(result)
-
13. Xpath expression
- What is xpath?
XPath (XML Path Language) is a language for finding information in XML documents. It can be used to traverse elements and attributes in XML documents. - What is xml? W3School
- XML refers to EXtensible Markup Language
- XML is a markup language, very similar to HTML
- XML is designed to transmit data, not display it
- XML tags are not predefined. You need to define your own label.
- XML is designed to be self descriptive.
- XML is a W3C recommendation
- The difference between XML and HTML
| data format | describe | effect |
|---|---|---|
| XML | Extensible markup language | Used to transmit and store data |
| HTML | Hypertext markup language | Used to display data |
- Common grammar
| expression | meaning |
|---|---|
| / | Start at the root node |
| // | From any node |
| . | From current node |
| ... | From the parent node of the current node |
| @ | Select Properties |
| text() | Select text |
- Common usage
from lxml import etree
data = """
        <div>
            <ul>
                 <li class="item-0"><a href="link1.html">first item</a></li>
                 <li class="item-1"><a href="link2.html">second item</a></li>
                 <li class="item-inactive"><a href="link3.html">third item</a></li>
                 <li class="item-1" id="1" ><a href="link4.html">fourth item</a></li>
                 <li class="item-0" data="2"><a href="link5.html">fifth item</a>
             </ul>
         </div>
        """

html = etree.HTML(data)#An XPath parsing object is constructed. etree.HTML module can automatically modify HTML text.

li_list = html.xpath('//ul/li ') # select all li nodes under ul
#li_list = html.xpath('//div/ul/li ') # select all li nodes under ul

a_list = html.xpath('//ul/li/a ') # select all a nodes under ul
herf_list = html.xpath('//ul/li/a/@href ') # select the value of attribute herf of all a nodes under ul
text_list = html.xpath('//ul/li/a/text() '# select the values of all a nodes under ul
print(li_list)
print(a_list)
print(herf_list)
print(text_list)

#Print
[<Element li at 0x1015f4c48>, <Element li at 0x1015f4c08>, <Element li at 0x1015f4d08>, <Element li at 0x1015f4d48>, <Element li at 0x1015f4d88>]
[<Element a at 0x1015f4dc8>, <Element a at 0x1015f4e08>, <Element a at 0x1015f4e48>, <Element a at 0x1015f4e88>, <Element a at 0x1015f4ec8>]
['link1.html', 'link2.html', 'link3.html', 'link4.html', 'link5.html']
['first item', 'second item', 'third item', 'fourth item', 'fifth item']
- wildcard
| wildcard | meaning |
|---|---|
| * | Pick any element node |
| @* | Select the node of any attribute |
- Common usage
from lxml import etree
data = """
        <div>
            <ul>
                 <li class="item-0"><a href="link1.html">first item</a></li>
                 <li class="item-1"><a href="link2.html">second item</a></li>
                 <li class="item-inactive"><a href="link3.html">third item</a></li>
                 <li class="item-1" id="1" ><a href="link4.html">fourth item</a></li>
                 <li class="item-0" data="2"><a href="link5.html">fifth item</a>
             </ul>
         </div>
        """

html = etree.HTML(data)

li_list = html.xpath('//li[@class="item-0"])) # select the li tag whose class is item-0
text_list = html.xpath('//li[@class="item-0"]/a/text() ') # select the value of a tag under the li tag whose class is item-0
li1_list  = html.xpath('//li[@id="1"]) # select the li tag whose ID attribute is 1
li2_list  = html.xpath('//li[@data="2"])) # select the li tag whose data attribute is 2
print(li_list)
print(text_list)
print(li1_list)
print(li2_list)

#Print
[<Element li at 0x101dd4cc8>, <Element li at 0x101dd4c88>]
['first item', 'fifth item']
[<Element li at 0x101dd4d88>]
[<Element li at 0x101dd4c88>]
- expression
| expression | meaning |
|---|---|
| [?] | Select the node |
| last() | Select the last node |
| last()-1 | Select the penultimate node |
| position()-1 | Select the first two |
- Common usage
from lxml import etree

data = jiayuan

html = etree.HTML(data)

li_list = html.xpath('//ul/li[1] '# select the first li node under ul
li1_list = html.xpath('//ul/li[last()] ') # select the last li node under ul
li2_list = html.xpath('//ul/li[last()-1] '# select the last li node under ul
li3_list = html.xpath('//ul / Li [position() < = 3] ') # select the first three tags under ul
text_list = html.xpath('//ul / Li [position() < = 3] / A / @ href ') # select the value of href in tag a of the first three tags under ul
print(li_list)
print(li1_list)
print(li2_list)
print(li3_list)
print(text_list)

#Print
[<Element li at 0x1015d3cc8>]
[<Element li at 0x1015d3c88>]
[<Element li at 0x1015d3d88>]
[<Element li at 0x1015d3cc8>, <Element li at 0x1015d3dc8>, <Element li at 0x1015d3e08>]
['link1.html', 'link2.html', 'link3.html']
- function
| Function name | meaning |
|---|---|
| starts-with | Pick an element that starts with what |
| contains | Select the element that contains some information |
| and | And the relationship between |
| or | Or your relationship |
from lxml import etree

data = """
        <div>
            <ul>
                 <li class="item-0"><a href="link1.html">first item</a></li>
                 <li class="item-1"><a href="link2.html">second item</a></li>
                 <li class="item-inactive"><a href="link3.html">third item</a></li>
                 <li class="item-1" id="1" ><a href="link4.html">fourth item</a></li>
                 <li class="item-0" data="2"><a href="link5.html">fifth item</a>
             </ul>
         </div>
        """

html = etree.HTML(data)

li_list = html.xpath('//li [starts with (@ class, "item-1")] '# get the class containing the li tag starting with item-1
li1_list = html.xpath('//li[contains(@class,"item-1")] '# get the li tag of the class containing the item
li2_list = html.xpath('//li[contains(@class,"item-0") and contains(@data,"2")] '# get the li tag with class item-0 and data 2
li3_list = html.xpath('//li[contains(@class,"item-1") or contains(@data,"2")] '# get the li tag with class item-1 or data 2
print(li_list)
print(li1_list)
print(li2_list)
print(li3_list)

#Print
[<Element li at 0x101dcac08>, <Element li at 0x101dcabc8>]
[<Element li at 0x101dcac08>, <Element li at 0x101dcabc8>]
[<Element li at 0x101dcacc8>]
[<Element li at 0x101dcac08>, <Element li at 0x101dcabc8>, <Element li at 0x101dcacc8>]
- plug-in unit
- Chrome plugin XPath Helper
- Firefox plugin XPath Checker
practice
Climbing bucket diagram: https://www.pkdoutu.com/article/list/?page=1
import requests
from lxml import etree
import os

'''
# Crawled website: url
https://www.pkdoutu.com/article/list/?page=2

# The idea of analyzing to pictures
//div[@class="col-sm-9 center-wrap"]//a
//div[@class="col-sm-9 center-wrap"]//a/div[@class="random_title"]/text()
//div[@class="col-sm-9 center-wrap"]//a/div[@class="random_article"]//img/@data-original
'''


class DouTuLaSpider():
    def __init__(self):
        self.url = 'https://www.pkdoutu.com/article/list/?page='
        self.headers = {
            'User-Agent': 'Mozilla/5.0 (Windows NT 10.0; Win64; x64) AppleWebKit/537.36 (KHTML, like Gecko) Chrome/97.0.4692.99 Safari/537.36'
        }

    # Send request
    def send_request(self, url):
        print(url)
        response = requests.get(url=url, headers=self.headers)
        return response

    def parse_content(self, response):
        html = response.text
        content = etree.HTML(html)
        a_list = content.xpath('//div[@class="col-sm-9 center-wrap"]//a')
        print(a_list)
        for a in a_list:
            title = a.xpath('./div[@class="random_title"]/text()')  # xpath takes out the list
            pic_list = a.xpath('./div[@class="random_article"]//img/@data-original')
            if title:
                if not os.path.exists('doutu/' + title[0]):
                    os.mkdir('doutu/' + title[0])
                for index, pic in enumerate(pic_list):
                    response = self.send_request(pic)  # Send picture request
                    name = str(index + 1) + "_" + pic[-20:]  # Picture name
                    self.write_content(response, name, 'doutu/' + title[0])

    def write_content(self, response, name, path):
        print('Writing%s' % name)
        with open(path + '/' + name, 'wb') as f:
            f.write(response.content)

    def start(self):
        for i in range(10, 20):
            full_url = self.url + str(i)
            reponse = self.send_request(full_url)
            self.parse_content(reponse)


if __name__ == '__main__':
    dtl = DouTuLaSpider()
    dtl.start()
Climbing chain home: https://sh.lianjia.com/chengjiao/pg1/
#bs4 use
15. bs4
- BS4
- Beautiful Soup Is a Python library that can extract data from HTML or XML files It can realize the usual way of document navigation, searching and modifying through your favorite converter Beautiful Soup will help you save hours or even days of working time
- install
- pip install beautifulsoup4
- Parser
| expression | usage method | advantage |
|---|---|---|
| Python standard library | BeautifulSoup(markup, "html.parser") | Python's built-in standard library Moderate execution speed Document fault tolerance |
| lxml HTML parser | BeautifulSoup(markup, "lxml") | Fast speed Document fault tolerance |
| lxml XML parser | BeautifulSoup(markup, ["lxml-xml"]) BeautifulSoup(markup, "xml") | Fast speed The only parser that supports XML |
| html5lib | BeautifulSoup(markup, "html5lib") | Best fault tolerance Parse documents in browser mode Generate documents in HTML5 format |
-
Object type
-
Tag
soup = BeautifulSoup('<b class="boldest">Extremely bold</b>') tag = soup.b type(tag) # <class 'bs4.element.Tag'> -
Name
tag.name
# 'b'
-
attrs
tag.attrs # {u'class': u'boldest'} -
NavigableString
tag.string
#Extremely bold
-
Search document tree
html_doc = """
<html><head><title>The Dormouse's story</title></head>
<body>
<p class="title"><b>The Dormouse's story</b></p>

<p class="story">Once upon a time there were three little sisters; and their names were
<a href="http://example.com/elsie" class="sister" id="link1">Elsie</a>,
<a href="http://example.com/lacie" class="sister" id="link2">Lacie</a> and
<a href="http://example.com/tillie" class="sister" id="link3">Tillie</a>;
and they lived at the bottom of a well.</p>

<p class="story">...</p>
"""

from bs4 import BeautifulSoup
soup = BeautifulSoup(html_doc, 'html.parser')
-
find_all(name, attrs, recursive, text, **kwargs)
-
character string
soup.find_all('b') # [<b>The Dormouse's story</b>] -
regular
import re for tag in soup.find_all(re.compile("^b")): print(tag.name) # body # b -
list
soup.find_all(["a", "b"])
# [<b>The Dormouse's story</b>,
#  <a class="sister" href="http://example.com/elsie" id="link1">Elsie</a>,
#  <a class="sister" href="http://example.com/lacie" id="link2">Lacie</a>,
#  <a class="sister" href="http://example.com/tillie" id="link3">Tillie</a>]
-
keyword
soup.find_all(id='link2') # [<a class="sister" href="http://example.com/lacie" id="link2">Lacie</a>] soup.find_all(href=re.compile("elsie")) # [<a class="sister" href="http://example.com/elsie" id="link1">Elsie</a>] -
Search by CSS
soup.find_all("a", class_="sister")
# [<a class="sister" href="http://example.com/elsie" id="link1">Elsie</a>,
#  <a class="sister" href="http://example.com/lacie" id="link2">Lacie</a>,
#  <a class="sister" href="http://example.com/tillie" id="link3">Tillie</a>]
-
-
-
-
CSS selector
soup.select("title") # [<title>The Dormouse's story</title>] soup.select("p nth-of-type(3)") # [<p class="story">...</p>]-
Find layer by layer through tag tag
soup.select("body a") # [<a class="sister" href="http://example.com/elsie" id="link1">Elsie</a>, # <a class="sister" href="http://example.com/lacie" id="link2">Lacie</a>, # <a class="sister" href="http://example.com/tillie" id="link3">Tillie</a>] soup.select("html head title") # [<title>The Dormouse's story</title>] -
Find the direct sub tag under a tag tag
soup.select("head > title") # [<title>The Dormouse's story</title>] soup.select("p > a") # [<a class="sister" href="http://example.com/elsie" id="link1">Elsie</a>, # <a class="sister" href="http://example.com/lacie" id="link2">Lacie</a>, # <a class="sister" href="http://example.com/tillie" id="link3">Tillie</a>] soup.select("p > a:nth-of-type(2)") # [<a class="sister" href="http://example.com/lacie" id="link2">Lacie</a>] soup.select("p > #link1") # [<a class="sister" href="http://example.com/elsie" id="link1">Elsie</a>] soup.select("body > a") # [] -
Find sibling node label:
soup.select("#link1 ~ .sister") # [<a class="sister" href="http://example.com/lacie" id="link2">Lacie</a>, # <a class="sister" href="http://example.com/tillie" id="link3">Tillie</a>] soup.select("#link1 + .sister") # [<a class="sister" href="http://example.com/lacie" id="link2">Lacie</a>] -
Find by CSS class name
soup.select(".sister") # [<a class="sister" href="http://example.com/elsie" id="link1">Elsie</a>, # <a class="sister" href="http://example.com/lacie" id="link2">Lacie</a>, # <a class="sister" href="http://example.com/tillie" id="link3">Tillie</a>] soup.select("[class~=sister]") # [<a class="sister" href="http://example.com/elsie" id="link1">Elsie</a>, # <a class="sister" href="http://example.com/lacie" id="link2">Lacie</a>, # <a class="sister" href="http://example.com/tillie" id="link3">Tillie</a>] -
Find by tag id:
soup.select("#link1") # [<a class="sister" href="http://example.com/elsie" id="link1">Elsie</a>] soup.select("a#link2") # [<a class="sister" href="http://example.com/lacie" id="link2">Lacie</a>] -
Query elements with multiple CSS selectors at the same time:
soup.select("#link1,#link2") # [<a class="sister" href="http://example.com/elsie" id="link1">Elsie</a>, # <a class="sister" href="http://example.com/lacie" id="link2">Lacie</a>] -
Find by whether a property exists:
soup.select('a[href]') # [<a class="sister" href="http://example.com/elsie" id="link1">Elsie</a>, # <a class="sister" href="http://example.com/lacie" id="link2">Lacie</a>, # <a class="sister" href="http://example.com/tillie" id="link3">Tillie</a>] -
Find by the value of the property:
soup.select('a[href="http://example.com/elsie"]')
# [<a class="sister" href="http://example.com/elsie" id="link1">Elsie</a>]

soup.select('a[href^="http://example.com/"]')
# [<a class="sister" href="http://example.com/elsie" id="link1">Elsie</a>,
#  <a class="sister" href="http://example.com/lacie" id="link2">Lacie</a>,
#  <a class="sister" href="http://example.com/tillie" id="link3">Tillie</a>]

soup.select('a[href$="tillie"]')
# [<a class="sister" href="http://example.com/tillie" id="link3">Tillie</a>]

soup.select('a[href*=".com/el"]')
# [<a class="sister" href="http://example.com/elsie" id="link1">Elsie</a>]
-
Returns the first of the found elements
soup.select_one(".sister")
# <a class="sister" href="http://example.com/elsie" id="link1">Elsie</a>
-
16.4 cases
Use process:
-Guide Package: from BS4 import beautiful soup
-Usage: you can convert an html document into a beautiful soup object, and then find the specified node content through the object's methods or attributes
(1) Convert local files:
-'soup ',' soup '= local file (XML')
(2) Convert network files:
-Soup = beautiful soup ('string type or byte type ',' lxml ')
(3) Print the soup object, and the displayed content is the content in the html file
Foundation consolidation:
(1) Find by tag name
- soup.a can only find the first label that meets the requirements
(2) Get properties
- soup.a.attrs gets a all attributes and attribute values and returns a dictionary
- soup.a.attrs ['href'] get href attribute
- soup.a ['href'] can also be abbreviated to this form
(3) Get content
- soup.a.string
- soup.a.text
- soup.a.get_text()
[note] if there are tags in the tag, the result obtained by string is None, while the other two can obtain the text content
(4) Find: find the first tag that meets the requirements
- soup.find('a ') find the first one that meets the requirements
- soup.find('a', title="xxx")
- soup.find('a', alt="xxx")
- soup.find('a', class_="xxx")
- soup.find('a', id="xxx")
(5)find_all: find all tags that meet the requirements
- soup.find_all('a')
- soup.find_all(['a', 'b']) find all a and b tags
- soup.find_all('a ', limit=2) limits the first two
(6) Select the specified content according to the selector
select:soup.select('#feng')
-Common selectors: label selector (a), class selector (.) id selector (#), level selector
-Level selector:
div . dudu #lala . meme . There are many levels below Xixi
div > p > a > . Lala can only be the lower level
[note] the select selector always returns a list, and the specified object needs to be extracted by subscript
17.jsonpath
-
jsonpath
Used to parse multi-layer nested JSON data; JsonPath is an information extraction class library. It is a tool for extracting specified information from JSON documents. It is available in multiple languages, including Javascript, Python, PHP and Java
-
Documentation and installation
- http://goessner.net/articles/JsonPath
- pip install jsonpath
-
usage
import requests
import jsonpath
import json
import chardet
url = 'http://www.lagou.com/lbs/getAllCitySearchLabels.json'
response = requests.get(url)
html = response.text
# Convert json format string into python object
jsonobj = json.loads(html)
# Match from node name, start from node root
citylist = jsonpath.jsonpath(jsonobj,'$..name')
18. Multithreaded crawler
-
Multithreading review
- One cpu can only execute one task at a time, and multiple CPUs can execute multiple tasks at the same time
- A cpu can only execute one process at a time, and other processes are not running
- The execution unit contained in a process is called thread. A process can contain multiple threads
- The memory space of a process is shared, and the threads in each process can use this shared space
- When one thread uses this shared space, other threads must wait (blocking state)
- The function of mutex lock is to prevent multiple threads from using this memory space at the same time. The first thread will lock the space, and other threads are in a waiting state. You can't enter until the lock is opened
- Process: represents an execution of a program
- Thread: the basic scheduling unit of CPU operation
- GIL (global lock): there is only one execution pass in python. The thread that gets the pass can enter the CPU to execute the task. Threads without GIL cannot perform tasks
- python's multithreading is suitable for a large number of intensive I/O processing
- python's multi process is suitable for a large number of intensive parallel computing
- Collaborative process switching has small task resources and high efficiency
-
queue
- Queue is a linear data structure with first in first out characteristics. The addition of elements can only be carried out at one end and the deletion of elements can only be carried out at the other end. The end of the queue that can add elements is called the end of the queue, and the end of the queue that can delete elements is called the head of the queue
-
Stack
-
Stacks are a linear data structure that can only store and retrieve data by accessing one end of it. They have the characteristics of last in first out (LIFO)
-
Thread pool crawler
from concurrent.futures import ThreadPoolExecutor from concurrent.futures import as_completed import requests url = 'https://www.baidu.com/s?wd=%E7%BE%8E%E5%A5%B3&pn=' # Initiate request def request(url): # Variable length parameters can be used print(url) response = requests.get(url) return response def parse(result): ''' analysis :param result: :return: ''' return ['https://www.baidu.com / '] # return new url def main(): with ThreadPoolExecutor(max_workers=28) as executor: url_list = [] # List of installed URL s for i in range(1, 11): # A total of 10 were initiated full_url = url + str((i - 1) * 10) url_list.append(full_url) result = executor.map(request, url_list) for res in result: new_url = parse(res) # To analyze result1 = executor.map(request, new_url) # Continue request for res1 in result1: print(res1) # Second ''' with ThreadPoolExecutor(max_workers=28) as executor: future_list = [] for i in range(1, 11): # A total of 10 were initiated full_url = url + str((i - 1) * 10) future= executor.submit(request, full_url) future_list.append(future) for res in as_completed(futrue_list): print(res.result()) ''' if __name__ == '__main__': main() -
-
Process pool crawler
from concurrent.futures import ProcessPoolExecutor from concurrent.futures import as_completed import requests url = 'https://www.baidu.com/s?wd=%E7%BE%8E%E5%A5%B3&pn=' # Initiate request def request(url): # Variable length parameters can be used print(url) response = requests.get(url) return response def parse(result): ''' analysis :param result: :return: ''' return ['https://www.baidu.com / '] # return new url def main(): with ProcessPoolExecutor(max_workers=3) as executor: url_list = [] # List of installed URL s for i in range(1, 11): # A total of 10 were initiated full_url = url + str((i - 1) * 10) url_list.append(full_url) result = executor.map(request, url_list) for res in result: print(res) new_url = parse(res) # To analyze result1 = executor.map(request, new_url) # Continue request for res1 in result1: print(res1) '''Second with ProcessPoolExecutor(max_workers=3) as executor: future_list = [] for i in range(1, 11): # A total of 10 were initiated full_url = url + str((i - 1) * 10) future = executor.submit(request, full_url) future_list.append(future) for res in as_completed(future_list): print(res.result()) ''' if __name__ == '__main__': main() -
Multiprogramme reptile
import requests
import gevent
from gevent import monkey
from gevent.pool import Pool

#Mark the Current IO operation so that gevent can detect it and realize asynchronous (or serial)
monkey.patch_all()


def task(url):
    '''
    1,request Initiate request
    :param url:
    :return:
    '''
    response = requests.get(url)
    print(response.status_code)


#It controls the maximum number of requests submitted to the remote at one time. None means no limit
pool = Pool(5)
gevent.joinall([
    pool.spawn(task,url='https://www.baidu.com'),
    pool.spawn(task,url='http://www.sina.com.cn'),
    pool.spawn(task,url='https://news.baidu.com'),
])

gevent+reqeust+Pool((control the number of requests per time)
20.selenium
1, Selenium
Selenium is an automated testing tool that supports mainstream interface browsers such as Chrome, Safari and Firefox; Support multiple language development, such as Java, C, Python, etc
2, Document address
- https://selenium-python-zh.readthedocs.io/en/latest/
3, Installation
pip install selenium
4, Driver download
http://npm.taobao.org/mirrors/chromedriver
5, Use
#Import webdriver
from selenium import webdriver

# To call the keyboard key operation, you need to introduce the keys package
from selenium.webdriver.common.keys import Keys
import time
#No interface browser related settings
# Create chrome parameter object
opt = webdriver.ChromeOptions()
#Set chrome to no interface mode
opt.set_headless()
#Create a chrome interface free object
driver = webdriver.Chrome(
    options=opt, executable_path='/Users/ljh/Desktop/chromedriver'
)
#Create a chrome interface object
#Call Chrome browser to create browser object (specify the location below)
driver = webdriver.Chrome(
    executable_path='/Users/ljh/Desktop/chromedriver'
)
#Open the browser and simulate the browser request page
driver.get('http://www.baidu.com/')
#Get page information
html = driver.page_source
print(html)
# Get the text content of the id tag with the page name wrapper
data = driver.find_element_by_id("wrapper").text
#Gets the properties of the tag
attrvaule = driver.find_element_by_id("wrapper").get_attribute('class')
#Print data content
print(data)
#Print header data
print(driver.title)
#Enter search keywords into Baidu's search box
driver.find_element_by_id('kw').send_keys('beauty')
#Baidu search button, click() is a simulated click
driver.find_element_by_id('su').click()
#Get cookies for the current page ()
cookies = driver.get_cookies()
cookie = ''
for item in cookies:
    cookie += item['name']+item['value']+' ;'
    print(cookie[:-1])
#Select all contents in the input box ctrl+a
print(driver.find_element_by_id('kw').send_keys(Keys.CONTROL, 'a'))
# ctrl+x cuts the contents of the input box
driver.find_element_by_id("kw").send_keys(Keys.CONTROL, 'x')
#Clear the contents of the input box
driver.find_element_by_id('kw').clear()
#Input box re-enter content
driver.find_element_by_id('kw').send_keys('scenery')
#Analog enter key
driver.find_element_by_id('su').send_keys(Keys.RETURN)
#Get the current url
currentUrl = driver.current_url
print(currentUrl)
#Intercept the web page (generate the current page snapshot and save it)
driver.save_screenshot('baidu.png')
#Sleep for 7 seconds
time.sleep(7)
# Close browser
driver.quit()
# Close the current page. If there is only one page, the browser will be closed
driver.close()
6, Set agent
opt = webdriver.ChromeOptions()
opt.add_argument("--proxy-server=http://118.20.16.82:9999")
7, Add Cookie
self.browser.add_cookie({
        'domain': '.xxxx.com',
        'name': cookie['name'],
        'value': cookie['value'],
        'path': '/',#Which page adds cookies
        'expires': None
    })
8, Display wait
Explicit waiting is defined in your code to wait for certain conditions to occur before further executing your code. The worst case is to use time Sleep (), which sets the condition to wait for an exact period of time. Here are some convenient ways to keep you waiting only for the time you need. WebDriverWait combined with ExpectedCondition is one way to implement.
from selenium import webdriver
from selenium.webdriver.common.by import By
from selenium.webdriver.support.ui import WebDriverWait
from selenium.webdriver.support import expected_conditions as EC

driver = webdriver.Firefox()
driver.get("http://somedomain/url_that_delays_loading")
try:
    element = WebDriverWait(driver, 10).until(
        EC.presence_of_element_located((By.ID, "myDynamicElement"))
    )
finally:
    driver.quit()
9, Implicit waiting
If some elements are not immediately available, implicit waiting is to tell WebDriver to wait for a certain time to find elements. The default waiting time is 0 seconds. Once this value is set, the implicit waiting is to set the life cycle of the instance of the WebDriver.
from selenium import webdriver

driver = webdriver.Firefox()
driver.implicitly_wait(10) # seconds
driver.get("http://somedomain/url_that_delays_loading")
myDynamicElement = driver.find_element_by_id("myDynamicElement")
10, Execute JS
driver.execute_script('window.scrollTo(0,document.body.scrollHeight)')
11, Set no page
options = webdriver.ChromeOptions()
# Add no interface parameters
options.add_argument('--headless')
browser = webdriver.Chrome(options=options)
12, Switch page
# Get all current handles (Windows)
all_handles = browser.window_handles
# Switch the browser to a new window and get the object of the new window
browser.switch_to.window(all_handles[1])
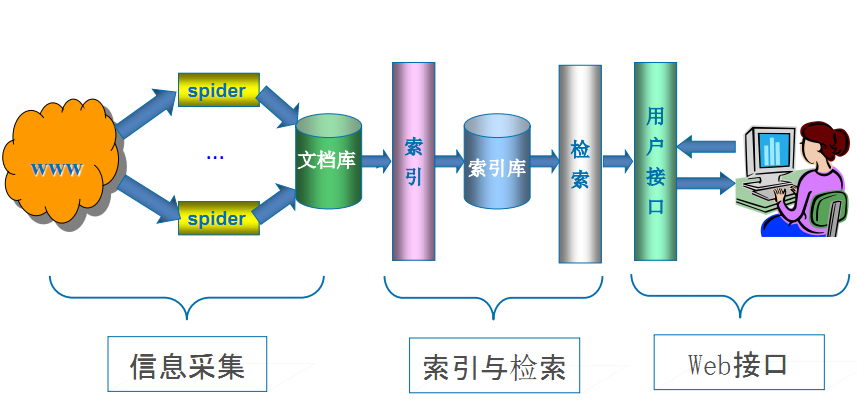
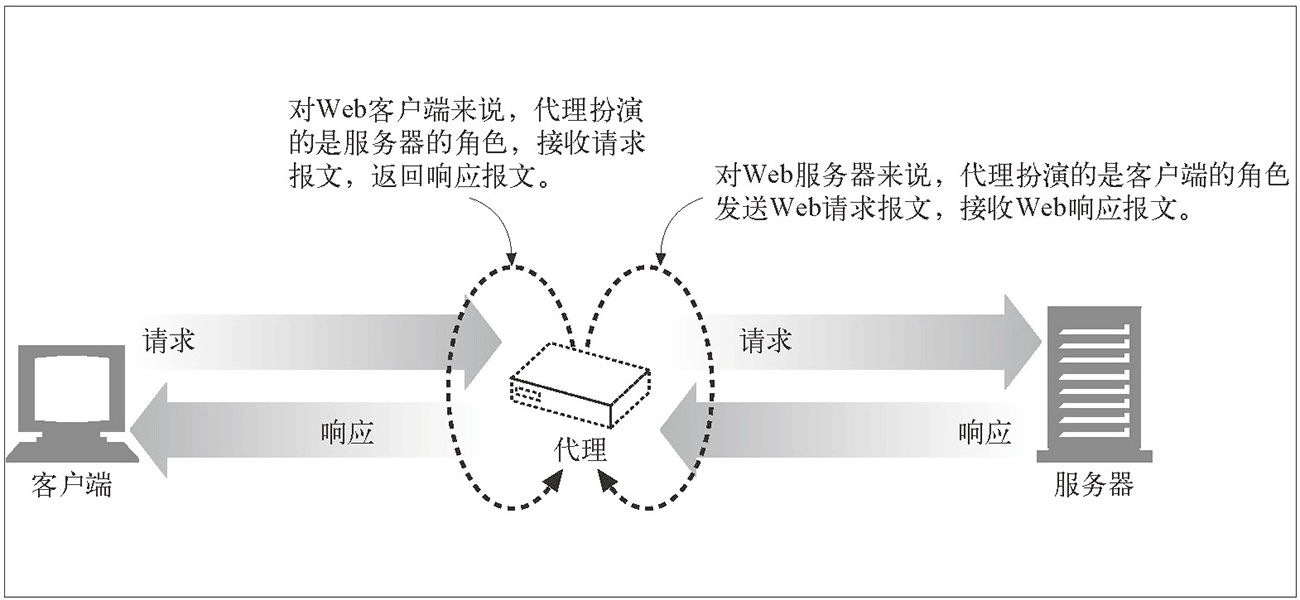
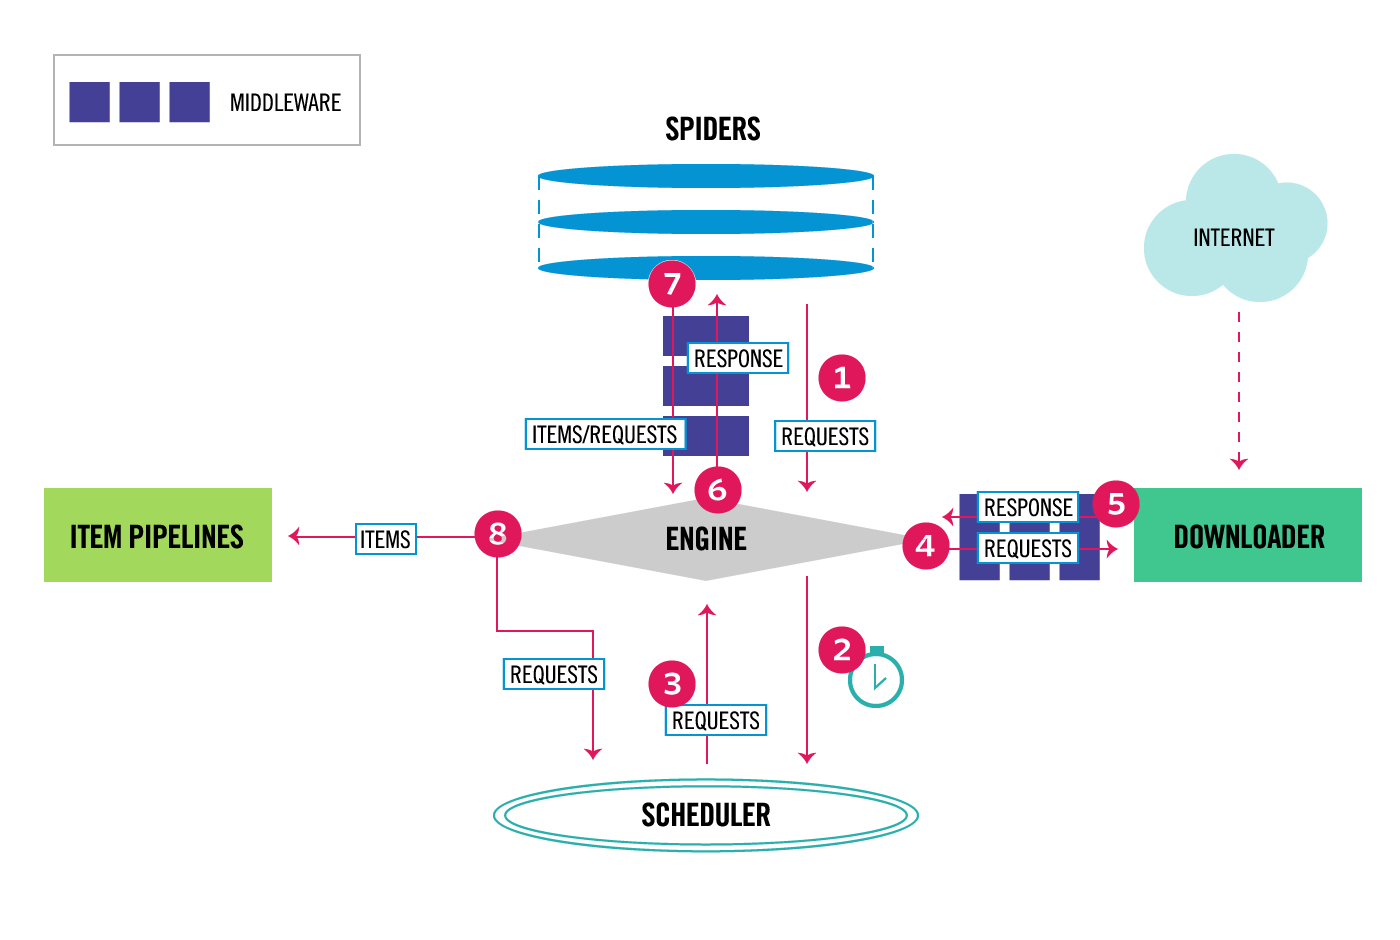
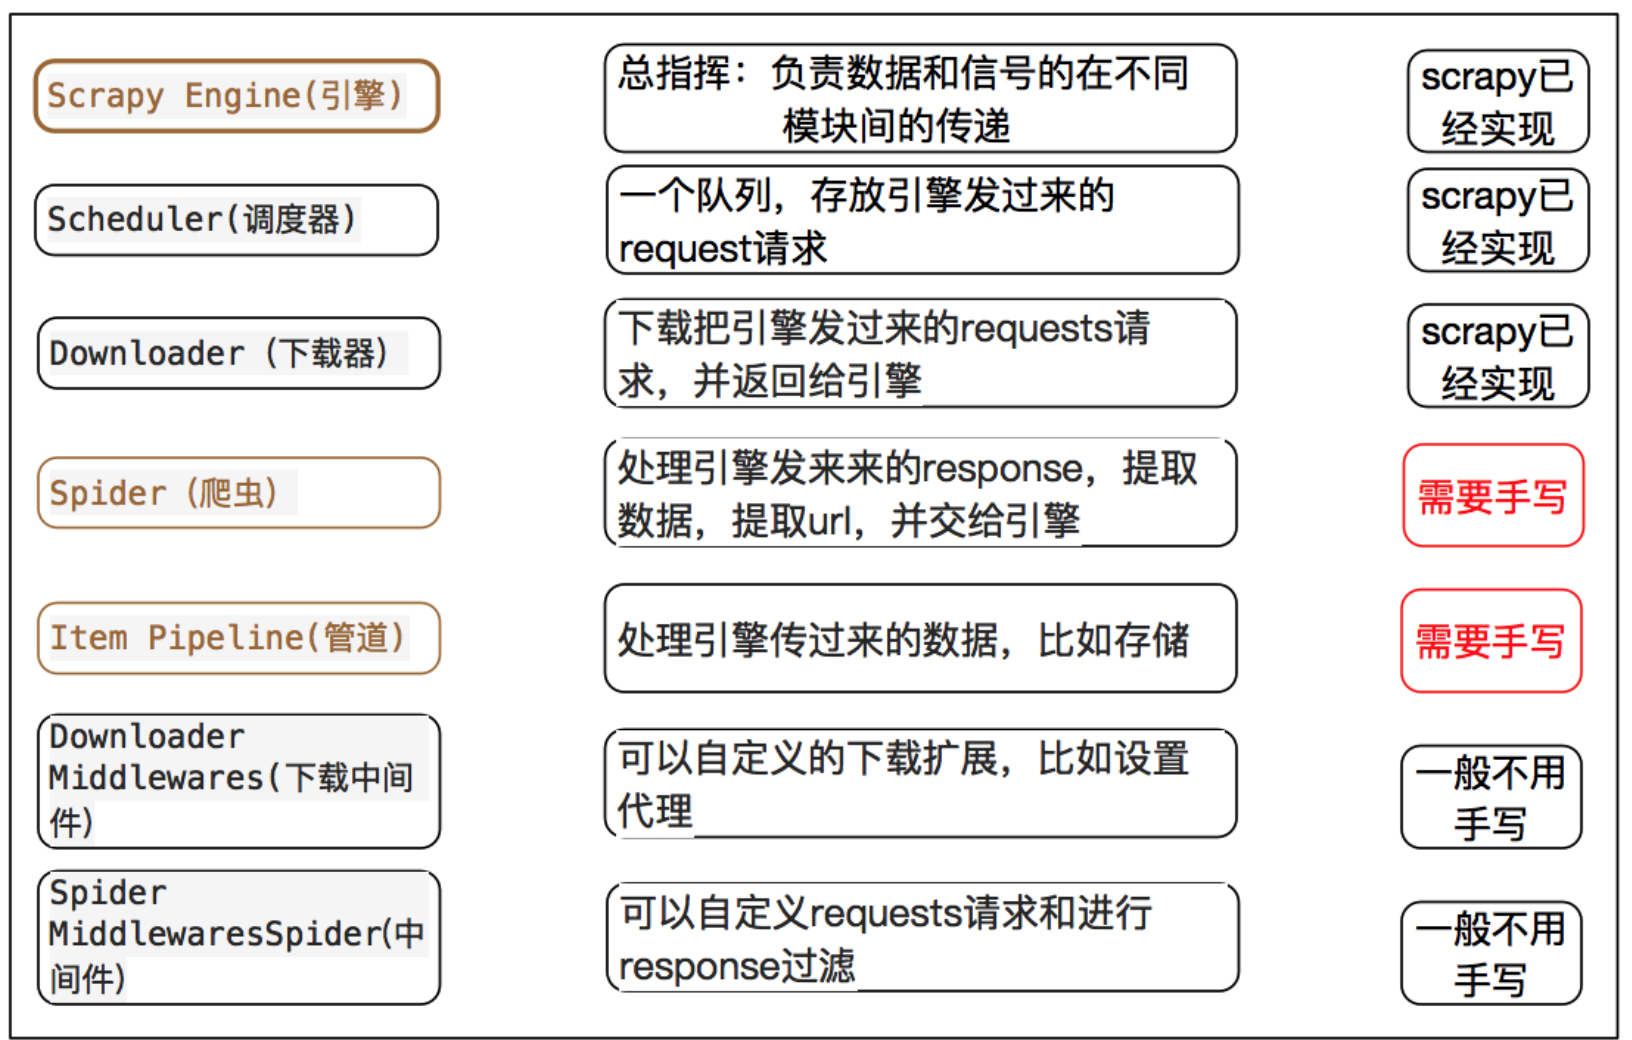
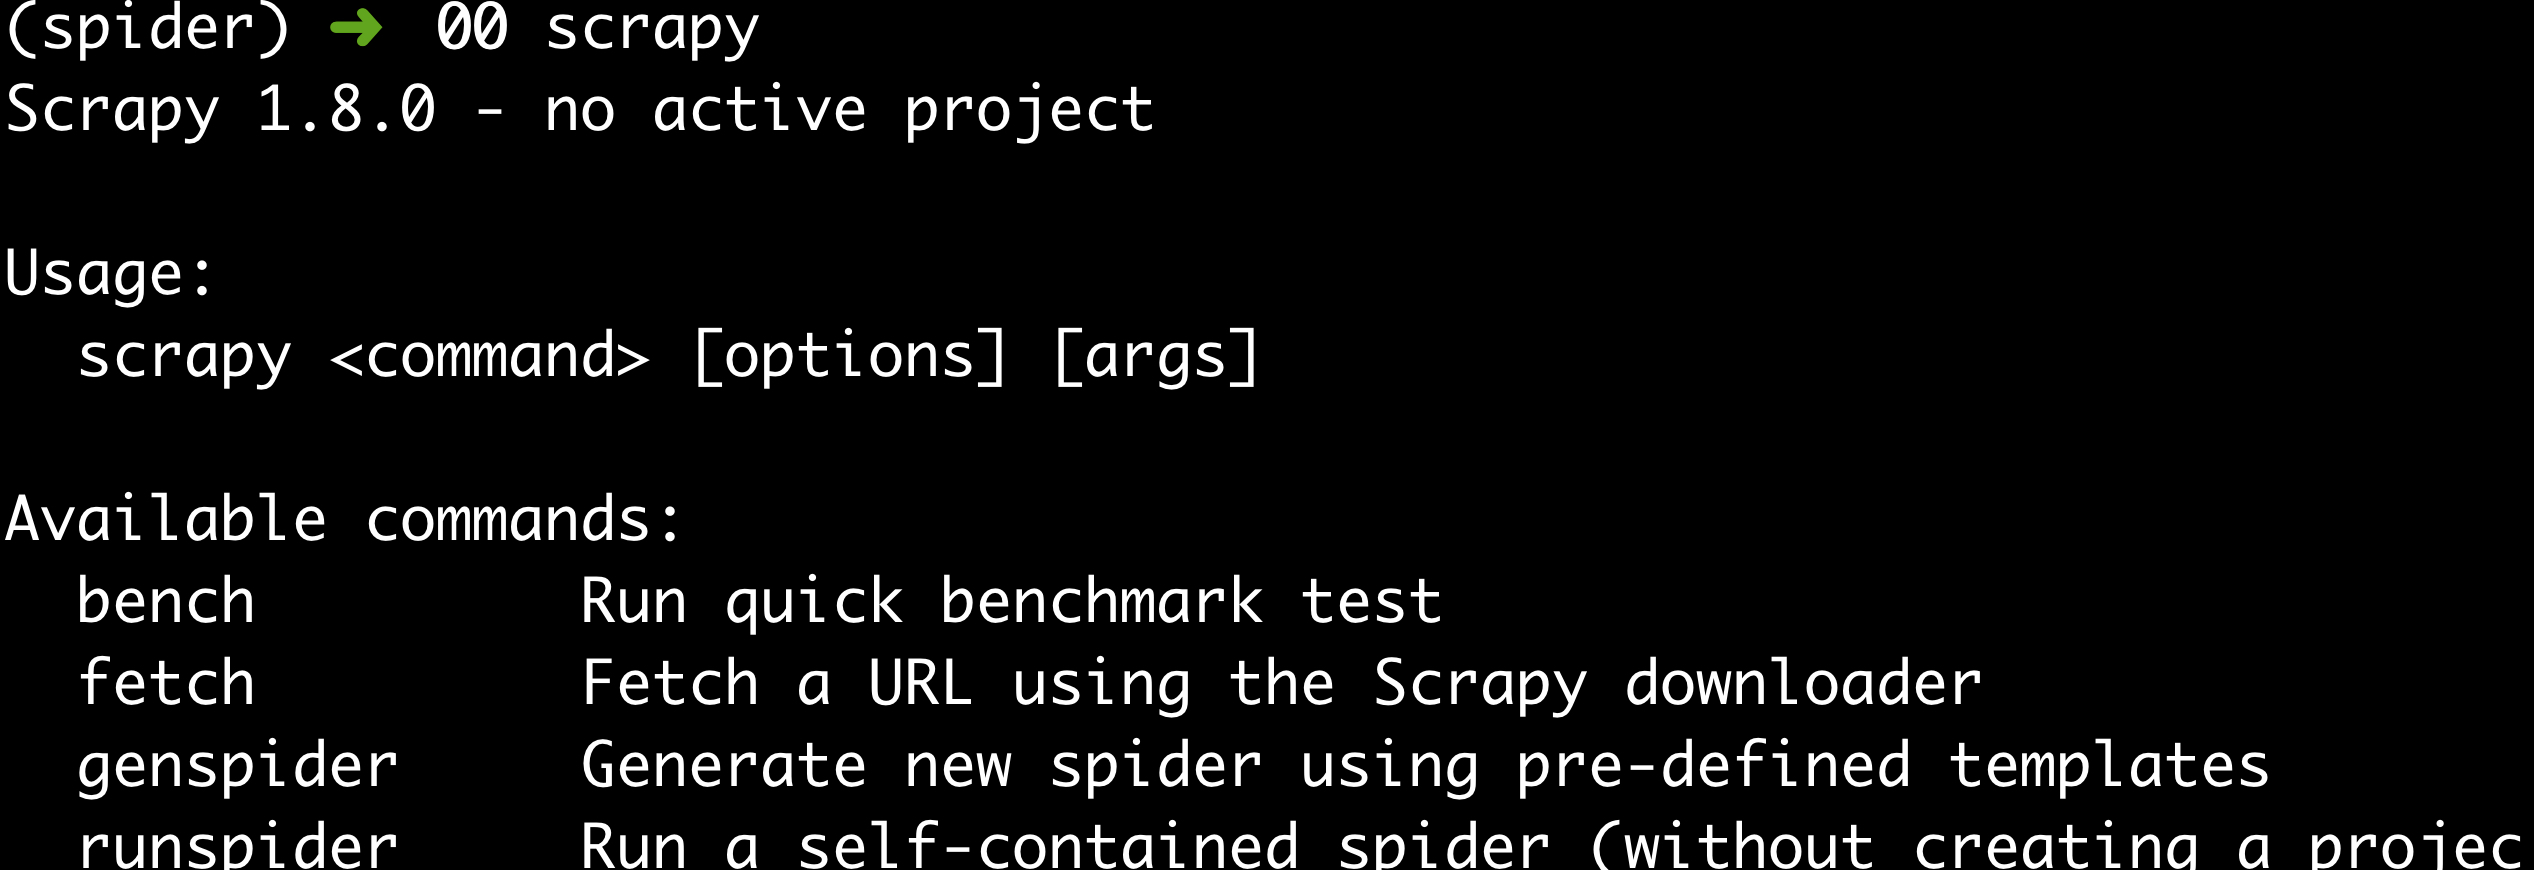
21.Scrapy
1, What is Scrapy
- Scrapy is an application framework written in pure Python to crawl website data and extract structural data. It is widely used
- We don't need to use the asynchronous middleware framework to process various network requirements, and we can use the Scrapy framework to speed up the download of our own network
2, Scrapy architecture diagram
3, Installation
pip3 install Scrapy
4, Check
Postscript
- When you are free, you are ready to crawl the content of the web page and turn it into a Markdown file