catalogue
1, Introduction to requests module
3, The requests module sends requests
4, The requests module sends a post request
5, Use requests Session state maintenance
1, Introduction to requests module
requests document: Requests: make HTTP service human - Requests 2.18.1 document
effect:
Send http request and get response data
install
The requests module is a third-party module that needs to be installed additionally in the python environment
-
pip/pip3 install requests
Send get request
Code example# Import module import requests # Target url url = 'https://www.baidu.com' # Send get request to target url response = requests.get(url) # Print response content print(response.text)
2, Response response object
Observing the operation results of the above code, it is found that there are a lot of garbled codes, which is caused by different character sets used in encoding and decoding. You can try to use the following method to solve the problem of Chinese garbled Codes:
# Import module
import requests

# Target url
url = 'https://www.baidu.com'

# Send get request to target url
response = requests.get(url)

# Print response content
# print(response.text)
print(response.content.decode())  # Pay attention here!
- response.text is the result of decoding by the requests module according to the encoded character set inferred by the chardet module
- The strings transmitted through the network are all bytes, so the response text = response. content. Decode ('inferred coded character set ')
- We can search charset in the web source code, try to refer to the coded character set, and pay attention to the inaccuracy
2.1 response.text and response The difference between content:
response.text
Type: str
Decoding type: the requests module automatically infers the encoding of the response according to the HTTP header, and infers the text encoding
response.content
Type: bytes
Decoding type: not specified
2.2 through response Content is decode d to solve Chinese garbled code
-
response.content.decode() # default utf-8
-
response.content.decode('GBK')
Common coded character sets
-
utf-8
-
gbk
-
gb2312
-
ascii (ask code)
-
iso-8859-1
2.3 other common attributes or methods
response = requests. In get (URL), response is the response object obtained by sending the request;
In the response response object, there are other common properties or methods besides text and content to obtain the response content:
-
response.url the url of the response; Sometimes the url of the response does not match the url of the request
-
response.status_code response status code
-
response.request.headers responds to the corresponding request header
-
response.headers response header
-
response.request._cookies: the cookie that responds to the corresponding request; Returns the cookieJar type
-
response. Cookie response cookie (after set cookie action; return cookie jar type)
-
response.json() automatically converts the response content of json string type into python object (dict or list)
# Import module
import requests

# Target url
url = 'https://www.baidu.com'

# Send get request to target url
response = requests.get(url)

# Print response content
# print(response.text)
# print(response.content.decode())  # Pay attention here!
print(response.url)  # Print the url of the response
print(response.status_code)  # Print the status code of the response
print(response.request.headers)  # Print the request header of the response object
print(response.headers)  # Print response header
print(response.request._cookies)  # Print the cookies carried by the request
print(response.cookies)  # Print the cookies carried in the response
3, The requests module sends requests
3.1 send request with header
Let's write a code to get Baidu home page first
import requests

url = 'https://www.baidu.com'

response = requests.get(url)

print(response.content.decode())

# Print the request header information in response to the corresponding request
print(response.request.headers)
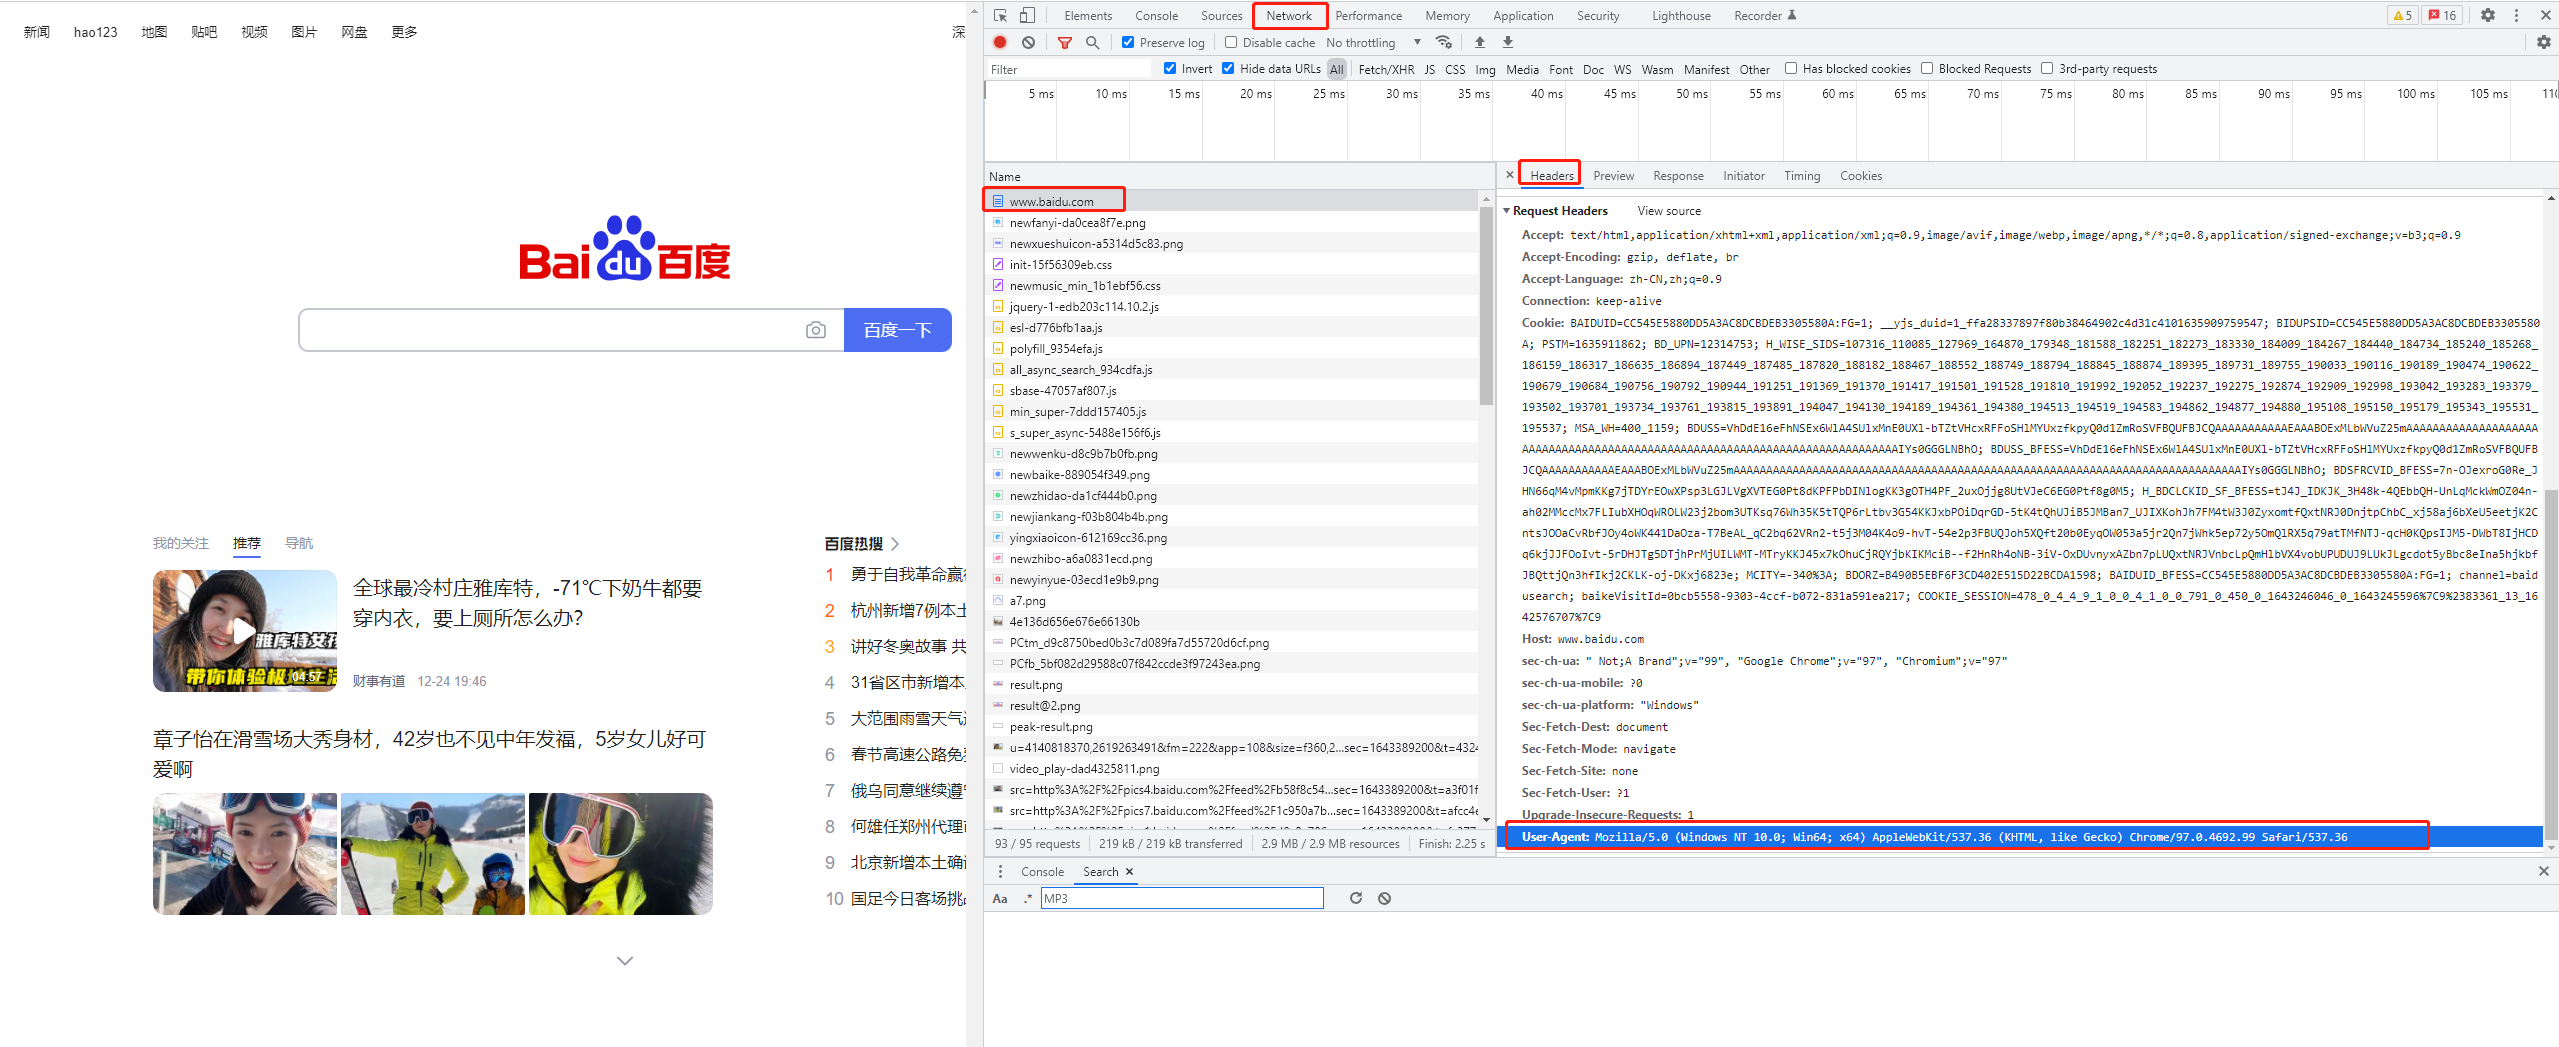
However, comparing the web source code (F12) of Baidu home page on the browser with the source code of Baidu home page in the code, it is found that the source code of Baidu home page in the code is very few, so we need to bring the request header information. There are many fields in the request header, among which the user agent field must be indispensable, indicating the operating system of the client and the information of the browser.
Method of carrying request and sending request
requests.get(url, headers=headers)
-
The headers parameter receives the request header in dictionary form
-
The request header field name is used as the key, and the corresponding value of the field is used as the value
Copy the user agent from the browser and construct the headers dictionary

import requests

url = 'https://www.baidu.com'

headers = {
    "User-Agent": "Mozilla/5.0 (Windows NT 10.0; Win64; x64) AppleWebKit/537.36 (KHTML, like Gecko) Chrome/54.0.2840.99 Safari/537.36"
}

# Bring user agent in the request header to simulate the browser to send the request
response = requests.get(url, headers=headers)

print(response.content)

# Print request header information
print(response.request.headers)
3.2 send request with parameters
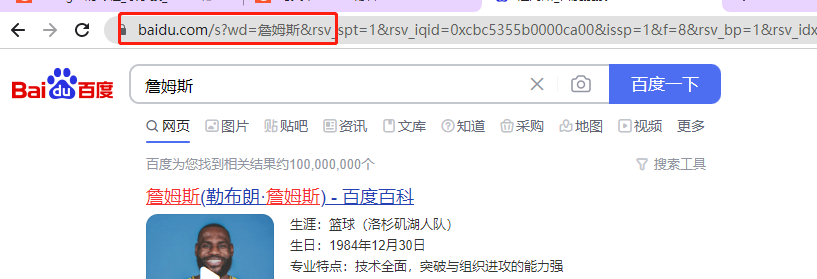
When using Baidu search, there will be one in the url address?, After this question mark is the request parameter, also known as the query string

url carrying parameters
import requests

headers = {
    "User-Agent": "Mozilla/5.0 (Windows NT 10.0; Win64; x64) AppleWebKit/537.36 (KHTML, like Gecko) Chrome/54.0.2840.99 Safari/537.36"
}

url = 'https://www.baidu.com/s?wd = James'

response = requests.get(url, headers=headers)
By building parameter dictionary
import requests

headers = {
    "User-Agent": "Mozilla/5.0 (Windows NT 10.0; Win64; x64) AppleWebKit/537.36 (KHTML, like Gecko) Chrome/97.0.4692.99 Safari/537.36"
}

# Target url
# url = 'https://www.baidu.com/s?wd= James'

# Is there a question mark in the end? The results are the same
url = 'https://www.baidu.com/s?'

# The request parameter is a dictionary, namely wd=python
kw = {'wd': 'James'}

# Initiate a request with request parameters and obtain a response
response = requests.get(url, headers=headers, params=kw)

print(response.content)
3.3 carrying cookie s in headers parameter
Websites often use the Cookie field in the request header to maintain the user's access status. Then we can add cookies in the headers parameter to simulate the requests of ordinary users.
-
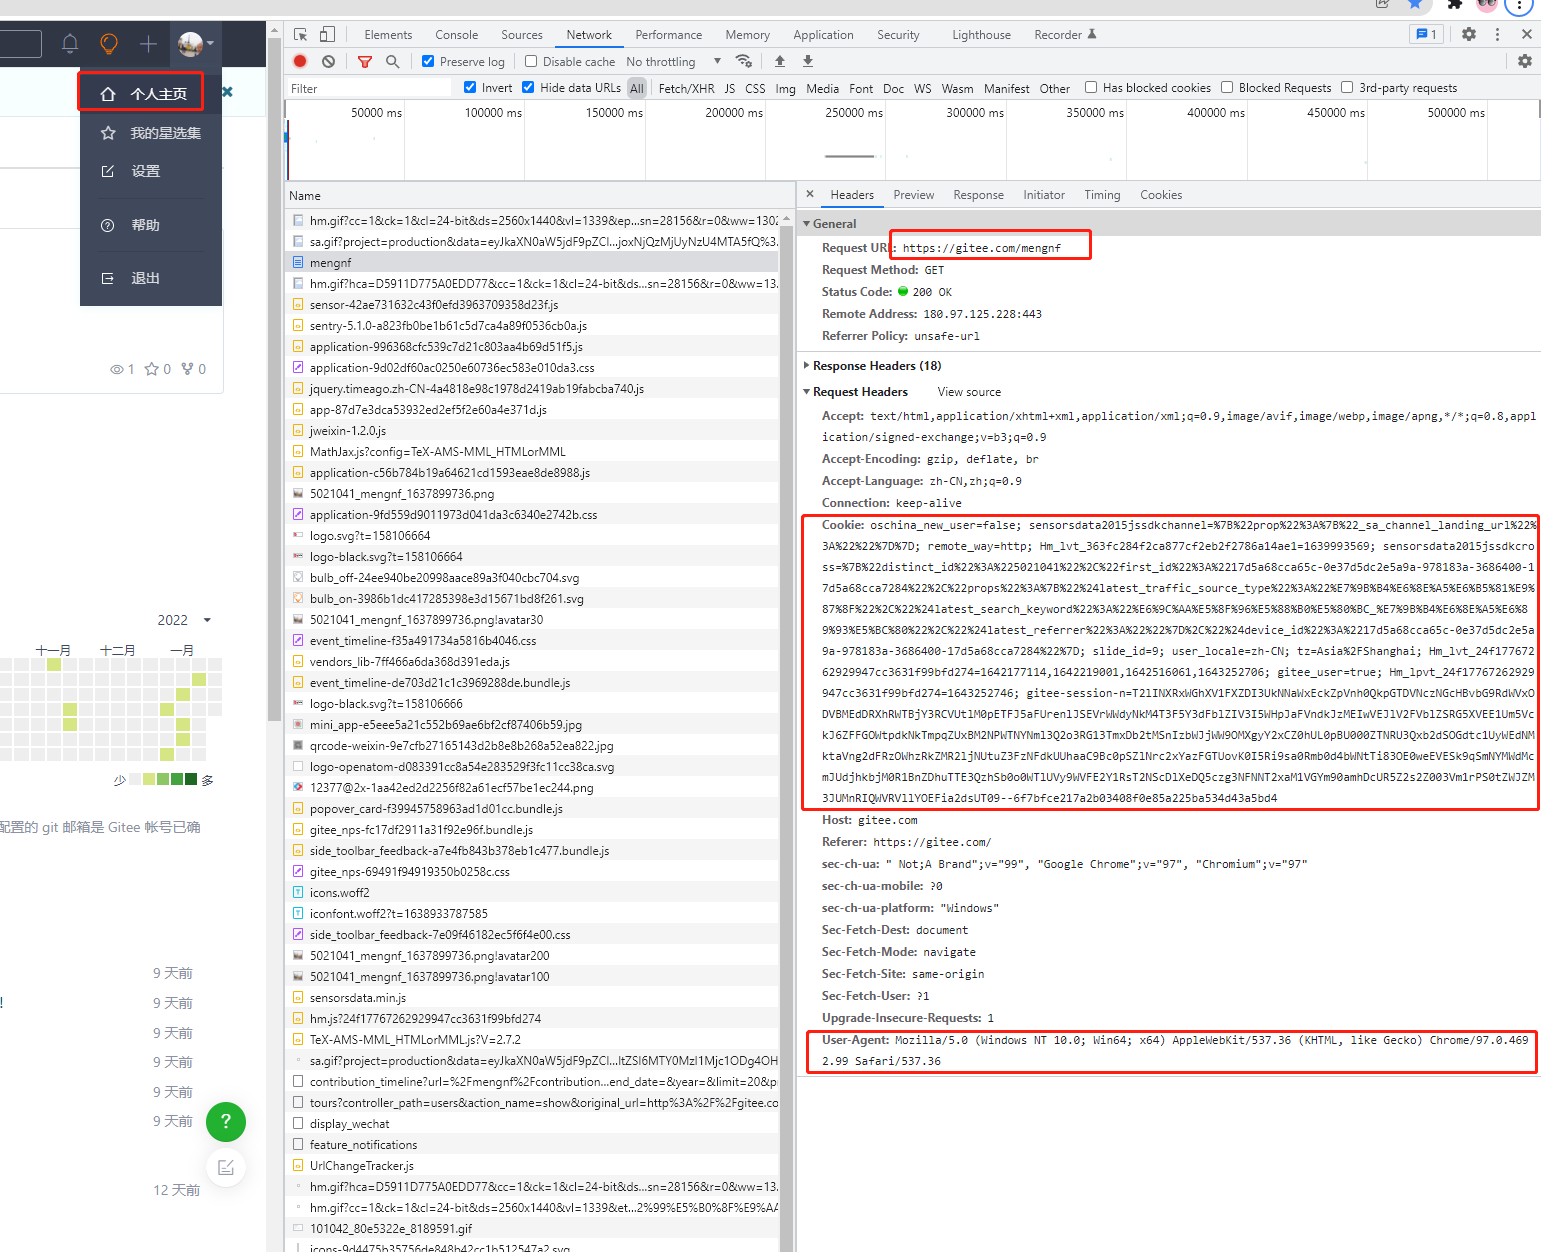
Visit the url of gitee login https://gitee.com/login
-
Enter the account password and click login to access a url that requires login to obtain the correct content, for example, click [personal center] in the upper right corner to access https://gitee.com/mengnf
-
After determining the url, determine the user agent and Cookie in the request header information required to send the request

Assign the value:
# Construct request header dictionary
headers = {
    # User agent copied from browser
    'User-Agent': 'Mozilla/5.0 (Windows NT 10.0; Win64; x64) AppleWebKit/537.36 (KHTML, like Gecko) Chrome/97.0.4692.99 Safari/537.36',
    # Cookie s copied from the browser
    'Cookie': 'Here is a copy cookie character string'
}
Form of cookie parameter: Dictionary
Cookies = {"name of cookie": "value of cookie"}
-
The dictionary corresponds to the Cookie string in the request header, and each pair of dictionary key value pairs is divided by semicolons and spaces
-
To the left of the equal sign is the name of a cookie, which corresponds to the key of the cookie dictionary
-
The right side of the equal sign corresponds to the value of the cookie dictionary
-
How to use cookie parameters
response = requests.get(url, cookies)
-
Dictionary required to convert cookie strings to cookie parameters:
cookies_dict = {cookie.split('=')[0]:cookie.split('=')[-1] for cookie in cookies_str.split('; ')}
-
Note: cookie s usually have expiration time. Once they expire, they need to be retrieved again
import requests

url = 'https://github.com/USER_NAME'

# Construct request header dictionary
headers = {
    'User-Agent': 'Mozilla/5.0 (Windows NT 10.0; Win64; x64) AppleWebKit/537.36 (KHTML, like Gecko) Chrome/67.0.3396.87 Safari/537.36'
}
# Construct cookie dictionary
cookies_str = 'From browser copy Come here cookies character string'

cookies_dict = {cookie.split('=')[0]: cookie.split('=')[-1] for cookie in cookies_str.split('; ')}

# The cookie string is carried in the request header parameter dictionary
resp = requests.get(url, headers=headers, cookies=cookies_dict)

print(resp.text)
Method of converting Cookie Jar object into cookie dictionary
The reposne object obtained by using requests has the cookie attribute. The attribute value is a cookie jar type, which contains the cookies set locally by the other server.
-
Conversion method
cookies_dict = requests.utils.dict_from_cookiejar(response.cookies)
-
Where response Cookies return objects of type cookie jar
-
requests. utils. dict_ from_ The cookie jar function returns the cookie dictionary
3.4. Use of timeout parameter
In the crawler, if a request has no result for a long time, the efficiency of the whole project will become very low. At this time, it is necessary to force the request to return the result within a specific time, otherwise it will report an error.
Timeout parameter timeout
response = requests.get(url, timeout=3)
timeout=3 means that the response will be returned within 3 seconds after the request is sent, otherwise an exception will be thrown
3.5 about proxy
The proxy proxy parameter specifies the proxy ip and enables the forward proxy server corresponding to the proxy ip to forward the request we sent
Process of using agent
-
Proxy ip is an ip that points to a proxy server
-
The proxy server can help us forward requests to the target server

The difference between forward proxy and reverse proxy
-
Distinguish between forward and reverse proxies from the perspective of the party sending the request
-
Forwarding a request for a browser or client (the party sending the request) is called a forward proxy
The browser knows the real ip address of the server that finally processes the request, such as VPN
-
Reverse proxy refers to forwarding a request not for the browser or client (the party sending the request), but for the server that finally processes the request
The browser does not know the real address of the server, such as nginx
Classification of proxy ip (proxy server)
-
According to the anonymity of proxy IP, proxy IP can be divided into the following three categories:
-
Transparent proxy: Although transparent proxy can directly "hide" your IP address, it can still find out who you are. The request header received by the target server is as follows:
REMOTE_ADDR = Proxy IP
HTTP_VIA = Proxy IP
HTTP_X_FORWARDED_FOR = Your IP -
Anonymous proxy: when using anonymous proxy, others can only know you used the proxy, but can't know who you are. The request header received by the target server is as follows:
REMOTE_ADDR = proxy IP
HTTP_VIA = proxy IP
HTTP_X_FORWARDED_FOR = proxy IP -
High anonymity proxy (Elite proxy or High Anonymity Proxy): high anonymity proxy makes it impossible for others to find that you are using an agent, so it is the best choice. There is no doubt that using high-quality agents works best. The request header received by the target server is as follows:
REMOTE_ADDR = Proxy IP
HTTP_VIA = not determined
HTTP_X_FORWARDED_FOR = not determined
-
-
According to the different protocols used by the website, the agency service of the corresponding protocol needs to be used. The protocols used in the proxy service request can be divided into:
-
http proxy: the target url is http protocol
-
https proxy: the target url is https protocol
-
socks tunnel agent (e.g. socks5 agent):
-
socks proxy simply transfers data packets, and does not care about the application protocol (FTP, HTTP, HTTPS, etc.).
-
socks proxy takes less time than http and https proxy.
-
socks proxy can forward http and https requests
-
-
Use of proxies proxy parameters
In order to make the server think that the same client is not requesting;
In order to prevent frequent requests to a domain name from being blocked, we need to use proxy ip;
proxies form: Dictionary
proxies = {
   "http": "http://12.34.56.79:9527",
   "https": "https://12.34.56.79:9527",
}

response = requests.get(url, proxies=proxies)
Note: if the proxies dictionary contains multiple key value pairs, the corresponding proxy ip will be selected according to the protocol of url address when sending the request
3.6. Ignore CA certificate with verify parameter
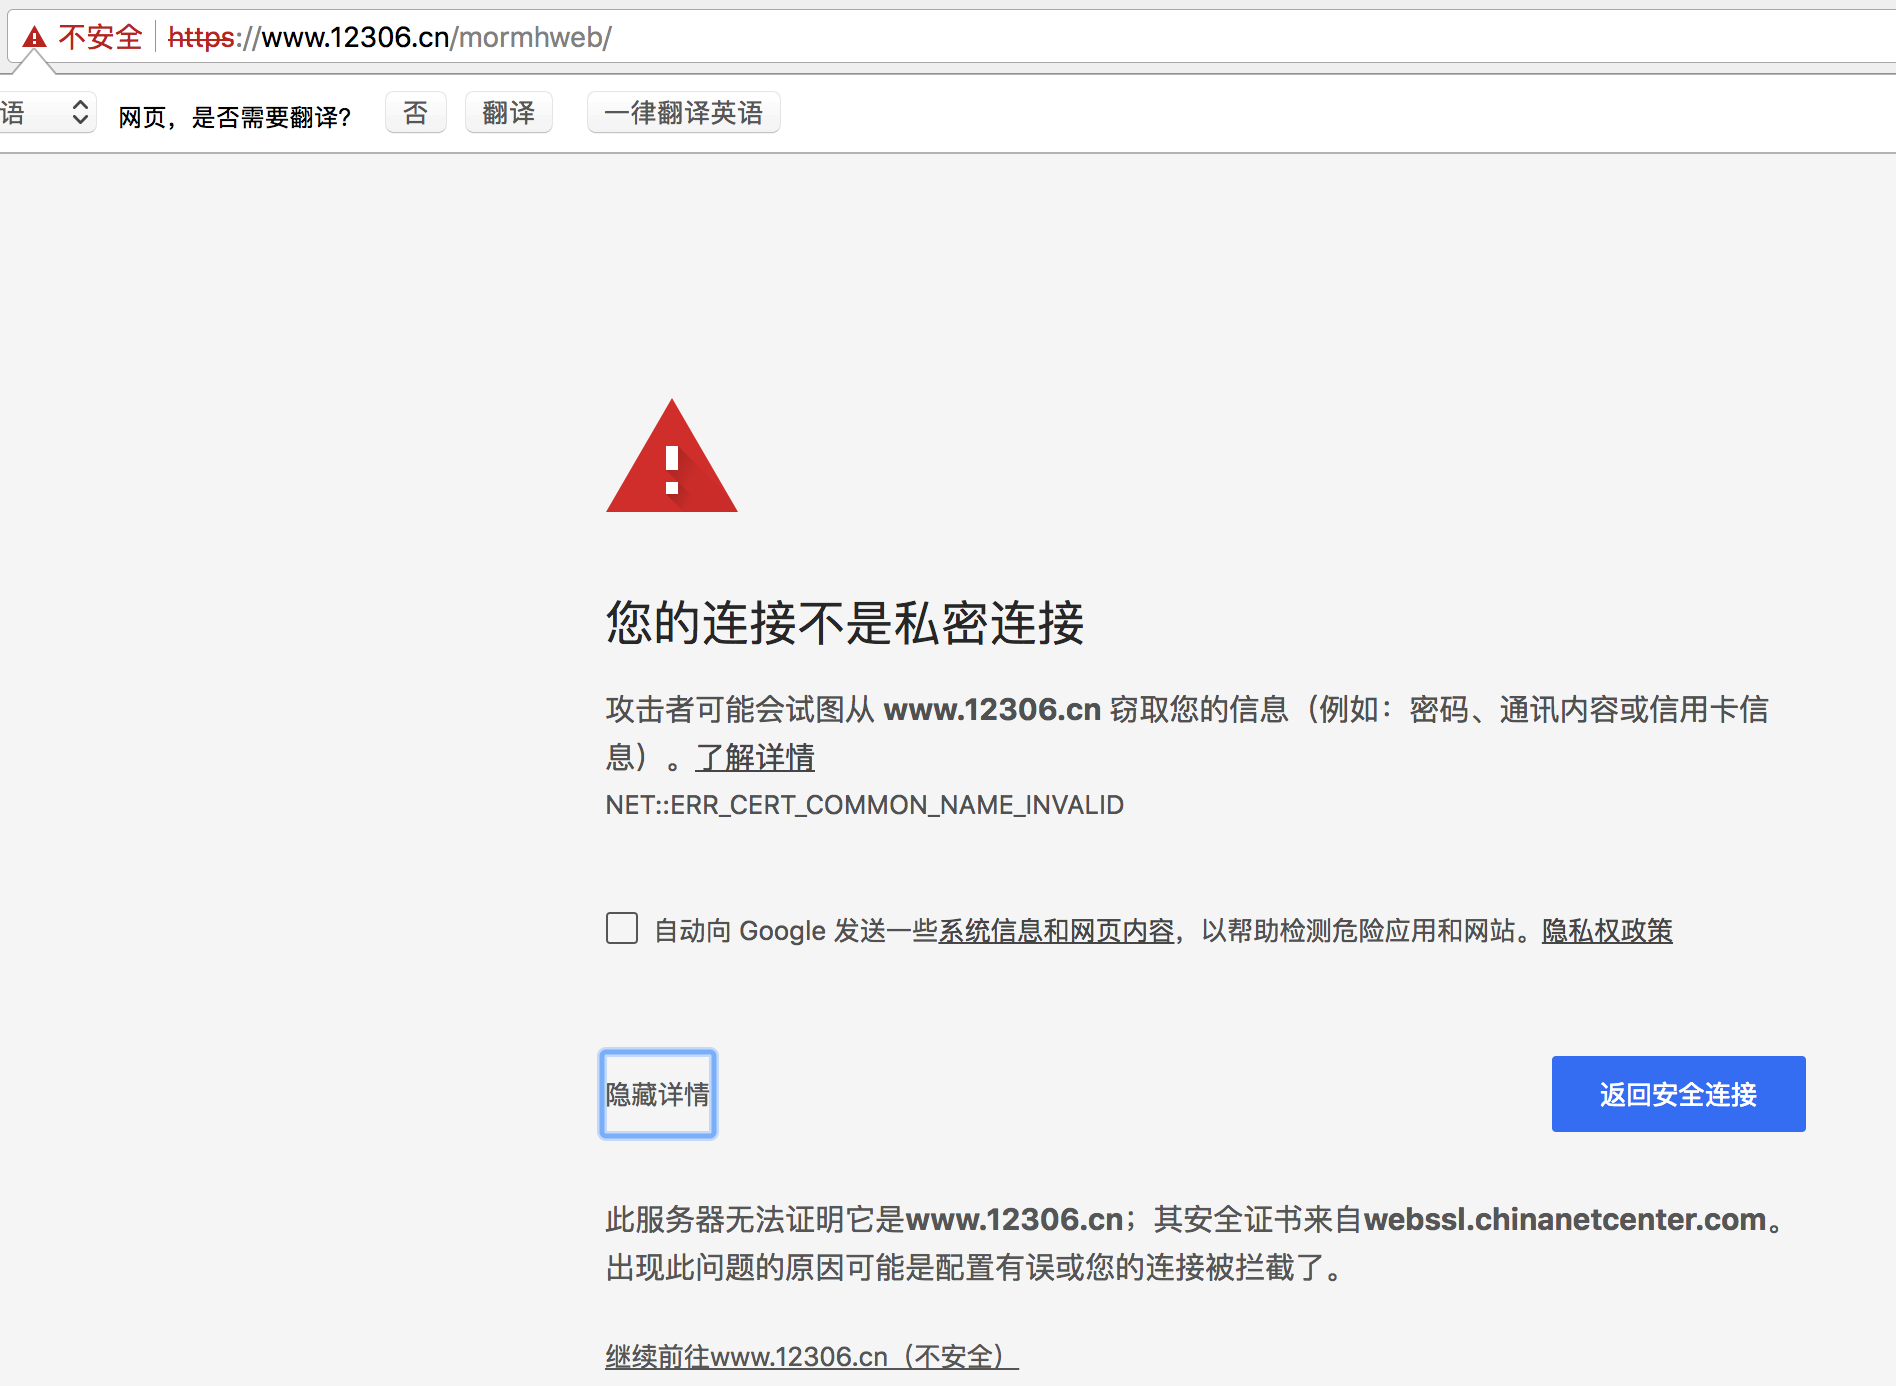
When using the browser to surf the Internet, I sometimes see such a prompt

-
Reason: the CA certificate of this website has not been certified by the trusted root certification authority
-
Click to learn more about CA certificates and trusted root certification authorities
In order to request normally in the code, use the verify=False parameter. At this time, the requests module will not verify the CA certificate when sending the request: the verify parameter can ignore the authentication of the CA certificate
response = requests.get(url,verify=False)
4, The requests module sends a post request
-
Login and registration (in the opinion of web engineers, POST is more secure than GET, and the user's account, password and other information will not be exposed in the url address)
-
When large text content needs to be transmitted (POST request does not require data length)
requests method of sending post request
-
response = requests.post(url, data)
-
The data parameter receives a dictionary
-
The other parameters of the post request function sent by the requests module are exactly the same as those of the get request
5, Use requests Session state maintenance
The Session class in the requests module can automatically process the cookie s generated in the process of sending requests and obtaining responses, so as to maintain the state.
Role and scene
- Automatically process cookies, that is, the next request will bring the previous cookie
-
Automatically handle cookie s generated during successive multiple requests
session = requests.session()  # Instantiate session object
response = session.get(url, headers, ...)
response = session.post(url, data, ...)
import requests
import re
# Construct request header dictionary
headers = {
'User-Agent': 'Mozilla/5.0 (Windows NT 10.0; Win64; x64) AppleWebKit/537.36 (KHTML, like Gecko) Chrome/67.0.3396.87 Safari/537.36',
}
# Instantiate session object
session = requests.session()
# Access the login page to obtain the parameters required by the login request
response = session.get('https://github.com/login', headers=headers)
authenticity_token = re.search('name="authenticity_token" value="(.*?)" />', response.text).group(1) # Use regular to obtain the parameters required by the login request
# Construct login request parameter dictionary
data = {
'commit': 'Sign in', # Fixed value
'utf8': '✓', # Fixed value
'authenticity_token': authenticity_token, # This parameter is in the response content of the landing page
'login': input('input github account number:'),
'password': input('input github account number:')
}
# Send login request (no need to pay attention to the response of this request)
session.post('https://github.com/session', headers=headers, data=data)
# Print pages that can only be accessed after logging in
response = session.get('https://github.com/1596930226', headers=headers)
print(response.text)