Python has many useful frameworks, and the Scrapy framework is the most important one in the crawling world.
1. Installation and Startup
Installation (Command Line)
pip3 install scrapy
Create a scrapy project (command line goes to the directory where the scrapy project is to be created):
scrapy startproject Project Name
Create a crawler (command line):
scrapy genspider Crawler Name Web Site Address to Crawl # Multiple crawls can be created
Start the crawl:
Command Line Start
scrapy crawl Reptilian name
scrapy crawl Reptilian name --nolog
scrapy starts in pycharm configuration (no command line start is required)
# Create a run.py (with a random name) in the project path and right-click to execute it
from scrapy.cmdline import execute
# execute(['scrapy','crawl','crawl name','--nolog'])
execute(['scrapy','crawl','Reptilian Name'])
2. Project structure of framework
Official structure chart:
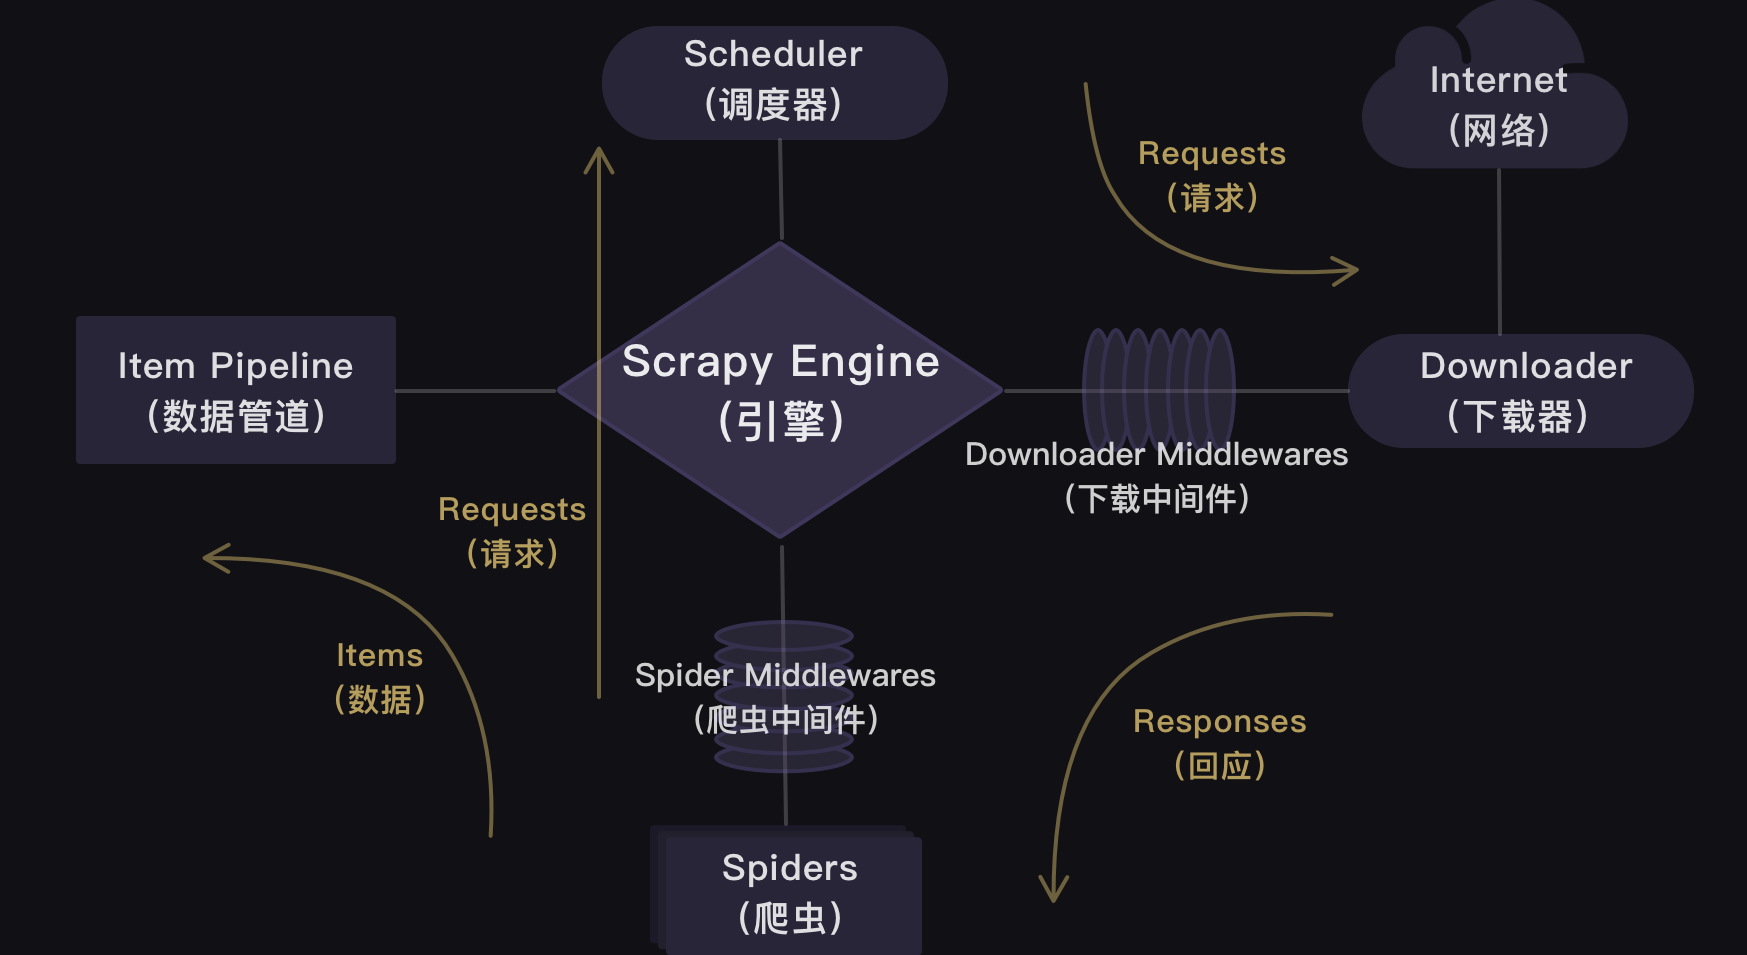
The structure diagram given in the brief book is clear
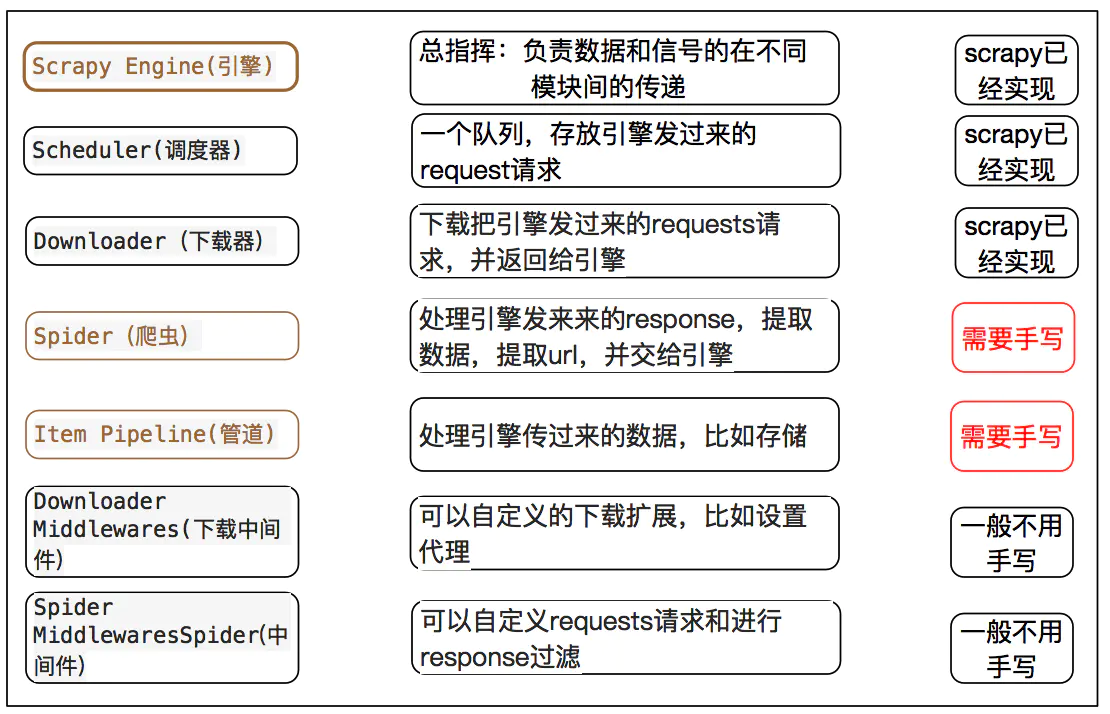
I'll use an example to illustrate the use of each section
For example, I plan to start with https://www.kanunu8.com( Nunu Bookstore-Fiction Online Reading (kanunu8.com) ) This website to download Agatha Christie's novel
Create a project from the command line above
scrapy startproject ajiasha
You will see a project structure like this
ajiasha/
    scrapy.cfg            # deploy configuration file

    ajiasha/             # project's Python module, you'll import your code from here
        __init__.py

        items.py          # project items definition file

        middlewares.py    # project middlewares file

        pipelines.py      # project pipelines file

        settings.py       # project settings file

        spiders/          # a directory where you'll later put your spiders
            __init__.py

3. Crawler Coding
 This folder, spiders, is used to place crawler files and is the core of the entire framework.
We create a new.Py file under this folder named paxiaoshuo.py
 The most important thing here is to create a new reptile, one that inherits from scrapy

class ajiashaSpider(scrapy.Spider):
    name = 'paajs'
    allowed_domains = ['https://www.kanunu8.com']
    urlbase=''
    start_urls = ['https://www.kanunu8.com/files/writer/3993.html']
    title=''
    author=''
    abstract=''
    bu=''
    jie=''
    content=''
The class first defines the name, which is used by subsequent start Crawlers
 Then set allowed_domains, which means filtering the crawled domain names.
When the plug-in OffsiteMiddleware is enabled (enabled by default), domain names that are not in this allowed range are filtered without crawling
 Then start_urls, as the name implies, is the starting link, and spider s start grabbing from that list when no specific url is specified.
Therefore, the url of the first page to be retrieved will be one of the lists. Subsequent URLs will be extracted from the retrieved data.
All that's left is to define some variables to keep under

The core of the following is the parse function, which handles the Response returned by each Request.
parse() is typically used to extract crawled data from Response into a data dictionary, or filter out URL s and continue issuing Request s for further crawling.
Here, because I downloaded a novel, and I wanted to keep the order of the chapters intact, I used only one parse function.
If there are many side-by-side data, you can first use a parse function to get a sequence of web addresses, then pass the sequence to the next parse function, parse one by one to get the desired data.
def parse(self,response):

        soup=bs4.BeautifulSoup(response.text,'html.parser')
        soup.encoding='gb2312'
        zuopinlist=soup.find('div').find_all('table')[8].find_all('table')[1].find_all('a')
        zpdic={}
        url_list=[]
        for zp in zuopinlist:
            f = re.findall('<(.*?)>',zp.text)[0]
            zpdic[f]=self.allowed_domains[0]+zp['href']
        print(zpdic)
        for k,v in zpdic.items():
            url=v
            #self.urlbase=url
            url_list.append(url)
            #yield scrapy.Request(url,callback=self.parse_sec)
            #page = response.url


            res_bu=requests.get(url)
            res_bu.encoding='gb2312'
            html=bs4.BeautifulSoup(res_bu.text,'html.parser')
            data1=html.find('div').find_all('table')[8].find_all('td')[0]
            self.title=data1.text.strip('\n')
            data2=html.find('div').find_all('table')[8].find_all('td')[1]
            n=data2.text.find('Release time')
            self.author=data2.text[:n]

            data3=html.find('div').find_all('table')[8].find_all('tr')[3].find_all('table')[0].find_all('tr')[1].find('td')
            self.abstract=data3.text

            data4=html.find('div').find_all('table')[8].find_all('tr')[3].find_all('table')[1].find_all('td')
            for i in data4:
                if len(i.find_all('strong'))>0:
                    self.bu = i.text
                elif i.text=='\xa0':
                    continue
                else:
                    self.jie = i.text
                    print(self.jie)
                    try:
                        j=i.find('a')
                        jie_link=j['href']
                        new_url = urllib.parse.urljoin(url,jie_link)
                        print(new_url)
Request(url=jie_link,callback=self.parse_sec)
                        res_jie = requests.get(new_url)
                        res_jie.encoding='gbk'
                        con=bs4.BeautifulSoup(res_jie.text,'html.parser')
                        data=con.find('div').find_all('table')[4].find('p')
                        self.content=data.text

                    except TypeError:
                        pass
                        #self.content='complete book'
4. Data Storage
scrapy can store data in either a built-in format or a custom format.
There are four main data formats built into scrapy: JSON, JSON lines, CSV, XML
We export the results using the most commonly used JSON with the following commands:
scrapy crawl dmoz -o douban.json -t json
-o followed by the export file name, -t followed by the export type
A custom format uses the Item class to generate output objects for storing data.
Item objects are custom python dictionaries that can use standard dictionary syntax to get the value of an attribute
The crawled data needs to be stored, and the data needs to be defined first.
This is what items.py does under the project directory.
For example, if I need to crawl the name of the novel, author, chapter name, etc., then define them in items.py
import scrapy
class AjiashaItem(scrapy.Item):
#Define a class, DoubanItem, that inherits from scrapy.Item
    # define the fields for your item here like:
    title = scrapy.Field()
    #Define data attributes for book names
    author=scrapy.Field()
    #Define Author's Data Properties
    abstract=scrapy.Field()
    #Define data properties for content feeds
    bu=scrapy.Field()
    #Define data attributes for sections and chapters
    jie=scrapy.Field()
    #Define the data properties of the section
    content = scrapy.Field()
    #Define data attributes for body content
Pass the crawled value to this item class in the crawl, adding the following code:
item=AjiashaItem()
item['title']=self.title
item['author']=self.author
item['abstract']=self.abstract
item['bu']=self.bu
item['jie']=self.jie
item['content']=self.content
yield item
Instantiate the AjiashaItem and assign the data to the class accordingly.
Next, the data is sent to pipelines.py for processing.
Similarly, we need to define a class of pipes first
class AjiashaPipeline:
    def __init__(self) -> None:
        self.flag=True
        self.title=''
        self.author=''
        self.abstract=''
        self.bu=''
        self.jie=''
        self.content=''
The item object is then processed with the function process_item
Storage formats can be csv, txt, Excel files, sql databases, mango databases, or even Word document formats.
Because I'm downloading a novel, I want to save it directly in the document format so it's easy to read. Python has a library docx that manipulates Word documents, so I save it here in Word format.
from itemadapter import ItemAdapter

import docx
from docx.shared import Inches,Pt,Cm
from docx.enum.text import WD_PARAGRAPH_ALIGNMENT


class AjiashaPipeline:
    def __init__(self) -> None:
        self.flag=True
        self.title=''
        self.author=''
        self.abstract=''
        self.bu=''
        self.jie=''
        self.content=''


    def process_item(self, item, spider):
        path=item['title']+'.docx'
        try:
            doc=docx.Document(path)
        except:
            doc=docx.Document()

        if item['title']!=self.title:
            #path='C:\Novels\Agatha Novels\\Items['title']+'.docx'
            #doc.save(path)
            self.title=item['title']
            #path='C:\Novels\Agatha Novels\\self.title+'.docx'
            #doc=docx.Document(path)

            self.flag=True

        if self.flag==True:
            tit=doc.add_heading(self.title,level=0)
            tit.style.font.name='Times New Roman'
            tit.style.font.size = Pt(25)
            tit.alignment = WD_PARAGRAPH_ALIGNMENT.CENTER

            self.author=item['author']
            aut=doc.add_heading(self.author,level=1)
            aut.style.font.name='Times New Roman'
            aut.style.font.size = Pt(18)
            aut.alignment = WD_PARAGRAPH_ALIGNMENT.CENTER

            self.abstract=item['abstract']
            abs=doc.add_paragraph()
            abs.paragraph_format.first_line_indent = Inches(0.3)
            textabs = abs.add_run(self.abstract)
            textabs.style.font.size = Pt(15)
            textabs.style.font.name = 'Times New Roman'
            doc.add_page_break()
            self.flag=False

        if item['bu']!=self.bu:
            self.bu=item['bu']
            bu=doc.add_heading(self.bu,level=2)
            bu.style.font.name='Times New Roman'
            bu.style.font.size = Pt(18)
            bu.alignment = WD_PARAGRAPH_ALIGNMENT.CENTER


        if item['jie']!=self.jie:
            self.jie=item['jie']
            jie=doc.add_heading(self.jie,level=3)
            jie.style.font.name='Times New Roman'
            jie.style.font.size = Pt(16)
            jie.alignment = WD_PARAGRAPH_ALIGNMENT.CENTER

            self.content=item['content']
            cont=doc.add_paragraph()
            cont.paragraph_format.first_line_indent = Inches(0.3)
            textcont = cont.add_run(self.content)
            textcont.style.font.size = Pt(15)
            textcont.style.font.name = 'Times New Roman'
            doc.add_page_break()

        doc.save(self.title+'.docx')


        return item
We also need to modify the setting s, add request headers, and change ROBOTSTXT_OBEY=True to ROBOTSTXT_OBEY=False.
We also want to uncomment the line DOWNLOAD_DELAY = 0 (delete #). Translation of DOWNLOAD_DELAY into Chinese means download delay.
This line of code controls the crawl speed. Since this item should not crawl too fast, we need to change the download delay to one second.
DOWNLOAD_DELAY = 1
Remove # from the comment below to make it effective
ITEM_PIPELINES = {
    'ajiasha.pipelines.AjiashaPipeline': 300,
}
This means opening the item pipeline, where the class ajiasha.pipelines.AjiashaPipeline is followed by the number 300 which is the priority order, if there are more than one pipeline class,
Use numbers to indicate their order. 300 is the default and can be changed to any number between 0-1000. The smaller the number, the higher the priority
You can also set the output path, file format, etc. directly in setting s, simply add the following code
#TXT is an example, so are other CSV s
FEED_URI='ajs.txt'
#This is the file path
FEED_FORMAT='txt'
#This is the file type
FEED_EXPORT_ENCODING='utf-8'
#This is the file encoding format
Since I opened the Word document directly in pipelines.py for storage, these sentences are not needed here.
5. Start the program
Finally, of course, we need to start the program to run it.
There are two ways to run Scrapy, one is to jump to the folder of the scrapy project at the terminal of your local computer (jump method: path name of cd + folder).
Then enter the command line: scrapy crawl crawl name (our project is paajs)
Another way to run it requires us to create a new main.py file (the same level as scrapy.cfg) in the outermost large folder.
ajiasha/
    main.py #startup file
    scrapy.cfg            # deploy configuration file

    ajiasha/             # project's Python module, you'll import your code from here
        __init__.py

        items.py          # project items definition file

        middlewares.py    # project middlewares file

        pipelines.py      # project pipelines file

        settings.py       # project settings file

        spiders/          # a directory where you'll later put your spiders
            __init__.py
We just need to enter the following code in this main.py file, click Run, and Scrapy's program will start.
from scrapy import cmdline
#Import the cmdline module to control the terminal command line.
cmdline.execute(['scrapy','crawl','paajs'])
#Enter the command to run scrapy using the execute () method. paajs is the name of the crawl defined in this project. The actual run will be replaced by your own crawl name