Batch automatic matting of pictures to remove background
Today, I found a good thing called pickwant.com, which is an online website that automatically extracts pictures to remove the background. As long as you upload the picture, you can automatically remove the background and pull out the target object.
Whether animals, cars or various products, or characters, you can automatically achieve amazing matting effects! Moreover, it is also said that it can achieve hair AI automatic matting. As a programmer with little hair, he suddenly feels a trace of malice from the world.
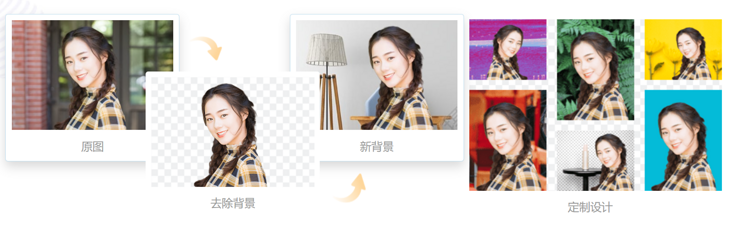
What's the use of this matting? For example, you can pick out the characters and change the background:
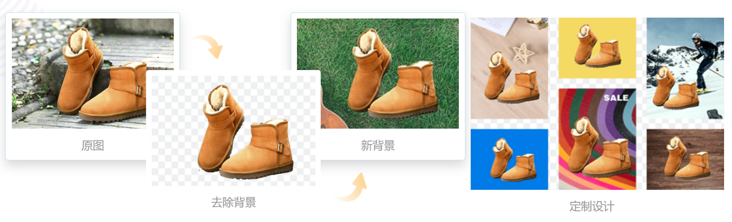
You can also pull out the product and make it into a new product publicity map: (friends who are e-commerce must understand it)
So easy to use things, now the key is: completely free!
Emmmmmmmm, this news was known by dozens of my ex girlfriends. They sent photos one after another, asking me to remove the background of the photos and pick out her beautiful portrait, so as to replace it with the background of Maldives.
So many pictures have to be passed on one by one, and then downloaded back. If I do the same thing dozens of times, I won't do it.
Well, you have to write a Python automated script to do it.
Just do it. Without saying a word, take out Selenium, the artifact of web page automation, and write a few lines of code:
"""
Selenium It is a third-party library and needs to be installed first,stay Teminal In execution: pip install selenium
 Driver chromedriver According to the browser chrome Version download
 If you have questions, you can add me: youbafu  (Network wide unification id)
"""
from selenium import webdriver
from selenium.webdriver.chrome.service import Service

s = Service(r'D:\driver\chromedriver.exe')
# Initialize browser to chrome browser
browser = webdriver.Chrome(service=s)

# Open a moment matting
browser.get(r'https://www.pickwant.com')
This completes the automatic opening of the web page:

But this is far from enough. We need to upload pictures automatically and then download them automatically.
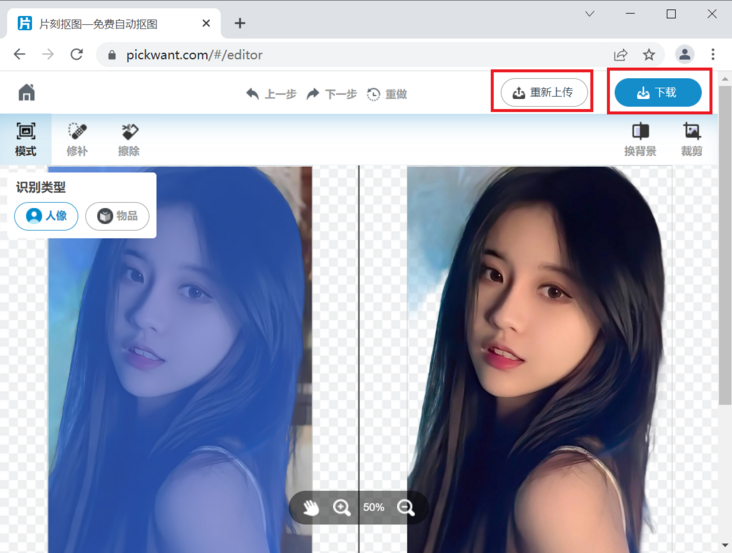
Through several manual operations to get the rule, we just need to enter the editing interface
Then cycle through the following steps:
1. Click the re upload button in the upper right corner of the page.
2. Select the picture to upload and click the open button.
3. Wait a few seconds to pick the picture, and then click the download button in the upper right corner of the web page.
4. After the dialog box pops up, click OK to download and the picture will be saved automatically.
You can complete the automatic matting of the pictures of ex girlfriends in the folder in turn.
To make an automated script, the next step is to find these buttons and simulate clicking. Right click the re download button and click Check in the pop-up menu. The element viewing interface of the web page pops up. Repeat the operation again to locate the web page code of this button:
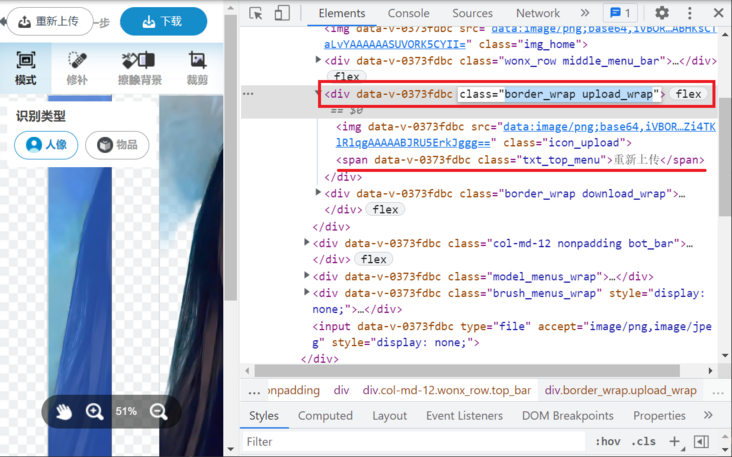
You can see that the re upload is a span. Here you can take its superior div and its class is border_wrap upload_wrap, then you can write code to locate this element and then perform the click() operation.
import time
from selenium import webdriver
from selenium.webdriver.chrome.service import Service
from selenium.webdriver.common.by import By

s = Service(r'D:\driver\chromedriver.exe')
# Initialize browser to chrome browser
browser = webdriver.Chrome(service=s)

# Open a moment matting
browser.get(r'https://www.pickwant.com/#/editor')
time.sleep(1)

# Navigate to the re upload button
upload = browser.find_element(By.CSS_SELECTOR, '.border_wrap.upload_wrap')
upload.click()
In particular, according to the basic syntax of CSS, id is # expressed and class is expressed If there is a space in the middle, it is also used To splice, lower level labels are spliced with >.
<div data-v-0373fdbc="" class="border_wrap upload_wrap"></div>
For such div tags, their class is border_wrap upload_wrap, so by CSS_ The parameter of the lookup element of the selector is' border_wrap.upload_wrap' .
After the code is executed, a dialog box for selecting files pops up:
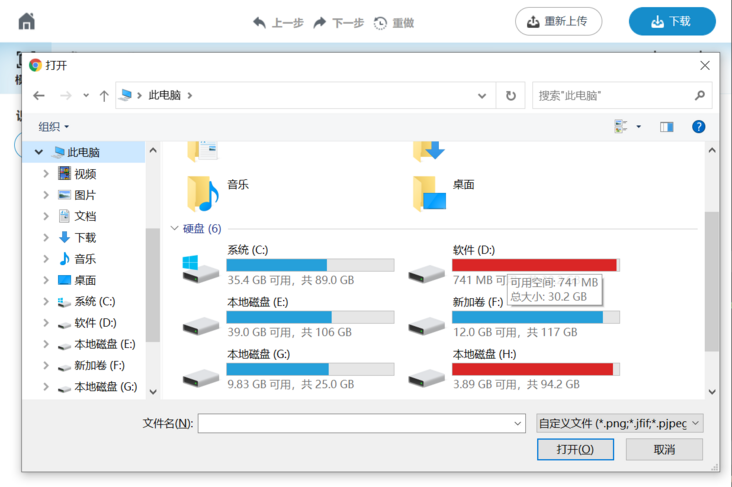
At this time, the problem comes. This dialog box is at the Windows system level and is not controlled by Selenium. What should I do?
Don't panic. It's not difficult for Mr. bafu. Since it's a Windows system pop-up window, it must be controlled by the system!
Then sacrifice the pywin32 library to deal with it. Enter the command in the Terminal command line to install the Library:
pip install pywin32
Then open the artifact spy + + to view the Windows window information, get the class name and hierarchy relationship of the window, and write the following function code to automatically select the file and click the button:
import win32con # win32 library contains many modules
import win32gui # The specific modules are imported here
def Upload pictures(File path):
    dialog = win32gui.FindWindow('#32770', u'open')  # dialog box
    ComboBoxEx32 = win32gui.FindWindowEx(dialog, 0, 'ComboBoxEx32', None)
    ComboBox = win32gui.FindWindowEx(ComboBoxEx32, 0, 'ComboBox', None)
    Edit = win32gui.FindWindowEx(ComboBox, 0, 'Edit', None)  # The above three sentences look for the object in turn until they find the handle of the Edit object in the input box
    button = win32gui.FindWindowEx(dialog, 0, 'Button', None)  # Open button
    time.sleep(0.5)
    win32gui.SendMessage(Edit, win32con.WM_SETTEXT, None, File path)  # Enter the absolute address into the input box
    time.sleep(0.5)
    win32gui.SendMessage(dialog, win32con.WM_COMMAND, 1, button)  # Click the open button
    time.sleep(5)
First write this function for standby. Which picture you want to upload later, as long as you pass in the file path of the picture as a parameter when calling the function, you can complete the goal.
After uploading the picture, just wait a second or two to automatically complete the matting. At this time, click the download button in the upper right corner of the web page. After the dialog box pops up, click OK to download and the picture will be saved automatically.
Previously, we learned the method of locating elements. It is not difficult for us to locate these two buttons.
However, you can insist on seeing here. Mr. bafu must teach you a more convenient skill:
Right click the download button and click Check in the pop-up menu. The element viewing interface of the web page pops up. Repeat the operation again to locate the web page code of this button. Then right-click the div tag at its upper level, select Copy, and then select Copy selector.
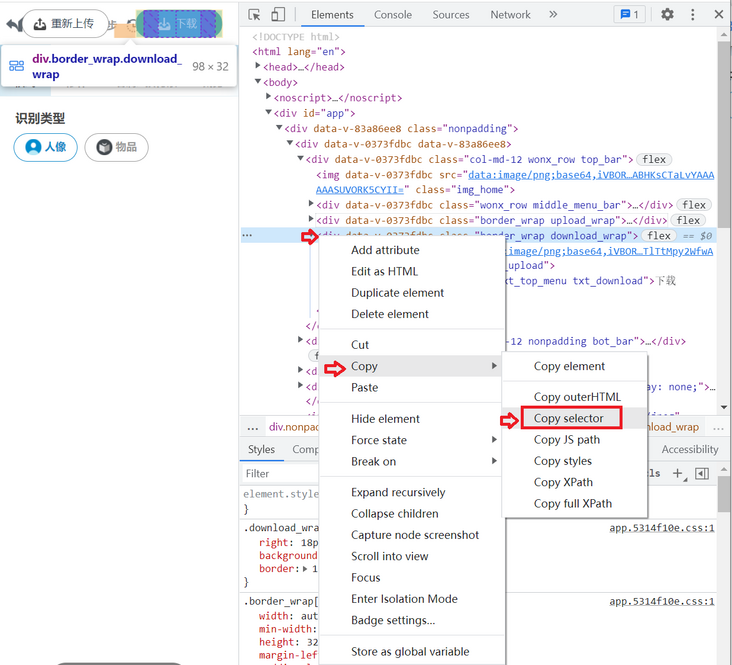
Then return to the python code editing window and paste to obtain accurate positioning parameters:
#app > div > div:nth-child(1) > div.col-md-12.wonx_row.top_bar > div.border_wrap.download_wrap
In this way, it saves the hard work of understanding and transforming parameters, greatly improves the efficiency, and then you can easily write the code for locating elements and clicking:
download = browser.find_element(By.CSS_SELECTOR, '#app > div > div:nth-child(1) > div.col-md-12.wonx_row.top_bar > div.border_wrap.download_wrap')
download.click() # Click download
time.sleep(0.5)

comfirm = browser.find_element(By.CSS_SELECTOR, '#app > div > div.container > div.dialog-content > div > div.download_wrap')
comfirm.click()  # Click to confirm the download
time.sleep(1)
The upload and download processes of a single picture are finished. Next, we need to write a function to obtain all the pictures in the folder to complete the matting task of each predecessor's pictures in turn.
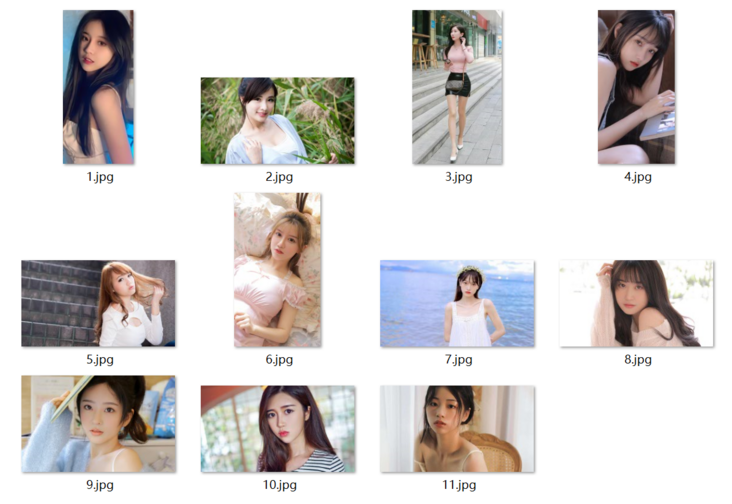
I put their photos in the folder of ex girlfriend under the E: disk of the computer, so just read all the pictures in this folder and upload and download them in turn.
Folder path = r'E:\Ex girlfriend'
names = os.listdir(Folder path)  # List all the file names in this directory
for name in names:
    path = os.path.join(Folder path, name)  # Splice the complete path of the picture
    # Click re upload() # Waiting for encapsulation
    Upload pictures(path)
    # Click download() # Waiting for encapsulation
After all the logic has been sorted out and the modules have been basically written, let's integrate the code to see the complete code:
"""
Moment matting
 Batch automatic matting of pictures to remove background
 Author: youbafu
 Please add if you have any questions vx: youbafu
"""
import time
from selenium import webdriver
from selenium.webdriver.chrome.service import Service
from selenium.webdriver.common.by import By
import win32con
import win32gui
import os

s = Service(r'D:\driver\chromedriver.exe')
# Initialize browser to chrome browser
browser = webdriver.Chrome(service=s)

# Open a moment matting
browser.get(r'https://www.pickwant.com')
time.sleep(1)
browser.get(r'https://www.pickwant.com/#/editor')
time.sleep(2)

def Click re upload():
    while True:
        try:
            # Navigate to the re upload button
            upload = browser.find_element(By.CSS_SELECTOR, '.border_wrap.upload_wrap')
            upload.click()
        except:
            print('Please scan or verify the login code first')
        else:
            print('Click re upload')
            break
        finally:
            time.sleep(1)

def Upload pictures(File path):
    dialog = win32gui.FindWindow('#32770', u'open')  # dialog box
    ComboBoxEx32 = win32gui.FindWindowEx(dialog, 0, 'ComboBoxEx32', None)
    ComboBox = win32gui.FindWindowEx(ComboBoxEx32, 0, 'ComboBox', None)
    Edit = win32gui.FindWindowEx(ComboBox, 0, 'Edit', None)  # The above three sentences look for the object in turn until they find the handle of the Edit object in the input box
    button = win32gui.FindWindowEx(dialog, 0, 'Button', None)  # Open button
    if Edit is not None and button is not None:
        time.sleep(0.5)
        win32gui.SendMessage(Edit, win32con.WM_SETTEXT, None, File path)  # Enter the absolute address into the input box
        print('Upload:', File path)
        time.sleep(0.5)
        win32gui.SendMessage(dialog, win32con.WM_COMMAND, 1, button)  # Click the open button
        time.sleep(5)

def Click download():
    while True:
        try:
            download = browser.find_element(By.CSS_SELECTOR, '.border_wrap.download_wrap')
            download.click()
            time.sleep(0.5)

            confirm = browser.find_element(By.CSS_SELECTOR, '.dialog-content>.content_wrap>.download_wrap')
            confirm.click()
        except:
            print('Please scan the login or complete the verification code identification first')
        else:
            print('Click download')
            break
        finally:
            time.sleep(1)

Folder path = r'E:\Ex girlfriend'
names = os.listdir(Folder path)  # List all the file names in this directory
for name in names:
    path = os.path.join(Folder path, name)  # Splice the complete path of the picture
    Click re upload()
    Upload pictures(path)
    Click download()

print('congratulations! All completed')
Exception handling is added to the complete code. If you need to scan the code for login or verification code, you can operate it manually and continue to execute it.
If you have any questions, please contact youbafu and have a good time.