20. Web development
CS architecture: C refers to the Client, and the software runs on the desktop; S refers to the Server, and the database runs on the Server.
CS architecture is not suitable for the Web. The biggest reason is that the modification and upgrading of Web applications are very fast, and CS architecture requires each client to upgrade desktop apps one by one. Therefore, Browser/Server mode has become popular, referred to as BS architecture for short.
Under BS architecture, the client only needs the browser, and the logic and data of the application are stored on the server. The browser only needs to request the server, obtain the Web interface, and display the Web page to the user.
Web application: news, blog, microblog and other services provided by Sina.
Web application development is the most important part of software development.
Stages of Web Development: static web page → CGI → ASP/JSP/PHP → MVC
1. Introduction to HTTP protocol
In Web application, the server transmits the Web page to the browser. In fact, it sends the HTML code of the Web page to the browser for the browser to display. The transmission protocol between browser and server is HTTP protocol, so:
- Html is a kind of text used to define web pages. If you can HTML, you can write web pages
- HTTP is a protocol for transmitting HTML on the network, which is used for the communication between browser and server
Google browser → developer tools:
- Elements displays the structure of the web page
- Network displays the communication between browser and server Click Network and make sure the first small red light is on, and Chrome will record all communications between browsers and servers
- Enter www.sina.com in the address field com. Cn, the browser will display Sina's home page
- GET represents a read request that will GET web page data from the server
- /Indicates the path of the URL. The URL always starts with / and / indicates the home page
- HTTP/1.1 indicates that the HTTP protocol version used is 1.1
- The HTTP response is divided into Header and Body (Body is optional)
- 200 indicates a successful response, and the following OK is the description
- The failed responses are 404 Not Found: the web page does not exist, 500 Internal Server Error: internal server error
- Content type indicates the content of the response. The browser relies on content type to determine whether the content of the response is a web page or a picture, a video or music
- text/html represents HTML web pages
HTTP request
HTTP request process:
- Step 1: the browser sends an HTTP request to the server. The request includes:
- Method: GET or POST. GET only requests resources, and POST will be accompanied by user data
- Path: / full/url/path
- Domain name: specified with Host header: Host: www.sina.com com. cn
- And other related headers
- In case of POST, the request also includes a Body containing user data
- Step 2: the server returns an HTTP response to the browser. The response includes:
- Response code:
- 200 indicates success
- 3xx indicates redirection
- 4xx indicates that there is an error in the request sent by the client
- 5xx indicates that an error occurred during server-side processing
- Response type: specified by content type
- Other related headers
- Response code:
- Step 3: if the browser needs to continue to request other resources from the server, such as pictures, send an HTTP request again, and repeat steps 1 and 2
An HTTP request only processes one resource.
HTTP format
Each HTTP request and response follow the same format. An HTTP contains two parts: Header and Body, in which Body is optional.
HTTP protocol is a text protocol with very simple format. Format of HTTP GET request:
GET /path HTTP/1.1
Header1: Value1
Header2: Value2
Header3: Value3
Each Header is one line, and the newline character is \ r\n.
Format of HTTP POST request:
POST /path HTTP/1.1
Header1: Value1
Header2: Value2
Header3: Value3

body data goes here...
When encountering two consecutive \ r\n, the Header part ends and the following data is all Body.
Format of HTTP response:
200 OK
Header1: Value1
Header2: Value2
Header3: Value3

body data goes here...
If the HTTP response contains body, it is also separated by \ r\n\r\n. Please note again that the data type of the body is determined by the content type header. If it is a web page, the body is the text. If it is a picture, the body is the binary data of the picture.
When content encoding exists, the Body data is compressed, and the most common compression method is gzip. Therefore, when you see content encoding: gzip, you need to decompress the Body data first to get the real data. The purpose of compression is to reduce the size of the Body and speed up network transmission.
2. Introduction to HTML
Simplest HTML format:
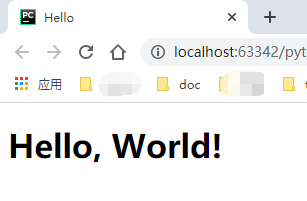
<html>
<head>
  <title>Hello</title>
</head>
<body>
  <h1>Hello, world!</h1>
</body>
</html>
Write HTML using a text editor and save it as hello HTML. Double click or drag the file to the browser to see the effect:
HTML document is composed of a series of tags. The outermost Tag is < HTML >, and the standard HTML includes < head ></ Head > and `..., don't get confused with HTTP Header and Body. Because html is a rich document model, there are also a series of tags to represent links, pictures, tables, forms, etc
CSS introduction
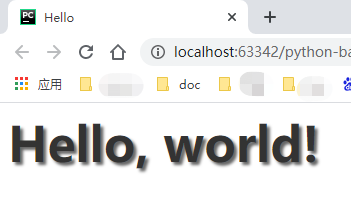
CSS is the abbreviation of cascading style sheets. CSS is used to control how all elements in HTML are displayed. For example, add a style to the title element < H1 > and turn it into 48 point font, gray and shaded:
<html>
<head>
  <title>Hello</title>
  <style>
    h1 {
      color: #333333;
      font-size: 48px;
      text-shadow: 3px 3px 3px #666666;
    }
  </style>
</head>
<body>
  <h1>Hello, world!</h1>
</body>
</html>
The effect is as follows:
Introduction to JavaScript
JavaScript is added as a scripting language to make HTML interactive. JavaScript can be embedded in HTML or linked to HTML from the outside.
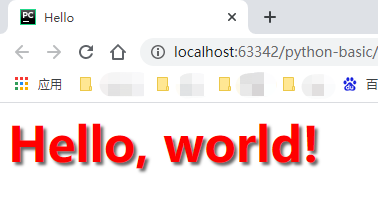
If you want to turn the title red when the user clicks the title, you must implement it through JavaScript:
<html>
<head>
  <title>Hello</title>
  <style>
    h1 {
      color: #333333;
      font-size: 48px;
      text-shadow: 3px 3px 3px #666666;
    }
  </style>
  <script>
    function change() {
      document.getElementsByTagName('h1')[0].style.color = '#ff0000';
    }
  </script>
</head>
<body>
  <h1 onclick="change()">Hello, world!</h1>
</body>
</html>
After clicking the title, the effect is as follows:
Summary
- CSS: controls the style of page elements
- JavaScript: responsible for the interaction logic of the page
3. WSGI interface
The essence of Web application:
- The browser sends an HTTP request
- The server receives the request and generates an HTML document
- The server sends the HTML document to the browser as the Body of the HTTP response
- The browser receives the HTTP response, takes out the HTML document from the HTTP Body and displays it
The simplest Web application: first save the HTML file, use a ready-made HTTP server software to receive user requests, read HTML from the file and return. Apache, Nginx, Lighttpd and other common static servers do these things.
WSGI(Web Server Gateway Interface): a unified interface. Instead of accepting and parsing HTTP requests and sending HTTP responses, we only concentrate on writing programs in Python.
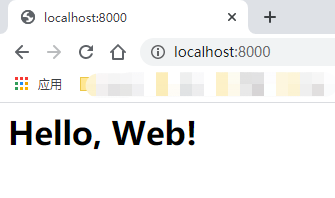
WSGI requires Web developers to implement a function to respond to HTTP requests. The simplest version of "Hello, Web":
def application(environ, start_response):
    start_response('200 OK', [('Content-Type', 'text/html')])
    return [b'<h1>Hello, Web!</h1>']
Description of the above functions:
- The application() function is an HTTP processing function conforming to the wsgi standard. It accepts two parameters:
- environ: a dict object that contains all HTTP request information
- start_response: a function that generates an HTTP response
- Function call start_response() sends the Header of the HTTP response. The Header can only be sent once, that is, start can only be called once_ Response() function
- start_ The response() function receives two parameters:
- HTTP response code
- A set of HTTP headers represented by a list. Each Header is represented by a tuple containing two STRs
- In general, you should give the beginning of content type to the browser
- Return value of function B '< H1 > Hello, web</ H1 > 'send the Body as an HTTP response to the browser
The function application() is called by the WSGI server. Python has a built-in WSGI server, which is called wsgiref.
"Reference implementation": it means that the implementation fully conforms to the WSGI standard, but does not consider any operation efficiency. It is only used for development and testing.
Running WSGI services
- First write hello Py, which implements the WSGI processing function of the Web application
hello.py
def application(environ, start_response):
    start_response('200 OK', [('Content-Type', 'text/html')])
    return [b'<h1>Hello, web!</h1>']
- Write a server Py, which is responsible for starting the WSGI server and loading the application() function
server.py
# Import from wsgiref module
from wsgiref.simple_server import make_server
# Import the application function written by yourself
from hello import application

# Create a server. The ip address is empty, the port is 8000, and the processing function is application
httpd = make_server('', 8000, application)
print('Serving HTTP on port 8000...')
# Start listening for HTTP requests
httpd.serve_forever()
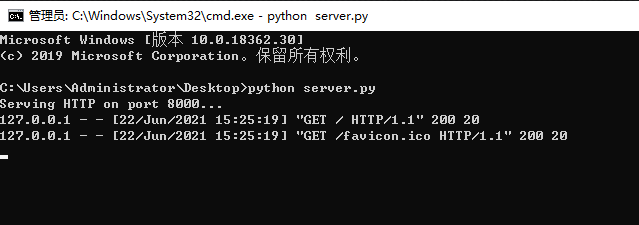
Ensure that the two files are in the same directory, open the cmd window and enter: Python server Py start WSGI server:
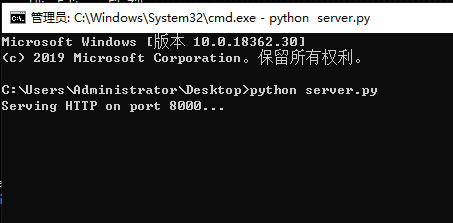
If port 8000 is occupied by other programs, the startup will fail, and it can be modified to other ports. After successful startup, open the browser and enter http://localhost:8000/ , you can see the results:
On the command line, you can see the log information printed by wsgiref:
Ctrl + C to terminate the service.
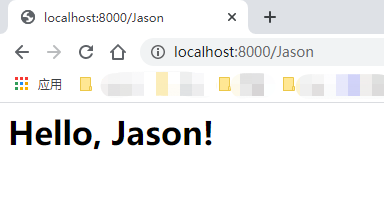
Or read path from environ_ Info, which can display more dynamic content:
hello.py
def application(environ, start_response):
    start_response('200 OK', [('Content-Type', 'text/html')])
    body = '<h1>Hello, %s!</h1>' % (environ['PATH_INFO'][1:] or 'web')
    return [body.encode('utf-8')]
Enter the user name in the address bar as part of the URL, which will return Hello, xxx!
Summary
- No matter how complex the Web application is, the entry is a WSGI processing function. All the input information of the HTTP request can be obtained through environ, and the output of the HTTP response can be obtained through start_response() plus the return value of the function as the Body.
4. Use Web Framework
WSGI framework: a Web App that writes a WSGI processing function to respond to each HTTP request.
Use a function to process a url, and leave the mapping from url to function to the Web framework.
Using the flash framework:
- First, use pip to install flash
pip install flask
- Write an app Py, which processes three URLs:
- GET /: home page, return home
- Get / sign: the login page displays the login form
- Post / sign: process the login form and display the login results
from flask import Flask, request

app = Flask(__name__)

@app.route('/', methods=['GET', 'POST'])
def home():
    return '<h1>Home</h1>'

@app.route('/signin', methods=['GET'])
def signin_form():
    return '''<form action="/signin" method="post">
              <p><input name="username"></p>
              <p><input name="password" type="password"></p>
              <p><button type="submit">Sign In</button></p>
              </form>'''

@app.route('/signin', methods=['POST'])
def signin():
    # You need to read the form content from the request object:
    if request.form['username'] == 'admin' and request.form['password'] == 'password':
        return '<h3>Hello, admin!</h3>'
    return '<h3>Bad username or password.</h3>'

if __name__ == '__main__':
    app.run()
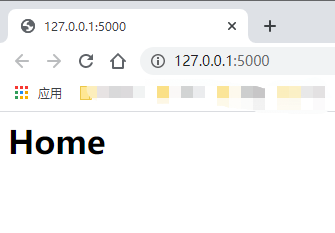
Run Python app Py, the Server of Flask listens on port 5000:
* Running on http://127.0.0.1:5000/ (Press CTRL+C to quit)
Enter the home page address in the browser: http://localhost:5000/ :
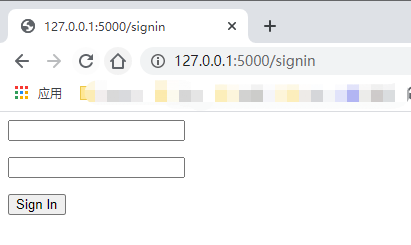
Then enter in the browser address http://localhost:5000/signin , the login form is displayed:
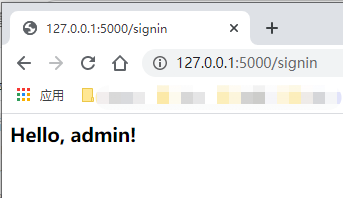
Enter the preset user name admin and password, and the login is successful:
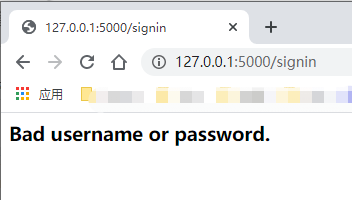
Enter other wrong user name and password, login failed:
In addition to Flask, common Python Web frameworks include:
- Django: omnipotent Web framework;
- web.py: a compact Web framework;
- Bolt: a Web framework similar to Flask;
- Tornado: Facebook's open source asynchronous Web framework
Summary
- With the Web framework, when writing Web applications, we shift our attention from WSGI processing function to URL + corresponding processing function, which makes it easier to write Web apps
- When writing the URL processing function, in addition to configuring the URL, it is also very important to get user data from the HTTP request. Web frameworks provide their own APIs to implement these functions
- Flask passed the request Form ['name '] get the content of the form
5. Use template
Template variable: {value}}
MVC: model view controller, Chinese name "model view controller":
- Python's URL processing function is C: Controller, which is responsible for business logic, such as checking whether the user name exists, taking out user information, etc.
- The template containing the variable {name}} is V: view. View is responsible for displaying logic. By simply replacing some variables, the final output of view is the HTML seen by the user.
- Model: used to pass it to the View, so that the View can get the corresponding data from the model when replacing variables.
Convert HTML in string form to template file:
app2.py
from flask import Flask, request, render_template
app = Flask(__name__)

@app.route('/', methods=['GET', 'POST'])
def home():
    return render_template('home.html')

@app.route('/signin', methods=['GET'])
def signin_form():
    return render_template('form.html')

@app.route('/signin', methods=['POST'])
def signin():
    username = request.form['username']
    password = request.form['password']
    if username == 'admin' and password == 'password':
        return render_template('signin-ok.html', username=username)
    return render_template('form.html', message='Bad username or password', username=username)

if __name__ == '__main__':
    app.run()
Flash through render_ The template() function implements the rendering of the template. The default template supported by Flask is jinja2.
Install jinja2:
pip install jinji2
Then write HTML:
home.html home page:
<!DOCTYPE html>
<html lang="en">
<head>
    <meta charset="UTF-8">
    <title>Home</title>
</head>
<body>
<h1 style="font-style:italic">Home</h1>
</body>
</html>
form.html login form:
<!DOCTYPE html>
<html lang="en">
<head>
    <meta charset="UTF-8">
    <title>Please Sign In</title>
</head>
<body>
    {% if message @}
    <p style="color:red">{{ message }}</p>
    {% enf if %}
    <form action="/signin" method="post">
        <legend>Please sign in:</legend>
        <p><input name="username" placeholder="Username" value="{{ username }}"></p>
        <p><input name="password" placeholder="Password" value="{{ password }}"></p>
        <p><button type="submit">Sign in</button></p>
    </form>
</body>
</html>
signin-ok.html template for successful login:
<!DOCTYPE html>
<html lang="en">
<head>
    <meta charset="UTF-8">
    <title>Welcome, {{ username }}</title>
</head>
<body>
    <p>Welcome, {{ username }}!</p>
</body>
</html>
Start app2 After py, Windows will report: jinja2 exceptions. TemplateNotFound: home. html
In the Jinja2 template, we use {name}} to represent a variable that needs to be replaced. In Jinja2, {%...%} is used to represent instructions.
For example, circular output page number:
{% for i in page_list %}
    <a href="/page/{{ i }}">{{ i }}</a>
{% endfor %}
If page_list is a list: [1, 2, 3, 4, 5]. The above template will output 5 hyperlinks.
In addition to Jinja2, common templates include:
Mako: use <%...% > And ${xxx};
Cheetah: also use <%...% > And ${xxx};
Django: Django is a one-stop framework with a built-in template using {%...%} and {{xxx}}.