You can visit my knowledge: https://zhuanlan.zhihu.com/p/478576485
Official documents: https://pytorch.org/docs/master/torch.html
Chinese documents: https://pytorch-cn.readthedocs.io/zh/latest/
torch Foundation
-
torch.device(): the GPU training model will be used
device = torch.device('cuda:0' if torch.cuda.is_available() else 'cpu') # If multiple GPU s model = Model() if torch.cuda.device_count() > 1: model = nn.DataParallel(model,device_ids=[0,1,2]) model.to(device) -
torch.permute(): tensor dimension transformation
a = torch.randn(16, 16, 3)
b = a.permute(2,0,1)
# b.shape=(3,16,16)
-
torch.cat(): splicing tensor
torch.cat((A,B),0)  # Dimension 0 is spliced downward, and the number of columns must be the same (all other dimensions must be the same)
torch.cat((A,B),0)  # The 1st dimension is spliced to the right, and the number of rows must be the same (all other dimensions must be the same)
-
tensor. Continuous (): deep copy
-
torch. Clamp (input, min,max): enter the input tensor. The value of each element is limited within the interval [min,max], and a new tensor is returned
-
torch.save(): save the model (parameters)
import torch state ={''net':model.state_dict(),'optimizer':optimizer.state_dict(), 'epoch':epoch} torch.save(state, filename) # state['net '] can also be a model; filename:'*. pt(h)/*. Pkl '(all binary storage) ------------------------------------------------------------------- checkpoint = torch.load(filename) model.load_state_dict(checkpoint['net']) optimizer.load_state_dict(checkpoint['optimizer']) start_epoch = checkpoint['epoch'] + 1 -
torch.squeeze(): remove the dimension taking 1; torch.unsqueeze(i): add dimension i
-
torch.gather(mytensor,i,index): index the ith dimension by index and return the index result
-
torch. Sacter (mytensor, i, index, val): fill in val for the i dimension according to the index value in the index, and return the filled result, which can be used to read the unique hot code. An example is as follows:
def one_hot(labels,num_class):
    batch_size = len(labels)
    return torch.scatter(torch.zeros(batch_size,num_class),
                         1,labels.view(batch_size,1),1)
[note]: see index in gather and sacter for details
torch.nn as nn
See: https://blog.csdn.net/qq_33952811/article/details/108430097
-
torch.nn.Conv2d(): two-dimensional convolution
The convolution size changes as follows:
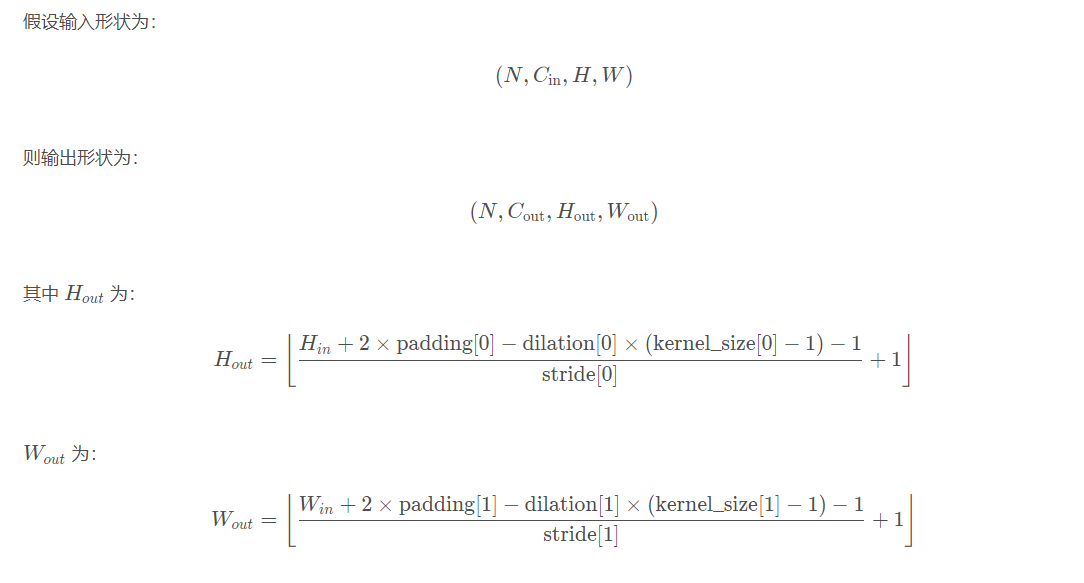
[remarks]: keep the output height and width unchanged \ (p =[\displaystyle \frac{k-1}{2}] \)
Conv2d(in_channels, out_channels, kernel_size, stride=1,padding=0, dilation=1, groups=1,bias=True, padding_mode='zeros')
# in_channels: number of channels entered [required]
# out_channels: number of output channels [required]
# kernel_size: the size of the convolution kernel. The type is int or tuple. When the convolution is square, only an integer side length is required. The convolution is not square. Enter a tuple to represent the height and width. [required]
# Stripe: the step size of each sliding of convolution. The default value is 1 [optional]
# Padding: set the size of the margin with the value of 0 added to all boundaries (that is, add a few circles of 0 around the periphery of the feature map). For example, when padding =1, if the original size is 3 ×  3, then the subsequent size is 5 ×  5 .  That is, add a circle of 0 on the periphery. [optional]
# Division: controls the spacing between convolution kernels. [optional]
# groups: controls the connection between inputs and outputs. [optional]
# Bias: whether to add a learned bias to the output. The default is True. [optional]
# padding_mode: string type. You can select "zeros" and "circular". [optional]
-
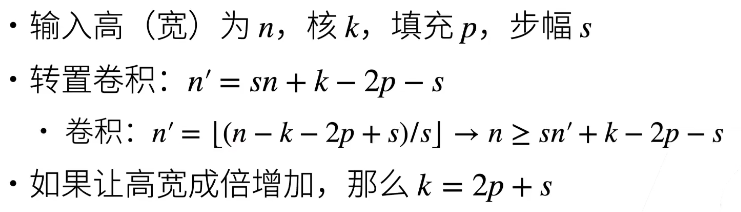
torch.nn.ConvTranspose2d(): 2D transpose convolution
- Convolution is to input m × Matrix output n of m × Matrix of n (shape reduction)
- Transpose convolution ≠ deconvolution is to input n × Matrix output m of n × Matrix of M (shape increases)
\[Y_{n^2×1} = W_{n^2×m^2} · X_{m^2×1} \to Y'_{m^2×1} = W^T_{m^2×n^2} · X'_{n^2×1}\\ \]- Shape conversion:
-
torch.nn.Identity(): occupation
No processing, input is output, which is equivalent to an empty layer of the network, which is used for the residual network
-
torch.nn.functional.interpolate(): interpolate when sampling up and down
# default:(input, size=None, scale_factor=None, mode='nearest',       align_corners=None)
# Input: input tensor
# Size: up / down sampling target size
# scale_ : the size of the scalar input tuple is expressed as the number of times of the scalar output
# mode: up sampling algorithm, including 'nearest', 'linear', 'bilinear', 'bicubic', 'trilinear' and 'area'
# align_corners: geometrically, we think that the input and output pixels are squares, not dots. If set to True, the input and output tensors are aligned by the center point of their corner pixels, retaining the value at the corner pixels. If set to False, the input and output tensors are aligned by the corners of their corner pixels, and the interpolation is filled with the boundary value of the value outside the boundary; When scale_ When the factor remains unchanged, make the operation independent of the input size. It can only be used when the algorithm used is' linear ',' bilinear ',' bilinear 'or' trilinear '. The default setting is False
torchvision
-
torchvision.utils.make_grid(): output the image matrix, which is used to compare the performance and effect of the algorithm
make_grid() arranges several images in a grid matrix, save_image() is used to save images. The parameters of the two functions are similar
# Tensor: 4D tensor, whose shape is (B x C x H x W), which represents the number of samples, the number of channels, the image height and the image width respectively. Or a list of images
# nrow: the number of pictures per line. The default value is 8
# padding: the interval between adjacent images. The default value is 2
# Normalize: if True, normalize the pixel value of the image to 0-1 through the maximum and minimum values specified by range. The default is False
Use examples:
def show(img): npimg = img.numpy() plt.imshow( np.transpose(npimg, (1,2,0)), interpolation='nearest') show(make_grid(images, nrow=5, padding=10)) -
torchvision.transforms(): image enhancement
reference resources: https://blog.csdn.net/u011995719/article/details/85107009
Note the image data format:
- ndarray->HWC
- tensor->CHW
- PIL->HW
import torchvision.transforms as transforms
trans = [
# data conversion
transforms.ToPILImage(),
transforms.ToTensor(),
#-----------------------------------------------------
# Random length width clipping
transforms.RandomResizedCrop(size,scale=(0.08, 1.0)),
# Scale the minimum side length of the image to 256 and the other side to the same scale
transforms.Resize(256),
# Pixel value normalization
transforms.Normalize(mean,std),
# Modify the four parameter values of the input image: brightness,contrast and saturation, hue, i.e. brightness, contrast, saturation and chroma
transforms.ColorJitter()
# 0.5 probability horizontal flip
transforms.RandomHorizontalFlip(),
# Cut out 5 images of specified size from an input image, including 4 corners and a center of the image Jiugong grid
transforms.FiveCrop(size)
# Random rotation
transforms.RandomRotation()
# affine transformation
torchvision.transforms.RandomAffine(degrees, translate=None, scale=None,    shear=None, resample=False, fillcolor=0)
]
transformer = transforms.Compose(trans)  # Integrate all rules of image batch preprocessing
data set
from torchvision.datasets import ImageFolder
dataset=ImageFolder(root,
                    transform=None,
    				target_transform=None,
    				is_valid_file=None
                   )
'''Parameter description'''
# Root: the root directory of image storage, that is, the upper level directory of the directory where each category folder is located.
# transform: the operation (function) of preprocessing the picture. The original picture is used as input to return a converted picture.
# target_transform: the operation of preprocessing the picture category. The input is target and the output is the conversion. If this parameter is not passed, that is, no conversion is made to the target, and the returned order index is 0,1,2
# is_valid_file: a function to get the path of the image file and check whether the file is a valid file (used to check for damaged files)
'''Returned dataset All have the following three attributes:'''
# self.classes: save category names in a list
# self.class_to_idx: the index corresponding to the category, corresponding to the target returned without any conversion
# self.imgs: save the list of (IMG path, class) tuples

from torch.utils.data import DataLoader
DataLoader(dataset,batch_size, shuffle, num_workers)
Transfer learning
A new network is derived, taking the fully connected convolutional neural network as an example:
from torchvision.models import resnet18
import torch.nn as nn

cnn = resnet18(pretrained=False)
FCN = nn.Sequential(*list(cnn.children())[:-2])  # Similar to transfer learning, delete the last average pool layer and full connection layer, and retain the structure of the previously extracted features
FCN.add_module('final_conv',nn.Conv2d(in_channels=512,out_channels=21,kernel_size=1))  # 1 * 1 convolution
FCN.add_module('transpose_conv',nn.ConvTranspose2d(in_channels=21,out_channels=21,kernel_size=64,stride=32,padding=16))
Deep reinforcement learning
torch.distributions(): probability distribution in deep learning
import torch
# 1. Convert the weight of pi list into probability to construct discrete distribution
dist = torch.distributions.Categorical(logits=pi)
dist.sample()  # Probability sampling subscript
dist.log_prob(action_batch)  # Right action_ Each element in batch reconstructs only one single hot coding sequence with index value of 1, and the cross entropy is calculated for each sequence

# 2. Construction( μ,σ) Normal distribution
dist = torch.distributions.Normal  # Construct three standard normal distributions
(loc=torch.Tensor([0,0,0]),scale=torch.Tensor([1,1,1]))
sample = dist.sample()   # Direct sampling for each normal distribution
rsample = dist.rsample() # First sample on the standard normal distribution and then μ+σ x
The following are used in reinforcement learning strategy gradients:
When the probability density function is differentiable relative to its parameters, we only need sample() and log_prob(): sample an action from the network output, apply the action to an environment, and then use log_prob construct loss function
from torch.distributions import Categorical
probs = policy_network(state)  # probs is a feature
m = Categorical(probs=probs)  # logits=probs is more recommended, which can also pass in non normalized parameters
action = m.sample()
next_state, reward = env.step(action)
loss = -m.log_prob(action) * reward  # max->min
loss.backward()
Another way to implement random / policy gradients is to use the reparameterization technique from the rsample() method, where parametric random variables can be constructed from parametric deterministic functions of nonparametric random variables Therefore, the re parameterized samples become differentiable.
from torch.distributions import Normal
params = policy_network(state)
m = Normal(loc)
action = m.rsample()
next_state, reward = env.step(action)
loss = -reward
loss.backward()