1, Where can I download it?
Enter the official website: https://www.qcustomplot.com/index.php/download , select the required file as needed:
- Full version. QCustomPlot.tar.gz source code + examples + help documents;
- Shared library. QCustomPlot-sharedlib.tar.gz library compilation and use;
- Source code. QCustomPlot-source.tar.gz source code
If you are using it for the first time, it is recommended to choose the full version. The following takes the full version as an example to illustrate how to use it.
2, Full version content
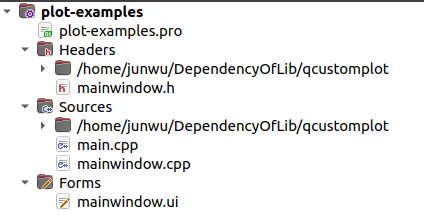
After decompression, find the folder qcustomplot, as follows:
└── qcustomplot
    ├── changelog.txt
    ├── documentation
    │   ├── html
    │   └── qcustomplot.qch
    ├── examples
    │   ├── axis-tags
    │   ├── interactions
    │   ├── plots
    │   ├── scrollbar-axis-range-control
    │   └── text-document-integration
    ├── GPL.txt
    ├── qcustomplot.cpp
    └── qcustomplot.h
- Update log changelog txt
- The help document documentation can be consulted directly after installation
- Example project examples
- Copyright notice GPL txt
- Source file and header file qcustomplot cpp qcustomplot. h
3, What Demo do you have? How do I use it on my project?
There are five projects in examples:
- Axis tags axis Tags
- interactions
- plots plot
- Scroll bar axis range control scroll bar
- Text document integration output image to document
Take plots as an example to illustrate how the demo is run and written using the QCustomPlot class. Find it Pro file. Open the pro file with creator:
The contents of pro file are as follows:
QT       += core gui
greaterThan(QT_MAJOR_VERSION, 4): QT += widgets printsupport

greaterThan(QT_MAJOR_VERSION, 4): CONFIG += c++11
lessThan(QT_MAJOR_VERSION, 5): QMAKE_CXXFLAGS += -std=c++11

TARGET = plot-examples
TEMPLATE = app

SOURCES += main.cpp\
           mainwindow.cpp \
         ../../qcustomplot.cpp

HEADERS  += mainwindow.h \
         ../../qcustomplot.h

FORMS    += mainwindow.ui
In order to use QCustomPlot, the following two points need to be done on the project:
- The relative path between the header file and the source file is added. You can #include "../../qcustomplot.h" at the reference. For QT5, you may need to add QT += widgets printsupport.
- Handle on the UI interface, upgrade the QWidget to QCustomPlot. Your own project may need to add a QWidget to the original UI, then right-click the pop-up menu, select promote to, fill in the header file and class name, and click upgrade to complete the performance of QCustomPlot on desinger (as if you dragged a QPushButton space).

PS: if a base class is a QWidget, you can intuitively operate it on the UI interface by promoting.
3, Demo content
  ui->setupUi(this);
  setGeometry(400, 250, 542, 390);

  setupDemo(0);
  //setupPlayground(ui->customPlot);
  // 0:  setupQuadraticDemo(ui->customPlot);
  // 1:  setupSimpleDemo(ui->customPlot);
  // 2:  setupSincScatterDemo(ui->customPlot);
  // 3:  setupScatterStyleDemo(ui->customPlot);
  // 4:  setupScatterPixmapDemo(ui->customPlot);
  // 5:  setupLineStyleDemo(ui->customPlot);
  // 6:  setupDateDemo(ui->customPlot);
  // 7:  setupTextureBrushDemo(ui->customPlot);
  // 8:  setupMultiAxisDemo(ui->customPlot);
  // 9:  setupLogarithmicDemo(ui->customPlot);
  // 10: setupRealtimeDataDemo(ui->customPlot);
  // 11: setupParametricCurveDemo(ui->customPlot);
  // 12: setupBarChartDemo(ui->customPlot);
  // 13: setupStatisticalDemo(ui->customPlot);
  // 14: setupSimpleItemDemo(ui->customPlot);
  // 15: setupItemDemo(ui->customPlot);
  // 16: setupStyledDemo(ui->customPlot);
  // 17: setupAdvancedAxesDemo(ui->customPlot);
  // 18: setupColorMapDemo(ui->customPlot);
  // 19: setupFinancialDemo(ui->customPlot);
  // 20: setupPolarPlotDemo(ui->customPlot);
  // for making screenshots of the current demo or all demos (for website screenshots):
  //QTimer::singleShot(1500, this, SLOT(allScreenShots()));
  //QTimer::singleShot(4000, this, SLOT(screenShot()));
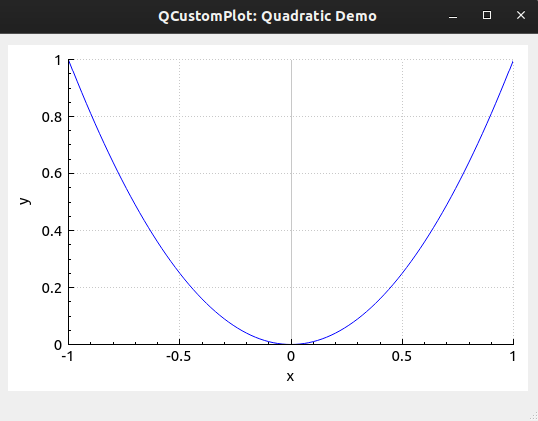
Through the serial number passed in by the setupDemo function, you can see the corresponding Demo and its implementation method. The default is to run the quadricdemo, and the results are as follows:
Change the serial number from 0 to 19, and the operation results are as follows:
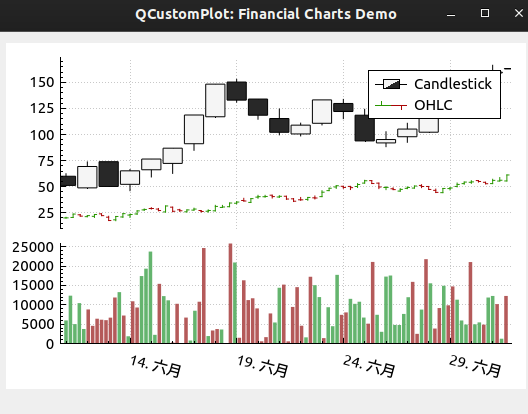
Carefully find the drawing effect you want, and refer to the source code to complete most applications in the project.