Qt encapsulates a simple LED (indicator light) control
1. Effect~

- therefore
- This simple LED class can be customized in size~
- It can be on or off, or it can flash 👁️~
- Blinking interval ⌛ It is customizable to call the class setInterval(msec) function before setting the flicker state.
- There are several predefined colors (red) 🔴, green 🟢, blue 🔵, yellow 🟡 And orange 🟠), Functions for customizing colors are also provided~
- If you can't meet your needs, you have to expand yourself 🧑🔧 The class is very small, which is also very convenient~
- There is this example code in the project file, which can be used as an introduction to usage. In fact, it just introduces the header file, defines the class object, and then uses it as a common control (such as QPushButton)~
- The easiest way is to put the class file qsimplemented H and qsimpled Copy CPP to your project and include it in the files you need to use. Class code has no special requirements for Qt version~
- Almost. With the above tips, download the file try try from below 💪💪💪, If you have any other questions, please leave a comment below~
- In addition, the third part below is some key points in the implementation process~
2. Resource file
- Download link: https://share.weiyun.com/5HK0503W Password: rxdmyk
- Engineering document structure
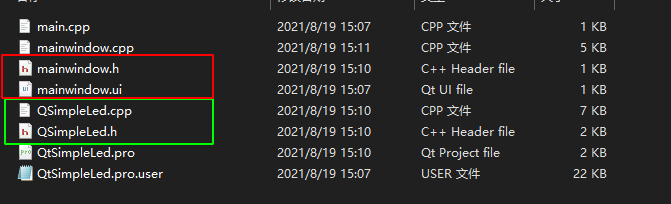
QtSimpleLed.h and qtsimpleled CPP is an encapsulated LED class
mainwindow.h and MainWindow CPP has examples
Others are generated by Qt during construction.
3. About examples
    QTimer::singleShot(200/7.0*1, nullptr, [&]() {
        stepLed01->setStates(QSimpleLed::BLINK);
    });
- The above code sets the LED flashing in the example and uses lamda (introduced by C + + 11). You can't understand it for the first time. It means:
- 200 / 7.0 * execute this code block {stepled01 - > setstates (qsimplled:: blink);}
- In the traditional way:
// Define a timer
// Set the timer to single shot type
// Define a slot with stepled01 - > setstates (qsimplled:: blink);
// Connect the timeout signal of the timer to the slot
// Call start() to start the timer
- Therefore, such steps are cumbersome. You can see the syntax of C++ lamda for the first time. It is very easy to use. After all, there is always a second time only after the first time~ 🙂
4. Key points in the implementation process
-
This is to write some ideas in the implementation process.
-
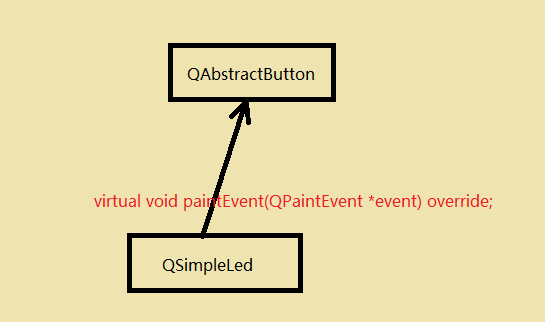
The overall idea is to inherit the QAbstractButton class, then implement its redrawing (paintEvent()) virtual function, and finally draw the effect we want:
-
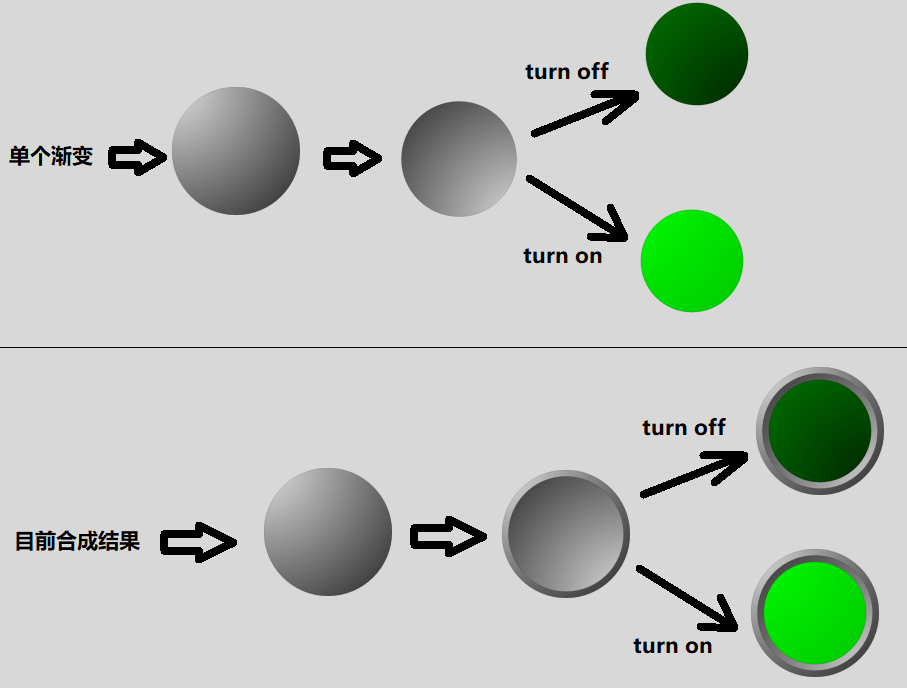
The following question is how to realize the effect of LED:
-
The color gradient effect is mainly used here. I said enough in a previous blog: 👇👇👇
Understand Qt color gradient- https://blog.csdn.net/weixin_37818081/article/details/118879134 -
Radial gradient is used here, which is also very easy to imagine. See the following figure for understanding:
-
So you can see similar code in the class:
    //
    // gradient - 1
    radialGent = QRadialGradient(QPointF(-500, -500)
                                 , 1500
                                 , QPointF(-500, -500));
    radialGent.setColorAt(0, QColor(224, 224, 224));
    radialGent.setColorAt(1, QColor(28, 28, 28));
	...
    //
    // gradient - 2
    radialGent = QRadialGradient(QPointF(500, 500)
                                 , 1500
                                 , QPointF(500, 500));
    radialGent.setColorAt(0, QColor(224, 224, 224));
    radialGent.setColorAt(1, QColor(28, 28, 28));
	...
    if (isChecked()) {
        //
        // gradient - on
        radialGent = QRadialGradient(QPointF(-500, -500)
                                     , 1500
                                     , QPointF(-500, -500));
        radialGent.setColorAt(0, smColorPalette[mColor].on0);
        radialGent.setColorAt(1, smColorPalette[mColor].on1);

    } else {
        //
        // gradient - off
        radialGent = QRadialGradient(QPointF(500, 500)
                                     , 1500
                                     , QPointF(500, 500));
        radialGent.setColorAt(0, smColorPalette[mColor].off0);
        radialGent.setColorAt(1, smColorPalette[mColor].off1);
    }
	...
- Finally, the following drawing method is used in the redraw function:
	...
    painter.setRenderHint(QPainter::Antialiasing);
    painter.translate(width()/2, height()/2);
    painter.scale(realSize/1000, realSize/1000);  // Here the coordinate system is scaled!!!
    painter.setBrush(QBrush(radialGent));
    painter.drawEllipse(QPointF(0, 0), 500, 500);
    ...
- Imagine if you want to draw a circle inscribed on the control, we might do this:
painter.drawEllipse(QPointF(0, 0), realSize/2, realSize/2);
- Where realSize is the actual size of the current control (the smaller side). We use half of it as the radius to draw a circle to form an inscribed circle.
- But now they are replaced by the following two sentences:
    painter.scale(realSize/1000, realSize/1000);
    ...
    painter.drawEllipse(QPointF(0, 0), 500, 500);
- This also enables the drawing of inscribed circles.
- In fact, we changed our thinking angle. Before drawing, we always took the coordinate system as the benchmark, and the graphics we drew were adapted to the existing coordinate system. Now we use the actual size of the control to affect the construction of the coordinate system. When we draw a circle with a size of (500, 500), in the coordinate system constructed with the graphic size (realSize), Its actual size is realSize/1000 * 500, that is, 1/2 * realSize, which is half the actual size of the graph.
- This "anti guest oriented" approach does give us the initiative to draw, otherwise we have to refer to realSize in all coordinate related codes, which is error prone and difficult to read.
- Why divide by 1000? In fact, this is not the point, but 1000 looks more like a unit. The key point is that we do use realSize to affect the structure of the coordinate system, that is, this sentence:
painter.scale(realSize/1000, realSize/1000);
- In this coordinate system, we draw a straight line with a length of 1000. In fact, its length is only the size of realSize. At this time, we pay more attention to the proportion rather than the specific coordinate value
5. Reference
- A great color matching website: https://www.schemecolor.com/
- https://github.com/colinbourassa/rovergauge/
- The official account, learn together and make progress together. 😳😳😳