summary
The window widget cannot be set to fillet directly through the style sheet. You need to drag the control QFrame into the window QWidget, set the QFrame to be the same size as the window QWidget, and drag the control required in the window QWidget into the QFrame.
Example
The following is a window that prompts the tool. It simply records how the style sheet implements the fillet window.
effect

Without good clipping, just look at the green window.
step
1. Create a project, open the ui file, and "platoon Department array" in the ui file (place the QFrame on the QWidget window, place the controls you need on the QFrame, set the QWidget to transparent, set the QFrame to fillet, and set its background color to realize the fillet window);
2. Write style settings in qss file;
3. Set the transparent and borderless background of the form in the class constructor corresponding to the ui file;
4. Load the qss file in the project, usually in the main function.
For the project itself:
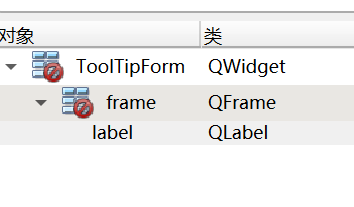
1. After creating a new file, open the ui file, drag the QFrame control into it, set the QFrame and QWidget to the same size, and then drag the required control into the QFrame. In this example, only one QLabel control is placed because of the prompt.
The object classes of the ui file are as follows:
style sheet
my.qss
/*Prompt tool*/
/*Background of the prompt window*/
QWidget#ToolTipForm
{
	background-color:transparent;
}

/*frame of prompt window*/
QWidget#ToolTipForm>QFrame#frame
{
	background-color:#aaff7f;
	border:none;
	border-radius:20px;
}

/*label*/
QFrame#frame>QLabel#label
{
	background-color:transparent;
	color:#ffffff;
	font:14px,"Song typeface";
}
Three controls, QWidget, qframe and qlabel, are set in the style sheet. Here is one thing to pay attention to: pay attention to the parent-child relationship between controls. The symbol ">" represents the immediate child part, indicating that there is a parent-child relationship between the two controls. "#" means that the following field is the name of the previous control type. Of course, you can omit the control type and write #objectname directly. In this way, more symbols will not be recorded here.
After the qss file is written, add it to the resource folder of the project. You also need to add a prefix when creating the resource file, and then add the qss file and save it. The last step is to load the contents of the qss file into the code. It needs to be written in the main function, so that no matter how large the project is, the style of the whole project can be loaded through a qss file. The loading of qss files is not mentioned here. It is written in the previous introduction to qss, and readers can consult it by themselves.
This has not yet reached the full fillet window. The window has black square corners under the fillet. The most critical step: you need to add the settings of window untitled bar and background transparency to the constructor of the window class of the prompt tool.
setAttribute(Qt::WA_TranslucentBackground);//Set background transparency
setWindowFlags(Qt::WindowTransparentForInput | Qt::ToolTip | Qt::FramelessWindowHint);//The window is for output only and does not receive any input events
Above, you only need setAttribute(Qt::WA_TranslucentBackground); And QT:: frameleswindowhint. The author's other two parameters are set for the project. The desired rounded window can be realized without adding.
The complete code is as follows:
tooltipform.h
#ifndef TOOLTIPFORM_H
#define TOOLTIPFORM_H

#include <QWidget>

/**********Class function description: prompt box***********/
namespace Ui {
class ToolTipForm;
}

class ToolTipForm : public QWidget
{
    Q_OBJECT

public:
    explicit ToolTipForm(QWidget *parent = nullptr);
    ~ToolTipForm();

    void setToolTipInfo(QString &strTip);//Set window prompt

private:
    Ui::ToolTipForm *ui;
};

#endif // TOOLTIPFORM_H
tooltipform.cpp
#include "tooltipform.h"
#include "ui_tooltipform.h"

ToolTipForm::ToolTipForm(QWidget *parent) :
    QWidget(parent),
    ui(new Ui::ToolTipForm)
{
    ui->setupUi(this);

    //To set the window to fillet, you must set the background transparent and borderless
    setAttribute(Qt::WA_TranslucentBackground);//Set background transparency
    setWindowFlags(Qt::WindowTransparentForInput | Qt::ToolTip | Qt::FramelessWindowHint);//The window is for output only and does not receive any input events
}

ToolTipForm::~ToolTipForm()
{
    delete ui;
}

void ToolTipForm::setToolTipInfo(QString &strTip)
{
    ui->label->setText(strTip);
}
The window property setting Qt::WindowTransparentForInput | Qt::ToolTip in the above code is only required by the project. When implementing the rounded window inherited from QWidget, you only need to set the window to be borderless and transparent background:
setAttribute(Qt::WA_TranslucentBackground);
setWindowFlags(Qt::FramelessWindowHint);
If there is no setAttribute(Qt::WA_TranslucentBackground); If you set the sentence window transparency, the following effects will appear:

A black right angle appears around the fillet of the fillet window. Setting the window background transparency solves this problem well.