preface
Learning notes of "advanced VTK graphics and image development Zhang Xiaodong Luo Huoling".
Learning materials
VTK8.2.0+QT5+VS2015 x86/x64 compiled third-party library to test DEMO:
https://download.csdn.net/download/qq_37373742/83350761?spm=1001.2014.3001.5503
VTK official website learning address: https://vtk.org/doc/nightly/html/
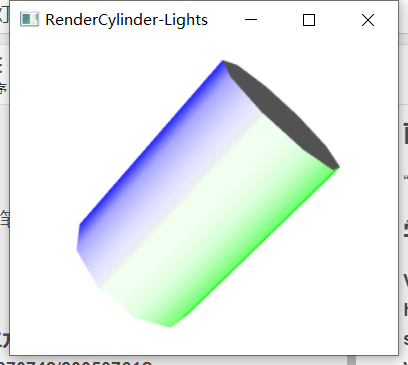
lighting
The program shows the effect of adding green and blue light
vtkLight light
There are all kinds of lights in the theater, as well as in the 3D rendering scene. Multiple lights can exist. Lights and cameras are essential elements for 3D rendering scenes, and vtkRenderer will automatically create default lights and cameras. VTK uses the class vtkLight to represent the lights in the rendered scene. Similar to lights in reality, vtkLight instances in VTK can also be turned on and off, and set the color of the light, the irradiation position (focus), the position and intensity of the light.
vtkLight can be divided into position light (also known as Spotlight) and direction light. Position light is the position of the light source in the rendered scene. You can specify the attenuation value and cone angle of the light; Directional light means that the light source is located at infinity. It can be considered that the light is parallel, such as sunlight in nature. The line between the position of the light source and the focus defines the direction of the light. The default vtkLight is directional light.
The common methods of vtkLight are as follows.
SetColor(): Set the color of the light to RGB Specifies the color as.
SetPosition(): Set the lighting position.
SetFocalPoint(): Set the light focus.
Setlntensity(): Sets the intensity of the light.
SetSwitch()/SwitchOn()/SwitchOff(): Turn on or off the corresponding light.
vtkLight Also provide SetPositional() / Get Positional() / PositionalOn() / PositionalOff()This kind of method is used to control the switch of position light.
Program description
The lighting example in this chapter defines two vtkLight objects. One is a green light, which is located at (0,0,1) and the focus is facing the focus of the camera; The other is blue light, located at (0,0, -1), and the focus is also on the focus of the camera. Finally, the method of calling vtkRenderer (AddLight()) adds two light objects to the rendering scene. Because there can be multiple lights in the Renderer, the interface provided by VTK is AddLight() instead of SetLight.
Program source code
#include <QApplication>
#include <vtkAutoInit.h>
VTK_MODULE_INIT(vtkRenderingOpenGL2)
VTK_MODULE_INIT(vtkInteractionStyle)

#include <vtkSmartPointer.h>
#include <vtkRenderWindow.h>
#include <vtkRenderer.h>
#include <vtkRenderWindowInteractor.h>
#include <vtkInteractorStyleTrackballCamera.h>
#include <vtkCylinderSource.h>
#include <vtkPolyDataMapper.h>
#include <vtkActor.h>
#include <vtkLight.h>
#include <vtkCamera.h>
#include <vtkProperty.h>

int main()
{
    vtkSmartPointer<vtkCylinderSource> cylinder = vtkSmartPointer<vtkCylinderSource>::New();
    cylinder->SetHeight( 3.0 );
    cylinder->SetRadius( 1.0 );
    cylinder->SetResolution( 10 );

    vtkSmartPointer<vtkPolyDataMapper> cylinderMapper = vtkSmartPointer<vtkPolyDataMapper>::New();
    cylinderMapper->SetInputConnection( cylinder->GetOutputPort() );

    vtkSmartPointer<vtkActor> cylinderActor = vtkSmartPointer<vtkActor>::New();
    cylinderActor->SetMapper( cylinderMapper );

    vtkSmartPointer<vtkRenderer> renderer = vtkSmartPointer<vtkRenderer>::New();
    renderer->AddActor( cylinderActor );
    renderer->SetBackground( 1.0, 1.0, 1.0 );

    vtkSmartPointer<vtkRenderWindow> renWin = vtkSmartPointer<vtkRenderWindow>::New();
    renWin->AddRenderer( renderer );
    renWin->SetSize( 640, 480 );
    renWin->Render();
    renWin->SetWindowName("RenderCylinder-Lights");

    vtkSmartPointer<vtkRenderWindowInteractor> iren = vtkSmartPointer<vtkRenderWindowInteractor>::New();
    iren->SetRenderWindow(renWin);

    vtkSmartPointer<vtkInteractorStyleTrackballCamera> style = vtkSmartPointer<vtkInteractorStyleTrackballCamera>::New();
    iren->SetInteractorStyle(style);

    vtkSmartPointer<vtkLight> myLight = vtkSmartPointer<vtkLight>::New();
    myLight->SetColor(0,1,0);       //Set light color
    myLight->SetPosition(0,0,1);    //Set lighting position
    myLight->SetFocalPoint(renderer->GetActiveCamera()->GetFocalPoint());  //Set light focus
    renderer->AddLight(myLight);

    vtkSmartPointer<vtkLight> myLight2 =vtkSmartPointer<vtkLight>::New();
    myLight2->SetColor(0,0,1);      //Set light color
    myLight2->SetPosition(0,0,-1);  //Set lighting position
    myLight2->SetFocalPoint(renderer->GetActiveCamera()->GetFocalPoint()); //Set light focus
    renderer->AddLight(myLight2);

    iren->Initialize();
    iren->Start();
    return EXIT_SUCCESS;
}
camera
The audience's eyes are like cameras in 3D rendered scenes, which are represented by vtkCamera class in VTK. vtkCamera is responsible for projecting the 3D scene onto the 2D plane, such as the screen. The schematic diagram of camera projection is shown in Figure 2-4. As can be seen from the figure below, there are mainly the following elements related to camera projection.
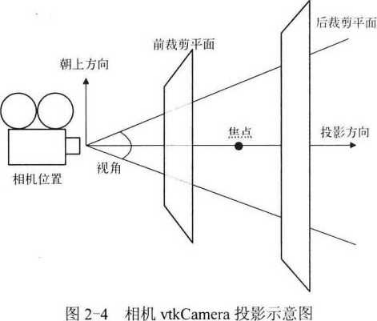
1) Camera position
The position of the camera is set with the vtkCamera::SetPosition() method.
2) Camera focus
Use the vtkCamera::SetFocusPoint() method to set the default focus position at the origin o of the world coordinate system
3) Upward direction
Up direction is the direction in which the camera is up. Just like looking at things upright, the direction is head up, and what you see is also upright. If you look at something upside down, the direction is head down, and what you see is upside down. Camera position, camera focus and upward direction determine the actual direction of the camera, that is, to determine the view of the camera.
4) Projection direction
The vector direction from the camera position to the camera focus is the projection direction.
5) Projection method
This feature is used to determine how the Actor is mapped to the image plane. vtkCamera defines two projection methods: one is orthogonal projection, also known as parallel projection, that is, the light entering the camera is parallel to the projection direction; the other is perspective projection, that is, all rays intersect at one point. This projection method is most in line with the visual habit of human eyes for the scene.
6) Perspective
In perspective projection, you need to specify the camera's view angle. The default view angle is 30 °, which can be set by vtkCamera::SetViewAngle().
7) Front and rear clipping planes
The clipping plane intersects with the projection direction and is generally perpendicular to the projection direction. The clipping plane is mainly used to evaluate the distance between the Actor and the camera. Only the Actor between the front and rear clipping planes is visible. The position of the clipping plane can be set with the vtkCamera::SetClippingRange() method.
The code demonstrates how to generate and set up a camera:
    vtkSmartPointer<vtkCamera> myCamera = vtkSmartPointer<vtkCamera>::New();
    myCamera->SetClippingRange(0.0475, 2.3786);         //Position of clipping plane clipping plane is mainly used to evaluate the distance between the Actor and the camera. Only the Actor between the front and rear clipping planes is visible
    myCamera->SetFocalPoint(0.0573, -0.2134, -0.0523);  //Camera focus
    myCamera->SetPosition(0.3245, -0.1139, 1);          //Camera position
    myCamera->SetViewUp(-0.2234, 0.9983, 0.0345);       //Camera up
    renderer->SetActiveCamera(myCamera);				//Set the camera to the rendered scene
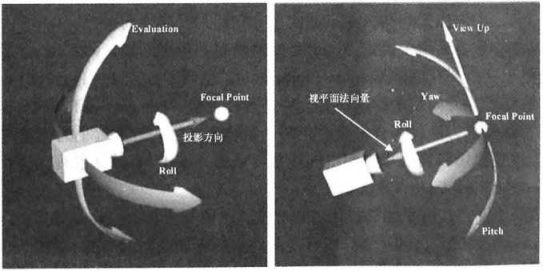
Method of controlling camera motion
As Dolly Roll. , Azimuth()^ Yaw(),Elevation. , Pitch. And Zoom. Please refer to the following figure and the schematic diagram of camera motion direction for how these methods move and relative position or direction.
colour
Color is one of the important properties of Actor. VTK uses RGB and HSV color systems to describe colors.
RGB color system
RGB color system is represented by the combination of three color components: red (R), green (g) and blue (B). In VTK, the value range of these three components is 0 ~ 1, (0, 0, 0) represents black and (1, 1, 1) represents white. vtkProperty::SetColor (r, g, b) uses the RGB color system to set the color property value.
HSV color system
HSV color system also determines the color by three components: Hue, which represents the basic attribute of color, which is commonly referred to as color name, such as red, yellow, etc; Saturation refers to the purity of color. The higher its value, the purer it will be; Value (value, that is, Intensity or brightness). A value of 0 usually indicates black, and a value of 1 indicates the brightest color. The value range of these three components is 0 ~ 1.
Class vtkLookupTable provides methods for setting HSV color system.
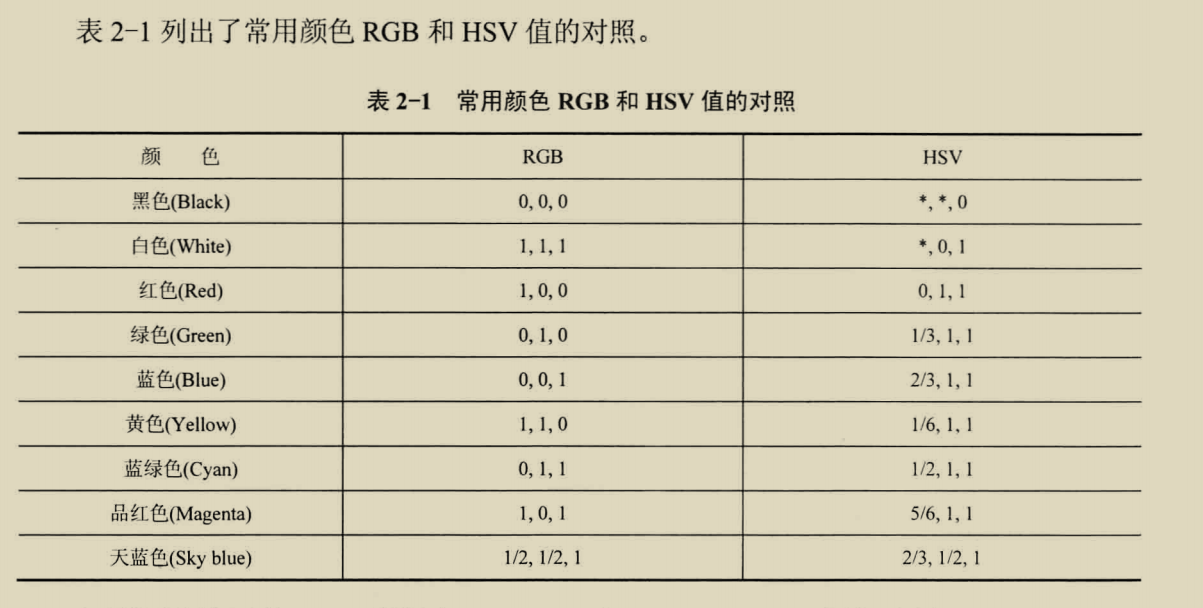
Table 2-1 lists the comparison of RGB and HSV values of common colors.
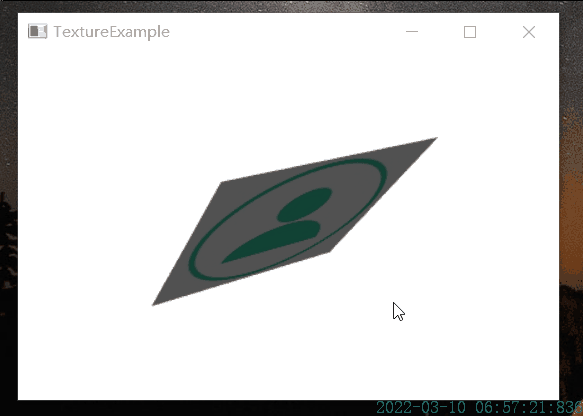
texture mapping
Program display
plane
spherical
cylinder
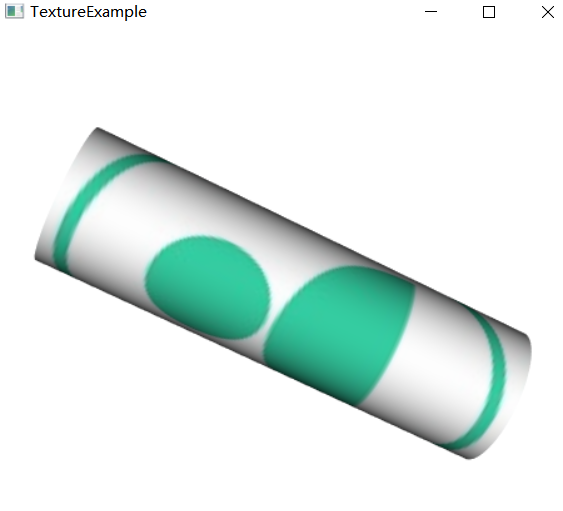
Texture mapping is a powerful graphic tool to create realistic effects. Its principle is to "paste" the two-dimensional image onto the surface of the object during rendering, and render colorful effects according to the two-dimensional image, so it is also called texture mapping.
Texture mapping requires three elements: the surface to be mapped, texture mapping, and texture coordinates.
vtkTextureMapToCylinder
VTK defines several classes to realize the mapping from texture space to model space. For example, vtkTextureMapToPlane establishes the mapping relationship from texture space to model space through a plane; vtkTextureMapToCylinder establishes the mapping relationship through cylindrical cotton; vtkTextureMapToSphere establishes mapping relationship through sphere. Their essence is to set texture coordinates for the point data of input data, which is a kind of attribute data.
Program source code
#include <QApplication>
#include <vtkAutoInit.h>
VTK_MODULE_INIT(vtkRenderingOpenGL2)
VTK_MODULE_INIT(vtkInteractionStyle)

#include <vtkSmartPointer.h>
#include <vtkJPEGReader.h>
#include <vtkTexture.h>
#include <vtkPlaneSource.h>
#include <vtkPolyDataMapper.h>
#include <vtkActor.h>
#include <vtkRenderWindow.h>
#include <vtkRenderer.h>
#include <vtkRenderWindowInteractor.h>
#include <vtkSphereSource.h>
#include <vtkTextureMapToSphere.h>
#include <vtkCylinderSource.h>
#include <vtkTextureMapToCylinder.h>

int main(int argc, char* argv[])
{
    char* imgPath = (char *)"C:/Users/jbyyy/Desktop/userIn.jpg";
    vtkSmartPointer< vtkJPEGReader > reader = vtkSmartPointer< vtkJPEGReader >::New();
    reader->SetFileName(imgPath);

    vtkSmartPointer< vtkTexture > texture = vtkSmartPointer< vtkTexture >::New();
    texture->SetInputConnection( reader->GetOutputPort() );
    texture->InterpolateOn();

    //    //Plane
    //    vtkSmartPointer< vtkPlaneSource > plane = vtkSmartPointer< vtkPlaneSource >::New();
    //    vtkSmartPointer< vtkPolyDataMapper > mapper = vtkSmartPointer< vtkPolyDataMapper >::New();
    //    mapper->SetInputConnection( plane->GetOutputPort() );

    //    //Sphere
    //    vtkSmartPointer<vtkSphereSource> sphereSource = vtkSmartPointer<vtkSphereSource>::New();
    //    sphereSource->SetCenter(0,0,0);
    //    sphereSource->SetRadius(1);
    //    sphereSource->SetThetaResolution(40);
    //    sphereSource->SetPhiResolution(40);
    //    sphereSource->Update();
    //    vtkSmartPointer<vtkTextureMapToSphere> textureMapToSphere = vtkSmartPointer<vtkTextureMapToSphere>::New();
    //    textureMapToSphere->SetInputConnection(sphereSource->GetOutputPort());
    //    //Create mapper and set the mapped texture as input
    //    vtkSmartPointer<vtkPolyDataMapper> mapper = vtkSmartPointer<vtkPolyDataMapper>::New();
    //    mapper->SetInputConnection(textureMapToSphere->GetOutputPort());

    //cylinder
    vtkSmartPointer<vtkCylinderSource> cylinder = vtkSmartPointer<vtkCylinderSource>::New();
    cylinder->SetHeight(20.0);
    cylinder->SetCenter(0, 0, 0);
    cylinder->SetRadius(3.0);
    cylinder->SetResolution(100);

    vtkSmartPointer<vtkTextureMapToCylinder> texturemap = vtkSmartPointer<vtkTextureMapToCylinder>::New();
    texturemap->SetInputConnection(cylinder->GetOutputPort());
    texturemap->SetPreventSeam(0);

    vtkSmartPointer<vtkPolyDataMapper> mapper = vtkSmartPointer<vtkPolyDataMapper>::New();
    mapper->SetInputConnection(texturemap->GetOutputPort());


    vtkSmartPointer< vtkActor > actor = vtkSmartPointer< vtkActor >::New();
    actor->SetMapper( mapper );
    actor->SetTexture( texture );

    vtkSmartPointer<vtkRenderer> renderer = vtkSmartPointer<vtkRenderer>::New();
    renderer->AddActor( actor );
    renderer->SetBackground( 1.0, 1.0, 1.0);

    vtkSmartPointer<vtkRenderWindow> renWin = vtkSmartPointer<vtkRenderWindow>::New();
    renWin->AddRenderer( renderer );
    renWin->SetSize( 640, 480 );
    renWin->Render();
    renWin->SetWindowName("TextureExample");

    vtkSmartPointer<vtkRenderWindowInteractor> iren = vtkSmartPointer<vtkRenderWindowInteractor>::New();
    iren->SetRenderWindow(renWin);
    iren->Initialize();
    iren->Start();

    return EXIT_SUCCESS;
}
