Web Sockets
The WebSockets module provides an implementation of the WebSockets protocol for WebSockets clients and servers. It mirrors the Qt CPP module. It allows sending a string and binary messages using a full duplex communication channel. A WebSocket is normally established by making an HTTP connection to the server and the server then "upgrades" the connection to a WebSocket connection.
WebSockets module provides the implementation of WebSockets protocol for WebSockets client and server. It reflects the Qt CPP module. It allows string and binary messages to be sent using full duplex communication channels. WebSocket is usually established by establishing an HTTP connection with the server, and then the server "upgrades" the connection to the WebSocket connection.
In Qt/QML you can also simply use the WebSocket and WebSocketServer objects to creates direct WebSocket connection. The WebSocket protocol uses the "ws" URL schema or "wss" for a secure connection.
In Qt/QML, you can also simply use WebSocket and WebSocketServer objects to create direct WebSocket connections. WebSocket protocol uses "ws" URL mode or "wss" for secure connection.
You can use the web socket qml module by importing it first.
You can use it by importing the web socket qml module first.
import QtWebSockets

WebSocket {
    id: socket
}
WS Server
WS server
You can easily create your own WS server using the C++ part of the Qt WebSocket or use a different WS implementation, which I find very interesting. It is interesting because it allows connecting the amazing rendering quality of QML with the great expanding web application servers. In this example, we will use a Node JS based web socket server using the ws module. For this, you first need to install node js. Then, create a ws_server folder and install the ws package using the node package manager (npm).
You can easily create your own WS server using QT's C + + module Qt WebSocket, or use different WS implementations, which is very interesting. This is interesting because it can connect the amazing rendering quality of QML with the expanding web application server. In this example, we will use the WS module to use the web socket server based on Node JS. To do this, you first need to install Node JS. Then, create a ws_server folder and install WS package using node package manager (npm).
The code shall create a simple echo server in NodeJS to echo our messages back to our QML client.
The code will create a simple echo server in NodeJS to echo our messages to our QML client.
cd ws_server
npm install ws
The npm tool downloads and installs the ws package and dependencies into your local folder.
The npm tool downloads and installs ws packages and dependencies into your local folder.
A server.js file will be our server implementation. The server code will create a web socket server on port 3000 and listens to an incoming connection. On an incoming connection, it will send out a greeting and waits for client messages. Each message a client sends on a socket will be sent back to the client.
server.js file will be our server implementation. The server code will create a web socket server on port 3000 and listen for incoming connections. On the incoming connection, it sends greetings and waits for client messages. Every message sent by the client on the socket will be sent back to the client.
const WebSocketServer = require('ws').Server

const server = new WebSocketServer({ port : 3000 })

server.on('connection', function(socket) {
	console.log('client connected')
	socket.on('message', function(msg) {
		console.log('Message: %s', msg)
		socket.send(msg.toString())
	});
	socket.send('Welcome to Awesome Chat')
});

console.log('listening on port ' + server.options.port)
You need to get used to the notation of JavaScript and the function callbacks.
You need to get used to JavaScript symbols and function callbacks.
WS Client
WS client
On the client side, we need a list view to display the messages and a TextInput for the user to enter a new chat message.
On the client side, we need a list view to display messages and a text input for users to enter new chat messages.
We will use a label with white color in the example.
In this case, we will use a white label.
// Label.qml
import QtQuick

Text {
    color: '#fff'
    horizontalAlignment: Text.AlignLeft
    verticalAlignment: Text.AlignVCenter
}
Our chat view is a list view, where the text is appended to a list model. Each entry is displayed using a row of prefix and message label. We use a cell width cw factor to split the with into 24 columns.
Our chat view is a list view, and the text is attached to the list model. Each entry is displayed with a line prefix and a message label. We use the cell width cw factor to split the width into 24 columns.
// ChatView.qml
import QtQuick

ListView {
    id: root
    width: 100
    height: 62

    model: ListModel {}

    function append(prefix, message) {
        model.append({prefix: prefix, message: message})
    }

    delegate: Row {
        id: delegate

        required property var model
        property real cw: width / 24

        width: root.width
        height: 18

        Label {
            width: delegate.cw * 1
            height: parent.height
            text: delegate.model.prefix
        }

        Label {
            width: delegate.cw * 23
            height: parent.height
            text: delegate.model.message
        }
    }
}
The chat input is just a simple text input wrapped with a colored border.
Chat input is just a simple text input wrapped in colored borders.
// ChatInput.qml
import QtQuick

FocusScope {
    id: root

    property alias text: input.text
    signal accepted(string text)

    width: 240
    height: 32

    Rectangle {
        anchors.fill: parent
        color: '#000'
        border.color: '#fff'
        border.width: 2
    }

    TextInput {
        id: input
        anchors.left: parent.left
        anchors.right: parent.right
        anchors.verticalCenter: parent.verticalCenter
        anchors.leftMargin: 4
        anchors.rightMargin: 4
        color: '#fff'
        focus: true
        onAccepted: function () {
            root.accepted(text)
        }
    }
}
When the web socket receives a message it appends the message to the chat view. Same applies for a status change. Also when the user enters a chat message a copy is appended to the chat view on the client side and the message is sent to the server.
When the web socket receives a message, it attaches the message to the chat view. The same applies to status changes. In addition, when the user enters the chat information, a copy will be added in the chat view of the client and the information will be sent to the server.
// ws_client.qml
import QtQuick
import QtWebSockets

Rectangle {
    width: 360
    height: 360
    color: '#000'

    ChatView {
        id: box
        anchors.left: parent.left
        anchors.right: parent.right
        anchors.top: parent.top
        anchors.bottom: input.top
    }

    ChatInput {
        id: input
        anchors.left: parent.left
        anchors.right: parent.right
        anchors.bottom: parent.bottom
        focus: true

        onAccepted: function(text) {
            print('send message: ' + text)
            socket.sendTextMessage(text)
            box.append('>', text)
            text = ''
        }
    }

    WebSocket {
        id: socket

        url: "ws://localhost:3000"
        active: true

        onTextMessageReceived: function (message) {
            box.append('<', message)
        }

        onStatusChanged: {
            if (socket.status == WebSocket.Error) {
                box.append('#', 'socket error ' + socket.errorString)
            } else if (socket.status == WebSocket.Open) {
                box.append('#', 'socket open')
            } else if (socket.status == WebSocket.Closed) {
                box.append('#', 'socket closed')
            }
        }
    }
}
You need first run the server and then the client. There is no retry connection mechanism in our simple client.
You need to run the server first and then the client. There is no retry connection mechanism in our simple client.
Running the server
Run server
cd ws_server
node server.js
Running the client
Run client
cd ws_client
qml ws_client.qml
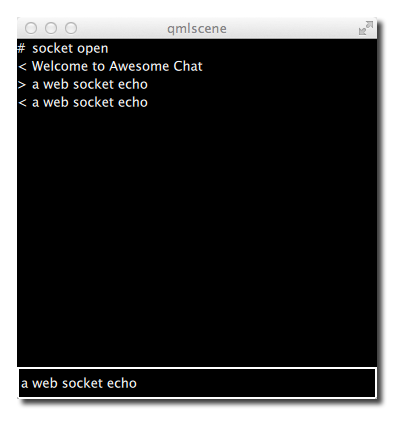
When entering text and pressing enter you should see something like this.
When you enter text and press enter, you should see something similar.
Sample source code download