Percona XtraDB Cluster (PXC) cluster is based on Galera 2.x library, a common multi-master synchronization replication plug-in for transactional applications. It is mainly used to solve the problem of strong consistency, keep the data synchronized between nodes in real time and achieve multi-node read and write simultaneously.It improves the reliability of the database as well as enables read-write separation, which is one of the generally accepted cluster preference schemes in MySQL relational databases.This paper briefly introduces its principle and gives installation guidance.
1. Structure and characteristics of PXC
1. Structure and Basic Description
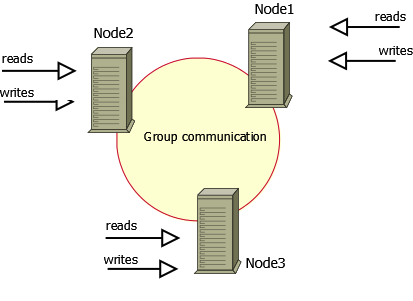
A cluster consists of nodes.The recommended configuration is at least three nodes, but you can make it
2 nodes running.
Each node can be a regular MySQL or Percona Server program.Support for upgrading existing MySQL/Percona Server as a node to a cluster node.You can also detach a node from the cluster to make it a regular server.
Each node contains a complete copy of the data.
2. Advantages and limitations
Advantages of PXC:
_High availability of services
_Data synchronous replication (concurrent replication) with little delay;
More than one node can read and write at the same time to achieve write expansion, but it is best to subdivide the tables into libraries beforehand so that each node can write different tables or libraries separately to avoid having galera resolve data conflicts.
_New nodes can be deployed automatically and the deployment operation is simple;
_Strict consistency of data, especially suitable for e-commerce applications;
_Fully compatible with MySQL;
PXC limitations:
_Support InnoDB engine only;
_All tables need a primary key;
_Explicit lock operations such as LOCK TABLE are not supported;
There are more lock conflicts and deadlock problems.
XA is not supported;
_Cluster throughput/performance depends on the short board;
_New joined nodes use SST for high price;
_Write expansion problems exist;
_If the concurrent transactions are large, it is recommended to use InfiniBand network to reduce network latency;
2. Installation and Configuration
1. Installation environment
Configure the following on each cluster node

### OS Version
# cat /etc/issue
CentOS release 6.7 (Final)
Kernel \r on an \m

###Add the following to all nodes
# vi /etc/hosts

192.168.1.132 node132 #Primary Node
192.168.1.133 node133
192.168.1.135 node135

mysql> select 'Leshami' Author,'http://blog.csdn.net/leshami' Blog,'645746311' QQ;
+---------+------------------------------+-----------+
| Author  | Blog                         | QQ        |
+---------+------------------------------+-----------+
| Leshami | http://blog.csdn.net/leshami | 645746311 |
+---------+------------------------------+-----------+

###Close Firewall
# service iptables stop
# chkconfig iptables off
# vi /etc/selinux/config
    SELINUX=disabled   #Modify this item to disabled
# setenforce 0       #Take effect immediately without restarting OS
2. Configure yum source and install PXC (all nodes)
###Configure epel source

# rpm -Uvh http://dl.fedoraproject.org/pub/epel/6/x86_64/epel-release-6-8.noarch.rpm

###YUM-based installation
# yum -y install cmake gcc gcc-c++ libaio libaio-devel automake autoconf bzr  ncurses5-devel
  # yum -y install perl-DBD-MySQL  perl-DBI  perl-Time-HiRes

# yum install http://www.percona.com/downloads/percona-release/redhat/0.1-3/percona-release-0.1-3.noarch.rpm
# yum install Percona-XtraDB-Cluster-56

### If the server cannot connect directly to the yum source, install using RPM:
# rpm -Uvh autoconf-2.63-5.1.el6.noarch.rpm
# rpm -Uvh bzr-2.1.1-2.el6.x86_64.rpm
# rpm -Uvh compat-readline5-5.2-17.1.el6.x86_64.rpm
# rpm -Uvh libaio-devel-0.3.107-10.el6.x86_64.rpm
# rpm -Uvh perl-DBI-1.609-4.el6.x86_64.rpm
# rpm -Uvh perl-DBD-MySQL-4.013-3.el6.x86_64.rpm
# rpm -Uvh automake-1.11.1-4.el6.noarch.rpm
# rpm -Uvh cmake-2.8.12.2-4.el6.x86_64.rpm
# rpm -Uvh libstdc++-4.4.7-18.el6.x86_64.rpm
# rpm -Uvh libstdc++-devel-4.4.7-18.el6.x86_64.rpm
# rpm -Uvh libgomp-4.4.7-18.el6.x86_64.rpm
# rpm -Uvh gcc-c++-4.4.7-18.el6.x86_64.rpm
# rpm -Uvh cpp-4.4.7-18.el6.x86_64.rpm
# rpm -Uvh libgcc-4.4.7-18.el6.x86_64.rpm
# rpm -Uvh libev-4.15-1.el6.rf.x86_64.rpm
# rpm -Uvh socat-1.7.2.3-1.el6.x86_64.rpm
# rpm -Uvh mysql-libs-5.1.73-8.el6_8.x86_64.rpm
# rpm -Uvh percona-xtrabackup-2.3.8-1.el6.x86_64.rpm
# rpm -ivh Percona-XtraDB-Cluster-shared-56-5.6.35-26.20.2.el6.x86_64.rpm
# rpm -ivh Percona-XtraDB-Cluster-galera-3-3.20-2.el6.x86_64.rpm
# rpm -ivh Percona-XtraDB-Cluster-client-56-5.6.35-26.20.2.el6.x86_64.rpm
# rpm -ivh Percona-XtraDB-Cluster-devel-56-5.6.35-26.20.2.el6.x86_64.rpm
# rpm -ivh Percona-XtraDB-Cluster-server-56-5.6.35-26.20.2.el6.x86_64.rpm
3. Configure the primary node
###In this demonstration, the primary node is 192.168.1.132
//Initialize the primary node

# /usr/bin/mysql_install_db --basedir=/usr --user=mysql

//mysql start
# service mysql start

//Change Password
# /usr/bin/mysqladmin -u root -h localhost password 'pass'

//Create User
mysql> grant reload,lock tables,replication client on *.* to 'sstuser'@'%' identified by 'xxx';

//Close mysql
# service mysql stop

//Modify/etc/my.cnf to add the following information:

[mysql]
user=root
password=pass

[mysqld]
datadir=/var/lib/mysql
user=mysql
server_id=132
wsrep_provider=/usr/lib64/libgalera_smm.so
wsrep_cluster_address="gcomm://192.168.1.132,192.168.1.133,192.168.1.135"
wsrep_sst_auth=wsrep_sst_auth=sstuser:xxx
wsrep_cluster_name=my_pxc_cluster
wsrep_sst_method=rsync
wsrep_node_address=192.168.1.132
wsrep_slave_threads=2
innodb_locks_unsafe_for_binlog=1
innodb_autoinc_lock_mode=2
binlog_format=ROW

//Start mysql and PXC services
/etc/init.d/mysql bootstrap-pxc
4. Configure other nodes
Modify the configuration file on other nodes as follows, taking 192.168.1.133 as an example
[mysql]
user=root
password=pass

[mysqld]
datadir=/var/lib/mysql
user=mysql
server_id=133
wsrep_provider=/usr/lib64/libgalera_smm.so
wsrep_cluster_address="gcomm://192.168.1.132,192.168.1.133,192.168.1.135"
wsrep_sst_auth=wsrep_sst_auth=sstuser:xxx
wsrep_cluster_name=my_pxc_cluster
wsrep_sst_method=rsync
wsrep_node_address=192.168.1.133
wsrep_slave_threads=2
innodb_locks_unsafe_for_binlog=1
innodb_autoinc_lock_mode=2
binlog_format=ROW

Note: server_id and wsrep_node_address are set to different values on each cluster node

Start the current node mysql after the configuration file has been modified
 Note that the cluster is not the initial primary node, so there is no need to initialize the database

# service mysql start

mysql> show global status like 'wsrep%';
+------------------------------+--------------------------------------+
| Variable_name                | Value                                |
+------------------------------+--------------------------------------+
| wsrep_local_state_uuid       | 05e19a0d-379c-11e7-8547-f6f31f261bbc |
| wsrep_protocol_version       | 7                                    |
| wsrep_last_committed         | 6                                    |
| wsrep_replicated             | 2                                    |
                ................                                      |
| wsrep_cert_interval          | 0.000000                             |
| wsrep_incoming_addresses     | 192.168.1.132:3306,192.168.1.133:330 |
| wsrep_desync_count           | 0                                    |
| wsrep_evs_delayed            |                                      |
| wsrep_evs_evict_list         |                                      |
| wsrep_evs_repl_latency       | 0/0/0/0/0                            |
| wsrep_evs_state              | OPERATIONAL                          |
| wsrep_gcomm_uuid             | baf33684-37ad-11e7-90ea-1e5d080abc7d |
| wsrep_cluster_conf_id        | 9                                    |
| wsrep_cluster_size           | 2 |
| wsrep_cluster_state_uuid     | 05e19a0d-379c-11e7-8547-f6f31f261bbc |
| wsrep_cluster_status         | Primary                              |
| wsrep_connected              | ON                                  |
| wsrep_local_bf_aborts        | 0                                    |
| wsrep_local_index            | 0                                    |
| wsrep_provider_name          | Galera                               |
| wsrep_provider_vendor        | Codership Oy <info@codership.com>    |
| wsrep_provider_version       | 3.20(r7e383f7)                       |
| wsrep_ready                  | ON                                   |
+------------------------------+--------------------------------------+
59 rows in set (0.01 sec)

Note: wsrep_cluster_size indicates the number of available nodes, and currently 2.wsrep_connected is ON, indicating that it is connected.

The other node does the same.
5. Verification results
Tables are created and data is updated at any node and visible to other nodes.
mysql> show status like 'wsrep_cluster_status';
+----------------------+---------+
| Variable_name        | Value   |
+----------------------+---------+
| wsrep_cluster_status | Primary |
+----------------------+---------+
1 row in set (0.00 sec)

mysql> use test;

mysql> create table t(id int,val varchar(20));
Query OK, 0 rows affected (0.04 sec)

mysql> insert into t values(1,'robin');
Query OK, 1 row affected (0.01 sec)

--The following query results return data for 133 nodes
mysql> select * from t;
+------+-------+
| id   | val   |
+------+-------+
|    1 | robin |
+------+-------+

--Validation on the remaining 2 nodes should see the data.
--Conversely, insert data on one node and the rest of the nodes can see it.

