What is Nessus?
This is a vulnerability scanning system based on C/S architecture
What is vulnerability scanning?
Vulnerability scanning is a technical means to find the vulnerabilities of the target system, and further use the discovered vulnerabilities to do something they have always wanted to do but couldn't do before, such as penetration testing. It is like a flexible tank with its own ammunition depot. It can bombard the specified target (operating system, including the services on the system) based on the ammunition depot (it has its own name: Vulnerability Database) and the launcher (here refers to various missing scanning means), so as to judge the safety factor of the target.
What are the common missed scanning methods?
-
One is vulnerability database information matching
It is divided into two parts. The first part is to obtain information,
Professional point: remotely detect the port service of the target, record the answers given by the host, and collect the feedback information of the target.
Rough point: just say hello to the other party and write down the other party's reaction. For example, when I saw an old beauty in the mall, I hugged her shoulder and said, "sister, is it convenient to add wechat?", Beauty's backhand is a slap, PA ~, and then a "blind, I'm male.".The second part is information comparison
Professional point: match the obtained information with the vulnerability database. If the matching conditions are met, it is proved that the vulnerability exists
Rough point: then I turned my head to respond to the information obtained above, "male" = "male" -
The other is plug-in attack
Professional point: simulate the hacker attack method to attack the target. If the attack is successful, it indicates that there are security vulnerabilities
Rough point: it's just to see who doesn't like you. Go up and have a crackling meal first. If you lie down, it means that the other party is not practicing family.
How to better conduct vulnerability scanning?
First step-Detect the host: confirm whether the attack target is online. (it can be understood as whether the other party is at home)
Step 2-Scan port: obtain target information, such as open port number, service name provided externally, version used, operating system type, etc
(How many windows and doors are there in the other party's house
 Step 3-Vulnerability attack: according to the information obtained by scanning the port, use the vulnerability module to carry out targeted attacks, so as to judge whether there are vulnerabilities
(It can be understood that it is better to pry the lock against the door or to knock it open directly)
Nessus strengths and weaknesses?
Advantages: it is popular in the world, has a complete missed scanning service, and can update the vulnerability database at any time
Disadvantages: spend money, spend money, spend money (can be activated)
What does Nessus consist of?
client
		User configuration tool    You can configure the scanning target and the vulnerabilities used during scanning
		Result storage/Generate report tool     Generate and store reports based on scan results
 Server side
		The vulnerability library contains various vulnerability information of various operating systems and methods of detecting vulnerabilities
		Scan engine    Conduct vulnerability scanning according to different scanning methods
		The current active scanning knowledge base monitors the current active scanning, provides vulnerability information to the scanning engine, and accepts the scanning results returned by the engine.
Workflow
		Login client tool( web)
		Configure scan targets, create scan policies, and perform scan tasks
		According to the configuration information, call the plug-in for vulnerability scanning
		Wait for the scan to finish and get the scan results
		View and analyze scan results
		Generate vulnerability scan report
What is the idea of Nessus deployment?
-
Download first
 Get installation package address: https://www.tenable.com/downloads/nessus
 Download the corresponding installation package according to your own operating system and architecture
-
In the whole activation code
 Function: used to activate Nessus service
 Activation code acquisition address: https://zh-cn.tenable.com/products/nessus/nessus-essentials?tns_redirect=true
-
Then start the installation
decompression windows System: double click Nessus Installation package, next step all the way linux System: dpkg -i Nessus-****.ded Select version Nessus Essentials Free version Nessus Professional professional edition Nessus Manager Management desk Managed Scanner Scanner Enter activation code + Create management account Download plug-ins + initialization Note: this process needs to ensure the stable communication between the network and. If it fails, enter the background and execute the following commands: /opt/nessus/sbin/nessuscli update --al Restart after downloading nessus service input Nessus Login user name and password, installation completed -
Note: start service
windows:
1. win + r enter services MSc, find Tenable Nessus service to start, stop and restart
2. cmd enter net stop "Tenable Nessus", net start "Tenable Nessus"linux:
1,systemctl start nessusd ,service nessusd start
2,systemctl stop nesssusd , service nessusd stop
What simple configurations can be made when logging in Nessus for the first time?
-
Change listening IP and port
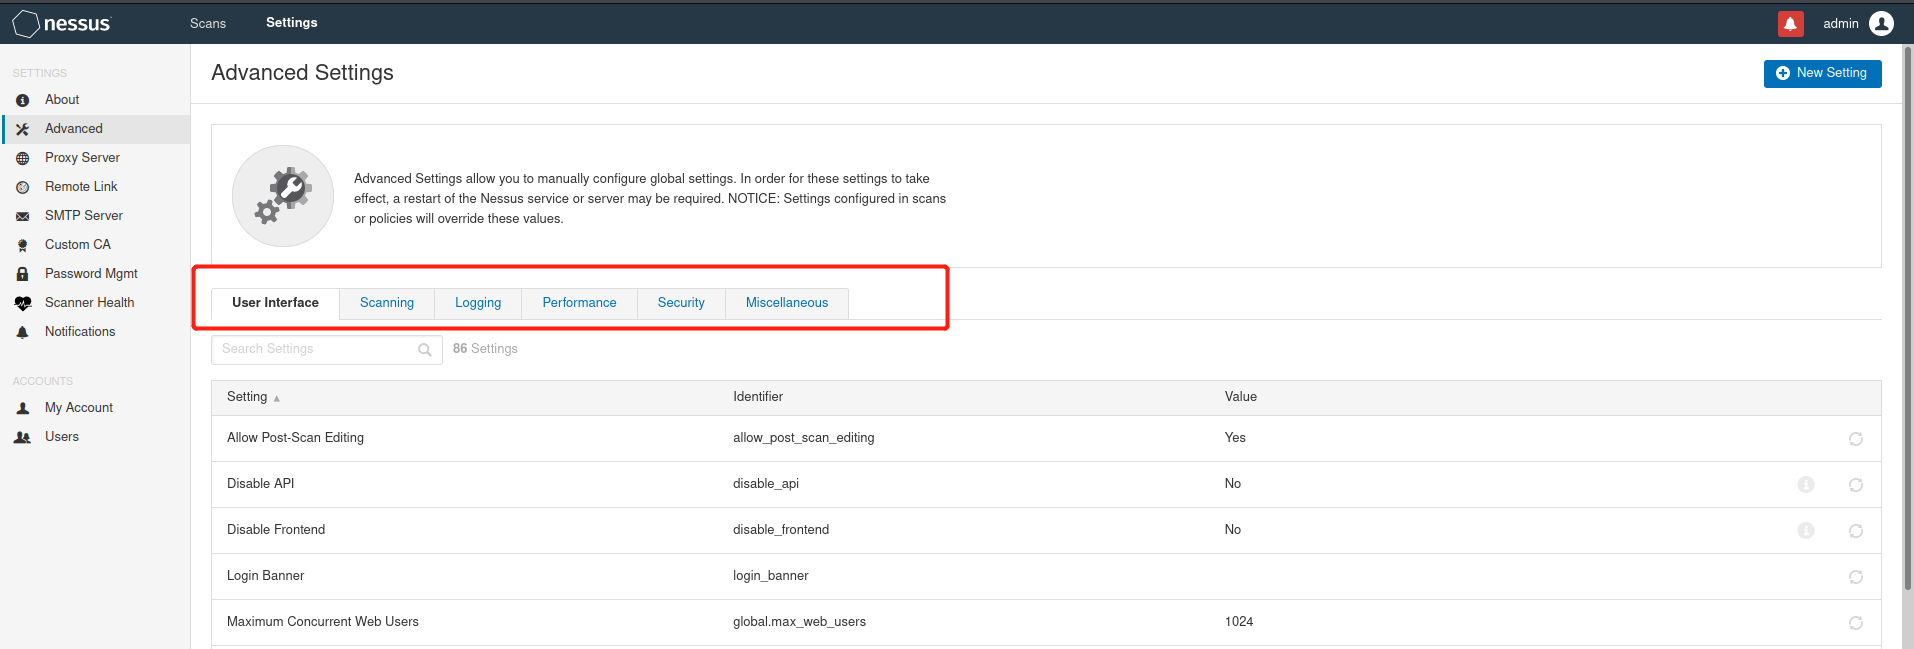
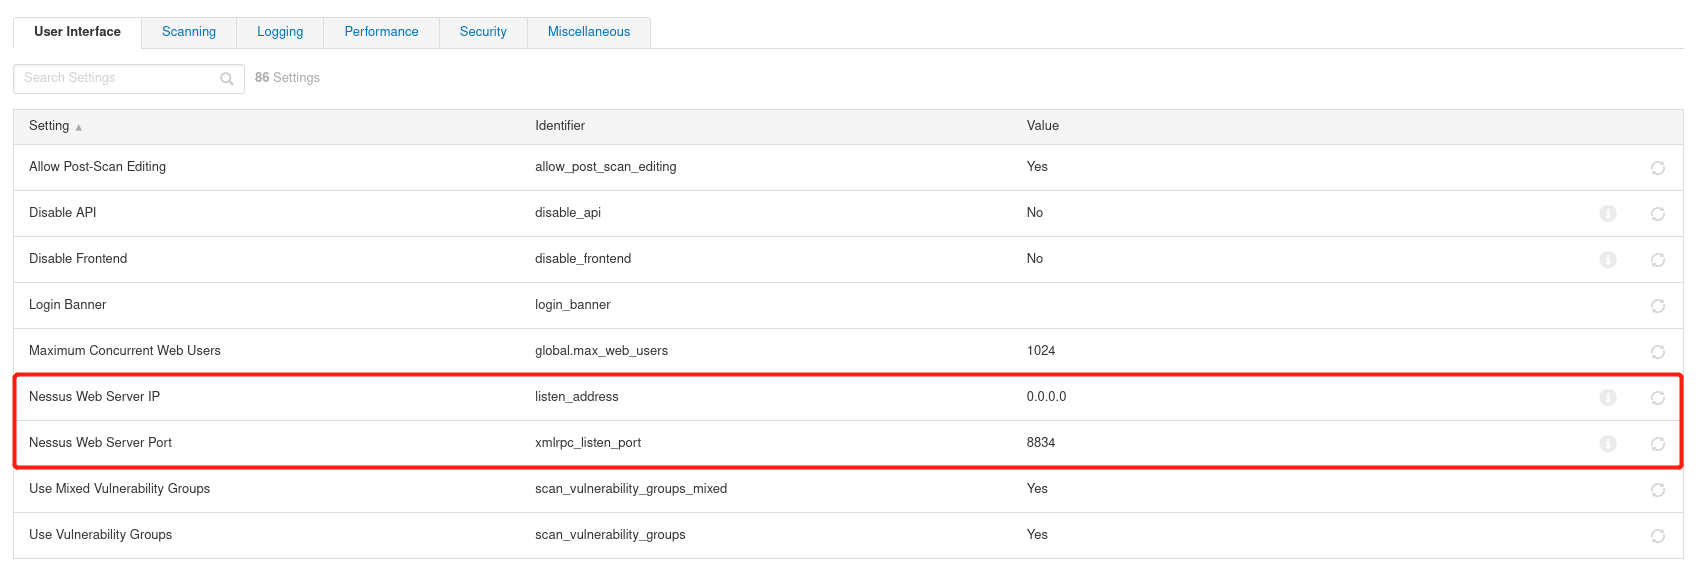
Default: 0.0.0.0   8834
 get into Settings---Advanced
 			User  Interface  User interface
 			Scanning  scanning
 			Logging  Sign in
 			Performance  performance
 			Security  security
 			Miscellaneous  Intermingle
Advanced settings allows you to manually configure global settings. A reboot may be required for these settings to take effect Nessus Service or server.
be careful:The settings configured in the scan or policy will override these values.
			modify IP address      Nessus  Web  Server  IP
			modify Port port    Nessus   Web  Server  Port
-
Software update
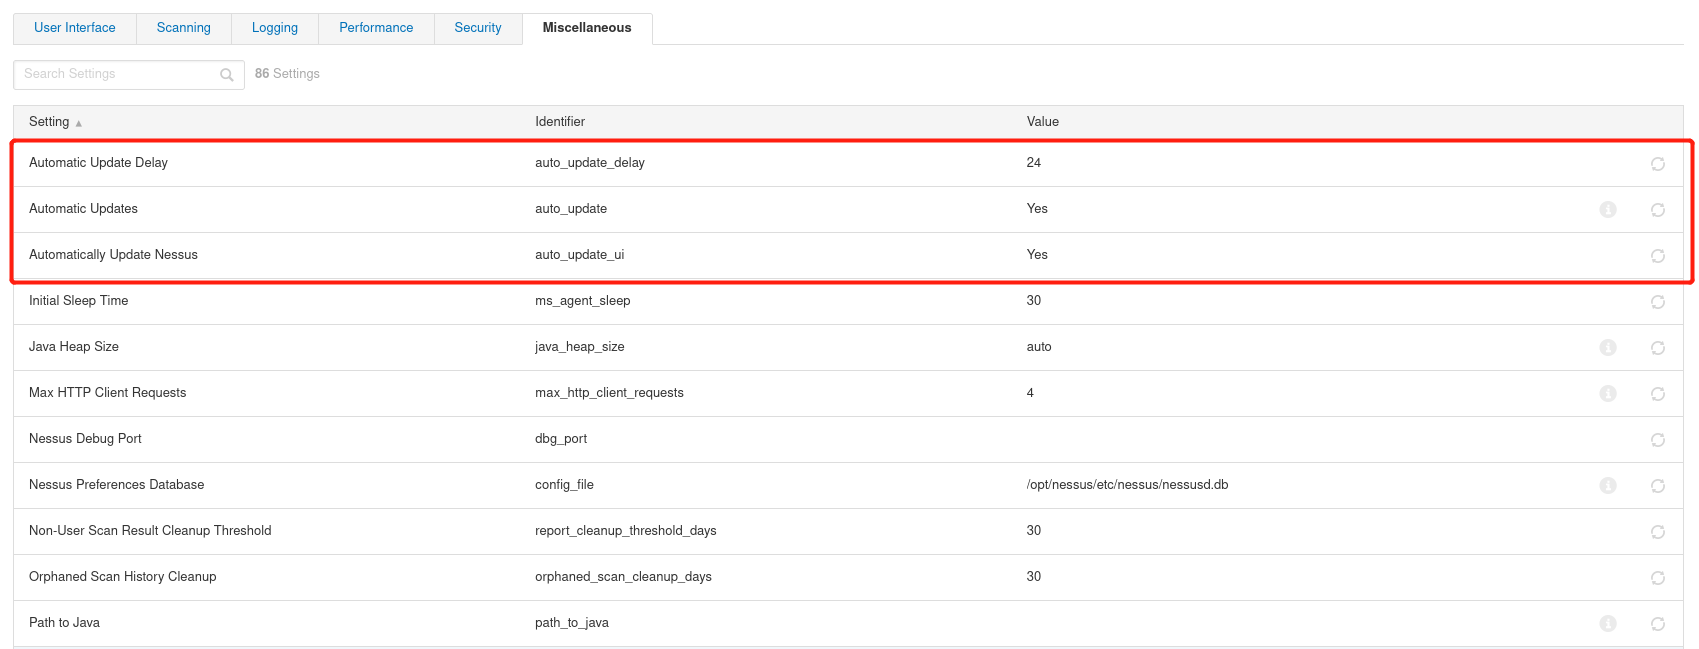
get into Settings---Advanced---Miscellaneous
 		Automatic Update Delay Automatic update interval
 		Automatic Updates  Automatic update plug-in
 		Automatically Update Nessus Automatic update Nessus
-
user management
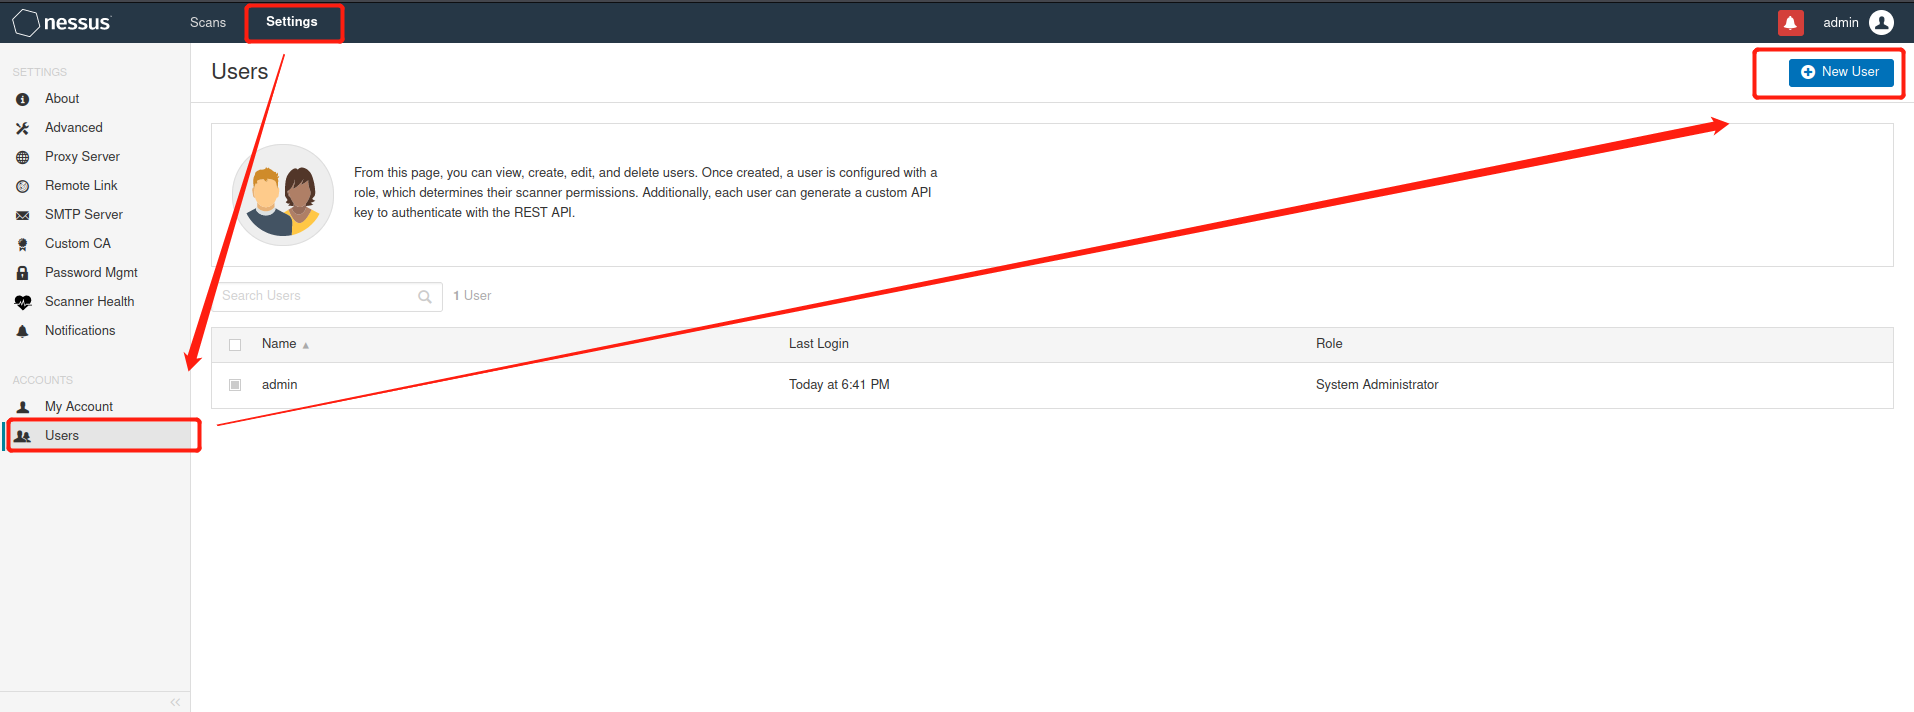
There are two roles
 	Administrator(Administrator): can access Nessus All functions of
 	Standard(Ordinary users): some functions are limited, such as software update, user management and advanced settings.

From this page, you can view, create, edit, and delete users. After the user is created, a role will be configured for the user, which determines their scanner permissions. In addition, each user
 Can generate a custom API Key to use REST API Authenticate.
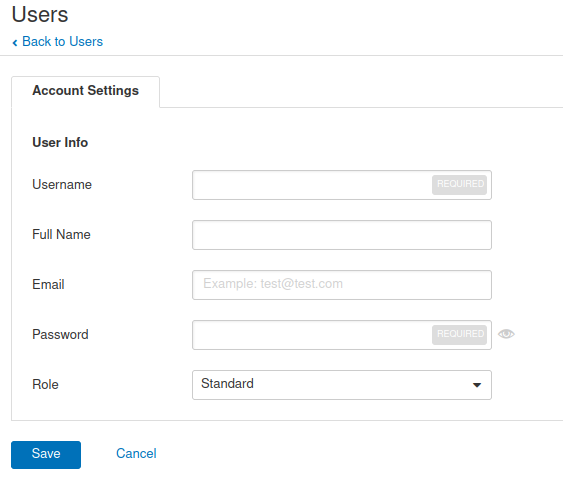
	   get into Settings---Users---New User
				Username  user name
				Full Name  full name
				Email mailing address
				Password password
				Role  role
- Proxy proxy
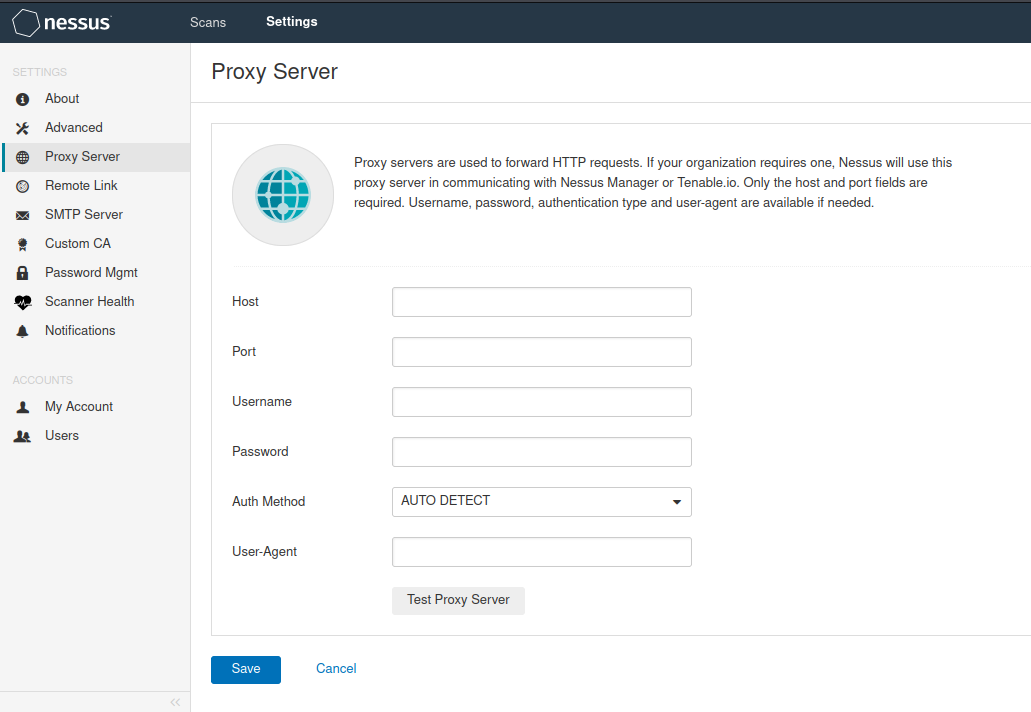
   get into Settings---Proxy Server
   Proxy server for forwarding HTTP Request. If your organization needs a proxy server, Nessus The proxy server will be used with Nessus Manager or Tenable.io signal communication. Only the host and port fields are required. Provide user name, password, authentication type and password as required user-agent.
	Host   The host name or of the proxy server IP address
	Port    The port number of the proxy server connection
	Username   The user name of the proxy connection
	Password    Password of the user connecting to the proxy server
	Auth Method  Authentication method
	User-Agent    If the proxy server uses the specified HTTP User agent filter, configure this option
-
SMTP service
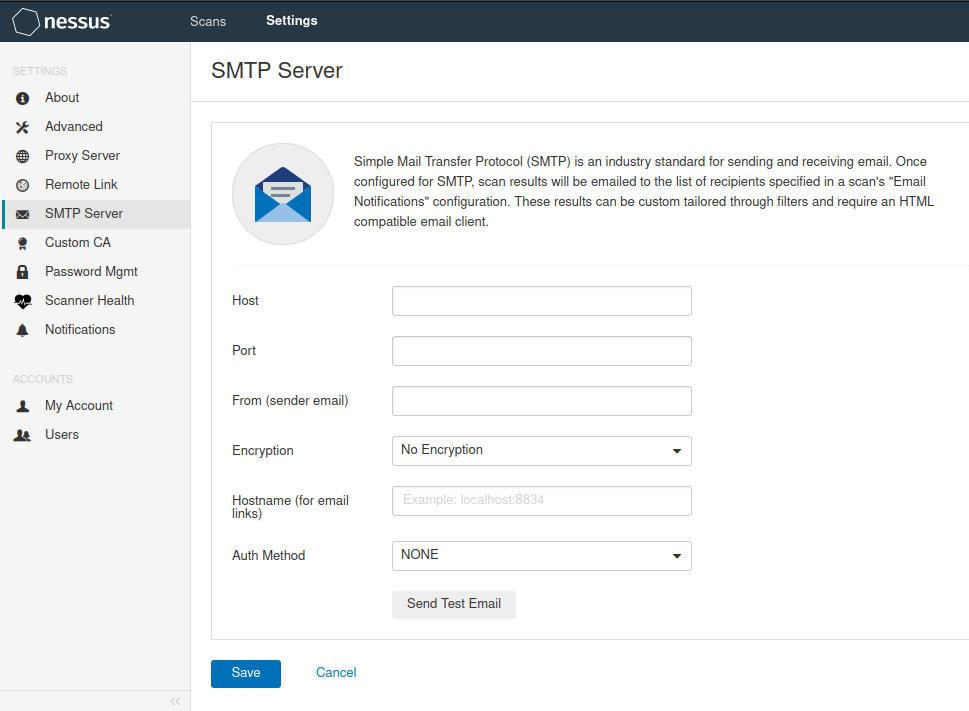
get into Settings---SMTP Server
SMTP (Simple Mail Transfer Protocol)Is an industry standard for sending and receiving e-mail. Once configured SMTP,The scan results will be sent by e-mail to the list of recipients specified in the e-mail notification configuration of the scan. These results can be customized through filters and require a HTML Compatible email client.
   Host   SMTP The host name or name of the service IP address
   Port   For connection SMTP Port number of the service
   From (sender email)  Email address to send scan report
   Encryption  Mail content encryption method
   Hostname (for email links)   Nessus Host name or password of the service
   Auth Method   SMTP Service authentication mode
-
security policy
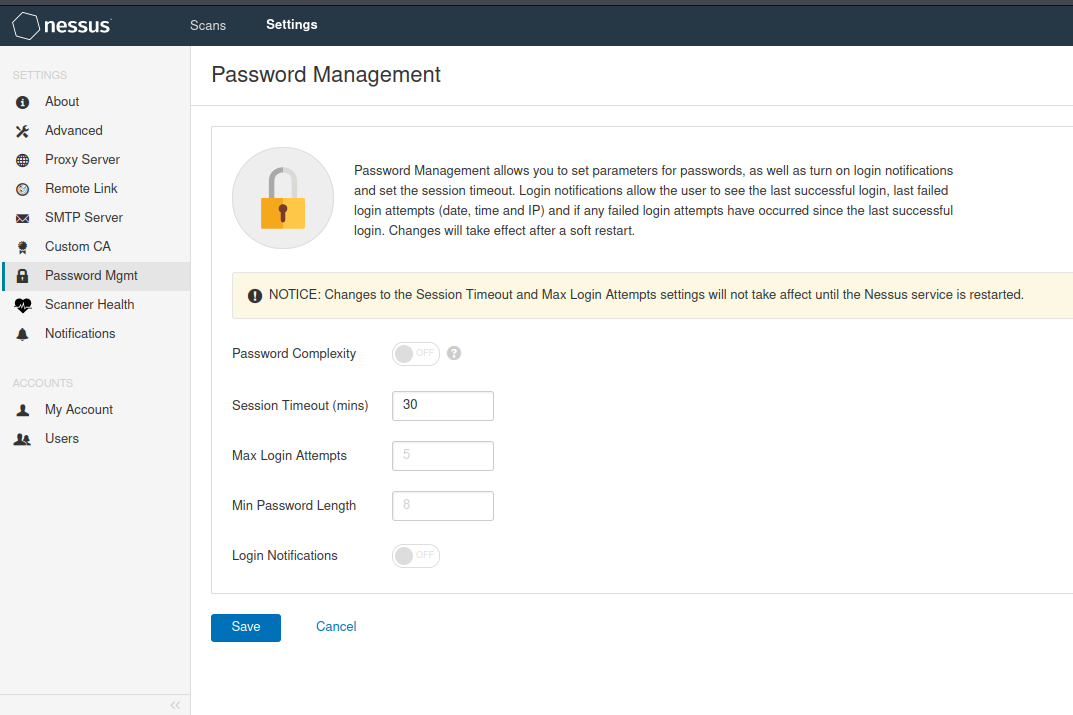
get into Settings---Password Mgmt
 Password management allows you to set password parameters, open login notifications, and set session timeouts. Login notification allows users to view the last successful login and the last failed login attempt(Date, time and IP),And whether there have been any failed login attempts since the last successful login. The modification will take effect after soft restart.
be careful:The settings for session timeout and maximum login attempts will not take effect until Nessus Service restart.
 	Password Complexity   Password complexity
 	Session Timeout (mins)   session time out
 	Max Login Attempts   Maximum login attempts
 	Min Password Length   Minimum password length
 	Login Notifications  Login notification
-
Performance monitoring
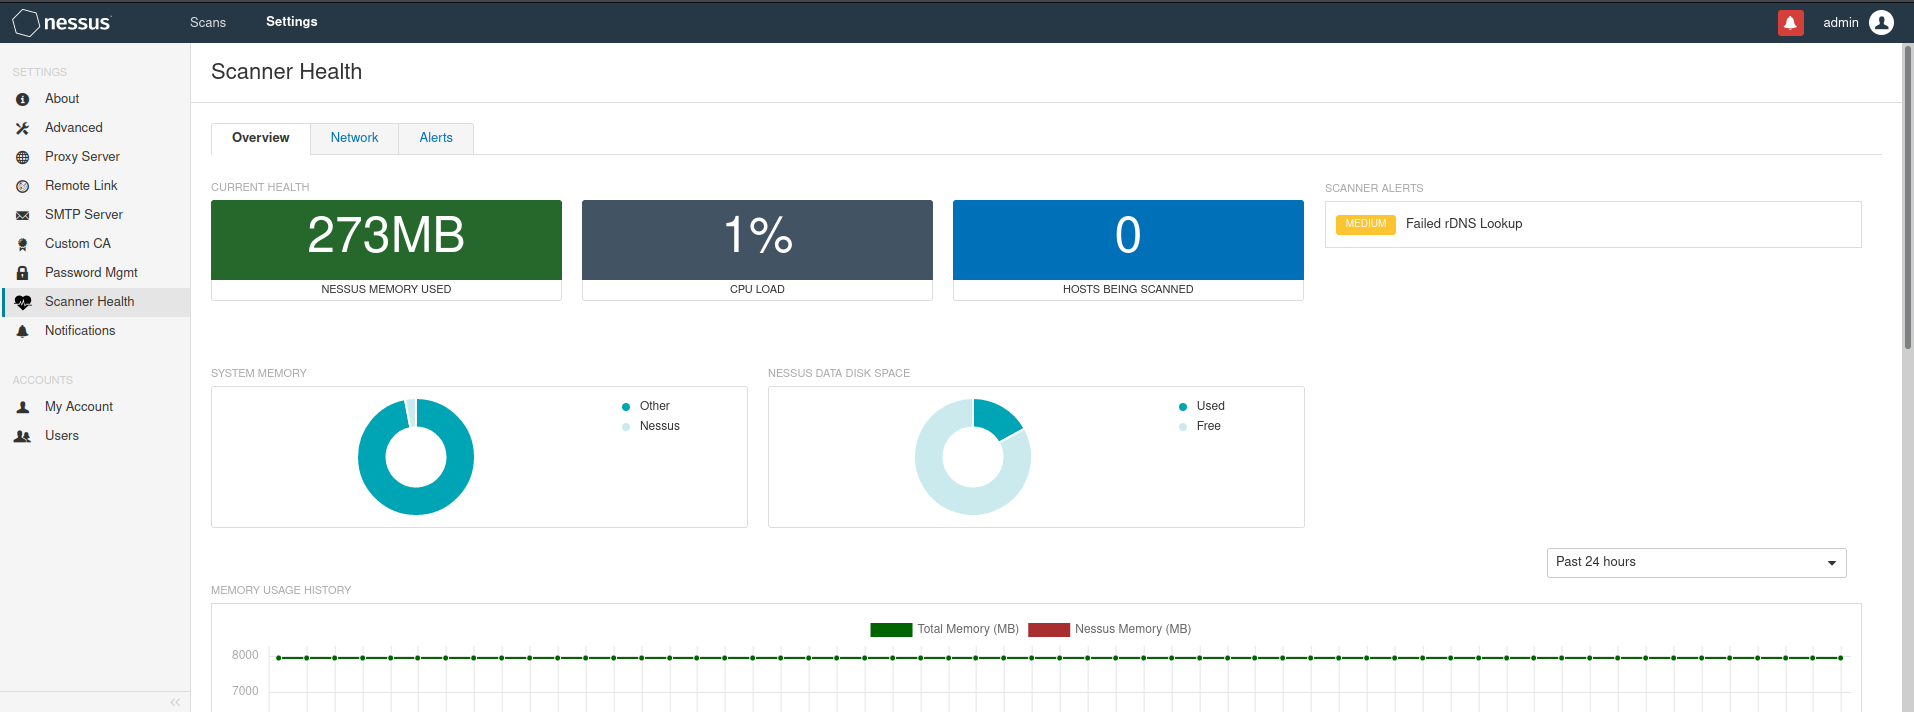
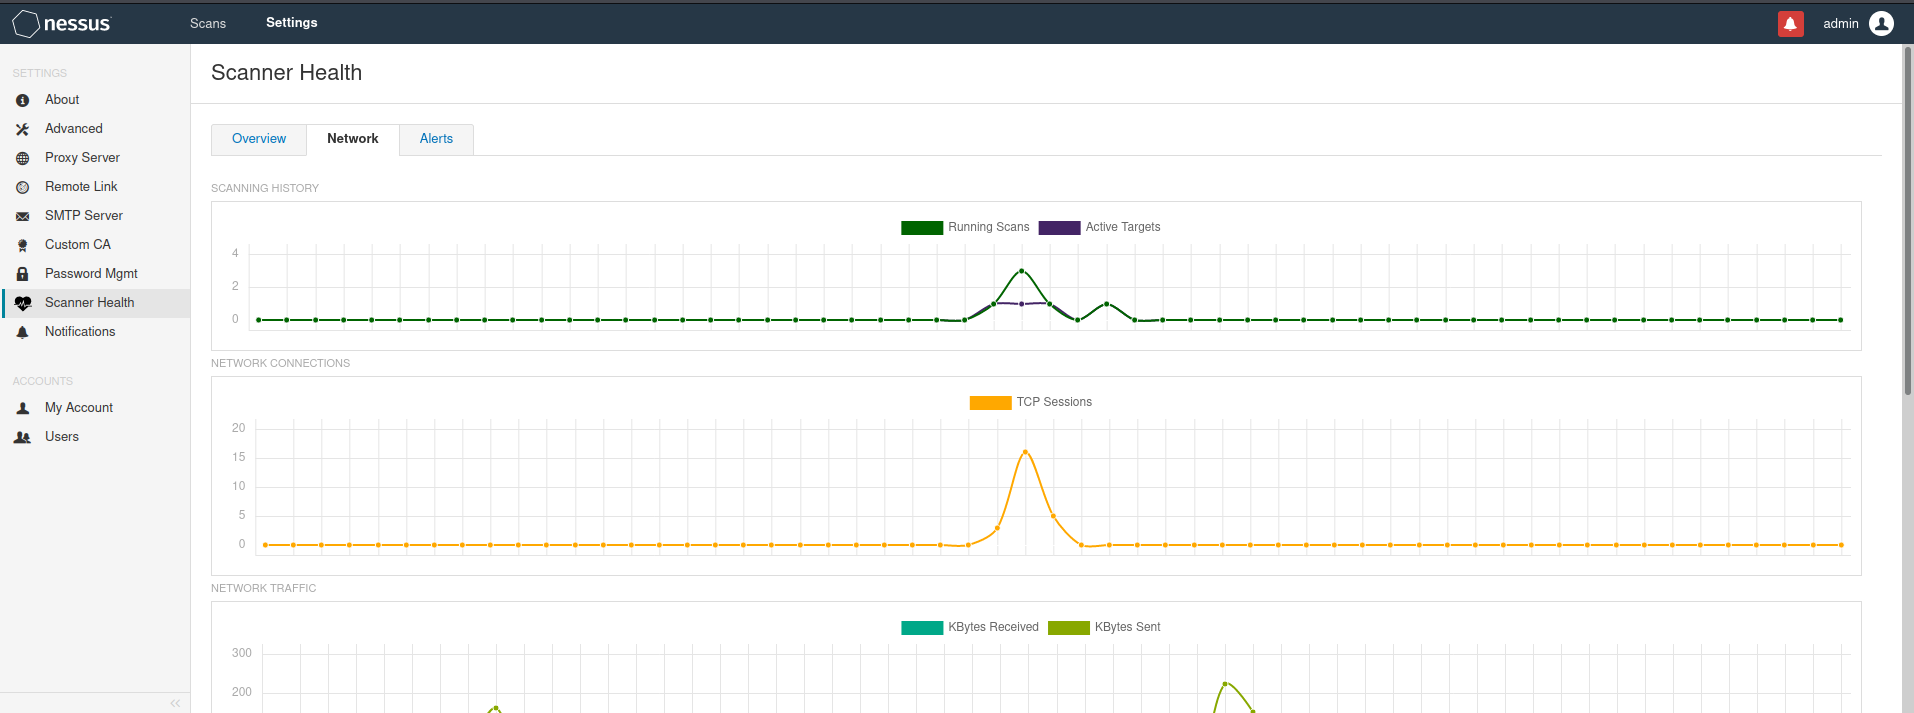
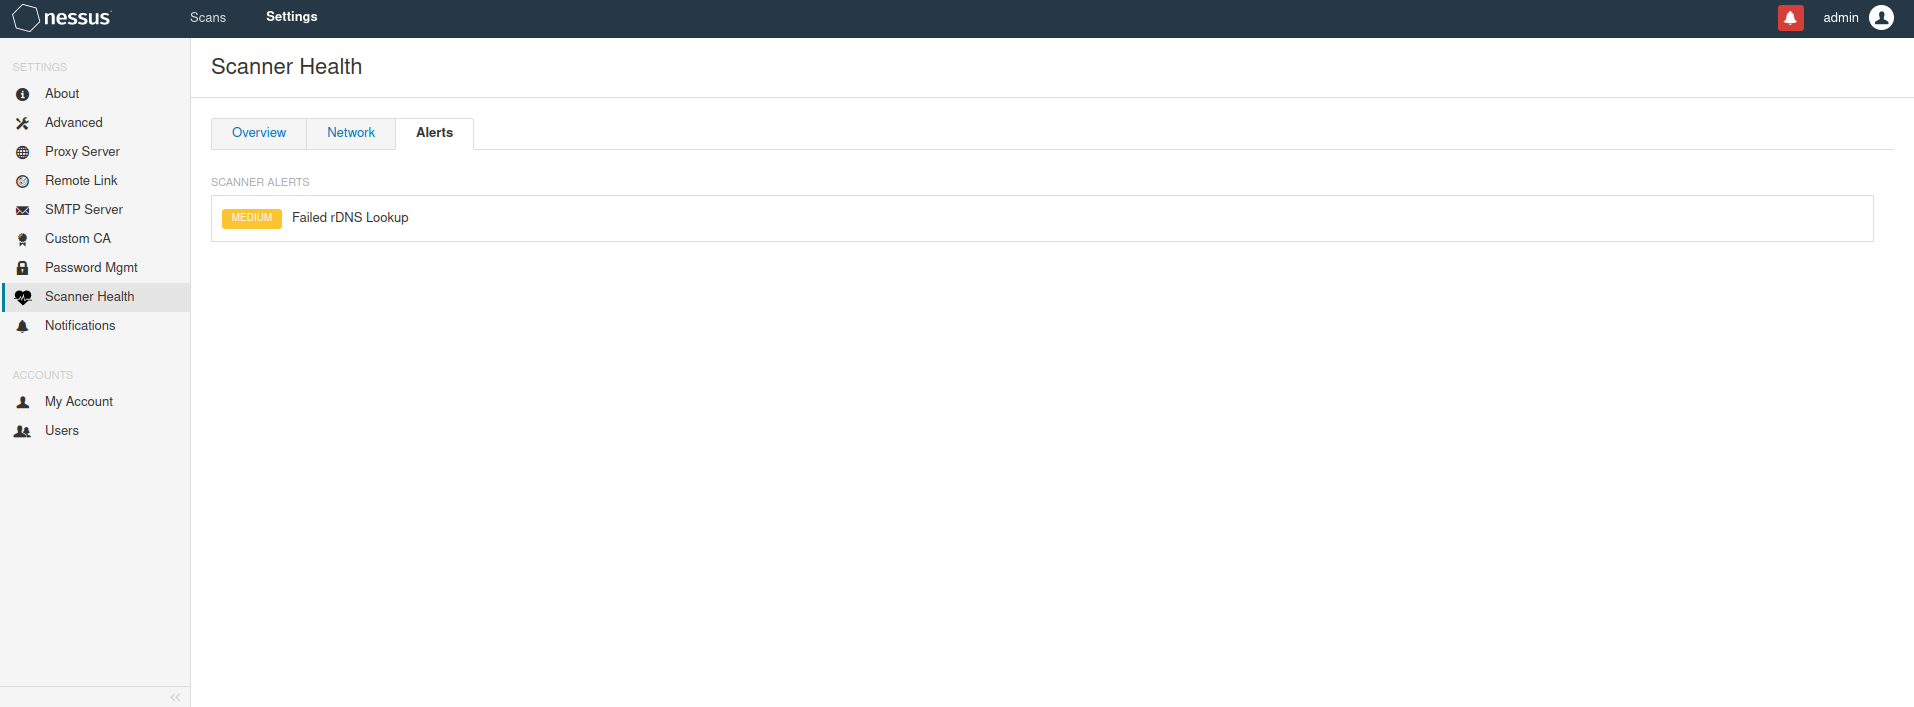
get into Settings---Scanner Health
   Overview  summary
 			Current Health  Current performance information
 			Scanner Alerts Scan warning information
 			System Memory Proportion of system memory
 			Nessus Data Disk Space Percentage of data disk space
 			Memory Usage History  Memory usage history
 			CPU Usage History  CPU Usage history
 			Scanning History  Scan history
   Network  network performance
 			Scanning History  Scan history
 			Network Connections Number of network connections
 			Network Traffic network flow
 			Number Of DNS Lookups  DNS Number of queries
 			DNS Lookup Time  DNS Query time
  Alerts warning
How to create a simple scan task?
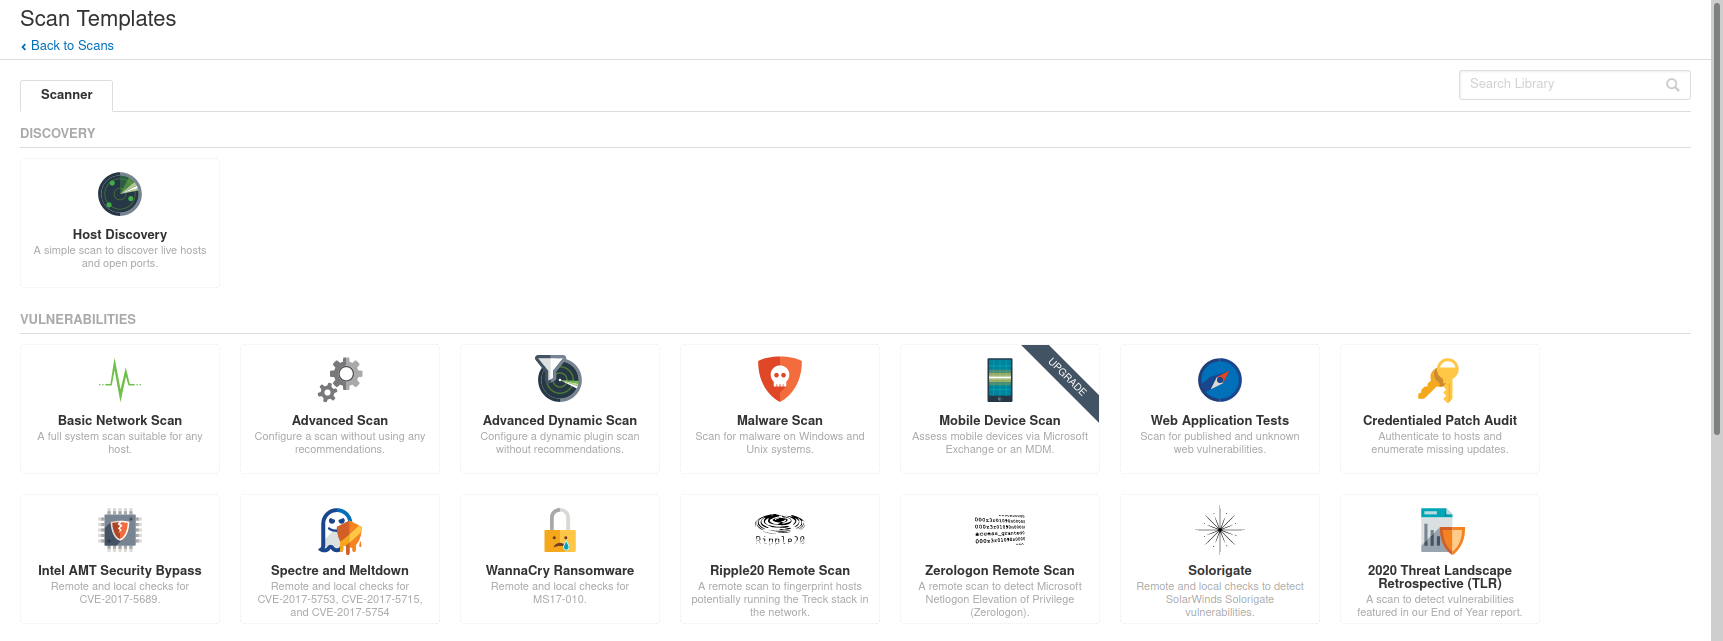

-
Nessus comes with templates - Nessus provides 22 scanning templates by default
 Discovery  Discoverability
 Vulnerabilities  Vulnerability
 Compliance  Compliance
-
Scan task configuration
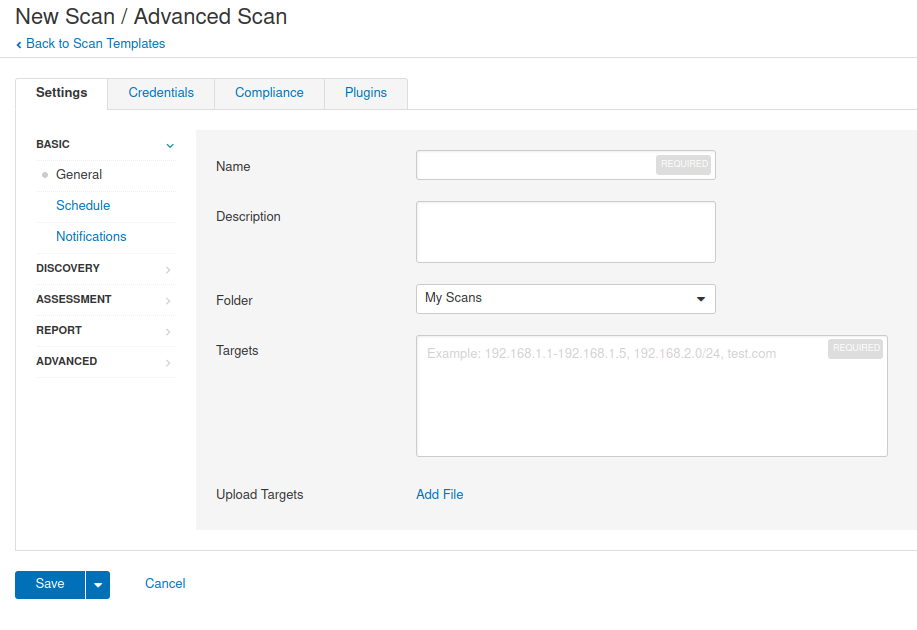
get into Scans---My Scans---New Scan---Advanced Scan
 BASIC  basic
 	General  summary
 		Name  Scan task name
 		Description  Task description information
 		Folder  Folder to which the scan task belongs
 		Targets  Scan target
 			Single objective
 				192.168.1.11,192.168.1.16,192.168.1.36
 			Continuous target
 				192.168.1.26-192.168.1.56
 			Mask mode
 				192.168.1.0/24
 		Upload Targets  Specify scan target file template
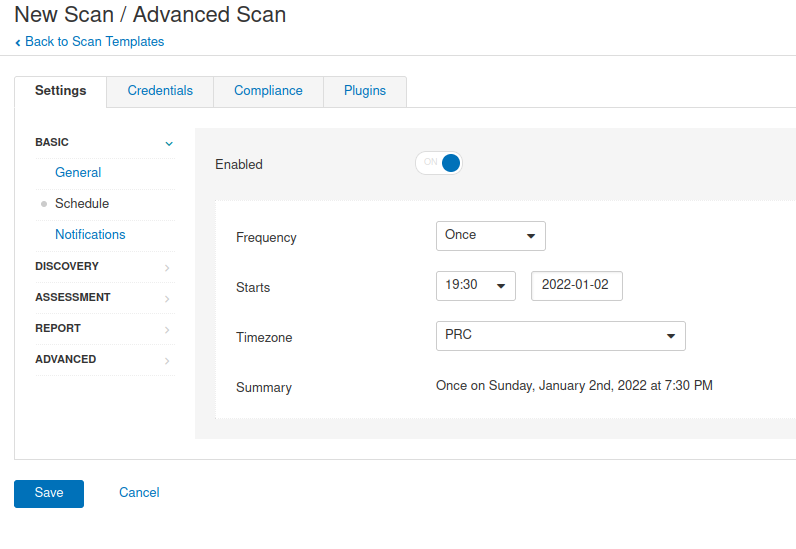
		Schedule Plan execution
			Frequency  frequency
			Starts  start time
			Timezone  time zone
			Summary summary
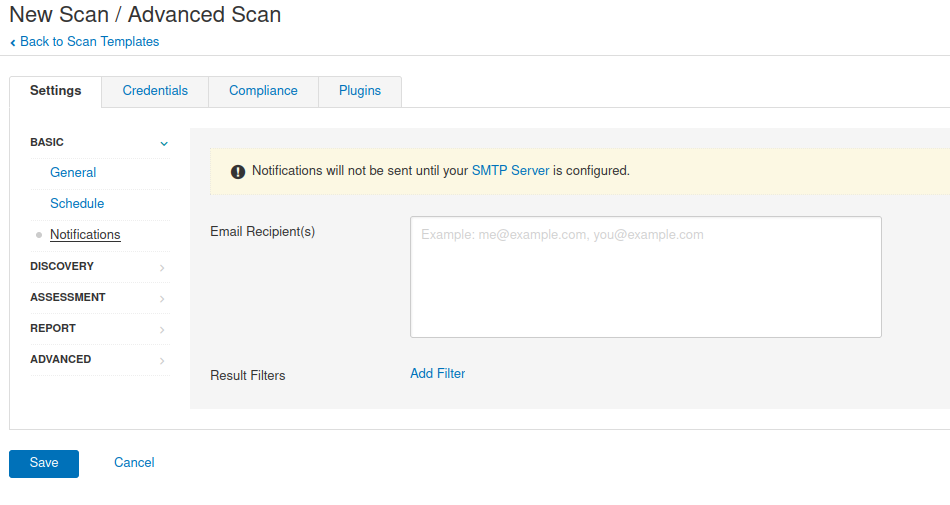
	   Notifications Email notification
			Email Recipient(s)  Specify recipients
			Result Filters  Specify receive filter file
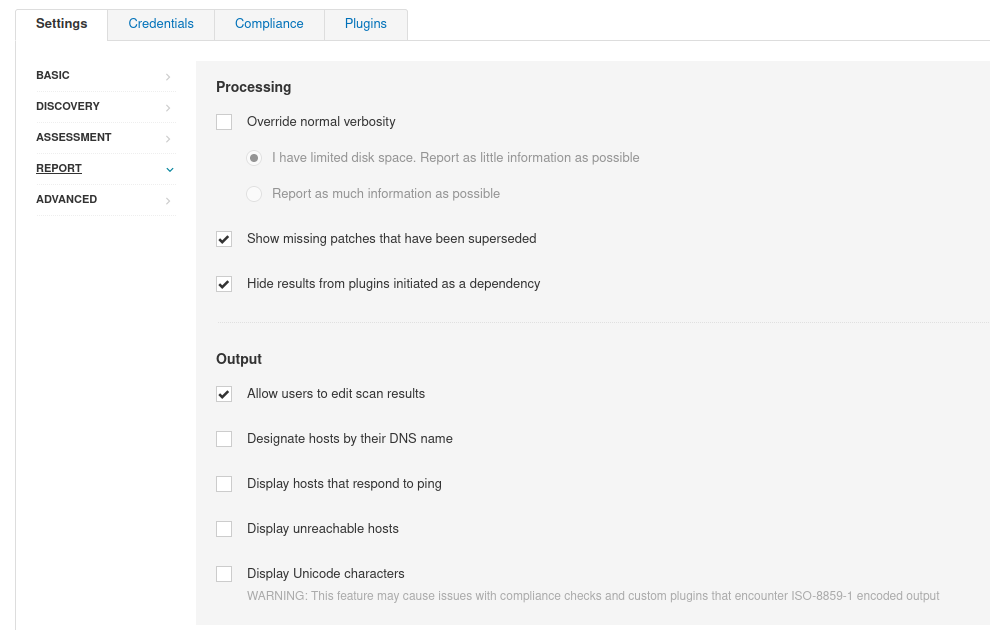
      REPORT report
		Processing Treatment method
			Override normal verbosity  Enable override mode
			   I have limited disk space. Report as little information as possible
              If disk space is limited, report brief information as much as possible
			   Report as much information as possible
              Report as much information as possible
			Show missing patches that have been superseded
              Displays the missing patches that have been replaced
			Hide results from plugins initiated as a dependency
              The dependency list does not appear in the report
	    Output Output mode
			Allow users to edit scan results  Allow users to edit scan results
			Designate hosts by their DNS name Show hosts DNS information
			Display hosts that respond to ping  Show response ping Host
			Display unreachable hosts  Show unreachable hosts
			Display Unicode characters  whether Unicode display

   After configuration, click Save Save, and then you can execute the task.