Question:
- Do you know the concept and function of npm?
- Do you know the concept of modularity and modularity in node project?
- When building a new node project, do you always find out how to install the corresponding module package and related configuration on the Internet in order to realize a certain basic function?
If these questions have standard answers in your mind, you can read other articles~
If you still have a little knowledge, you are welcome to review my article!
preface
Recently, I wrote a background management system and selected node JS and vue related frameworks and technologies. I have gained a lot of knowledge and experience, so I'll write this article and share some information about node JS and teach you how to quickly build and configure a new node project (involving how to configure express, joi, jwt, mysql and cors).
Node. What is JS?
First of all, everyone must have used JavaScript!
Do you know why JavaScript can manipulate DOM and BOM in browser?
Each browser has built-in API functions such as DOM and BOM, so JavaScript in the browser can call them.
So why can browsers parse JavaScript language?
Different browsers use different JavaScript parsing engines to parse the JavaScript we write
Among them, the V8 parsing engine of Chrome browser has the best performance
Here I found a picture on the Internet, which vividly explained my above answer:
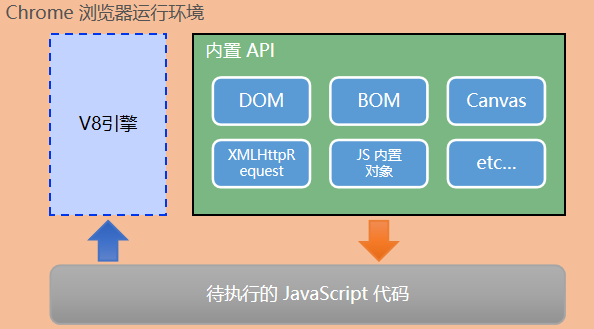
Node.js® is a JavaScript runtime built on Chrome's V8 JavaScript engine.
Node.js is a JavaScript back-end running environment based on Chrome V8 engine
In short, it is a technology that uses JavaScript to write the back end
It only provides some basic functions and APIs. However, based on these basic functions and APIs, many powerful frameworks have been produced,
For example:
Based on Express framework( http://www.expressjs.com.cn/ ), you can quickly build a Web application
Based on Electron framework( https://electronjs.org/ ), you can build cross platform desktop applications
Based on Restify framework( http://restify.com/ ), you can quickly build API interface projects
As long as you know JavaScript, you can use node JS write back-end. You can use node. For everything that Springboot+SpringMVC+Mybatis can do JS to achieve!
modularization
General concepts:
Modularization refers to the process of dividing the system into several modules from top to bottom when solving a complex problem. For the whole system, modules are units that can be combined, disassembled and replaced.
Modularity in programming:
Modularization in the field of programming is to abide by fixed rules and divide a large file into independent and interdependent small modules.
effect:
It improves the reusability of the code
It improves the maintainability of the code
On demand loading can be realized
So node How to realize modularization in JS?
⚫ Built in module (officially provided by Node.js, such as fs, path, http, etc.)
⚫ Custom module (each. js file created by the user)
⚫ Third party module (a module developed by a third party, which needs to be downloaded before use), also known as package (important)
Package, that is, the third-party module is encapsulated based on the built-in module, which provides a more advanced and convenient API and greatly improves the development efficiency.
These modules usually use node The require() method in JS is loaded for use
const fs = require('fs') //Load the built-in fs module for reading and writing files
const router = require(./userRouter.js) //Load user-defined js file
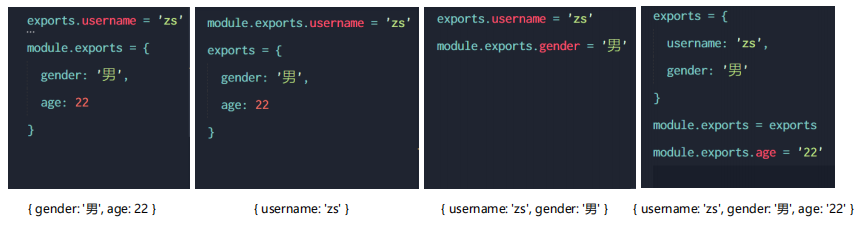
const express = require('express') //Load the third-party module express, which is used to create and configure server instancesEach module file is passed through module Exports or exports to share the members in the module for external use.
When the outside world uses the require() method to import a custom module, the result is module Objects pointed to by exports
Here, pay attention to distinguish between modules Exports and exports. Exports is designed to simplify the writing of the former
By default, exports and module Exports points to the same object. However, the final shared result is still based on module Exports refers to the object.
Let's take a look at the provisions of CommonJS:
CommonJS specifies the characteristics of modules and how they depend on each other
① Inside each module, the module variable represents the current module.
② The module variable is an object, and its exports attribute (i.e. module.exports) is an external interface.
③ Loading a module is actually loading the module of the module Exports property. The require() method is used to load the module
npm(Node Package Manager)
Concept:
NPM is a package management tool installed with NodeJS. It can solve many problems in NodeJS code deployment. The common use scenarios are as follows:
1. Allow users to download third-party packages written by others from NPM server for local use.
2. Allow users to download and install command line programs written by others from NPM server for local use.
3. Allow users to upload their own package or command-line program to NPM server for others to use.
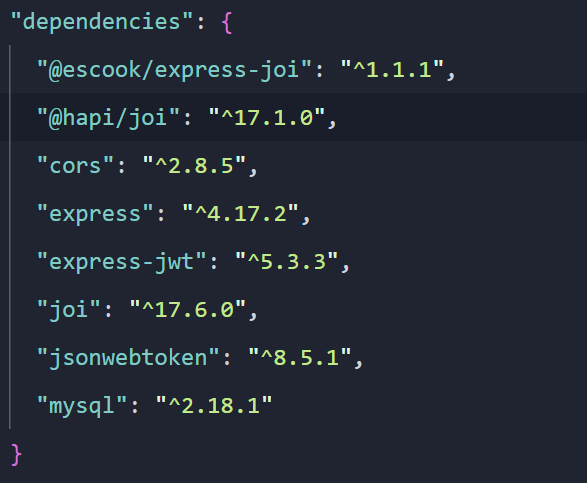
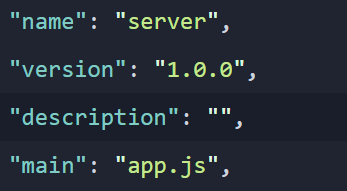
npm stipulates that in the root directory of the project, you must provide a file called package JSON package management configuration file. Used to record some configurations related to the project
Information. For example:
⚫ Project name, version number, description, etc
⚫ What packages are used in the project
⚫ Which packages will only be used during development
⚫ Those packages are required for development and deployment
How to quickly create a package json?
//For an empty folder at the beginning of the project
npm init -y
//When you run the npm install command to install the package, npm will automatically record the name and version number of the package in package JSON
Note: the above command can only run successfully in the English directory! Therefore, the root directory name of the project cannot have English or spaces
The dependencies node in this file records all packages and version numbers installed by the project
When you get someone else's project, if there is no package needed by the project in the project folder (because the package storage folder node_modules folder is too large, the project writer usually won't upload it to websites such as github), you can use it
npm i
Install package All packages under the dependencies node of JSON
Quickly build and configure a new project of NodeJs
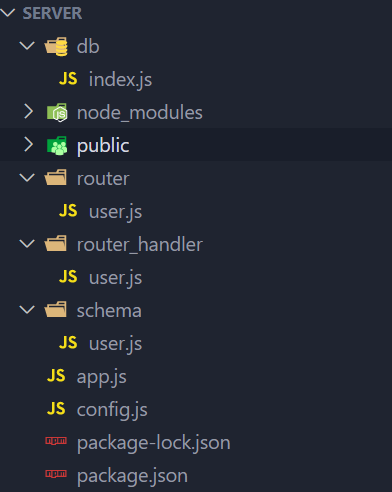
You can refer to my project folder structure
1. Create project
1.1 create a new server folder as the root directory of the project, and run the following command in the root directory to initialize the package management configuration file:
npm init -y
Then your project will appear pakage JSON file
1.2 installing a specific version of express:
npm i express@4.17.1
A popular framework for web server, which is used to create and configure server instances
1.3 create a new app in the project root directory JS as the entry file of the whole project, and initialize the following code:
// Import express module
const express = require('express')
// Create a server instance of express
const app = express()
// Other configurations after that are written here
// Call app Listen method, specify the port number and start the web server
app.listen(8888, function () {
console.log('server is running at http://127.0.0.1:8888')
})And in package The entry of the modified project in JSON is app js
2. Configure cors cross domain
2.1 installing cors middleware:
npm i cors@2.8.5
2.2 on app Import and configure cors Middleware in JS:
// Import cors Middleware
const cors = require('cors')
// Register cors as a global middleware to allow cross domain requests
app.use(cors())
3. Configure middleware and routing for parsing form data
3.1 configure the middleware for parsing the form data in application/x-www-form-urlencoded format, otherwise the server cannot parse the parameters in the request body of the post request that are in the form data format
app.use(express.urlencoded({ extended: false }))3.2 initialize routing related folders
- In the project root directory, create a router folder to store all routing modules In the routing module, only the mapping relationship between the client's request and the processing function is stored
- In the project root directory, create a router_ The handler folder is used to store all routing processing function modules The routing processing function module is specially responsible for storing the processing function corresponding to each route
Similar to the relationship between service interface and serviceImpl class in SSM framework
3.3 initialize user routing module
In the router folder, create a new user JS file (for example), as the user's routing module, and the initialization code format is as follows:
const express = require('express')
const router = express.Router()

// Import user routing processing function module
const userHandler = require('../router_handler/user')

// Mapping relationship for processing login requests
router.post('/login', userHandler.login)

module.exports = router
In / router_handler/user.js, use the exports object to share the corresponding routing processing functions:
/**
* User related routing functions are defined here for / router / user JS module
*/
// Processing function of login request
exports.login = (req, res) => {
res.send('login OK')
}On app JS, import and use the user routing module:
// Import and register user routing module
const userRouter = require('./router/user')
app.use('/api', userRouter)
4. Install and configure mysql, a third-party module, to connect and operate MySQL database
4.1 install mysql module:
npm i mysql@2.18.1
4.2 create / db / index. In the project root directory JS file to create the connection object of the database in this customization module:
// Import mysql module
const mysql = require('mysql')
// Create database connection object
const db = mysql.createPool({
host: '127.0.0.1',
user: 'root',
password: 'root',
database: 'db_name',
})
// Shared db database connection object
module.exports = db5. Configure bcryptjs
In the current project, bcryptjs is used to encrypt the user password,
advantage:
The encrypted password cannot be cracked reversely
The same plaintext password is encrypted many times, and the encryption results are different, which ensures the security
5.1 run the following command to install the specified version of bcryptjs:
npm i bcryptjs@2.4.3
5.2 in / router_handler/user.js, import bcryptjs:
const bcrypt = require('bcryptjs')5.3 if you have a registration function, you can call the bcrypt. in the registered user's processing function after you confirm that the user name is available. The hashsync (plaintext password, random salt length) method encrypts the user's password:
// bcrype encrypt the user's password, and the return value is the encrypted password string
userinfo.password = bcrypt.hashSync(userinfo.password, 10)
// Take the password entered by the user and compare it with the password stored in the database
const compareResult = bcrypt.compareSync(Password entered by the user, Encrypted password in database)
The principle of form verification: the front-end verification is supplemented by the back-end verification. The back-end should never trust any content submitted by the front-end
6. Configure the form verification module
Use if else... It has low efficiency, high error rate and inconvenient maintenance. Therefore, we can choose to use the third-party data verification module to reduce the error rate and improve the efficiency and maintainability of verification, so that we can focus more on the processing of core business logic.
6.1 install the joi package and define validation rules for each data item carried in the form:
npm install joi
6.2 install @ escook / express joi middleware to realize the function of automatic verification of form data:
npm i @escook/express-joi
6.3 create / schema / user JS user information verification rule module, and the initialization code is as follows:
const joi = require('joi')
/**
* string() The value must be a string
* alphanum() The value can only be a string containing a-zA-Z0-9
* min(length) Minimum length
* max(length) Maximum length
* required() Value is required and cannot be undefined
* pattern(Regular expression) values must conform to the rules of regular expressions
*/
// Authentication rules for user names
const username = joi
.string()
.alphanum()
.min(1)
.max(10)
.required()
// Password verification rules
const password = joi
.string()
.pattern(/^[\S]{6,12}$/)
.required()
// Authentication rule object for sharing login forms externally
exports.reg_login_schema = {
// Indicates that req Verify the data in the body
body: {
username,
password,
},
}6.4 modify / router / user The code in JS is as follows:
const express = require('express')
const router = express.Router()
// Import user routing processing function module
const userHandler = require('../router_handler/user')
// 1. Middleware for importing and verifying form data
const expressJoi = require('@escook/express-joi')
// 2. Import the required validation rule object
const { reg_login_schema } = require('../schema/user')
// Sign in
// 3. In the route of user login, declare the local middleware to verify the data carried in the current request
// 3.1 after the data is verified, the request will be transferred to the following routing processing function
// 3.2 after data verification fails, terminate the execution of subsequent codes and throw a global Error
router.post('/login', reg_login_schema, userHandler.login)
module.exports = router7. Generate Token string of JWT
When generating Token string, we must eliminate privacy values such as password and avatar to ensure the security of user information
7.1 quickly eliminate the value of password through the advanced syntax of ES6:
// After elimination, only the values of the user's ID, username, nickname and email are retained in the user
const user = { ...results[0], password: '' }
7.2 install the package that generates Token string:
npm i jsonwebtoken@8.5.1
7.3 in / router_ handler/user. In the header area of the JS module, import the JSON webtoken package:
// Use this package to generate Token strings
const jwt = require('jsonwebtoken')
7.4 create config JS file and share the jwtSecretKey string of encrypted and restored Token to the outside:
module.exports = {
  jwtSecretKey: 'CodeGoat24 ^_^',
}
7.5 encrypt the user information object into Token string:
// Import profile
const config = require('../config')
// Generate Token string
const tokenStr = jwt.sign(user, config.jwtSecretKey, {
expiresIn: '10h', // The valid period of the token is 10 hours
})7.6 respond the generated Token string to the client:
res.send({
  status: 0,
  message: 'Login succeeded!',
  // In order to facilitate the client to use Token, the prefix of Bearer is directly spliced on the server
  token: 'Bearer ' + tokenStr,
})
8. Configure middleware for parsing Token
8.1 run the following command to install the middleware for parsing Token:
npm i express-jwt@5.3.3
8.2 on app Before registering the route in JS, configure the middleware for parsing the Token:
// Import profile
const config = require('./config')
// Middleware for parsing token
const expressJWT = require('express-jwt')
// use. Unless ({path: [/ ^ \ / API \ / /]}) specifies which interfaces do not require Token authentication
app.use(expressJWT({ secret: config.jwtSecretKey }).unless({ path: [/^\/api\//] }))Summary:
See here, do you have a further understanding of NodeJs? Although the NodeJs project involves a lot of configuration in the project construction stage, it is very convenient to write the business logic after it is built. It is enough to follow the above steps to build a new NodeJs project and configure some common packages!, It is recommended that I divide the routing processing function module into router folder and router_ In the business layer, the structure of the persistent folder and the persistent folder handler are simulated. The router folder only stores the mapping relationship between the client's request and the processing function_ The handler folder is specially responsible for storing the processing function corresponding to each route, so that the directory structure of the routing function will be clearer!
If there are mistakes in the above sharing, you are welcome to correct them in the comment area!
After that, I will also contribute to the relevant articles on deduction algorithm and front and rear end technology. Welcome to pay attention to and support!