1. Start Spring Boot project from scratch
Spring Boot can quickly build Java Web applications based on spring framework and quickly integrate various frameworks including view layer, MVC architecture and persistence layer. It does not need to be manually configured by developers. Spring Boot will realize automatic assembly. This paper mainly introduces how to realize common data CRUD (add, delete, modify and check) services from zero. Technically, it includes Spring Boot integration MyBatis and Spring Boot integration Thymeleaf template.
Create a new SpringBoot project using IDEA;
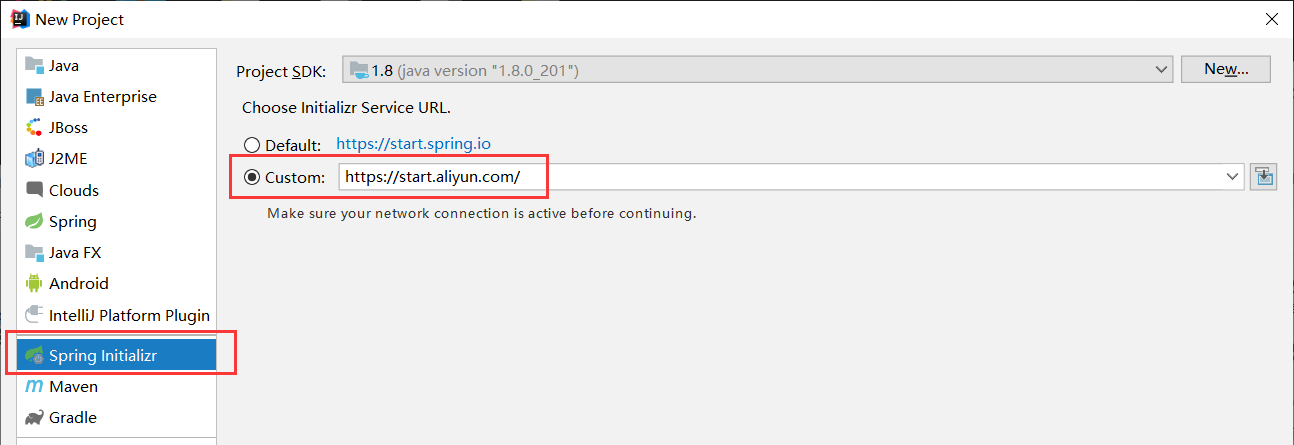
Select [Spring Initializr], check [Custom] and enter https://start.aliyun.com/ , considering that the direct use of the default web address will cause the project download timeout (so Alibaba's image environment is used), then select [Next] to enter the project naming.
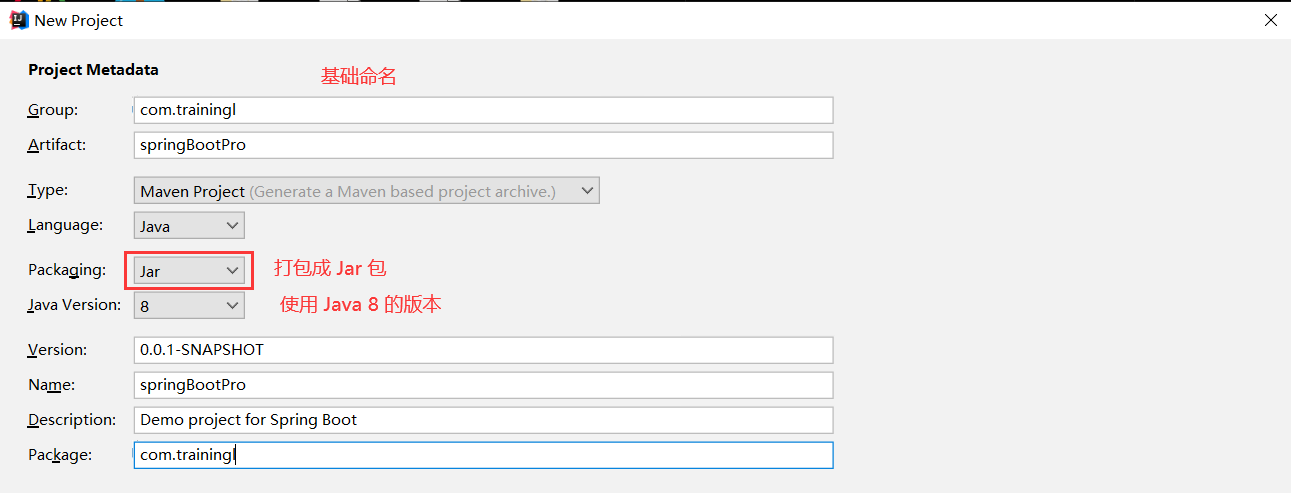
Note that the packaging method here is Jar Package and the appropriate project name. Select [Package] to the second level com XXXXXX is enough.
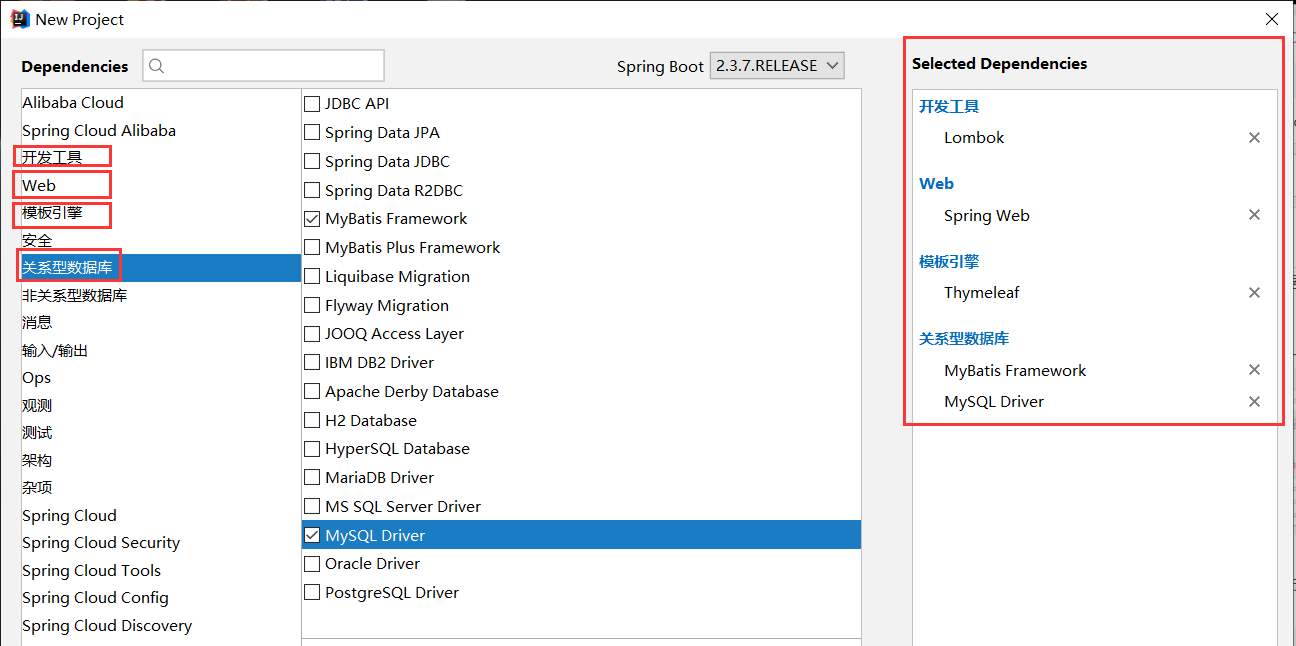
In this step, you need to check the relevant dependencies when building the SpringBoot project, including [development tool: Lombok], [Web: Spring Web], [template engine: Thymeleaf] and [relational database: MySQL Driver, MyBatis Framework], and then click next to finish the project creation
Note: Thymeleaf template is the dependence of view layer data rendering, which is similar to JSP in Java EE. MyBatis is an important framework for the interaction between data persistence layer and database, and is responsible for the addition, deletion, modification and query of background database.
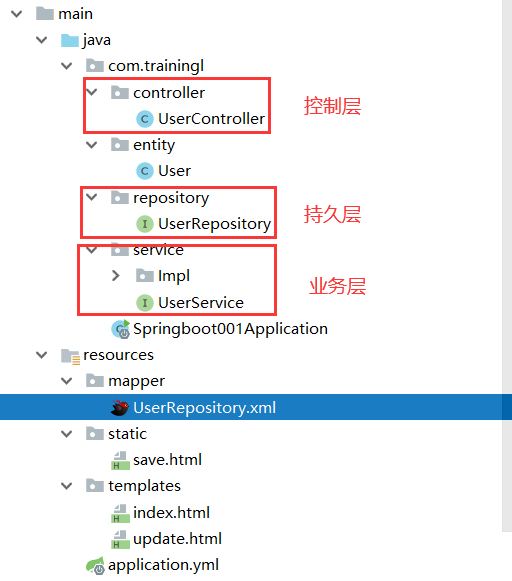
The project structure is as follows:
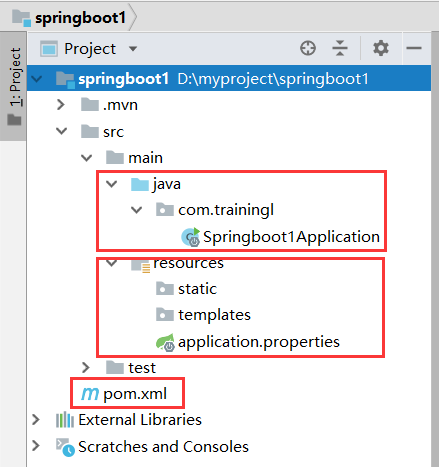
- pom.xml: the related configuration of the project, mainly adding dependent information;
- java/com.trainingl: the storage location of back-end business code, including control layer (Controller), service layer (Service), data persistence layer (Repository), entity class (Entity) and other files;
- Springboot1Application: the startup class of the project. Run the main method to start the project;
- resources: this directory includes static resource files, HTML templates and some global configuration applications Properties (port number, data source information, view parser, etc.);
Open POM From the XML file, you can see that the project automatically imports relevant dependencies, avoiding various problems of version incompatibility caused by developers' manual import (problems in SSM framework integration).

<dependencies>
    <dependency>
        <groupId>org.springframework.boot</groupId>
        <artifactId>spring-boot-starter-thymeleaf</artifactId>
    </dependency>
    <dependency>
        <groupId>org.springframework.boot</groupId>
        <artifactId>spring-boot-starter-web</artifactId>
    </dependency>
    <dependency>
        <groupId>org.mybatis.spring.boot</groupId>
        <artifactId>mybatis-spring-boot-starter</artifactId>
        <version>2.1.4</version>
    </dependency>

    <dependency>
        <groupId>mysql</groupId>
        <artifactId>mysql-connector-java</artifactId>
        <version>8.0.25</version>
    </dependency>
    <dependency>
        <groupId>org.projectlombok</groupId>
        <artifactId>lombok</artifactId>
        <optional>true</optional>
    </dependency>
    <dependency>
        <groupId>org.springframework.boot</groupId>
        <artifactId>spring-boot-starter-test</artifactId>
        <scope>test</scope>
        <exclusions>
            <exclusion>
                <groupId>org.junit.vintage</groupId>
                <artifactId>junit-vintage-engine</artifactId>
            </exclusion>
        </exclusions>
    </dependency>
</dependencies>
When writing a project, create a user data table in MySQL database and enter several test data.
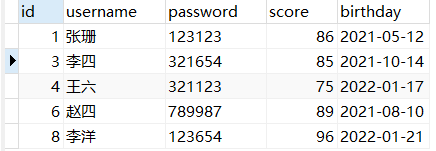
DROP TABLE IF EXISTS `user`;
CREATE TABLE `user`  (
  `id` int(11) NOT NULL AUTO_INCREMENT COMMENT 'User number',
  `username` varchar(50) CHARACTER SET utf8 COLLATE utf8_general_ci NULL DEFAULT NULL COMMENT 'user name',
  `password` varchar(50) CHARACTER SET utf8 COLLATE utf8_general_ci NULL DEFAULT NULL COMMENT 'User password',
  `score` double(10, 0) NULL DEFAULT NULL COMMENT 'User score',
  `birthday` date NULL DEFAULT NULL COMMENT 'User birthday',
  PRIMARY KEY (`id`) USING BTREE
) ENGINE = InnoDB AUTO_INCREMENT = 10 CHARACTER SET = utf8 COLLATE = utf8_general_ci ROW_FORMAT = Dynamic;
Create the entity class User corresponding to the data table
package com.trainingl.entity;

import lombok.AllArgsConstructor;
import lombok.Data;
import lombok.NoArgsConstructor;
import org.springframework.format.annotation.DateTimeFormat;

import java.util.Date;

@Data
@AllArgsConstructor
@NoArgsConstructor
public class User {
    private Integer id;
    private String username;
    private String password;
    private Double score;
    @DateTimeFormat(pattern = "yyyy-MM-dd")
    private Date birthday;
}
2. Realize CRUD business with three-tier architecture
2.1 Spring Boot configuration file
Spring Boot removes all XML files, because Spring Boot can realize automatic loading, so developers do not need to assemble components in XML manually. However, some personalized configurations still need to be manually configured by developers, such as database connection information. Spring Boot provides application configuration files for personalized configuration. The application configuration file is located in the resources directory and supports Properties and yml has two formats. Spring Boot defaults to properties, but yml is more recommended in actual development because it is simpler and intuitive.
In the global configuration file resources / application Configure data source information, view parser, port number and other related configurations in YML
spring:
  thymeleaf:
    prefix: classpath:/templates/
    suffix: .html
    mode: HTML5
    encoding: UTF-8
  datasource:
    url: jdbc:mysql://localhost:3306/user?useUnicode=true&characterEncoding=UTF-8
    username: root
    password: 123456
    driver-class-name: com.mysql.cj.jdbc.Driver
server:
  port: 9090
mybatis:
  type-aliases-package: com.trainingl.entity
  mapper-locations: classpath:/mapper/*.xml
If you don't write the fully qualified class name and only write the name of an entity class, you need to write it in application Set the mybatis: type aliases package parameter in the YML file
2.2 business code
2.2.1 data persistence layer
Create the interface UserRepository under the path com > trainingl > repository
package com.trainingl.repository;

import com.trainingl.entity.User;
import org.springframework.stereotype.Repository;

import java.util.List;

@Repository
public interface UserRepository {
    //CRUD
    public List<User> findAll();
    public User findById(Integer id);
    public void save(User user);
    public void update(User user);
    public void deleteById(Integer id);
}
Write SQL statement under MyBatis configuration file, XML configuration path:
resources/mapper/UserRepository.xml
<?xml version="1.0" encoding="UTF-8" ?>
<!DOCTYPE mapper PUBLIC "-//mybatis.org//DTD Mapper 3.0//EN"
        "http://mybatis.org/dtd/mybatis-3-mapper.dtd">
<mapper namespace="com.trainingl.repository.UserRepository">
    <select id="findAll" resultType="com.trainingl.entity.User">
        select * from user;
    </select>
    <select id="findById" parameterType="Integer" resultType="com.trainingl.entity.User">
        select * from USER where id = #{id};
    </select>
    <insert id="save" parameterType="com.trainingl.entity.User">
        insert into
        user(username, password, score, birthday)
        values (#{username}, #{password}, #{score}, #{birthday})
    </insert>
    <update id="update" parameterType="com.trainingl.entity.User">
        update user
        set username=#{username}, password=#{password}, score=#{score}, birthday=#{birthday}
        where id = #{id};
    </update>
    <delete id="deleteById" parameterType="Integer">
        delete from user where id = #{id}
    </delete>
</mapper>
Why create an xml file in the resources directory instead of directly in the repository?
In fact, corresponding SQL implementation files can be created in both directories. However, since the project cannot be read at startup, the xml files in the repository directory need to be in POM Open read permission in xml, which makes it more cumbersome, and the xml file created directly in the resources directory can be read directly.
2.2.2 business layer
Create business layer interface UserService
package com.trainingl.service;

import com.trainingl.entity.User;

import java.util.List;

public interface UserService {
    public List<User> findAll();
    public User findById(Integer id);
    public void save(User user);
    public void update(User user);
    public void deleteById(Integer id);
}
The business layer implements UserServiceImpl
package com.trainingl.service.Impl;

import com.trainingl.entity.User;
import com.trainingl.repository.UserRepository;
import com.trainingl.service.UserService;
import org.springframework.beans.factory.annotation.Autowired;
import org.springframework.stereotype.Service;

import java.util.List;

@Service
public class UserServiceImpl implements UserService {
    @Autowired
    private UserRepository userRepository;

    @Override
    public List<User> findAll() {
        return userRepository.findAll();
    }

    @Override
    public User findById(Integer id) {
        return userRepository.findById(id);
    }

    @Override
    public void save(User user) {
        userRepository.save(user);
    }

    @Override
    public void update(User user) {
        userRepository.update(user);
    }

    @Override
    public void deleteById(Integer id) {
        userRepository.deleteById(id);
    }
}
2.2.3 control layer
Create a UserController controller, which is mainly responsible for receiving browser requests and responses from the client. Spring Boot supports REST Ful style.
package com.trainingl.controller;

import com.trainingl.entity.User;
import com.trainingl.service.UserService;
import org.springframework.beans.factory.annotation.Autowired;
import org.springframework.stereotype.Controller;
import org.springframework.web.bind.annotation.*;
import org.springframework.web.servlet.ModelAndView;

@Controller
@RequestMapping("/user")
public class UserController {
    @Autowired
    private UserService userService;

    //Query all records in the database
    @GetMapping("/index")
    public ModelAndView findAll(){
        ModelAndView modelAndView = new ModelAndView();
        modelAndView.setViewName("index");
        modelAndView.addObject("users", userService.findAll());
        return modelAndView;
    }

    //Query a record
    @GetMapping("/findById/{id}")
    public ModelAndView findById(@PathVariable Integer id){
        ModelAndView modelAndView = new ModelAndView();
        modelAndView.setViewName("update");
        modelAndView.addObject("user",userService.findById(id));
        return modelAndView;
    }

    //Add a record
    @PostMapping("/save")
    public String save(User user){
        userService.save(user);
        return "redirect:/user/index";
    }

    //Modify a record
    @PostMapping("/update")
    public String update(User user){
        userService.update(user);
        return "redirect:/user/index";
    }

    //Delete a record
    @GetMapping("/delete/{id}")
    public String delete(@PathVariable Integer id){
        userService.deleteById(id);
        return "redirect:/user/index";
    }
}
Note: after the above classes are annotated with @ Repository, @ Service and @ Controller, the corresponding objects will be generated in the Spring IOC container when the project is started. In addition, if the member variables of some classes automatically load the generated corresponding objects through @ Autowired. In the SSM framework, these tasks can only be completed by developers' manual configuration, but they are completed automatically after the default configuration in Spring Boot, which greatly simplifies the configuration.
2.4 viewing layer
Information display page resources > Templates > index HTML, which displays the information queried by the database to users in the form of tables
<!DOCTYPE html>
<html lang="en" xmlns:th="http://www.w3.org/1999/xhtml">
<html xmlns:th="http://www.thymeleaf.org"></html>
<head>
<meta charset="UTF-8">
<title>home page</title>
</head>
<body>
<h2>User list</h2>
<table>
<tr>
<th>User number</th>
<th>User name</th>
<th>User password</th>
<th>Student status score</th>
<th>date of birth</th>
<th>operation</th>
</tr>
<tr th:each="user:${users}">
<td th:text="${user.id}"></td>
<td th:text="${user.username}"></td>
<td th:text="${user.password}"></td>
<td th:text="${user.score}"></td>
<td th:text="${#dates.format(user.birthday,'yyyy-MM-dd')}"></td>
<td><a th:href="@{/user/findById/{id}(id=${user.id})}" class="btn btn-primary">modify</a>
<a th:href="@{/user/delete/{uid}(uid=${user.id})}" class="btn btn-danger">delete</a></td>
</tr>
</table>
<a th:href="@{/save.html}">Add new user</a>
</body>
</html>
Information modification page resources > Templates > update html
<!DOCTYPE html>
<html lang="en" xmlns:th="http://www.w3.org/1999/xhtml">
<html xmlns:th="http://www.thymeleaf.org"></html>
<head>
    <meta charset="UTF-8">
    <title>Modify information</title>
</head>
<body>
    <h2>Modify user information</h2>
    <form th:action="@{/user/update}" method="post">
        User number:<input type="text" th:value="${user.id}" name="id" readonly><br>
        User name:<input type="text" th:value="${user.username}" name="username"><br>
        User password:<input type="text" th:value="${user.password}" name="password"><br>
        User score:<input type="text" th:value="${user.score}" name="score"><br>
        date of birth:<input type="date" th:value="${#dates.format(user.birthday,'yyyy-MM-dd')}" name="birthday"><br>
        <input type="submit" value="Submit modification"><br>
    </form>
</body>
</html>
Add user page resources > static > save html
<!DOCTYPE html>
<head>
<meta charset="UTF-8">
<title>New user</title>
</head>
<body>
<h2>Add user information</h2>
<form action="/user/save" method="post">
User name:<input type="text" name="username"><br>
User password:<input type="text" name="password"><br>
User score:<input type="text" name="score"><br>
date of birth:<input type="date" name="birthday"><br>
<input type="reset" value="Reset"> <input type="submit" value="Submit"><br>
</form>
</body>
</html>
Note: if you want the client to directly access HTML resources, you can place these resources under the static path. Otherwise, you can access static resources only through the background mapping of the Controller. The user information page added in this example is to jump directly from one HTML resource to another HTML page, so it is written in the static route.
2.3 startup Application
package com.trainingl;

import org.mybatis.spring.annotation.MapperScan;
import org.springframework.boot.SpringApplication;
import org.springframework.boot.autoconfigure.SpringBootApplication;

@SpringBootApplication
@MapperScan("com.trainingl.repository")
public class Springboot001Application {

    public static void main(String[] args) {
        SpringApplication.run(Springboot001Application.class, args);
    }

}
@MapperScan(...) The function of is to specify the package where the interface to become the implementation class is located, and then all interfaces under the package will generate corresponding implementation classes after compilation. The add location is above the SpringBoot startup class. After adding the @ MapperScan("com.trainingl.repository") annotation, com trainingl. The interface classes under the repository package will generate corresponding implementation classes after compilation.
Summary: this example successfully realizes the data interaction between the front and back businesses of Spring Boot + Thymeleaf + MyBatis. Although the page of the view layer is relatively simple, it is a good example of quickly building a Spring Boot project.